My problem is with the latest version of px4v1.12.3 of pixhawk1 brush. The specific reason is unknown. The version is too high. It is OK to brush v1.11.3 stable version
My problem is with the latest version of px4v1.12.3 of pixhawk1 brush. The specific reason is unknown. The version is too high. It is OK to brush v1.11.3 stable version
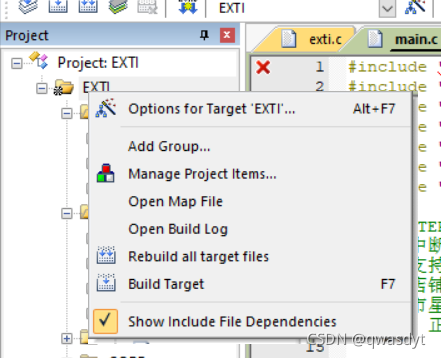
This is a problem when writing interrupt experiments. Generally, the path of exti. C file is not added
Step 1: click manage to add
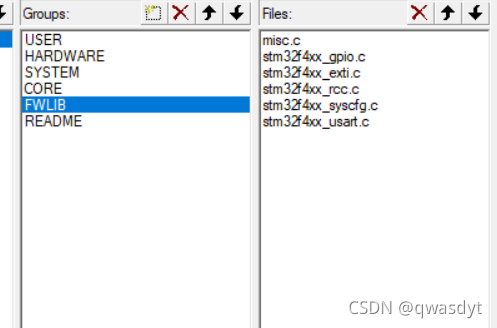
Step 2: add the exti file in fwalb
Step 3 click add in files and find the exti. C file in the SRC file in fwlib
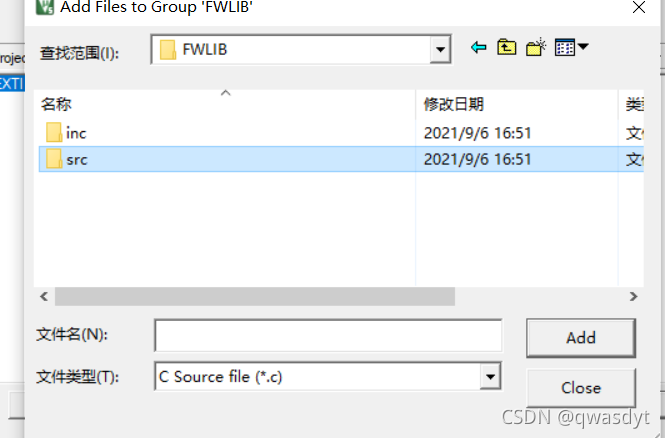
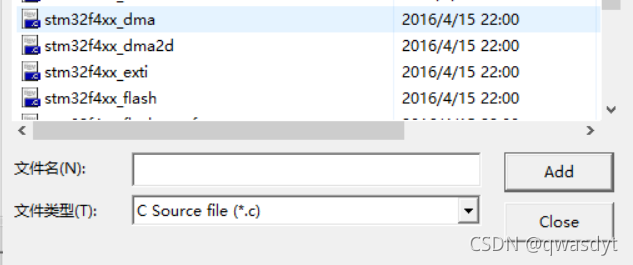
Add will work normally.
The Keil version is v5.25.30.0
the Downloader is st-link
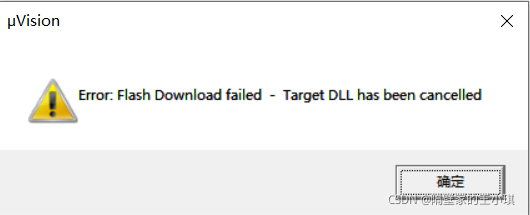
1. As shown in the figure below, Keil prompts error: Flash download failed – target DLL has been cancelled
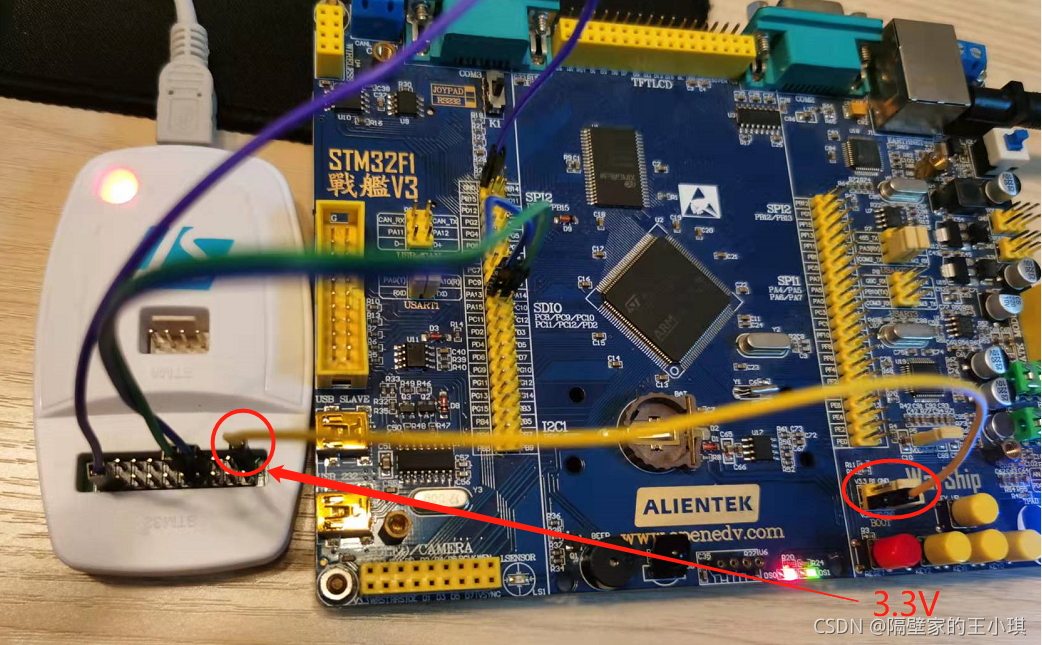
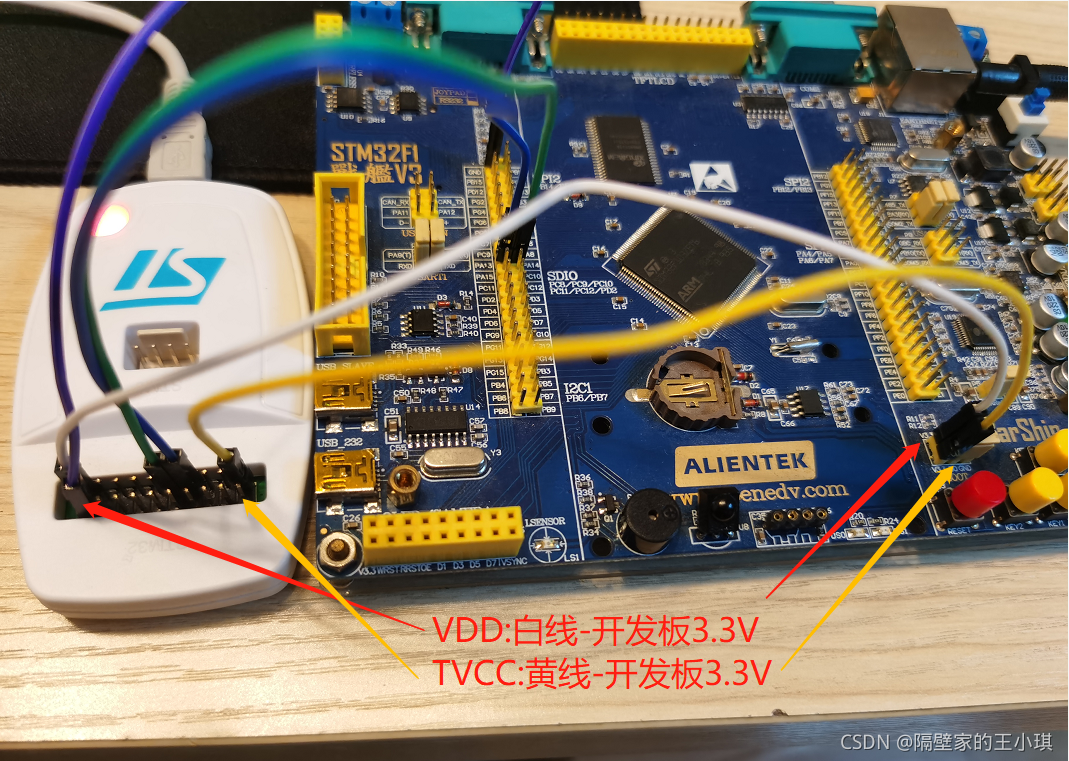
2. The reason is that the TVCC of st-link in the figure below is not connected to the 3.3V of the circuit board
as shown in the figure below. When the yellow line is connected, it can be downloaded normally. If the yellow line is not connected to stlink, The target DLL has been cancelled error will appear
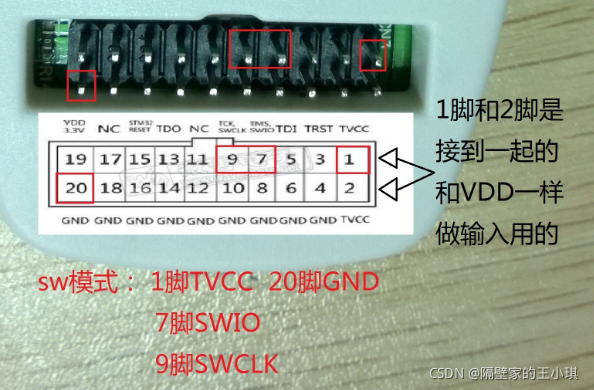
3. Discuss the difference between Vdd and TVCC in stlink
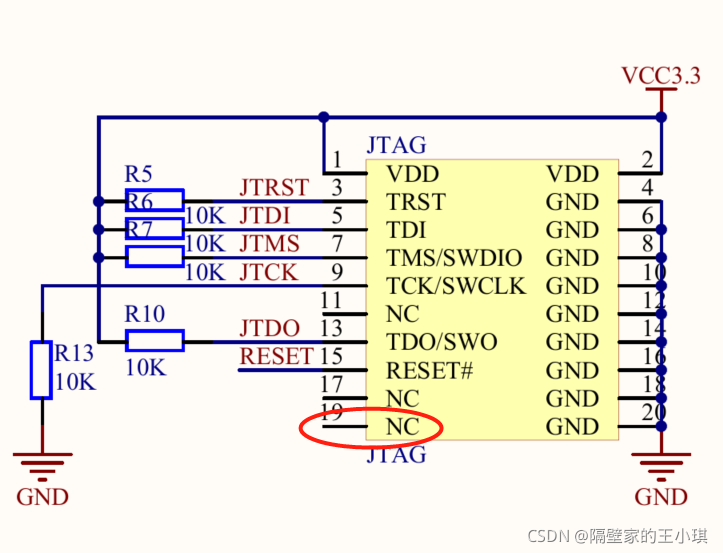
as shown in the figure below, TVCC is pin 1.2. When stlink is plugged in USB, TVCC has no 3.3V output
VDD is pin 19. When stlink is plugged in USB, VDD has 3.3V output

when downloading the program in SW mode:
TVCC must receive 3.3V to download successfully, otherwise an error will be reported: Flash download failed – target DLL has been cancelled
VDD is not connected
So can VDD be connected to TVCC to power up the single chip microcomputer?I tried. It is feasible in theory, but I generally don’t do so, because the 3.3V driving ability is not strong
I test with the board of the punctual atomic warship. When VDD is connected to TVCC, both Vdd and TVCC will be pulled to about 2V, and keil can also successfully download the code. As shown in the figure below, VDD gives a voltage of 3.3V to the MCU through the white line, and then to TVCC through the yellow line. However, the LED will not be lit. Personally, I think the voltage is too low
Looking through the manual of STM32, you can see that the working voltage of STM32 is 2v-3.6v, so Vdd and TVCC are two or more volts, which can also make the STM32 program download successful

to sum up:
1. TVCC itself has no voltage. When downloading the program, it needs to be connected to 3.3V of the circuit board
2. VDD can supply power to the MCU to download the program. At the same time, if the power is supplied on the circuit board or separately, VDD should not be connected to the development board to avoid the conflict between the two 3.3V. So it can be described by one word, but it’s not necessary. VDD is just a foot that doesn’t exist. Don’t use it
PS: the standard JTAG interface is attached. It can be seen that the 19 pin is not connected. I don’t quite understand why stlink wants to output the 19 pin to 3.3V as VDD
KEIL compiles and reports an error
…\OBJ\USART.axf: Error: L6218E: Undefined symbol ADC_Cmd (referred from adc.o).
…\OBJ\USART.axf: Error: L6218E: Undefined symbol ADC_DeInit (referred from adc.o).
…\OBJ\USART.axf: Error: L6218E: Undefined symbol ADC_GetCalibrationStatus (referred from adc.o).
…\OBJ\USART.axf: Error: L6218E: Undefined symbol ADC_GetConversionValue (referred from adc.o).
…\OBJ\USART.axf: Error: L6218E: Undefined symbol ADC_GetFlagStatus (referred from adc.o).
…\OBJ\USART.axf: Error: L6218E: Undefined symbol ADC_GetResetCalibrationStatus (referred from adc.o).
…\OBJ\USART.axf: Error: L6218E: Undefined symbol ADC_Init (referred from adc.o).
…\OBJ\USART.axf: Error: L6218E: Undefined symbol ADC_RegularChannelConfig (referred from adc.o).
…\OBJ\USART.axf: Error: L6218E: Undefined symbol ADC_ResetCalibration (referred from adc.o).
…\OBJ\USART.axf: Error: L6218E: Undefined symbol ADC_SoftwareStartConvCmd (referred from adc.o).
…\OBJ\USART.axf: Error: L6218E: Undefined symbol ADC_StartCalibration (referred from adc.o).
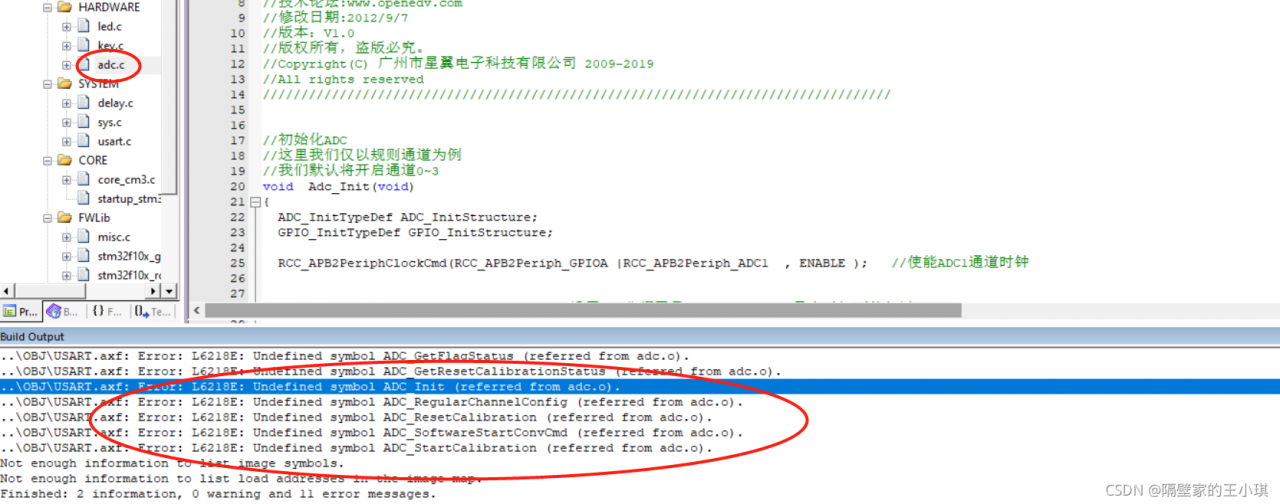
Go to Manage Project Items and add adc.c under FWLib, see the picture below for the exact location, I used the project template of Positive Point Atomic, anyway, find the adc.c file and add it in.
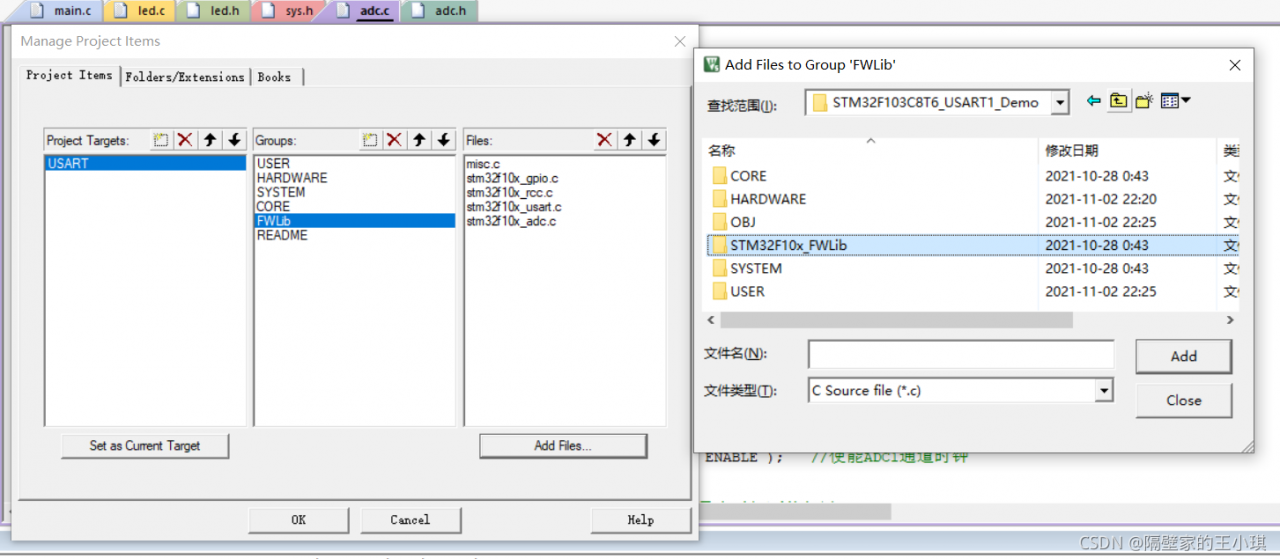
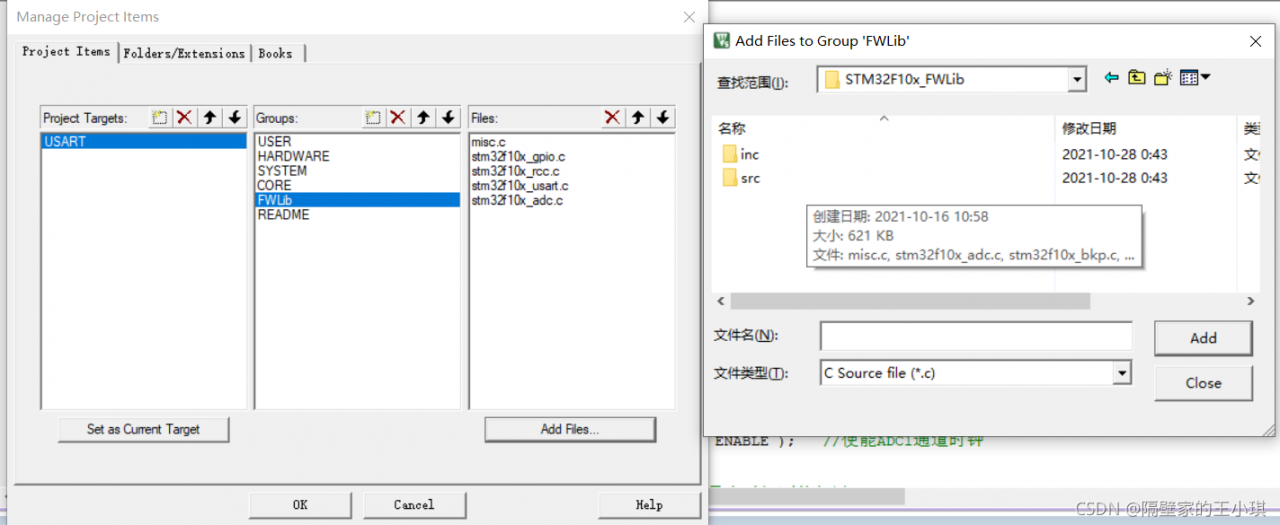
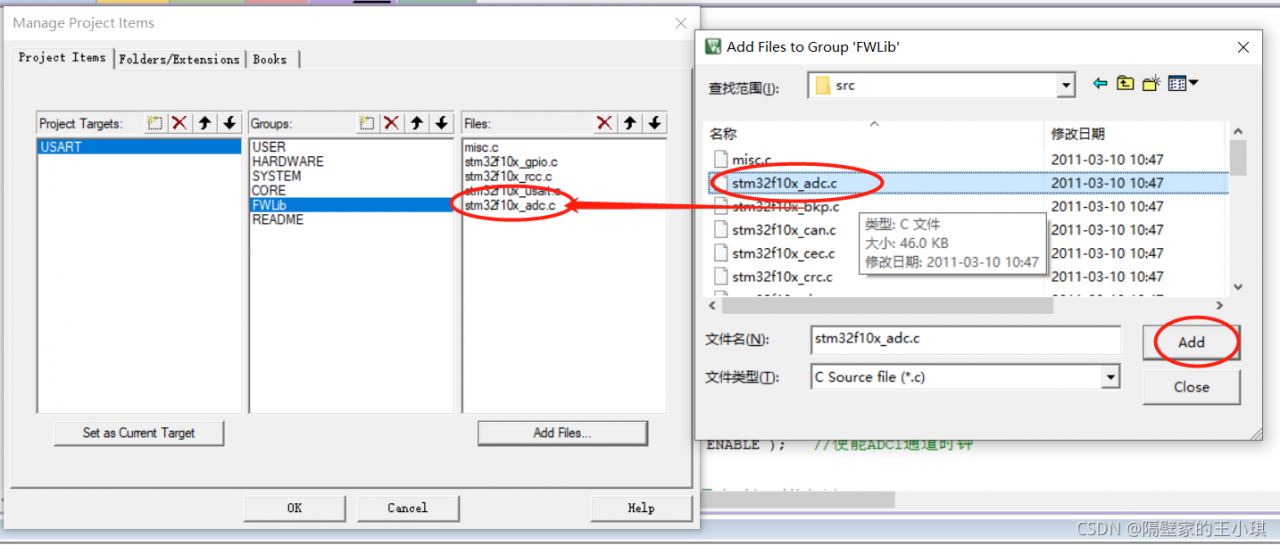
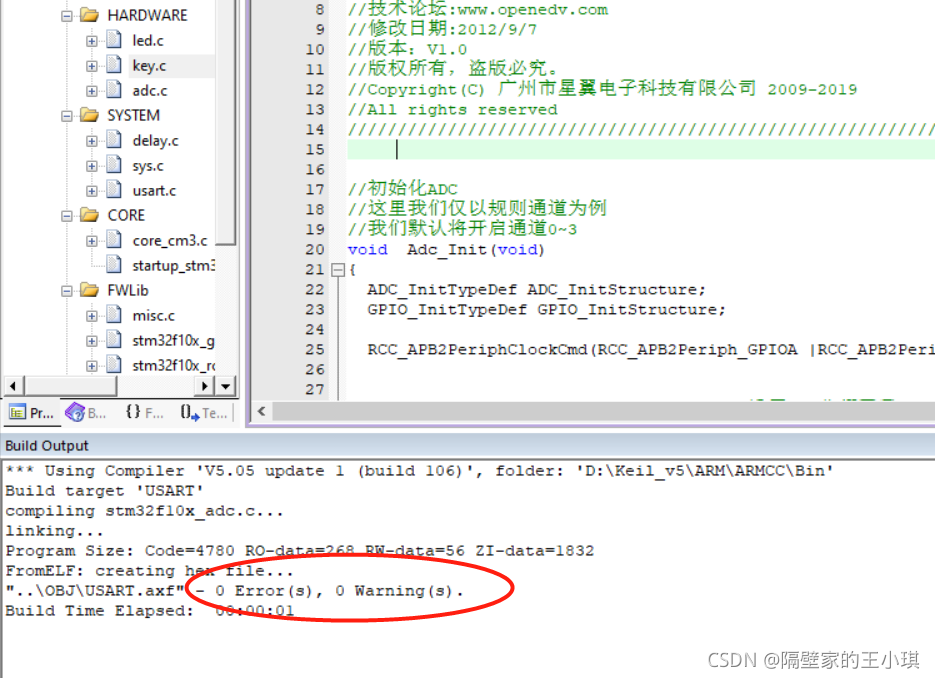
After adding and recompiling, no error will be reported
Recently, if you want to use clion to replace keil for STM32 development, you need to install the following software and add the last two to the system path:
STM32CubeMX
Clion
MinGW
arm-none-eabi-gcc
After configuring toolchain and cmake, it is found that the simplest project cannot cmake and displays
CMake Error: CMake was unable to find a build program corresponding to “MinGW Makefiles”. CMAKE_ MAKE_ PROGRAM is not set. You probably need to select a different build tool.
After debugging for a long time, the final solution: do not use mingw64, download the installation tool of mingw32 on the official website: mingw-get-setup.exe, and configure it again. It may be that 64 bit MinGW is incompatible.
Note: see also the FAQ in the source distribution.
It contains workarounds to several common problems.
In particular, if Valgrind aborted or crashed after
identifying problems in your program, there's a good chance
that fixing those problems will prevent Valgrind aborting or
crashing, especially if it happened in m_mallocfree.c.

If that doesn't help, please report this bug to: www.valgrind.org

In the bug report, send all the above text, the valgrind
version, and what OS and version you are using.  Thanks.
This is a bug in this version. Upgrading to the latest version can solve this problem.
valgrind:  Note that if you are debugging a 32 bit process on a
valgrind:  64 bit system, you will need a corresponding 32 bit debuginfo
valgrind:  package (e.g. libc6-dbg:i386).
Just install a GDB. apt install gdb.
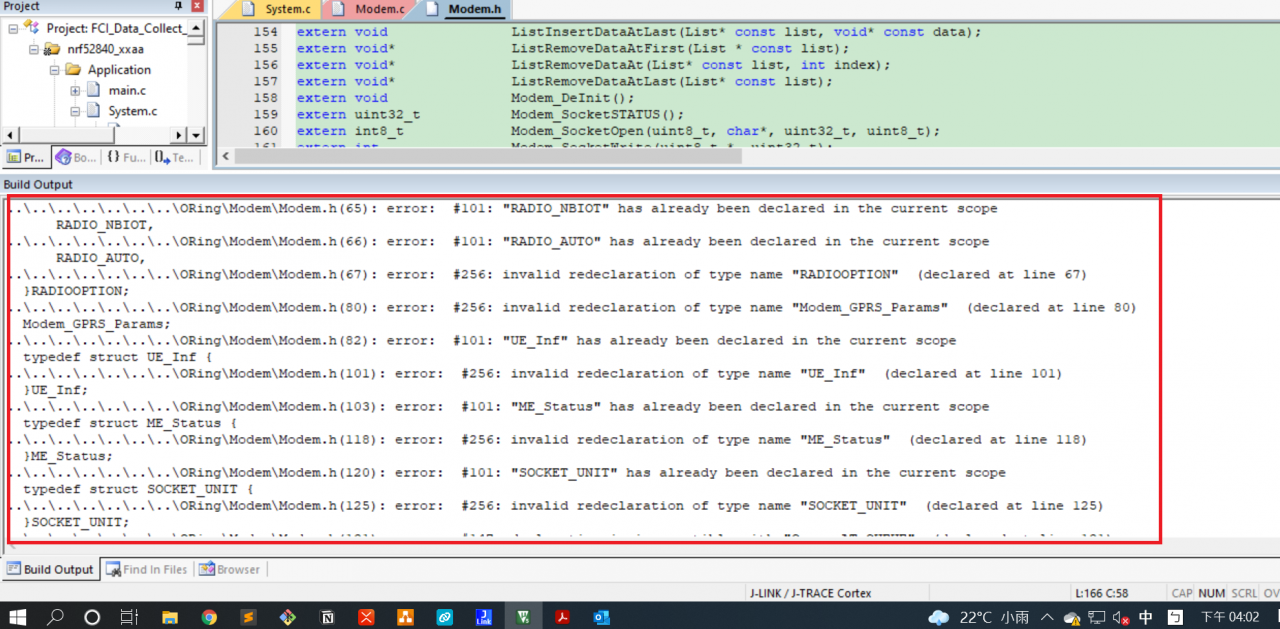
Keil compilation error
#include <stdio.h>
#include <stdlib.h>
...

#define Result_TIMOUT               3
#define Result_INTIAL               0
#define Result_ERROR                1

...
typedef enum
{
    MD_INIT,
    HARDWARE_CHECK,
    FILESYSTEM,
    BS_SEARCH,
    BS_REGISTER,
    BS_REG_CHK,
    ME_FC_INIT,
		ME_SOCKET,
    ME_READY
}STATUS_MACHINE_INDEX;

... // struct, enum, union

extern md_Socket_CB 			SocketOpen_CB;
extern md_Socket_CB 			SocketClose_CB;

...
Solution:
Use conditional compilation to prevent header files from being included repeatedly. Take the above code as an example
#ifndef __MODEM_H__
#define __MODEM_H__

#include <stdio.h>
#include <stdlib.h>
...

#define Result_TIMOUT               3
#define Result_INTIAL               0
#define Result_ERROR                1

...
typedef enum
{
    MD_INIT,
    HARDWARE_CHECK,
    FILESYSTEM,
    BS_SEARCH,
    BS_REGISTER,
    BS_REG_CHK,
    ME_FC_INIT,
		ME_SOCKET,
    ME_READY
}STATUS_MACHINE_INDEX;

... // struct, enum, union

extern md_Socket_CB 			SocketOpen_CB;
extern md_Socket_CB 			SocketClose_CB;

...

#endif

Keil compiled successfully
COMPILER=
ARCHIVER=
CP=cp
COMPILER_FLAGS=
EXTRA_COMPILER_FLAGS=
LIB=libxil.a
RELEASEDIR=../../../lib
INCLUDEDIR=../../../include
INCLUDES=-I./. -I${INCLUDEDIR}
INCLUDEFILES=*.h
LIBSOURCES=*.c
OUTS = *.o
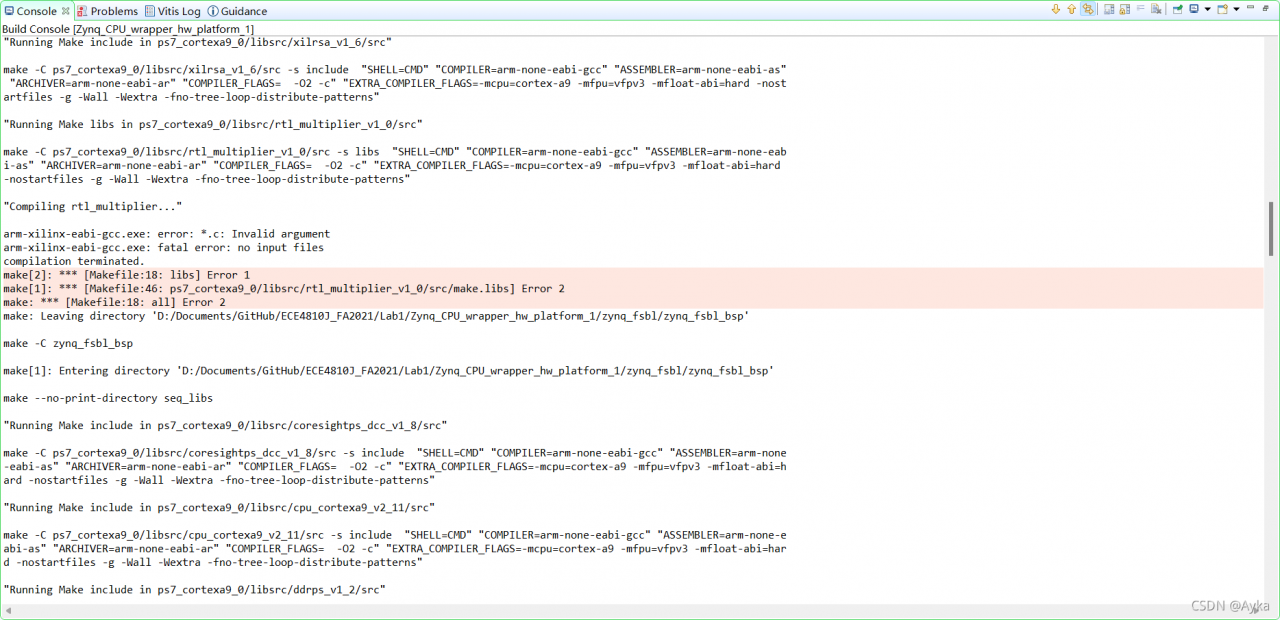
libs:
echo "Compiling rtl_multiplier..."
$(COMPILER) $(COMPILER_FLAGS) $(EXTRA_COMPILER_FLAGS) $(INCLUDES) $(LIBSOURCES)
$(ARCHIVER) -r ${RELEASEDIR}/${LIB} ${OUTS}
make clean
include:
${CP} $(INCLUDEFILES) $(INCLUDEDIR)
clean:
rm -rf ${OUTS}
According to
Drivers created in Vivado fail in Vitis 2021.1![]() https://support.xilinx.com/s/question/0D52E00006ihQSXSA2/drivers-created-in-vivado-fail-in-vitis-2021175527 – Drivers created in Create or Import Wizard in Vivado fail in Vitis
https://support.xilinx.com/s/question/0D52E00006ihQSXSA2/drivers-created-in-vivado-fail-in-vitis-2021175527 – Drivers created in Create or Import Wizard in Vivado fail in Vitishttps://support.xilinx.com/s/article/75527
and damiet’s answer inVitis IDE 2021.1 custom AXI IP core compile error![]() https://support.xilinx.com/s/question/0D52E00006hpYgWSAU/vitis-ide-20211-custom-axi-ip-core-compile-errorNote if we do not modify LIBSOURCES as instructed above, there will be still an error pointing to the same line because it requires $(LIBSOURCES):
https://support.xilinx.com/s/question/0D52E00006hpYgWSAU/vitis-ide-20211-custom-axi-ip-core-compile-errorNote if we do not modify LIBSOURCES as instructed above, there will be still an error pointing to the same line because it requires $(LIBSOURCES):
We modify the Makefile as:
COMPILER=
ARCHIVER=
CP=cp
COMPILER_FLAGS=
EXTRA_COMPILER_FLAGS=
LIB=libxil.a

RELEASEDIR=../../../lib
INCLUDEDIR=../../../include
INCLUDES=-I./. -I${INCLUDEDIR}

INCLUDEFILES=*.h
LIBSOURCES=$(wildcard *.c)
OUTS = *.o
OBJECTS = $(addsuffix .o, $(basename $(wildcard *.c)))
ASSEMBLY_OBJECTS = $(addsuffix .o, $(basename $(wildcard *.S)))

libs:
	echo "Compiling rtl_multiplier..."
	$(COMPILER) $(COMPILER_FLAGS) $(EXTRA_COMPILER_FLAGS) $(INCLUDES) $(LIBSOURCES)
	$(ARCHIVER) -r ${RELEASEDIR}/${LIB} ${OBJECTS} ${ASSEMBLY_OBJECTS}
	make clean

include:
	${CP} $(INCLUDEFILES) $(INCLUDEDIR)

clean:
	rm -rf ${OBJECTS} ${ASSEMBLY_OBJECTS}
We only modify LIBSOURCES, add OBJECTS and ASSEMBLY_OBJECTS, and replace $(OUTS) at $(ARCHIVER) line and rm -rf line with $(OBJECTS) $(ASSEMBLY_OBJECTS). If you go through Makefile under other directories under libsrc, like Zynq_CPU_wrapper_hw_platform_1\zynq_fsbl\zynq_fsbl_bsp\ps7_cortexa9_0\libsrc\cpu_cortexa9_v2_11\src\Makefile, you will see how is this patch invented.
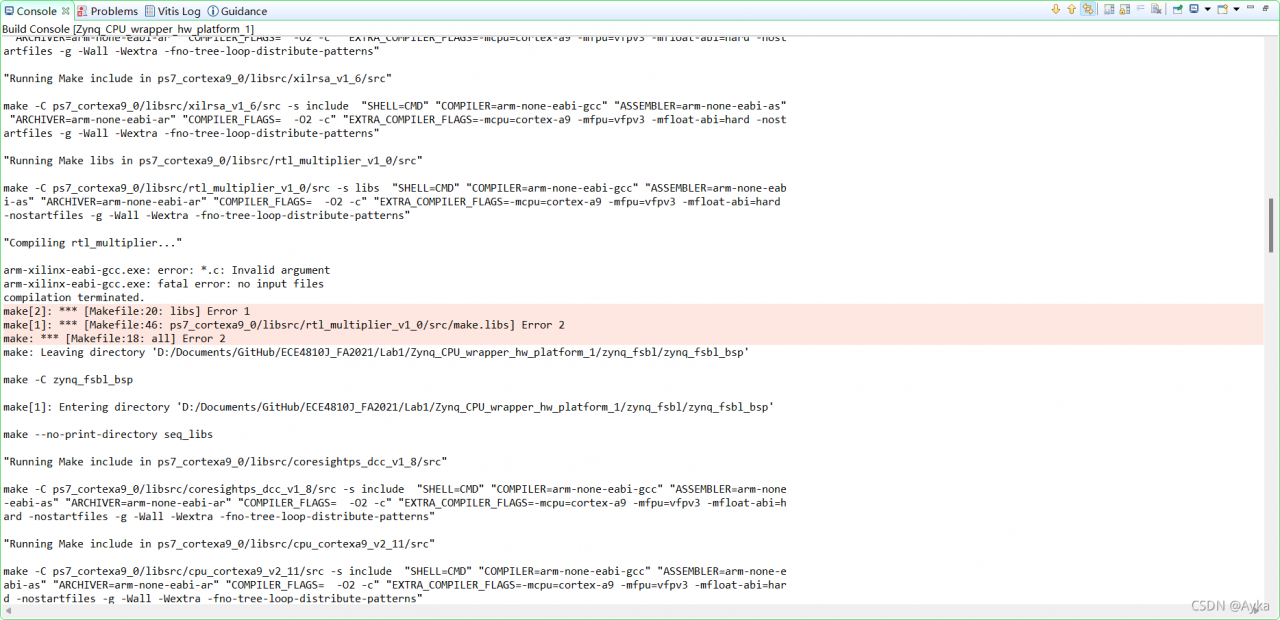
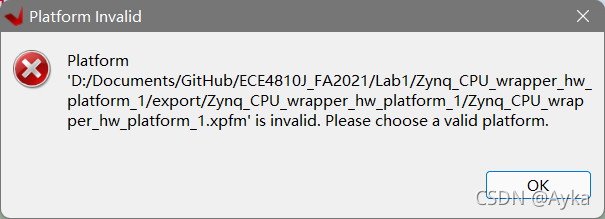
This time building goes further, but still fails:
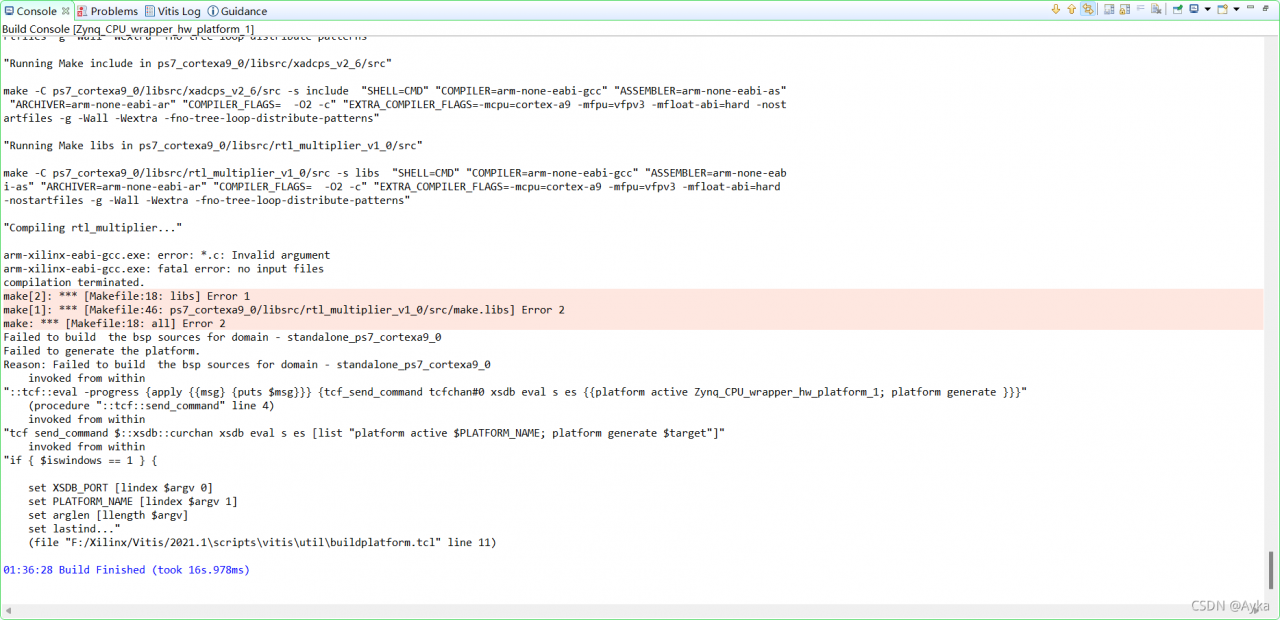
and two identical pop-up windows:
By adding echo, we found that this error is no longer caused by the Makefile we modified before. Reading information given by Build Console carefully, we found the following information:
‘Finished building libraries’
make: Leaving directory ‘D:/Documents/GitHub/ECE4810J_FA2021/Lab1/Zynq_CPU_wrapper_hw_platform_1/zynq_fsbl/zynq_fsbl_bsp’
arm-none-eabi-gcc -o fsbl.elf sd.o nand.o image_mover.o md5.o fsbl_hooks.o main.o nor.o qspi.o rsa.o ps7_init.o pcap
.o fsbl_handoff.o -MMD -MP -mcpu=cortex-a9 -mfpu=vfpv3 -mfloat-abi=hard -mcpu=cortex-a9 -mfpu=vfpv3 -mfloat-abi=hard –
Wl,-build-id=none -specs=Xilinx.spec -lrsa -Wl,–start-group,-lxil,-lgcc,-lc,–end-group -Wl,–start-group,-lxilffs,-lxil,-lgc
c,-lc,–end-group -Wl,–start-group,-lrsa,-lxil,-lgcc,-lc,–end-group -Wl,–gc-sections -Lzy
nq_fsbl_bsp/ps7_cortexa9_0/lib -L./ -Tlscript.ld
Building the BSP Library for domain – standalone_ps7_cortexa9_0 on processor ps7_cortexa9_0
make –no-print-directory seq_libs
“Running Make include in ps7_cortexa9_0/libsrc/coresightps_dcc_v1_8/src”
make -C ps7_cortexa9_0/libsrc/coresightps_dcc_v1_8/src -s include “SHELL=CMD” “COMPILER=arm-none-eabi-gcc” “ASSEMBLER=arm-none
-eabi-as” “ARCHIVER=arm-none-eabi-ar” “COMPILER_FLAGS= -O2 -c” “EXTRA_COMPILER_FLAGS=-mcpu=cortex-a9 -mfpu=vfpv3 -mfloat-abi=h
ard -nostartfiles -g -Wall -Wextra -fno-tree-loop-distribute-patterns”
For me, it is located at Zynq_CPU_wrapper_hw_platform_1\ps7_cortexa9_0\standalone_ps7_cortexa9_0\bsp\ps7_cortexa9_0\libsrc\rtl_multiplier_v1_0\src\Makefile. Its contents are identical to the contents of the previous Makefile.
Interestingly, another same Makefile Zynq_CPU_wrapper_hw_platform_1\hw\drivers\rtl_multiplier_v1_0\src\Makefile does not cause any errors.
After done that, we can see the qemu_args.txt error mentioned by Programaths’s answer in
Vitis 2021.1 error Makefile![]() https://support.xilinx.com/s/question/0D52E00006hpRo8SAE/vitis-20211-error-makefile
https://support.xilinx.com/s/question/0D52E00006hpRo8SAE/vitis-20211-error-makefile
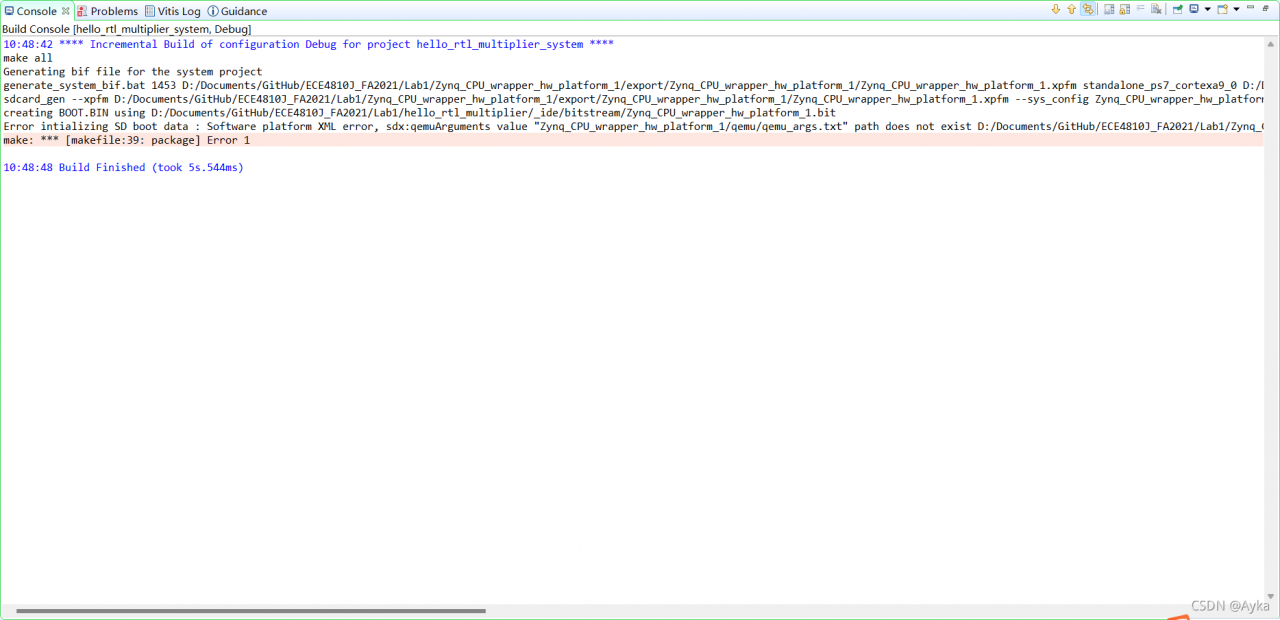
10:48:42 **** Incremental Build of configuration Debug for project hello_rtl_multiplier_system ****
make all
Generating bif file for the system project
generate_system_bif.bat 1453 D:/Documents/GitHub/ECE4810J_FA2021/Lab1/Zynq_CPU_wrapper_hw_platform_1/export/Zynq_CPU_wrapper_hw_platform_1/Zynq_CPU_wrapper_hw_platform_1.xpfm standalone_ps7_cortexa9_0 D:/Documents/GitHub/ECE4810J_FA2021/Lab1/hello_rtl_multiplier_system/Debug/system.bif
sdcard_gen –xpfm D:/Documents/GitHub/ECE4810J_FA2021/Lab1/Zynq_CPU_wrapper_hw_platform_1/export/Zynq_CPU_wrapper_hw_platform_1/Zynq_CPU_wrapper_hw_platform_1.xpfm –sys_config Zynq_CPU_wrapper_hw_platform_1 –bif D:/Documents/GitHub/ECE4810J_FA2021/Lab1/hello_rtl_multiplier_system/Debug/system.bif –bitstream D:/Documents/GitHub/ECE4810J_FA2021/Lab1/hello_rtl_multiplier/_ide/bitstream/Zynq_CPU_wrapper_hw_platform_1.bit –elf D:/Documents/GitHub/ECE4810J_FA2021/Lab1/hello_rtl_multiplier/Debug/hello_rtl_multiplier.elf,ps7_cortexa9_0
creating BOOT.BIN using D:/Documents/GitHub/ECE4810J_FA2021/Lab1/hello_rtl_multiplier/_ide/bitstream/Zynq_CPU_wrapper_hw_platform_1.bit
Error intializing SD boot data : Software platform XML error, sdx:qemuArguments value “Zynq_CPU_wrapper_hw_platform_1/qemu/qemu_args.txt” path does not exist D:/Documents/GitHub/ECE4810J_FA2021/Lab1/Zynq_CPU_wrapper_hw_platform_1/export/Zynq_CPU_wrapper_hw_platform_1/sw/Zynq_CPU_wrapper_hw_platform_1/qemu/qemu_args.txt, platform path D:/Documents/GitHub/ECE4810J_FA2021/Lab1/Zynq_CPU_wrapper_hw_platform_1/export/Zynq_CPU_wrapper_hw_platform_1, sdx:configuration Zynq_CPU_wrapper_hw_platform_1, sdx:image standard
make: *** [makefile:39: package] Error 1
10:48:48 Build Finished (took 5s.544ms)
Under Zynq_CPU_wrapper_hw_platform_1\export\Zynq_CPU_wrapper_hw_platform_1\sw\Zynq_CPU_wrapper_hw_platform_1, create a new folder called qemu, and create a new TXT file called qemu_args.txt under qemu folder. Just leave it empty (you may find another existing qemu_args under standalone_ps7_cortexa9_0\qemu folder).
Finally, we solved this problem.
In Proteus simulation, the duplicate part reference error is found after running the code.
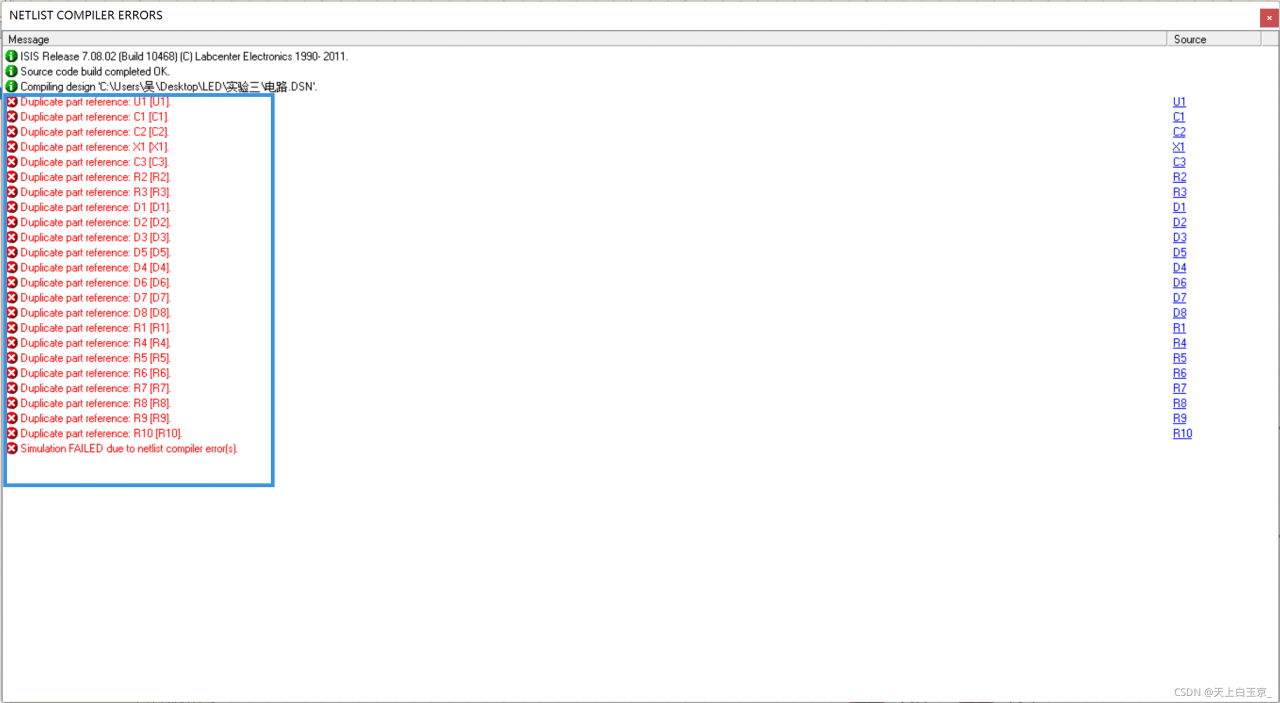
This is due to an error in part naming:

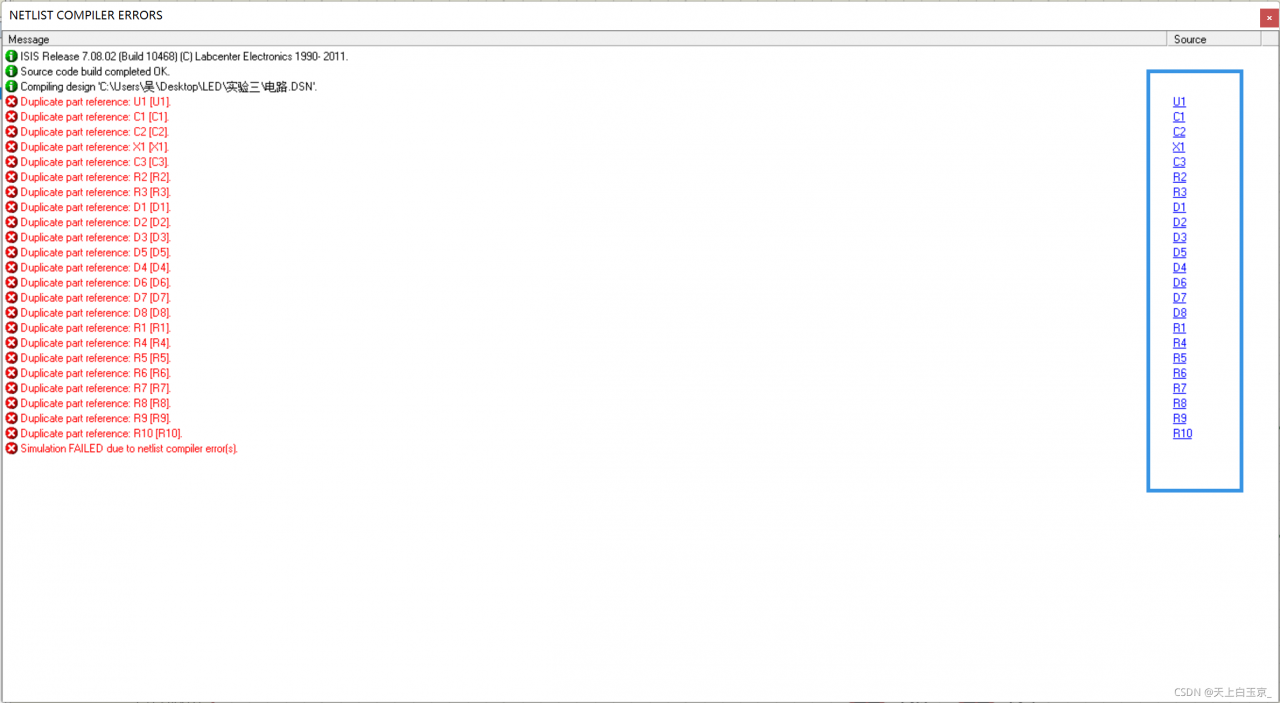
Double click the error location to quickly locate the faulty component:
Double click the faulty component to modify the component name:
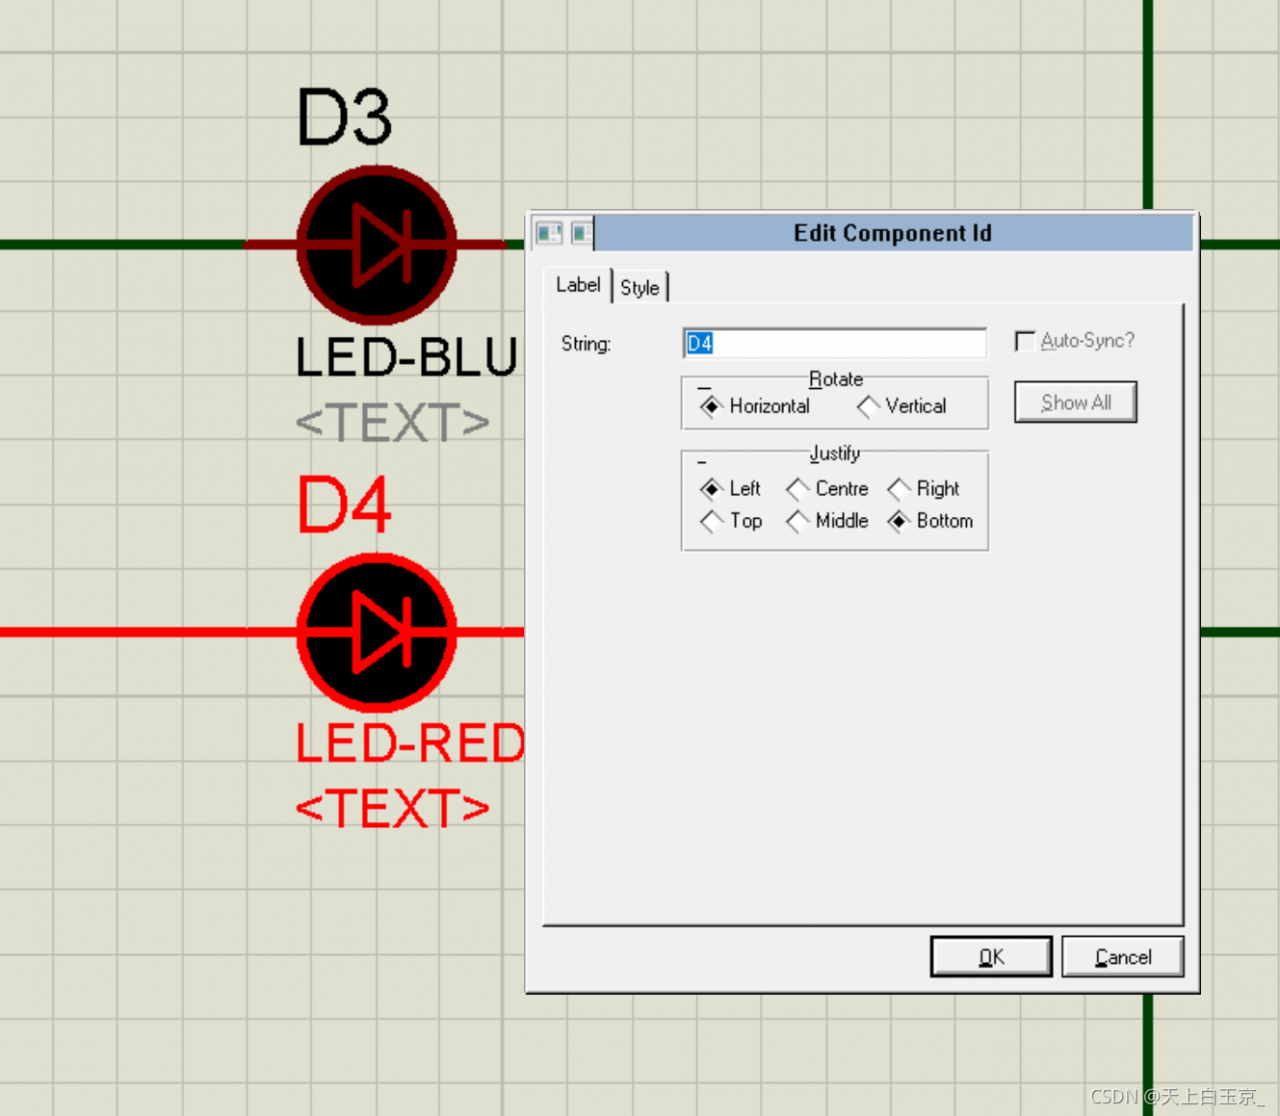
After renaming all electronic components with duplicate names, they can operate normally.
During the development of Nordic 52810, after the softdevice is re written, when nrfconnect for Mobile Connect is used, the connection fails, and the mobile phone displays peer removed pairing information. Device side log information:
< info> peer_ manager_ handler: Connection security failed: role: Peripheral, conn_ handle: 0x0, procedure: Encryption, error: 4102
Solution: in the Bluetooth settings of the mobile phone, find the device to be connected, select “ignore this device”, and re connect with nrfconnect. Success!