Tag Archives: Android

Termux setting path environment variable

Problem description

When using termux, it is found that the permissions are not enough by using commands. After switching to root by using Su, it is found that many previous commands cannot be used

First, echo $path to view the environment variable of root

Results: in/SBIN/Su/Su/bin/Su/xbin/system/bin/system/xbin

It is found that these three are all in the root path, without/data/data/com.termux/files/usr/bin, so the command here can’t be executed naturally

Exit switch to normal user.

Echo $path view environment variables

The value is/data/data/com. Termux/files/usr/bin/data/data/com. Termux/files/usr/bin/applets

That is to say, you just need to tell root the variables of ordinary users

Here is the solution——————————————————————————————-

In order to ensure the security of the system, the temporary variable is used to save the error

export PATH=/data/data/com.termux/files/usr/bin:/data/data/com.termux/files/usr/bin/applets:$PATH

(tell root the executable

Note that there is no space beside the equal sign, the colon in English: segmentation, the front part is the path value of ordinary users: the Lib path of ordinary users (because some commands also need the library files we download), just paste it

export LD_ LIBRARY_ PATH=/data/data/com.termux/files/usr/lib

(link LIB)

be careful!! For the sake of safety, the operation I posted is temporary. Exit will restore the original identity or turn it off or reopen it. But it’s absolutely safe.

For your convenience, you can create a script to quickly use the downloaded function.

Cd ~ (home directory)

VIM getmytermuxorders (create a file)

Enter the following:

#!/bin/bash
export PATH=/data/data/com.termux/files/usr/bin:/data/data/com.termux/files/usr/bin/applets:$PATH
export LD_LIBRARY_PATH=/data/data/com.termux/files/usr/lib
echo "LYM_nb" 

: WQ save exit

Then exit returns to the original user

When you want to use the root permission again in the future:

Su or TSU comes to root

Run the source command directly in the home directory

source getMyTermuxOrders

If output lym_ NB means that all bin functions of termux have been obtained

You can also use export, echo $path, env and other commands to confirm
Mobile phone code termux

Recommend two apps, termux and better terminal, and search directly in the app store.

The purpose of using this app is to let beginners experience learning Linux system, or let you have a portable server, intranet penetration and so on.

Below is how to turn on SSH

———————

With termux, you can easily convert your mobile phone into Linux to practice or learn

If you feel inconvenient, you can use Google input method or hacker input method

Feel not used to external keyboard, OTG adapter can be used, about five dollars look, very convenient, you can also read and write U disk

If you think the screen is small, you can use SSH to connect your mobile phone. You can use any SSH tool on your computer to connect your mobile phone

Common shortcut keys for mobile phone to operate termux——————–

The Ctrl key is a key commonly used by end users – but most touch keyboards don’t have it. To do this, termux uses the volume down button to simulate the Ctrl key.  
for example, on the touch keyboard, press to decrease the volume button+   L sends the same input as pressing Ctrl + L on the hardware keyboard.

Ctrl+A  -& gt; Move the cursor to the beginning of the line Ctrl + C  -& gt; Abort the current process Ctrl + d  -& gt; Log off terminal session Ctrl + e  -& gt; Move the cursor to the end of the line Ctrl + k  -& gt; Delete from cursor to end of line Ctrl + L  -& gt; Clear terminal Ctrl + Z  -& gt; Suspend (send sigtstp to) the current process

The volume up key can also be used as a special key to generate a specific input

volume + e  -& gt; ESC key volume + T  -& gt; Tab volume + 1  -& gt; F1 (and volume increase + 2 → F2, etc.) volume increase + 0  -& gt; F10 volume + B  -& gt; Alt + B, use readLine to return a word volume plus + F  -& gt; Alt + F, forward a word when using readLine volume + x  -& gt; Alt + x volume + W  -& gt; Up arrow key volume + a  -& gt; Left arrow key volume + s  -& gt; Down arrow key volume + d  -& gt; Right arrow key volume + L  -& gt; | ( Pipe character) volume plus + H  -& gt; 〜( Wave character) volume plus + U  -& gt; _ ( Underline character) volume plus + P  -& gt; Previous volume plus + n  -& gt; Next page volume up +.  -& gt; CTRL + \ \ (sigquit) volume + V  -& gt; Display volume control volume plus + Q  -& gt; Show additional key view

Suggestions———————————————————————–

It is recommended that beginners do not always run as root. If you want to use root, you can

su

After the command is switched to root

exit

Return to the original identity

 
Openssh needs to be installed in termux. As we all know, Linux has two major distributions.

General Command

uname -a

You can view the kernel information of this machine. For more details, execute the following command

 cat /proc/version 

For the convenience of operation, I use SSH to connect my Android phone,

Open SSH: I’m afraid this is the most detailed one for termux to open SSH

https://blog.csdn.net/qq_ 35425070/article/details/84789078


Solutions to the failure of installing jupyters in termux

When installing jupyter in termux, the network was cut off in the middle of the installation, which led to a day’s struggle. Finally, the installation was completed, and the problem was a. C   . H file is not available

Main reason: the dependency is not fully installed

Later, after some problems were solved, the installation of pyzmq (zeromq) got stuck, and the card owner did not move. Neither PIP install pyzmq nor PIP install jupyter alone could work

Follow these steps:

———————Check basic operations and commands:

pkg update

PKG install VIM curl WGet git unzip Unrar

———————Install dependency packages (5)

apt install python-dev clang fftw

apt-get install   libzmq

apt-get install   libzmq-dev

———————Install jupyter again

pip install –force-reinstall –no-cache-dir jupyter       // Force download and install again

 
========================================================
Using termux for Linux unfamiliar students can come to git this, a script written by high school students, fool type installation termux common tools

termux-tools-install

—————————————————————————————————————–

Other solutions reference:

Baidu reference here   http://www.drehere.com/?s=termux%20jupyter%20zmq

To re install termux: http://tieba.baidu.com/p/5537783650

Manual installation of zeromq (download source code analysis): there are a lot of online tutorials, just choose one: https://blog.csdn.net/n_ sev7/article/details/77320250

 
Other related issues: installing sketch, lxml, etc

https://www.jianshu.com/p/4deba3fad266

Flash back problem when Android studio plays music in sdcard through intent

Code

Add a button in the layout file, set listening events for button in the main class, and play music through intent

1. Write activity_ main.xml

<?xml version="1.0" encoding="utf-8"?>
<LinearLayout xmlns:android="http://schemas.android.com/apk/res/android"
    android:layout_width="match_parent"
    android:layout_height="match_parent"
    android:orientation="vertical" >
    
    <Button
        android:id="@+id/btn_click"
        android:layout_width="match_parent"
        android:layout_height="wrap_content"
        android:layout_margin="10dp"
        android:gravity="center"
        android:padding="8dp"
        android:text="@string/click4" />

</LinearLayout>

2. Import music into virtual machine

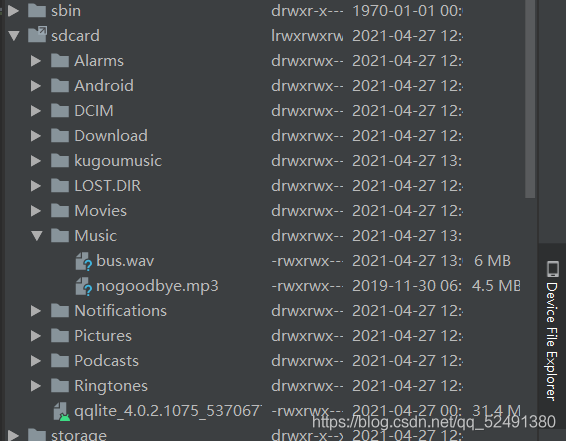
There is a device file explorer in the lower right corner of Android studio. After opening, you can see the file directory of the virtual machine. Find/MNT/sdcard/music, right-click upload and select the music to be imported. The file name should not appear in Chinese

3. Write mainactivity.class

package com.ch5_2;
import android.app.Activity;
import android.content.Intent;
import android.net.Uri;
import android.os.Bundle;
import android.view.View;

import java.io.File;

public class MainActivity extends Activity {

    @Override
    protected void onCreate(Bundle savedInstanceState) {
        super.onCreate(savedInstanceState);
        setContentView(R.layout.activity_main);
        
        findViewById(R.id.btn_click4).setOnClickListener(new View.OnClickListener() {
            @Override
            public void onClick(View v) {
                Intent intent = new Intent();
                intent.setAction(Intent.ACTION_VIEW);
                //Get the file path, the path is the virtual machine memory card path
                Uri data = Uri.fromFile(new File("/mnt/sdcard/Music/nogoodbye.mp3"));
                intent.setDataAndType(data,"audio/*");
                startActivity(intent);
            }
        });
    }
}

Questions

1. Flashback

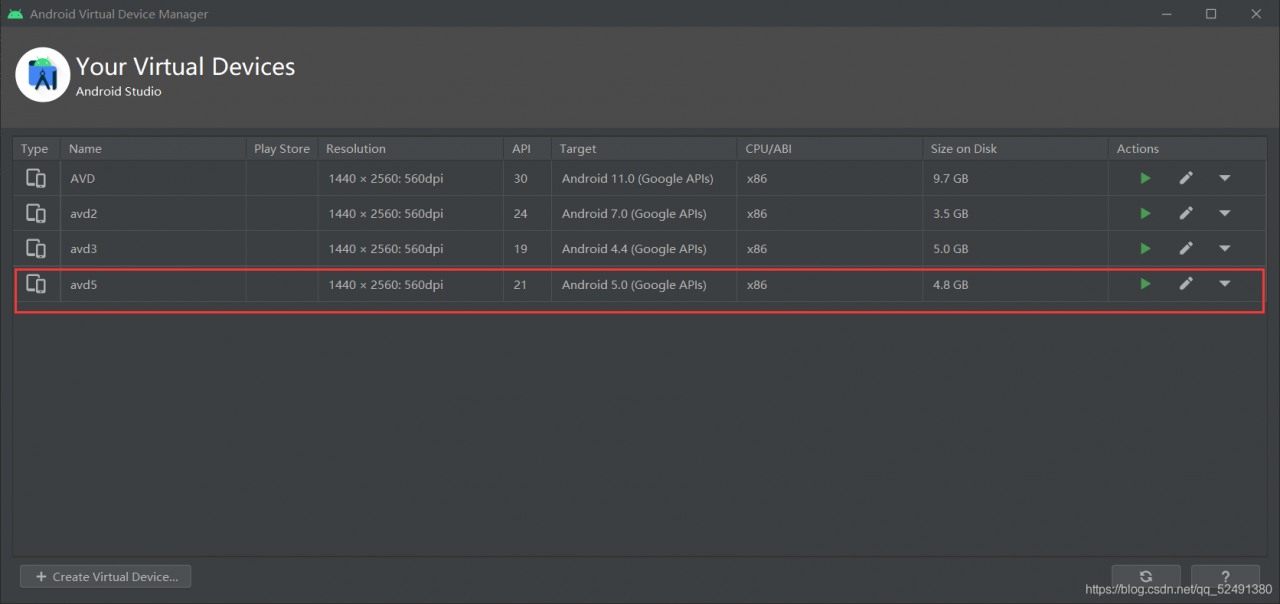
Here, the version of the virtual machine will affect the operation. If the version is too high, it will flash back. I used to use Android 11.0, but as soon as I click button, it will flash back. The reason should be the compatibility problem. Change to a lower version

here is Android 5.0

2. This file type problem is not supported

When changing to a lower version of the virtual machine, you may encounter the problem that Android music playing software does not support this type of file. I used MP3 file at the beginning, and the result shows that it does not support it. It’s OK to change to WAV format.

[How to Solve] Easyclick read text garbled

Easyclick read text garbled solution

This problem is caused by the forced reading of text encoded as UTF-8 after the upgrade of easyclick
for example,

terms of settlement

    1. write and read Java plug-ins in your own way. After modifying the encoding of the text to UTF-8, it can be read normally</ ol>

Java plug-in code


package com.plugin.gudcgukOhj;

import android.content.Context;
import android.os.Environment;
import android.util.Log;

import java.io.*;
import java.nio.charset.Charset;

public class PluginClz {
    Context context;

    public PluginClz(Context context) {
        System.out.println("--- " + context);
    }  
        /**
	     * Read the local text content to the specified encoding type
	     * @param strFilePath Full name of the text path
	     * @param encode encoding type
	     * @return
	     */
    public static String ReadTxtFile(String strFilePath ,String encode) {
        String path = strFilePath;
        String content = ""; 
        //open
        File file = new File(path);
        if (!file.isDirectory()) {
            try {
                InputStream instream = new FileInputStream(file);
                InputStreamReader inputStreamReader = null;
                try {
                    inputStreamReader = new InputStreamReader(instream, encode);
                } catch (UnsupportedEncodingException e1) {
                    e1.printStackTrace();
                }
                BufferedReader reader = new BufferedReader(inputStreamReader);
                StringBuffer sb = new StringBuffer("");
                String line;
                try {
                    while ((line = reader.readLine()) != null) {
                        sb.append(line);
                        sb.append("\n");
                    }
                } catch (IOException e) {
                    e.printStackTrace();
                }
                content = sb.toString();
            } catch (java.io.FileNotFoundException e) {
               System.ou.println("TestFile", "The File doesn't not exist.");
            }
        }
        return content;
    }
}    

Calling method main.js

//The call here is made by loading the apk file first and then instantiating the object
// the js file package will not enter the plug-in, for testing purposes only
function main() {
  //this is where the plugin is loaded
  var r = loadDex("mokuai.apk");
  if (!r) {
      loge("failed to load the plugin");
      return;
  } else {
      logd("Loading the plugin was successful");
  }


  //Here the object is instantiated, and then the relevant method is called
  var obj = new com.plugin.gudcgukOhj.PluginClz(context);
  let file = "/sdcard/1.txt"
  let encode = "GB18030"; // Specify your original encoding
  var s = obj.ReadTxtFile(file,encode);
  logd("java return data: "+s);

}

main();

How to distinguish the source channel of router.push jump fast application

Phenomenon description:

Jump from a fast app a to the B1 page of B fast app. A may be a fast app or a card with a negative screen. How can you tell which one comes from?

Solution:
fast application and card jump to other fast applications through router.push interface, which is realized by using the HAP link in deeplink. At the same time, parameters can be carried in the HAP link, and a flag parameter can be added when skipping. Parameters can be obtained from B1 page of B fast application. According to the parameter value, whether the source is a negative screen card or fast application a can be judged, Then do the corresponding logic processing according to the needs. Fast application uses this.xx to get parameters carried by jump.

Example code:
a fast application code:

<template>
    <div>
        <text class="button" onclick="router">test</text>
    </div>
</template>
<style>
    .button{
        width: 100%;
        height: 200px;
        color: #000000;
        font-size: 80px;
    }
</style>
<script>
    import router from '@system.router';
    module.exports = {
        data: {
            
        },
        onInit() {
            this.$page.setTitleBar({ text: '' })
        },
        router(){
            console.log("router");
            router.push({
                uri: 'hap://app/com.huawei.ceshi/Test?body=quickapp',
            })
        }
    }
</script>

Card related codes:

<template>
    <div>
        <text class="button" onclick="router">测试</text>
    </div>
</template>
<style>
    .button{
        width: 100%;
        height: 200px;
        color: #000000;
        font-size: 80px;
    }
</style>
<script>
    import router from '@system.router';
    module.exports = {
        data: {
            
        },
        onInit() {
            this.$page.setTitleBar({ text: '' })
        },
        router(){
            console.log("router");
            router.push({
                uri: 'hap://app/com.huawei.ceshi/Test?body=card',
            })
        }
    }
</script>

B fast application code:

In the oninit() life cycle method, the parameter value is obtained. In the following code, the accept variable is defined to receive the parameter value. For example, in the onbackpress() method, different business logic is implemented according to the source.

<template>
    <div style="flex-direction: column;">
        <text class="text">datas</text>
        <text class="text" style="background-color: black">{{accept}}</text>
    </div>
</template>
<style>
    .text {
        height: 80px;
        font-size: 50px;
        color: red;
        width: 500px;
    }
</style>
<script>
    import router from '@system.router';
    module.exports = {
        data: {
            accept: ""
        },
        onInit() {
            this.$page.setTitleBar({ text: '' })
            this.accept = this.body;
        },
        onBackPress() {
            if (this.accept === "quickapp") {
                console.log("this is quickapp");
            } else if (this.accept === "quickapp") {
                console.log("this is crad");
            }else{
                router.back()
            }
            return true;
        }
    }
</script>

Plugin is too old, please update to a more recent version, or set ANDROID_DAILY_OVERRIDE environment

Error:
Plugin is too old, please update to a more recent version, or set ANDROID_DAILY_OVERRIDE environment variable to “fa35b67976287d3da3af2aeff1d760df30957c4c”


Shotscreen


Solution
Main project build.gradle file modification

classpath 'com.android.tools.build:gradle:2.0.0-alpha3'

To:

classpath 'com.android.tools.build:gradle:2+'

Or go to the website http://tools.android.com/tech-docs/new-build-system Get the latest gradle version

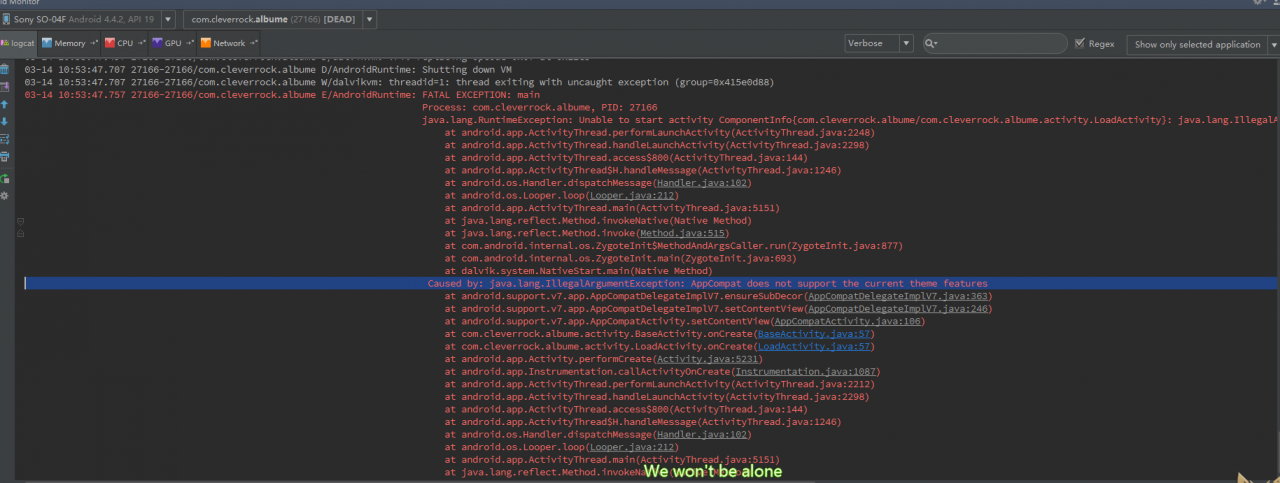
AppCompat does not support the current theme features

Error message

Process: com.cleverrock.albume, PID: 27166
java.lang.RuntimeException: Unable to start activity ComponentInfo{com.cleverrock.albume/com.cleverrock.albume.activity.LoadActivity}: java.lang.IllegalArgumentException: AppCompat does not support the current theme features
   at android.app.ActivityThread.performLaunchActivity(ActivityThread.java:2248)
   at android.app.ActivityThread.handleLaunchActivity(ActivityThread.java:2298)
   at android.app.ActivityThread.access$800(ActivityThread.java:144)
   at android.app.ActivityThread$H.handleMessage(ActivityThread.java:1246)
   at android.os.Handler.dispatchMessage(Handler.java:102)
   at android.os.Looper.loop(Looper.java:212)
   at android.app.ActivityThread.main(ActivityThread.java:5151)
   at java.lang.reflect.Method.invokeNative(Native Method)
   at java.lang.reflect.Method.invoke(Method.java:515)
   at com.android.internal.os.ZygoteInit$MethodAndArgsCaller.run(ZygoteInit.java:877)
   at com.android.internal.os.ZygoteInit.main(ZygoteInit.java:693)
   at dalvik.system.NativeStart.main(Native Method)
Caused by: java.lang.IllegalArgumentException: AppCompat does not support the current theme features
   at android.support.v7.app.AppCompatDelegateImplV7.ensureSubDecor(AppCompatDelegateImplV7.java:363)
   at android.support.v7.app.AppCompatDelegateImplV7.setContentView(AppCompatDelegateImplV7.java:246)
   at android.support.v7.app.AppCompatActivity.setContentView(AppCompatActivity.java:106)
   at com.cleverrock.albume.activity.BaseActivity.onCreate(BaseActivity.java:57)
   at com.cleverrock.albume.activity.LoadActivity.onCreate(LoadActivity.java:57)
   at android.app.Activity.performCreate(Activity.java:5231)
   at android.app.Instrumentation.callActivityOnCreate(Instrumentation.java:1087)
   at android.app.ActivityThread.performLaunchActivity(ActivityThread.java:2212)
   at android.app.ActivityThread.handleLaunchActivity(ActivityThread.java:2298) 
   at android.app.ActivityThread.access$800(ActivityThread.java:144) 
   at android.app.ActivityThread$H.handleMessage(ActivityThread.java:1246) 
   at android.os.Handler.dispatchMessage(Handler.java:102) 
   at android.os.Looper.loop(Looper.java:212) 
   at android.app.ActivityThread.main(ActivityThread.java:5151) 
   at java.lang.reflect.Method.invokeNative(Native Method) 
   at java.lang.reflect.Method.invoke(Method.java:515) 
   at com.android.internal.os.ZygoteInit$MethodAndArgsCaller.run(ZygoteInit.java:877) 
   at com.android.internal.os.ZygoteInit.main(ZygoteInit.java:693) 
   at dalvik.system.NativeStart.main(Native Method) 

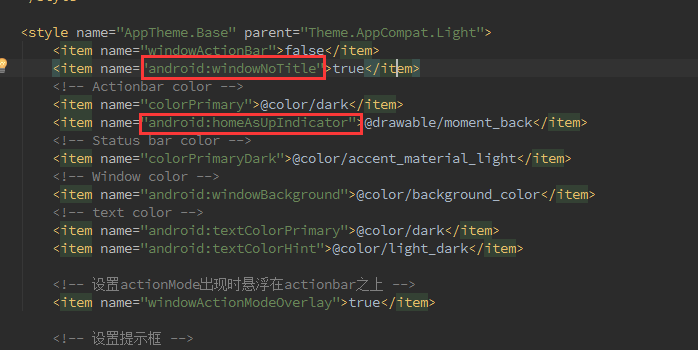
25130;`22270


1.2.2.2.2.2.2.2.2.

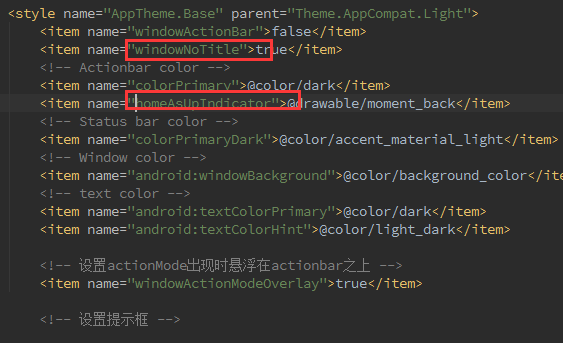
values style.xml

21435;”25481an android:
To:

Android studio Error:Execution failed for task ‘: app:transformResourcesWithMergeJavaResForDebug ‘

Android studio error Error:Execution failed for task

Recently, when doing the face recognition check-in system based on Android platform, after importing the third party’s lib package, Android studio reported the following error:

Error:Execution failed for task ‘: app:transformResourcesWithMergeJavaResForDebug ’.
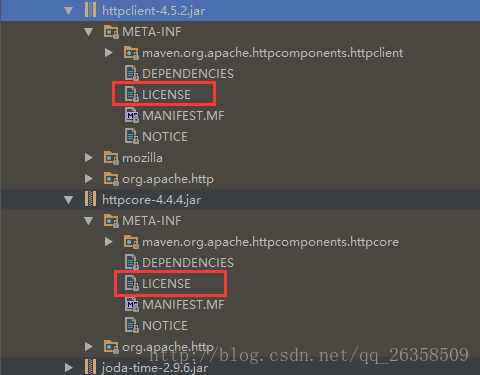
com.android.build . api.transform.TransformException : com.android.builder . packaging.DuplicateFileException : Duplicate files copied in APK META-INF/LICENSE
File1: E:\Workspaces\Swface\app\libs\httpcore-4.4.4.jar
File2: E:\Workspaces\Swface\app\libs\httpclient-4.5.2.jar

After consulting the data, it is found that there are duplicate contents loaded in the meta-inf directory of the jar package. Open the corresponding jar package
sure enough, both of the two jar packages have license, and further Click to find that the contents are exactly the same. However, it seems that the next three files are also duplicate (only there is no clear prompt in the error report), so we can solve them all at once
all Now that we know that it is caused by repeatedly loading files, the solution is to remove the repeatedly loaded files during compilation. The specific operations are as follows:

    1. Open app\ build.gradle File
    1. 2. Modify the configuration as follows:
buildTypes {
          ...... (omit part of the code)
          // Add the following code here
          packagingOptions {
            exclude 'META-INF/DEPENDENCIES'
            exclude 'META-INF/NOTICE'
            exclude 'META-INF/LICENSE'
            exclude 'META-INF/LICENSE.txt'
            exclude 'META-INF/NOTICE.txt'
            exclude 'META-INF/ASL2.0'
            exclude 'META-INF/notice.txt'
        }
 }       
``

3. Rebuild project

A link to the original text is attached

http://stackoverflow.com/questions/34031395/errorexecution-failed-for-task-apptransformresourceswithmergejavaresfordebug

Android 11 toast error

Using toast with pictures on Android 11, toast.getView () is null. After checking, the API has banned some methods in Android 11.

The solution is as follows:

    public static void showCenter(Context context, String text) {
        Toast toast = Toast.makeText (context, text, Toast.LENGTH_ Short);
// in the upper left corner. If you want to move to the right, set the second parameter to & gt; 0; move down and increase the third parameter; the last two parameters only have pixels
if( Build.VERSION.SDK_ INT < Build.VERSION_ CODES.R) {
            toast.setGravity ( Gravity.CENTER , 0, 0);
            LinearLayout layout = (LinearLayout) toast.getView ();
            ImageView image = new ImageView(context);
            image.setImageResource (R. mipmap.icon_ success);
            layout.addView (image, 0);
        }
        toast.show ();
    }