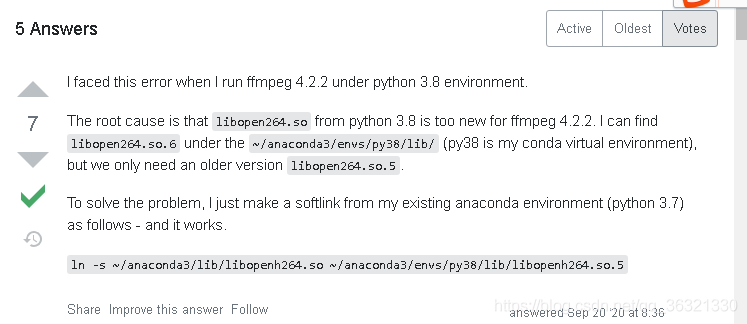
Tag Archives: anaconda

FileNotFoundError: Could not find module ‘D:\Anaconda3\envs\labe\Library\bin\geos_c.dll‘ [Solved]

Solution:
FileNotFoundError: Could not find module
‘D:\Anaconda3\envs\LabelImg\label\bin\geos_c.dll’ (or one of its dependencies).
Try using the full path with constructor syntax.(or one of its dependencies). Try using the full path with constructor syntax.

1, most people are not importing the “shapely” dependency. You only need to import it

pip install shapely

2. Import this or report an error, basically it is wrong with your Python version.

To download the corresponding. WHL file, the link is as follows: https://www.lfd.uci.edu/~gohlke/pythonlibs/#shapely , after entering the website, Ctrl + F can find shapely, and select the version up or down according to your own version( The author is python3.8)

#First uninstall the downloaded shapely
pip uninstall shapely
#then download the local cp38 version of shapely
pip install D:\PyCharm\Pro\OCR\PaddleOCR\PPOCRLabel\BACK\Shapely-1.7.1-cp38-cp38-win_amd64.whl

Solution: from. Import ft2font importerror: DLL load failed: the specified module cannot be found

    1. This is an error in matplotlib. Win +R opens a command prompt;

PIP install matplotlib Open Anaconda Prompt and activate the environment you want to apply. a>ate tensorflow-gpu
nd install :>
PIP install matplotlib not yet, just to the IDE to terminal, there

pip install matplotlib
# If it doesn't work, it's in the terminal
conda install matplotlib

[Solved] removeerror: ‘requests’ is a dependency of CONDA and cannot be removed from

[Solved]RemoveError: ‘requests’ is a dependency of conda and cannot be removed from conda’s operating environment.

Collecting package metadata: done
Solving environment: done

Downloading and Extracting Packages
certifi-2018.1.18    | 144 KB    | ############################################################################ | 100%
mkl-2018.0.1         | 155.2 MB  | ############################################################################ | 100%
freetype-2.9.1       | 475 KB    | ############################################################################ | 100%
scipy-1.0.0          | 13.0 MB   | ############################################################################ | 100%
......
......
pyparsing-2.3.1      | 54 KB     | ############################################################################ | 100%
kiwisolver-1.0.1     | 60 KB     | ############################################################################ | 100%
qt-5.6.2             | 55.6 MB   | ############################################################################ | 100%
setuptools-38.4.0    | 540 KB    | ############################################################################ | 100%
matplotlib-2.2.2     | 6.5 MB    | ############################################################################ | 100%
six-1.12.0           | 21 KB     | ############################################################################ | 100%
openssl-1.0.2n       | 5.4 MB    | ############################################################################ | 100%
pyqt-5.6.0           | 4.5 MB    | ############################################################################ | 100%
zlib-1.2.11          | 236 KB    | ############################################################################ | 100%
tornado-5.1.1        | 665 KB    | ############################################################################ | 100%
sqlite-3.22.0        | 907 KB    | ############################################################################ | 100%
cycler-0.10.0        | 8 KB      | ############################################################################ | 100%
Preparing transaction: done
Verifying transaction: failed

RemoveError: 'requests' is a dependency of conda and cannot be removed from
conda's operating environment.

conda update --force condaconda update –force conda

ffmpeg:error while loading shared libraries: libopenh264.so.5

Problem Description:
in the Ubuntu 10.04 system, we want to use ffmpeg for face cutting, but there is a title error. I can’t generate the corresponding version number by inputting ffmpeg – version. After Google[ https://stackoverflow.com/questions/62213783/ffmpeg-error-while-loading-shared-libraries-libopenh264-so-5 ]It turned out to be too new

I use the name of CONDA virtual environment, which is houyw. If houyw appears below, it is my virtual name.

(1) I’ll take a chance according to the instructions given by the boss

sudo ln -s ~/anaconda3/lib/libopenh264.so  ~/anaconda3/envs/houyw/lib/libopen264.so.5

As a result, there is no libopenh264. So in my ~/anaconda3/lib directory. So there is an error that the file does not exist

(2) At this time, I found that although there is no ~/anaconda3/lib directory, there is ~/anaconda3/envs/houyw/lib directory.. So I had a whim and tried to use libopenh264. So under ~/anaconda3/envs/houyw/lib (delete libopenh264. So. 5 first).

cd ~/anaconda3/envs/houyw/lib
rm -rf libopenh264.so.5
sudo ln -s libopenh264.so libopenh264.so.5

(3) Finished, input ffmpeg – version to display the version number correctly
(4) Summary: if libopenh264.so exists in ~/anaconda3/lib, use method 1, if not, use method 2. Finally, I hope everyone can solve this problem perfectly!!!

Windows10 DOTA_devkit Error: TypeError: ‘>=‘ not supported between instances of ‘NoneType‘ and ‘str‘

1. The system configuration is: windows10 + python3.6 + anaconda3 + swig4.0.2. Swig needs to add environment variables to the system environment manually.

2. According to the official readme file, execute the command [swig – C + + – Python polyiou. I], basically no problem.

3. When executing the command [Python setup. Py build]_ The error [if self. LD] appears when “ext — inplace”_ version >= ” 2.10.90″: TypeError: ‘>=’ not supported between instances of ‘NoneType’ and ‘str’】。 In the python installation path of the virtual environment, find the file of  lib  distutils  distutils.cfg, open it and find the following content: [build] compiler = mingw32, the content of the file is correct.

4. Solution: after exploration and research, we need to configure GCC, install mingw-w64 compiler, command is [CONDA install libpython m2w64 toolchain – C msys2], and then execute the command [Python setup. Py build]_ Ext — inplace], run successfully, and you will find that the_ polyiou.cp36-win_ Amd64.pyd file.

After the new video card rtx3060 arrives, configure tensorflow and run “TF. Test. Is”_ gpu_ The solution of “available ()” output false

First of all, install according to the normal installation method:
the necessary conditions for success are:
1. The version number should be correct, that is, CUDA should be installed above 11.1 (because CUDA version supported by 30 AMP architecture graphics card starts from 11.1)
link: https://developer.nvidia.com/zh-cn/cuda-downloads
2. Cudnn needs to install the, Link (to register and log in to NVIDIA account) https://developer.nvidia.com/zh-cn/cudnn
If you haven’t installed it, you can see other posts https://so.csdn.net/so/search/all?q=3060%20tensorflow& t=all& p=1& s=0& tm=0& lv=-1& ft=0& l=& U =
after installation, enter the created environment and run tf.test.is_ gpu_ available()。
if the computer can detect the graphics card, it can display the number of cores, computing power and other parameters of each graphics card, but the final answer is false
if the command line shows that cusolver64 cannot be found_ 10 documents

, at the following address C:// program files/NVIDIA GPU computing toolkit/CUDA/V11.1/bin

Will cusolver64_ 11. DLL renamed to cusolver64_ 10. Dll
and then run tf.test.is again_ gpu_ available()

Your uncle made it!

After canceling the startup of Ubuntu terminal, it will automatically enter the base environment of CONDA

After installing Anaconda on Ubuntu, every time you start the terminal, it will automatically enter the CONDA base environment. You can exit the CONDA environment through the following instructions:

conda deactivate

But considering that you need to perform this step to exit every time, it is troublesome, so you want to start the terminal without entering the CONDA environment. It is recommended to modify the config file of CONDA

conda config --set auto_activate_base false

However, I don’t use it here. After starting, I will automatically enter the base environment of CONDA. The final solution is to modify the configuration file of CONDA directly

sudo vi ~/.condarc

Add in the last line:

auto_activate_base: false

So far, it’s done.

Query specific settings through “CONDA – H”:

usage: conda [-h] [-V] command ...

conda is a tool for managing and deploying applications, environments and packages.

Options:

positional arguments:
  command
    clean        Remove unused packages and caches.
    config       Modify configuration values in .condarc. This is modeled
                 after the git config command. Writes to the user .condarc
                 file (/home/XXX/.condarc) by default.
    create       Create a new conda environment from a list of specified
                 packages.
    help         Displays a list of available conda commands and their help
                 strings.
    info         Display information about current conda install.
    init         Initialize conda for shell interaction. [Experimental]
    install      Installs a list of packages into a specified conda
                 environment.
    list         List linked packages in a conda environment.
    package      Low-level conda package utility. (EXPERIMENTAL)
    remove       Remove a list of packages from a specified conda environment.
    uninstall    Alias for conda remove.
    run          Run an executable in a conda environment. [Experimental]
    search       Search for packages and display associated information. The
                 input is a MatchSpec, a query language for conda packages.
                 See examples below.
    update       Updates conda packages to the latest compatible version.
    upgrade      Alias for conda update.

optional arguments:
  -h, --help     Show this help message and exit.
  -V, --version  Show the conda version number and exit.


Anaconda Error: ‘Destination folder’ contains 2 spaces. This can cause problems with several conda packa

Anaconda installation error: ‘destination folder’ contains 2 spaces. This can cause problems with vertical CONDA packages. Please consider removing the space

In fact, there is a space in the directory during installation. Because it is installed under program files (x86), an error will be reported. It will prompt you to install CONDA packages later. Just change the path without space.

To solve Anaconda error: command error out with exit status 1

Development environment:

win10 x64

cuda10.0

anaconda4.0.0


catalog

1. PIP error: cannot open D: anaconda3/scripts/pip- script.py

2. PIP switches domestic sources

3. Solve SciPy error: importerror: cannot import name ‘show_ config’ from ‘numpy’ (unknown location) 

4. Solve the problem of error: command error out with exit status 1

5. After installing scikit learn, it can be imported, but the running error is: importerror: DLL load failed: the specified program cannot be found


—————————————————————————————————————————————————————-


This error is due to the dependency package version is too high (too new).

Phenomenon restore: install scikit learn with anaconda, and then install Matplotlib to report the above error.

Solution: the installed version of Matplotlib is too high, and it can be solved by reducing the version.


However, this is not the end. Generally, scikit learn installed with the CONDA command may import normally, but it is easy to report an error when using it

The solution is to uninstall sklearn, and then use pip to install it again. However, if you directly use the PIP install scikit learn command to install it, there may be errors, and the process of installing again will be very complicated

See:

After installing sklearn, it can be imported normally, but an error is reported


Welcome to my personal blog: the road of machine learning


(20210301 solved) can’t connect to HTTPS URL because the SSL module is not available

Overview uses requests to send a message with the following error:

Can’t connect to HTTPS URL because the SSL module is not available.

there is no problem with the requested URL, and the Linux side is running normally. Only Anaconda under Windows runs abnormally. In the solution reference, 3, 4 and 5 are common explanations, which have no effect on my situation. In my case, I use the second answer in reference 1:

# copy the files
libcrypto-1_1-x64.*
libssl-1_1-x64.*
# from ~\anaconda3\Library\bin to ~\anaconda2\DLLs

This can solve the problem, the specific reason is still not understand, mainly for the SSL network transmission level understanding is not deep enough. References

    requests (caused by sslerror (“can’t connect to HTTPS URL because the SSL module is not available.”) error in pychar requesting websitecan’t connect to HTTPS URL because the SSL module is not available ⁑ python3 sends an HTTPS request using the requests module, indicating caused by SSL error, can’t connect to HTTPS URL because the SSL module is not available When using the requests library, python reports an error when visiting the website of HTTPS. SSL module is not available. Python encounters can’t connect to HTTPS URL because the SSL module is not available.

Anaconda installation opencv Python error solution

Error message: PIP _vendor. Urllib3. Exceptions. ReadTimeoutError:
HTTPSConnectionPool (host = “pypi.tuna.tsinghua.edu.cn”, the port = 443) : Read timed out.
directly in the console input PIP install opencv – python error as shown in figure:

May be because I accidentally canceled the cause behind all installation not
behind direct route directly to tsinghua source download and then switch to the installation was successful
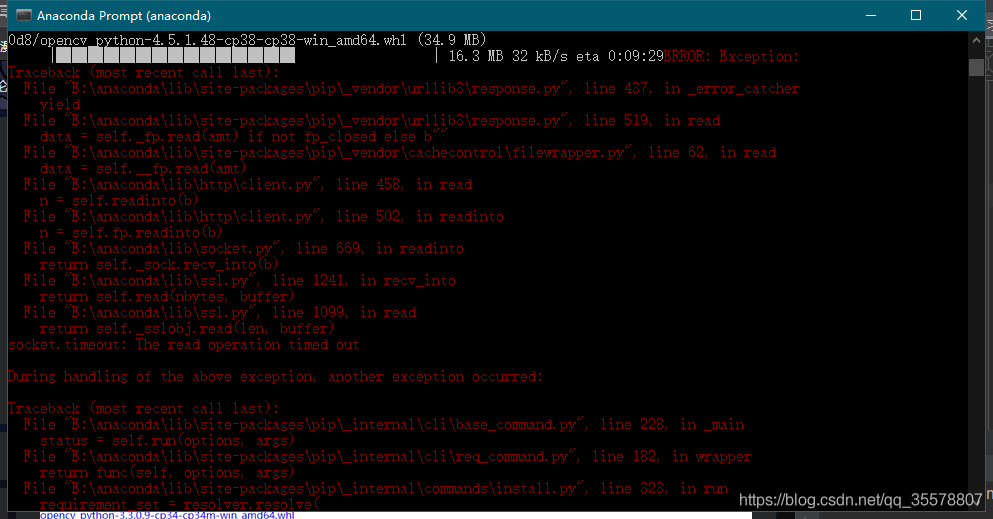
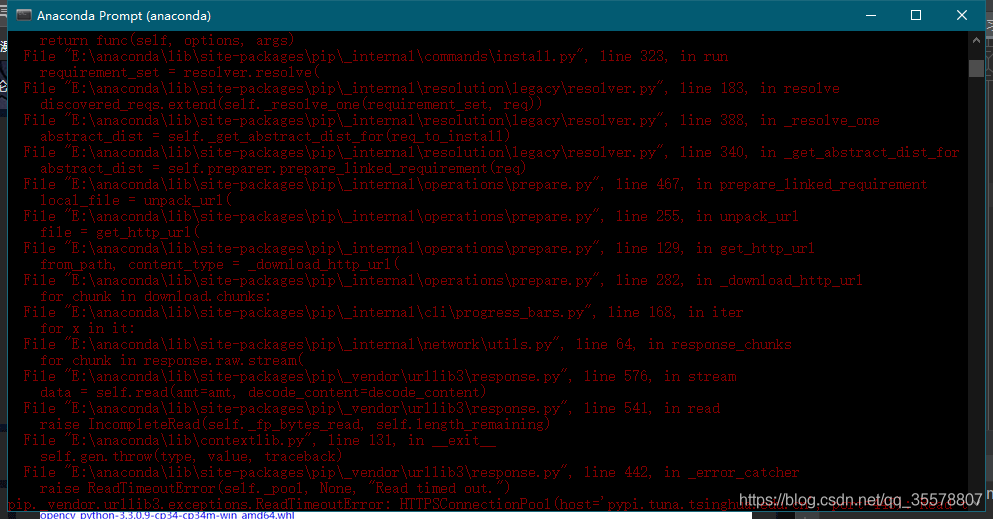
tsinghua source: https://pypi.tuna.tsinghua.edu.cn/simple/opencv-python/
small pit: switch plate command is “E:”, rather than the CD disc cutting
reference: https://blog.csdn.net/qq_43766304/article/details/104862174