The blogger was using Intellij IDEA normally, but Intellij IDEA suddenly sounded wrong for unknown reasons. The error hints were as follows:
Error:Cannot run program “F:\WINDOWS Application Installation \ JRE \bin\ Java “(in directory “C:\Users\ Li Junde \.IntelliJIdea2018.1\ System \ Compile-Server “): CreateProcess Error =2, the system could not find the specified file.

Ii. Problem analysis
By observing the Intellij IDEA error, we know that it was caused by a failure to find the correct installation path for the JDK(Java Development Kit). There are many reasons why Intellij IDEA might not find the JDK: Maybe you accidentally removed it; Or if you install the JDK in a path with Chinese characters, Intellij IDEA does not recognize paths with Chinese characters; Or maybe you accidentally configured the WRONG ENVIRONMENT variable for the JDK on your computer.
The wrong solution
1. Make sure we have the JDK installed on our computer
In 2019, the new version of the JDK(also known as Java) already has the JDK and JRE bundled in it, so installing the JDK is equivalent to installing the JDK and JRE.
Press and hold Windows+R on the computer keyboard, pops out and run program, enter CMD and to confirm. enter Java --version in the black box console to view the Java version number.
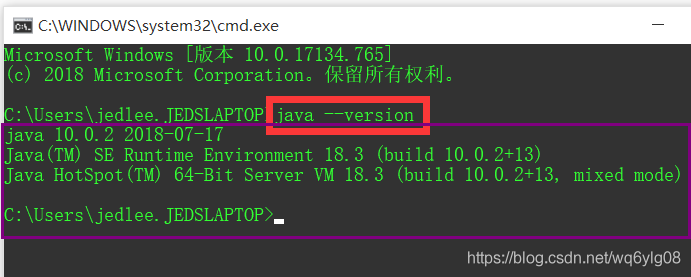
If your computer pops up a prompt like the one above (describing the Java version number, release date, etc.), then your computer has the JDK installed correctly, and we go straight to the next step. Otherwise, it means that your computer did not properly install the JDK, you still have to search the latest version of Java in 2019 Java10 and above Java installation tutorial, the bloggers do not recommend small white users to install the old version of Java, the old version of Java needs to install the Java JDK and JRE, also need to configure environment variables, small white users are easy to make mistakes.
2. Properly set the JDK installation path at Intellij IDEA
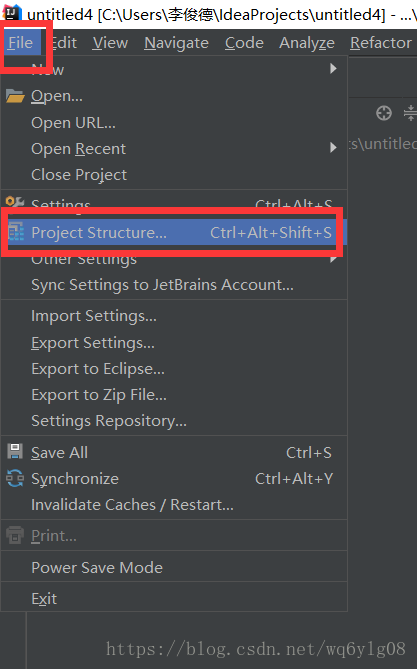
Click the File option in the upper-left menu bar of Intellij IDEA, and then click the Project Structure sub-option.
In the configuration page for Project Structure, the project-JDK must not be red as shown in the figure below, because red indicates that there is no corresponding JDK under the file path.
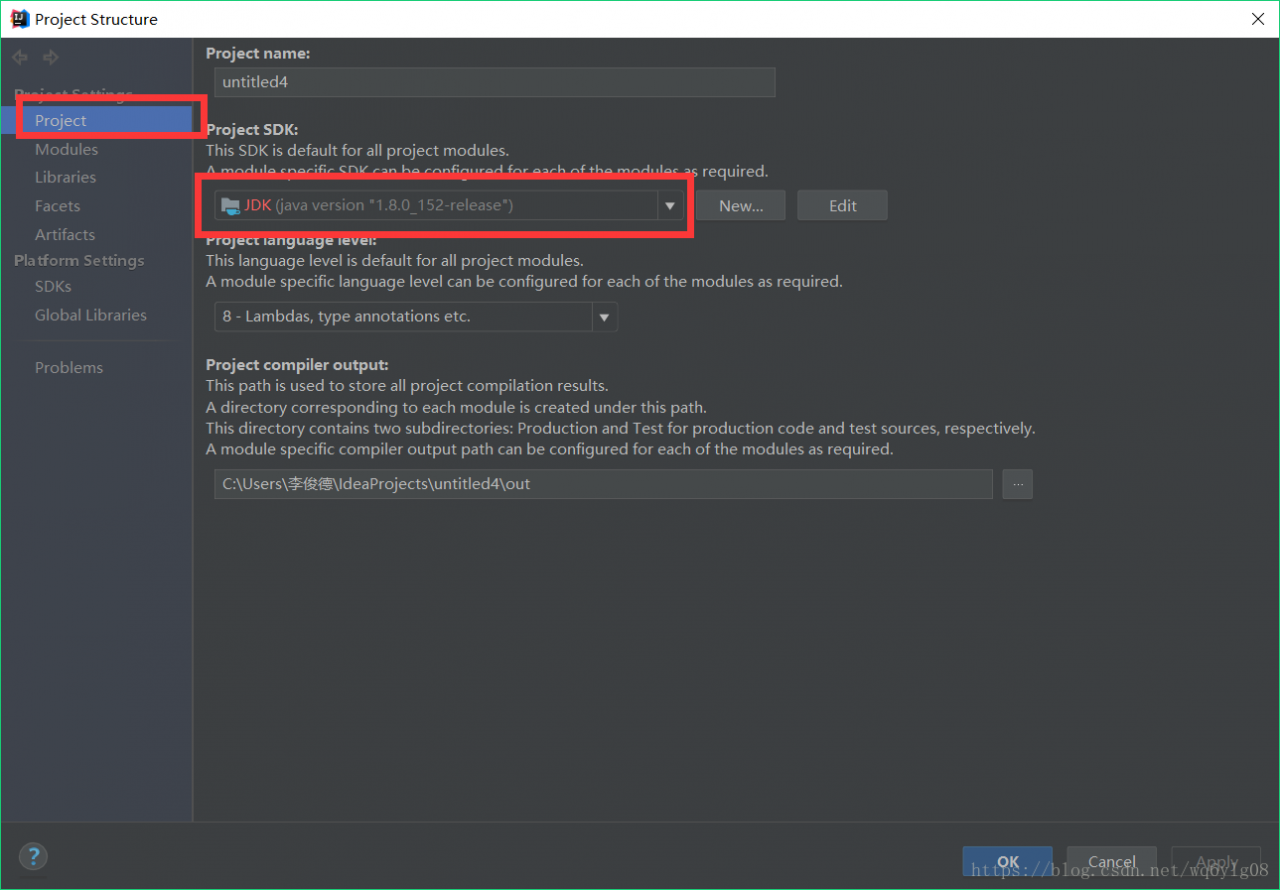
First, make sure that you have followed the first step above to find the current Java version on your computer through the black box command Java — Version. Otherwise, you will have to reinstall the JDK before you see this step. Under the Project SDK TAB, we clicked on the small triangle arrow in the drop-down box to see if Intellij IDEA had helped us find an alternative JDK version. If so, we checked that Intellij IDEA was basically back to normal by selecting the existing JDK in the drop-down box.
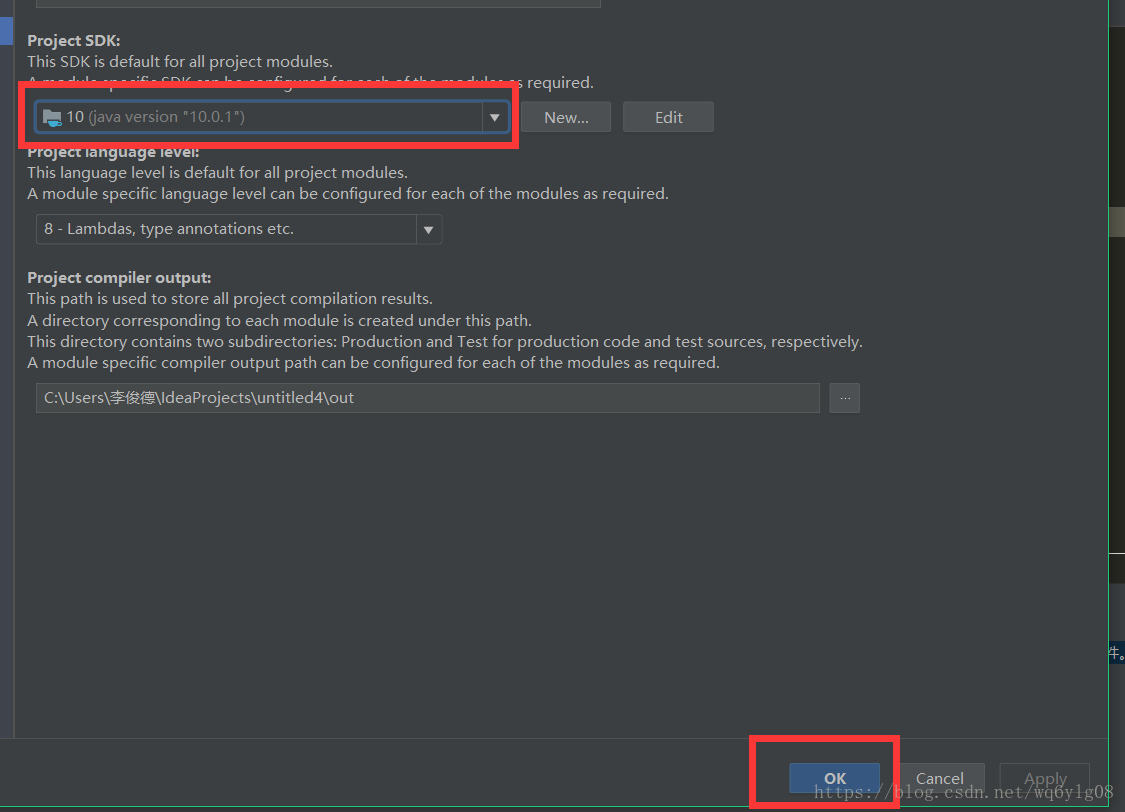
If there is no existing JDK version in the drop-down box, we need to manually click New… , then select the “install the latest JDK on our computer properly” installation path. If you’ve just reinstalled the JDK you must remember the JDK installation path. If you’ve forgotten where you installed the JDK, type Java –verbose — in the black box and the JDK installation path appears at the end of the command line.
3. Save the configuration of Project Structure and recompile it to run the Java program normally
After OK, compile Run again to Run the Java program as normal.
Read More:
- When idea executes the command, an error is reported: CreateProcess error = 2. The system cannot find the specified file
- Phpstrom reported an error when using SVN: CreateProcess error = 2, the system could not find a solution for the specified file
- Perfect solution to raise runtimeerror (“distributed package doesn’t have nccl”) in Windows system“
- net start mysql System error 2 has occurred. The system cannot find the file specified.
- The process of solving Intellij IDEA can’t load jvm DLL error at a time
- The solution of notes floating red error in IntelliJ idea
- When IntelliJ idea is programmed, 1. Black thick line or black cursor appears; 2. The solution of carriage return unable to wrap. (practical recommendation method 2)
- IntelliJ idea startup error: error statuslogger log4j2 could not find a logging implementation
- Solve the error of POM file failed to read artifact descriptor for XXX under IntelliJ idea
- Ubuntu 20.04: How to create shortcut startup mode in IntelliJ idea
- Solution of spring auto injection always report error in IntelliJ idea
- The solution of using Autowired annotation to report errors in IntelliJ idea
- IntelliJ idea debugging Java 8 stream
- Idea always reports errors when using “SVN” to associate projects Error:Cannot run Program “SVN” (in directory “path XXXXXX”): CreateProcess error = 2,
- IntelliJ idea community community integrated Tomcat or jetty tutorial
- [error] error handling of IntelliJ idea
- Upgrade to IntelliJ idea 2021.2 and start the project with an error
- IntelliJ idea error: error: Java does not support release 5
- Git uploads local IntelliJ idea project to GitHub
- How can IntelliJ idea completely delete a project