When setting up an Android application, you only need to select the minimum required SDK to Android 4.0 (API 14) or above, and there will be no annoying appcompat_ V7
Configure HTTPS and self signed certificate for nginx
1、 Get the certificate ready.
The steps are similar to those described in using OpenSSL to self issue the server’s HTTPS certificate. Again here.
Making CA certificate:
1 ca.key CA private key:
 OpenSSL gensa - DES3 - out ca.key  2048
 making the decrypted CA private key (generally unnecessary):
  OpenSSL RSA - in ca.key  -out ca_ decrypted.key
  ca.crt  CA root certificate (public key):
  OpenSSL req - New - x509 - days 7305 - key ca.key  -out  ca.crt  make and generate the certificate of the website and use CA signature for authentication. Here, assume that the website domain name is blog.creke.net  generate blog.creke.net Certificate private key:  OpenSSL genrsa - DES3 - out blog.creke.net .pem 1024  Making the decrypted blog.creke.net Certificate private key:  OpenSSL RSA - in blog.creke.net .pem -out  blog.creke.net . key  generate signature request:  OpenSSL req - New - key blog.creke.net .pem -out  blog.creke.net . CSR  in common Fill in the website domain name in the name, such as blog.creke.net Can generate a certificate to change the site, but also can use the pan domain name, such as * creke.net To generate site certificates available for all secondary domain names. Sign with Ca:
openssl ca -policy policy_anything -days 1460 -cert ca.crt -keyfile ca.key -in blog.creke.net.csr -out blog.creke.net.crt
Among them, the policy parameter allows the signed Ca and website certificate to have different country, place name and other information, and the days parameter is the signature time limit. If "I am unable to access the /… /Ca/newcerts directory/etc/PKI/TLS/ openssl.cnf Then: MKDIR - P Ca/newcerts touch CA/ index.txt Touch Ca/serial echo "01" & gt; then re execute the signature command. Finally, put ca.crt Paste the contents of to blog.creke.net . CRT. This is more important! If not, some browsers may not support it. OK, now you need the private key of the website blog.creke.net . key and website certificate blog.creke.net . CRT is ready. Next, start to configure the server.
2、 Configure nginx
Open a new virtual host and set it in the server {} section
listen 443;

ssl on;

ssl_certificate /path/to/blog.creke.net.crt;

ssl_certificate_key /path/to/blog.creke.net.key;
The path is the path of the website certificate just generated. Then use the following command to detect configuration and reload nginx: detect configuration: nginx - T reload: nginx - s reload
3、 Optimize nginx configuration
- optimize nginx performance by adding:
ssl_session_cache shared:SSL:10m;
ssl_session_timeout 10m;
According to the official documents, the 1m cache can store 4000 sessions. Add: keep alive to the virtual host server {} configured with HTTPS_ Timeout 70; sometimes, you will find that after the program such as phpMyAdmin logs in, it will jump to HTTP by mistake. The solution is to locate "location ~. * (PHP | PHP5)?${}" in include fcgi.conf ; or in fastcgi_ Add after param configuration:
fastcgi_param HTTPS on;

fastcgi_param HTTP_SCHEME https;
Here is the official document of nginx about HTTPS, which can be used as a reference.
Note: transferred from http://blog.creke.net/762.html
How to Use DOM to operate CSS
-
- Modify styles through JS: the styles modified by this method are inline styles with high priority. However, if “! Important” is used in the style, the modification of JS will not work.
	Syntax: element.style.styleName = styleValue ;
	The style value must be a string
	Note: If the style of css contains " - " , this name is not legal in JS, you need to change this style name to camel naming, remove the " - " and change the
	initial letter to uppercase.
Read style:
Syntax: element.style.styleName
The styles set and read through the style property are inline styles
-
- get the display style of the current element:
	Syntax: element.currentStyle.styleName
	currentStyle is only supported by IE browser
In other browsers, you can use the getcomputedstyle() method to get the current style of the element. This method is a window method and can be used directly. This method will return a style object that encapsulates the corresponding style of the current element.
	Two parameters are required
	The first: the element to get the style
	The second: you can pass a pseudo-element, which is usually null
Note: the styles obtained through currentstyle and getcomputestyle are read-only and cannot be modified. If you want to modify them, you must use the style property </OL> to modify them
The addition, deletion and modification of DOM in JS Foundation
-
- document.createElement (); you need to pass in a tag name as a parameter. You will create a corresponding node according to the tag name and return the node. document.createTextNode (); you need to pass in a text content as the parameter appendChild ()
Usage: parent element.appendChild( child node ).
A child of a node can be inserted before the new node
Usage: Parent node. insertBefore( new node, old node );
Replacechild(); replace child node
Usage: parent.replaceChild( new node, old node );
Removechild(); can delete a child node
Usage: parent.removeChild(child node).
InnerHTML can also be used to add dom. Generally, the two methods are combined.
e.g. city.innerHTML += " <li>GuangZhou</li> ";
Confirm (“); a prompt box with confirm and Cancel buttons will pop up. If the user clicks confirm, it will return true; otherwise, it will return false </ OL>
When using postman assertion, the global variables set in the tests of the pit will take effect only after the interface is executed
Background:
I want to confirm at the interface level whether the new application can be found after it is successfully added. I don’t think it’s troublesome to write a query interface alone, so I write the query interface into the tests of the new interface. I want to do the assertions of whether the new application can be queried after the new application is successful in the tests of the new interface. Code directly skip, the following first on the execution results.
Implementation results:
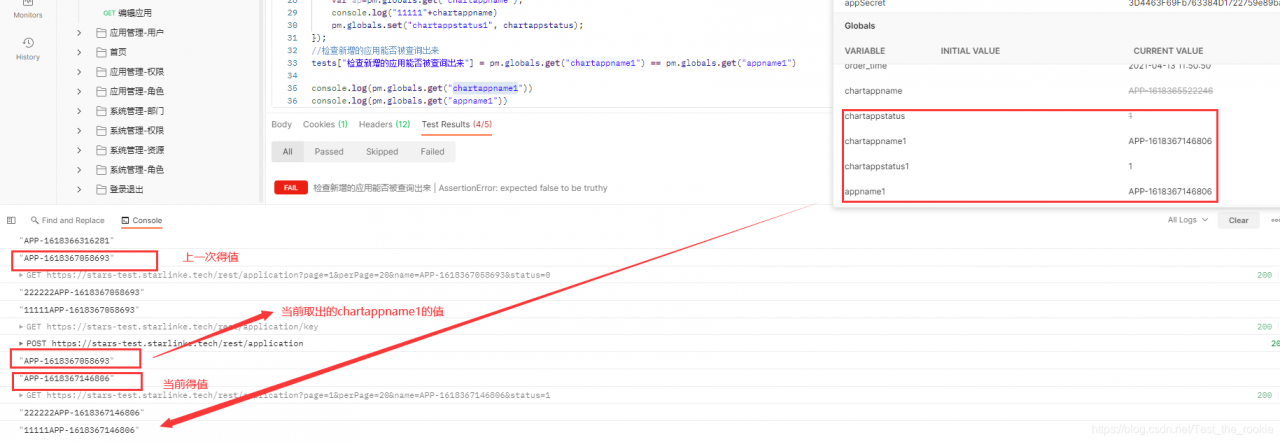
Summary:
my assertion failed, but when I checked the global variables set, I found that the global variables have been set successfully. But using pm.globals.get (“chartappname1”) when taking this value, the value taken out is inconsistent with what you see…. After checking the code repeatedly, no error was found. Finally, I consulted a senior. The senior told me that the global variable set in tests will take effect only after the interface is executed. I immediately understood that my assertion is executed during the interface execution. Therefore, the value I took when I made the assertion is not updated. As for why the corresponding value has been changed when I checked it Update, because even if my assertion fails, the interface completes the corresponding request.
Solution to electron error “cannot find module app”
Solution:
The original code looks like this:
var app = require('app');
var BrowserWindow = require('browser-window');
To be amended as follows:
const electron = require('electron');
const app = electron.app;
const BrowserWindow = electron.BrowserWindow;
Cause of error: the version of electron used is too new, and this API has been removed in electron v1.0.0. “Cannot find module…” appears again Basically, it’s all because the module is directly introduced by require. If there are errors in the introduction of other modules, you have to check the API now. Not all of them are “const Balabala”= electron.balabala ”For example, the introduction of IPC is:
const ipc = electron.ipcMain;How to Solve Error: could not list the contents of folder
when I was using phpstorm, I encountered the error of could not list the contents of folder. Using external FTP tools, I could connect to the server normally, but not on phpstorm. After struggling for a long time, I found the following content on phpstorm’s official website
PhpStorm seems to connect to the server but can’t list files or perform upload
This may be because the deployment server requires a so-called passive FTP connection. To set this mode, select Project Settings | Deployment, open Advanced Settings for the server and toggle Passive mode.
Limiting the number of concurrent FTP connections may also help in this situation. To do this, select Project Settings | Deployment, open Advanced Settings for the server and toggle Limit concurrent connections mode setting the number of connections (usually 3-5 concurrent connections is OK for any server if you experience problems with a higher number of connections).A link to visit is attached:
http://confluence.jetbrains.com/display/PhpStorm/Troubleshooting
The translation means:
Phpstorm appears to be connected to the server, but cannot list files or perform uploads
this may be because the deployment server requires a so-called passive FTP connection. To set this mode, select project settings | deployment, find and open advanced settings, and select passive mode.
limiting the number of concurrent FTP connections also helps. To do this, select project settings | deployment, set the number of connections for the server and switch the limited concurrent connection mode, and open advanced settings (usually 3-5 concurrent connections can be for any server if you have a higher number of connections).
In this way, try to use the above solution.
open the server configuration interface tools & gt; deployment & gt; configuration, and then on the interface, find the advanced settings button, open it, check the passive mode option, and then OK
Test again, you can upload normally.
It seems that if you have a problem, you should first check the official documents~
How to Solve SQL state [HY000]: general error 2503
SQLSTATE[HY000]: General error 2503
This error is caused by $this – & gt; query. In version 3.2.3, the query and execute methods should be called separately, otherwise an error will be reported in debug mode
After 3.2.3, the TP framework requires different method calls for read and write operations. If it is used incorrectly, an error will be reported in non debugging mode.
Read data using $this->query
Write data using $this->execute
After TP5, it is written as follows:
Read data using Db::query
Write data using Db::execute[docker] error in deleting image: image is referenced in multiple repositories
Error in deleting according to image ID:
[root@master-gxf zipkin-ui]# docker rmi 66ce95468449
Error response from daemon: conflict: unable to delete 66ce95468449 (must be forced) - image is referenced in multiple repositories
Docker images finds that the same image ID is tagged into multiple different warehouses
[root@master-gxf zipkin-ui]# docker images
REPOSITORY                                 TAG                 IMAGE ID            CREATED             SIZE
blanchedingding/zipkin-ui                  logvisualization    66ce95468449        23 minutes ago      78.8MB
doraemon/zipkin-ui                         logvisualization    66ce95468449        23 minutes ago      78.8MB
zipkin-ui                                  latest              66ce95468449        23 minutes ago      78.8MB
Use R epository:tag You can delete it in the following way:
[root@master-gxf zipkin-ui]# docker rmi doraemon/zipkin-ui:logvisualization
Untagged: doraemon/zipkin-ui:logvisualization
[root@master-gxf zipkin-ui]# docker images
REPOSITORY                                 TAG                 IMAGE ID            CREATED             SIZE
blanchedingding/zipkin-ui                  logvisualization    66ce95468449        25 minutes ago      78.8MB
zipkin-ui                                  latest              66ce95468449        25 minutes ago      78.8MB
[solution] the resource file cannot be found in the jar package of Java
The file is placed in the Resources folder and will appear in the boot after it is typed as a jar package_ INF/classes/ xx.xx The second one is the second one;
The file path uses “absolute path”/ xx.xx “, load URL and create InputStream with classloader:
URL fileURL=this.getClass().getResource("/xx.xx");
InputStream is=this.getClass().getResourceAsStream("/resource/res.txt");
When MySQL is running, the server suddenly goes down, which causes Mysql to be unable to restart
When MySQL is running, the server suddenly goes down, which causes Mysql to be unable to restart
When MySQL transfers files, it suddenly loses power. Find the database file under data, delete/move the previous database folder, and then restart.
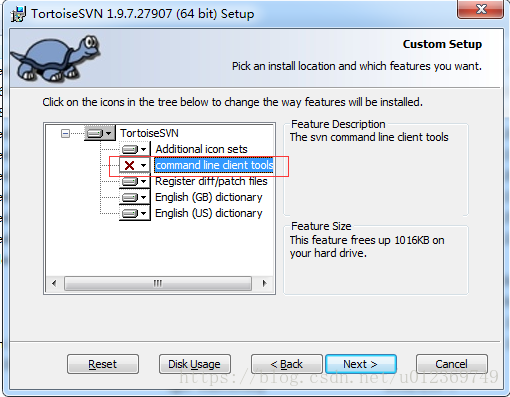
Phpstrom reported an error when using SVN: CreateProcess error = 2, the system could not find a solution for the specified file
After phpstrom is installed, the following error will appear during SVN checkout:
Cannot load supported formats: Cannot run program “svn”: CreateProcess error=2
The reason is that SVN uses command-line tools. If there is no SVN command-line tool locally, it will lead to an error.
Solution
Re install SVN, select the installation command line and complete the installation
Change to:
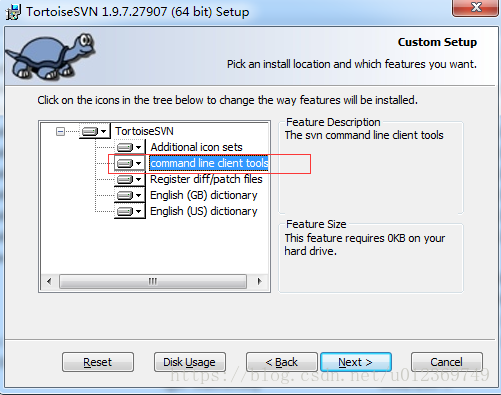
Then all the way to next, the installation is successful.
Restart phpstrom, SVN can be used normally.