general method of setting autoincrement field:
add:
when creating table
create table table1(id int auto_increment primary key,...)after creating the table add:
alter table table1 add id int auto_increment primary key 自增字段,一定要设置为primary key. many times we hope that the id of the data in the table does not start from 1, like qq, id starts from 10000
code is as follows:
add:
when creating table
CREATE TABLE `orders` (
  `order_num` int(11) NOT NULL auto_increment,
  `order_date` datetime NOT NULL,
  `cust_id` int(11) NOT NULL,
  PRIMARY KEY  (`order_num`),
  KEY `fk_orders_customers` (`cust_id`),
  CONSTRAINT `fk_orders_customers` FOREIGN KEY (`cust_id`) REFERENCES `customers` (`cust_id`) ON DELETE CASCADE ON UPDATE CASCADE
) ENGINE=InnoDB AUTO_INCREMENT=10000 DEFAULT CHARSET=utf8;
create table add:
alter table users AUTO_INCREMENT=10000;and this statement is also applicable to modify the id of the existing table, such as after a large number of data deletion, id from 654321 back to 123456
alter table users AUTO_INCREMENT=123456;
Save file and exit command of vim
vim save file and exit command
collates VIM save and exit commands as follows:
|
command |
simple description |
|
: w |
save the edited content of the files, but don’t quit vim editor. The purpose of this command is to write the data from the memory buffer to the file specified when you start vim. |
|
:w! |
forced write files, or forced to cover the original file. You can use this command to force a write if the original file has access that does not allow writing to the file, for example, if the original file is read-only. However, this command usage applies only if the user is the owner of the file, not to the superuser. |
|
: wq |
to save the file content after exit vim editor. The purpose of this command is to write the data from the memory buffer to the file specified when you start vim, and then exit the vim editor. Another alternative is to use the ZZ command. |
|
:wq! |
exit after being forced to save the file content vim editor. The purpose of this command is to force the data from the memory buffer to the file specified when you start vim, and then exit the vim editor. ZZ1 |
|
: q |
without doing any editing process and ready to quit vim , you can use this command. No write since last change (:quit! overrides) |
|
:q! |
require a vim editor, give up the result of the editing process. If you really don’t need to save the contents of the modified file, type :q! “command, forced to exit vim editor. |
|
: w |
writes the editor after processing the results of the specified file save |
|
: w! |
0 compulsorily saves the edited result to the specified file, overwriting the existing file if the file already exists. |
|
:wq! |
0. |
Common shell (1): shell gets the current time stamp of the system
1. Shell script as follows
current=`date "+%Y-%m-%d %H:%M:%S"`
timeStamp=`date -d "$current" +%s`
#将current转换为时间戳,精确到毫秒
currentTimeStamp=$((timeStamp*1000+`date "+%N"`/1000000))
echo $currentTimeStamp
2. Operation effect
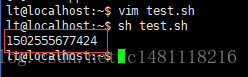
3. Note
this in timestamp way has a small error, the need to obtain precise timestamp refer to: https://blog.csdn.net/AQ931752921/article/details/85071221
JS opens a new tab( window.open Application)
js how to open a new TAB
in & lt; a> The tag can be opened by setting target= “_blank”. But sometimes you need Javascript to open a new tag, so how do you do that?Here’s how:
window.open(” http://www.wlzhys.com “); .
or:
Windows open (” http://www.wlzhys.com “, “_blank”); // note that the second parameter
, some people may wonder, window.open() is not used to open a new window, how can you open a new TAB?In fact, the browser will only open a new window when the third property
is specified in window.open() (i.e. the characteristics of the new window). If the third property is not specified, the browser will only open a new TAB in the current window (in IE, if the URL to be opened does not belong to the same main domain name as the URL of the current
page, the new window will be opened; In Chrome, if the window.open() function is called not by mouse and keyboard events, but directly by the page, or via a
timer, etc., then a new window is opened instead of a TAB. In addition, the following applies to < a> The target parameter of the tag also applies to the name parameter of window.open() :
note:
1. In IE, if the domain you want to open does not belong to the same primary domain as the current domain, it will open in a new window (< a> The tag does the same. 2. In Chrome, if the window.open() function is called not by mouse and keyboard events, but either directly by the page or via timers (including those triggered by mouse and keyboard), then a new window is opened instead of a TAB. 3. In a new window or tag, the _parent and _top arguments of window.open() are invalid (valid only in frame). The framename parameter can be set to the name value of the frame in the current page, the name value of the new window, or the name value of the new tag.
[footnote]
window.open(url,target,init); //URL represents the page address; 1. Open the link in the new TAB/page
window.open(‘ http://www.wlzhys.com ‘, ‘Target’, “);
2, open the link
(1) window.open(‘ http://www.wlzhys.com ‘, ‘_self’, “);
(2) window.location.href= ‘http://www.wlzhys.com’;
Restart and shutdown of Ubuntu system in the terminal
if you want to keep the current user logged in and execute the command using root:
su root
can! Enter the honey code to run, shutdown command restart command:
1, reboot
2, shutdown -r now immediately restart (used by root user)
3, shutdown-r 10 over 10 minutes automatic restart (root user)
If the restart is set by the shutdown command, the shutdown can be canceled by using the shut-down c command to restart
shutdown command:
1, halt immediately shut down
2, poweroff immediately shut down
3, shutdown-h now immediately shutdown (used by root user)
If the shutdown is set by the shutdown command, the shutdown can be cancelled by the shutdown -c command to restart
shutdown and restart systems under Linux have shutdown, halt, reboot, init, and their internal working procedures are different for them.
1, shutdown command
can be used to safely shut down the system. However, when the system is shut down, all logged in users will be notified that the system is going to be shut down, and all instructions will be frozen, that is, all new users can no longer log in. Using this instruction will result in an immediate shutdown or restart and a delayed shutdown or restart. (note: only superusers can use this command)
command syntax format:
Shutdown [option] [time] [warning message]
-k: just sends a warning message to the user
-r: restart the system after shutting down the system
-h: do not restart the system after shutting down the system
-f: quickly shut down the system, but do not do disk detection when restarting the system (found that the system entered the BIOS interface during the experiment, but can not do any operation)
-n: quickly shut down the system, but without an init program
-c: interrupt to shut down the system (no specific experiment found)
2, halt command
using the halt command is a call to the shut-down -h command to execute shutdown system
command syntax format;
halt [option]
-w: don’t really shut down the system, just write “WTMP” (/var/log/ WTMP) record
-d: do not write “WTMP”
-f: shutdown is not called, but
is forced to close
-i: close all uo interfaces in the network
before shutting down or restarting the system
-p: this option is the default option to call “power off”
when the system is shut down
3, reboot command
The
reboot command works similarly to the halt command, but reboot triggers a host reboot. All its parameters are similar to “HALT”.
4, init command
init command USES the system’s runlevel control system. It is the ancestor of all systems’ processes, and its process number is always 1, so signaling “TERM” to init kills all user processes, daemons, etc. Shutdown is the mechanism used. Init 0 shuts down the system and init 1 restarts the system.
Java gets the type t.class of generic t
import java.lang.reflect.ParameterizedType;
import java.lang.reflect.Type;

public class Main{
    public static void main(String[] args)
    {
        Foo<String> foo = new Foo<String>(){};
        // 在类的外部这样获取
        Type type = ((ParameterizedType)foo.getClass().getGenericSuperclass()).getActualTypeArguments()[0];
        System.out.println(type);
        // 在类的内部这样获取
        System.out.println(foo.getTClass());
    }
}

abstract class Foo<T>{
    public Class<T> getTClass()
    {
        Class<T> tClass = (Class<T>)((ParameterizedType)getClass().getGenericSuperclass()).getActualTypeArguments()[0];
        return tClass;
    }
}
Output:
class java.lang.String
class java.lang.String
the above code is not omnipotent, only a subclass of instantiated T can get the actual type of T in the above method,
if the subclass does not instantiate T, you cannot get the actual type of T; For example, the class Child does not instantiate T, so it does not get string.class;
import java.lang.reflect.ParameterizedType;
import java.lang.reflect.Type;

public class Main{
    public static void main(String[] args){
        //区别在new Child<String>()没有{}匿名类
        Foo<String> foo = new Child<String>();
        // 在类的外部这样获取
        Type type = ((ParameterizedType)foo.getClass().getGenericSuperclass()).getActualTypeArguments()[0];
        System.out.println(type);
        // 在类的内部这样获取
        System.out.println(foo.getTClass());
    }
}

abstract class Foo<T>{
    public Class<T> getTClass()
    {
        Class<T> tClass = (Class<T>)((ParameterizedType)getClass().getGenericSuperclass()).getActualTypeArguments()[0];
        return tClass;
    }
}

class Child<T> extends Foo<T>{
}
output:
Exception in thread "main" java.lang.ClassCastException: java.lang.Class cannot be cast to java.lang.reflect.ParameterizedType
    at com.hankcs.Main.main(Main.java:9)
    at sun.reflect.NativeMethodAccessorImpl.invoke0(Native Method)
    at sun.reflect.NativeMethodAccessorImpl.invoke(NativeMethodAccessorImpl.java:57)
    at sun.reflect.DelegatingMethodAccessorImpl.invoke(DelegatingMethodAccessorImpl.java:43)
    at java.lang.reflect.Method.invoke(Method.java:606)
is a solution where the parent class itself does not get the concrete type of the generic type, but only provides abstract methods, and the subclass provides the concrete type
public abstract class Foo<T> {
    public abstract Class getEntityClass();
}

public class Child extends Foo<String> {
    public Class getEntityClass() {
        return String.class;
    }
}
the complete code for the method to get the generics is as follows :
import java.lang.reflect.ParameterizedType;
import java.lang.reflect.Type;

public class GenericsUtils {
    /**
     * 通过反射,获得定义Class时声明的父类的范型参数的类型. 如public BookManager extends
     * GenricManager<Book>
     *
     * @param clazz The class to introspect
     * @return the first generic declaration, or <code>Object.class</code> if cannot be determined
     */
    public static Class getSuperClassGenricType(Class clazz) {
        return getSuperClassGenricType(clazz, 0);
    }

    /**
     * 通过反射,获得定义Class时声明的父类的范型参数的类型. 如public BookManager extends GenricManager<Book>
     *
     * @param clazz clazz The class to introspect
     * @param index the Index of the generic ddeclaration,start from 0.
     */
    public static Class getSuperClassGenricType(Class clazz, int index)
            throws IndexOutOfBoundsException {
        Type genType = clazz.getGenericSuperclass();
        if (!(genType instanceof ParameterizedType)) {
            return Object.class;
        }
        Type[] params = ((ParameterizedType) genType).getActualTypeArguments();
        if (index >= params.length || index < 0) {
            return Object.class;
        }
        if (!(params[index] instanceof Class)) {
            return Object.class;
        }
        return (Class) params[index];
    }
}
reproduced source: http://blog.csdn.net/wangjunjun2008/article/details/43970217
http://www.hankcs.com/program/t-class.html
https://www.cnblogs.com/sirab415/p/6133533.html
Points for attention in setting up robot framework + Python 3.7.0 environment
download python3.7.0 32 bit if the operating system is 32 bit and 64 bit if 64.
in addition RF does not support python3.8.5, the EDIT interface will not be expanded. Python3.7.5, ride file error not supported.
1.
python installation check the “add to PATH” option to automatically add environment variables, and remember python. Exe installation PATH
2.
pycharm after the installation completes, click file> settings> Project Interpreter interface Upper-right gear & GT; Add, click system interpreter to add python. Exe path, save exit
3.
and then click the [+] button in the upper right corner of the project interpreter to update PIP and setuotools
after entering the add library interface
4.
version number must be correct, otherwise it may not be supported
install wxPython (4.0.3), a Python cross-platform toolkit, ride is developed based on it, and you need to install
install the robotframework (3.2.2) automated test framework
install robotframe-ride (1.7.4.1), RF framework test editor, visual interface tool
install the robotframe-selenium 2library (3.0.0), and the keyword library
install robotframe-requests (0.7.1), RESTful interface request library
5.
download the chromedriver corresponding to the Google browser version, put it in the python path installed and C:\Users\Administrator\AppData\Local\Google\Chrome\Application
6.
run the desktop ride.py file, or find
under the Scripts file under the python installation path
Opencv, CV2. Puttext() usage
these basic functions are lost for a while, and then forgotten.
cv2.putText(I,'there 0 error(s):',(50,150),cv2.FONT_HERSHEY_COMPLEX,6,(0,0,255),25)each parameter is in order: photo/added text/upper-left coordinates/font/font size/color/font thickness
Python dynamically imports objects, importlib.import_ Module() uses
Background of
- a function needs to be run by dynamically importing the corresponding configuration file according to the configuration of different projects.
solution
- file structure
a #文件夹
	│a.py
	│__init__.py
b #文件夹
	│b.py
	│__init__.py
	├─c#文件夹
		│c.py
		│__init__.py

# c.py 中内容
args = {'a':1}

class C:

    def c(self):
        pass
Purpose of the
-
to a module import c.p y objects in the
-
solution
a.py
import importlib

params = importlib.import_module('b.c.c') #绝对导入
params_ = importlib.import_module('.c.c',package='b') #相对导入

# 对象中取出需要的对象
params.args #取出变量
params.C  #取出class C
params.C.c  #取出class C 中的c 方法
import_module
- file structure
a #文件夹
│a.py
│__init__.py
b #文件夹
│b.py
│__init__.py
├─c#文件夹
│c.py
│__init__.py
# c.py 中内容
args = {'a':1}
class C:
def c(self):
pass
Purpose of the
-
to a module import c.p y objects in the
-
solution
a.py
import importlib params = importlib.import_module('b.c.c') #绝对导入 params_ = importlib.import_module('.c.c',package='b') #相对导入 # 对象中取出需要的对象 params.args #取出变量 params.C #取出class C params.C.c #取出class C 中的c 方法import_module
VMware virtual machine prompt: locking file failed, unable to open the disk solution
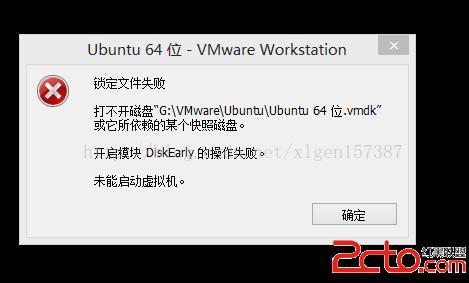
looks for a long time, this is because the virtual machine when running, will lock the file, prevent modification, and if the system suddenly crashed, the virtual machine will not hurry to unlock the locked file, so you will be able to boot, can not lock the file. The solution:
in your virtual machine installation directory, search [. LCK]
to delete the three files found!
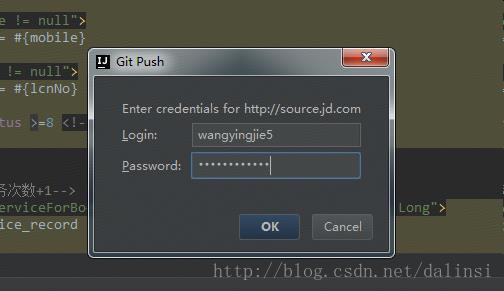
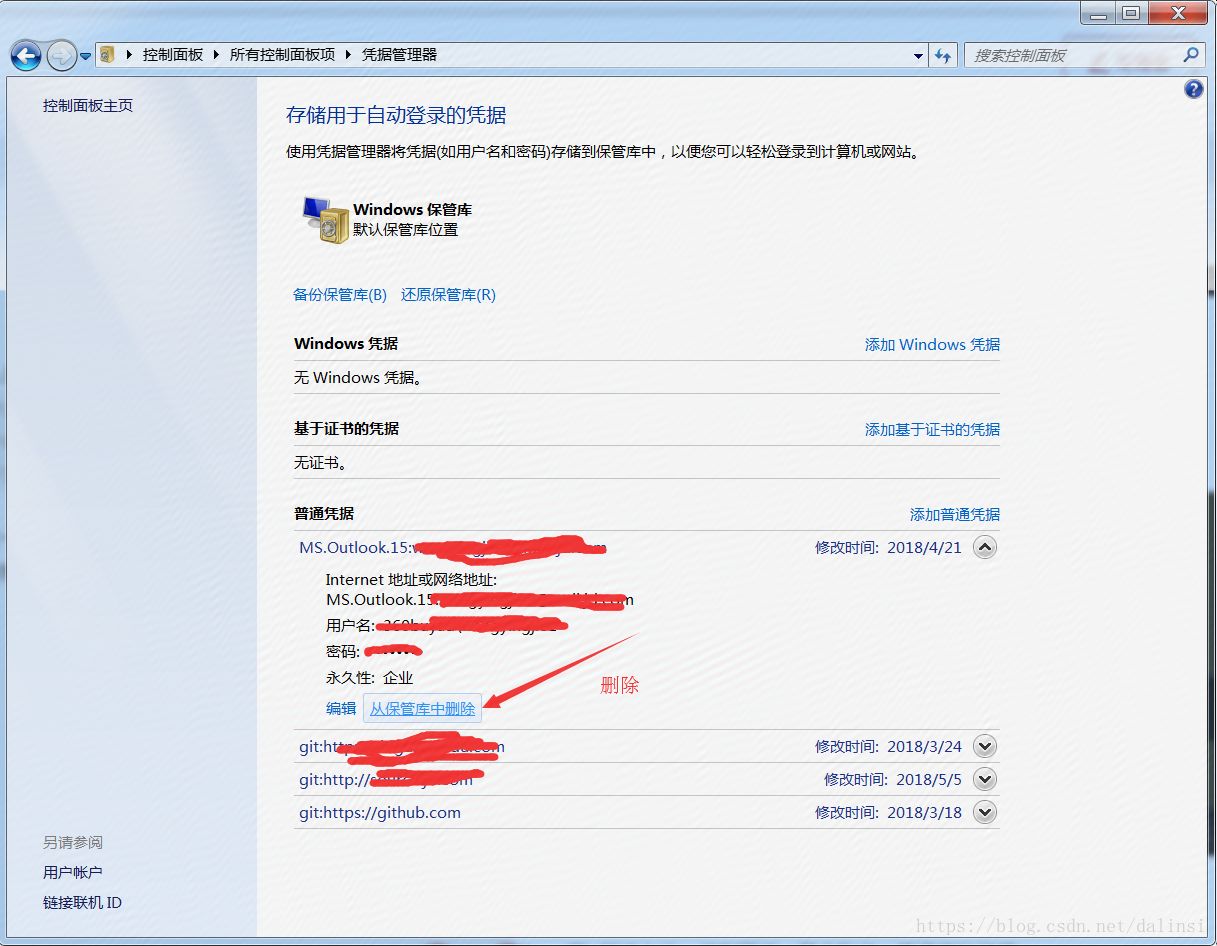
Idea method of modifying git account and password
IDEA how to modify git account and password:
1, file-> settings-> passwords
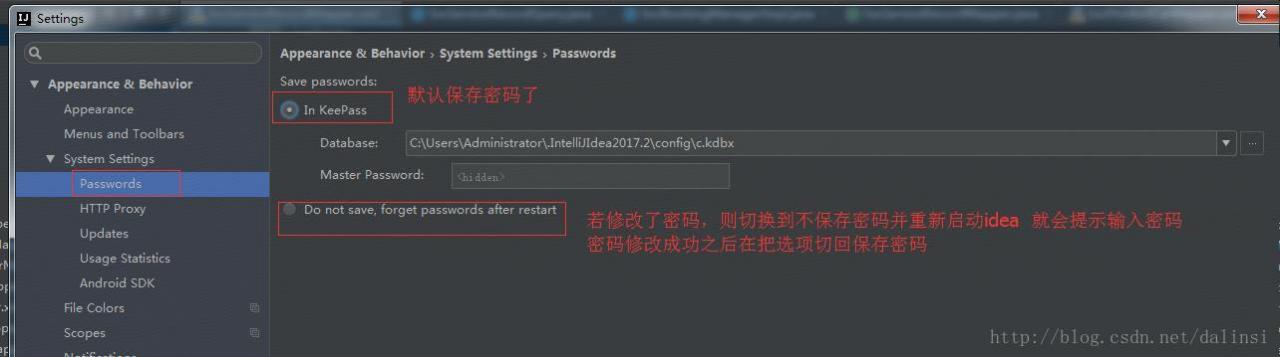
2. Restart IDEA
3, perform a submit or update
when the submit or update is performed, idea will automatically prompt for the account and password as follows:
4, if the above can not be modified, please try the following way
solution: control panel -> User account -& GT; Manage your credentials
Several methods of executing multiple commands in Linux shell
can execute more than one command at a time on the command line, in the following categories:
1. Use between each command;
indicates that the execution results of each command will not affect the execution of other commands. In other words, each command will execute,
but there is no guarantee that each command will execute successfully.
cd /home/PyTest/src; python suning.py2. Use & between each command; & Separate
indicates that the following command will only be executed if the previous command succeeds. This ensures that all commands are executed successfully.
cd /home/PyTest/src&&python suning.py3. Use | or | or | between each command
.
pipe can direct the output of one command to the input of another, allowing two (or more) commands to work in a continuous pipeline, constantly processing text streams. On the command line, we use | for pipes
cd /home/PyTest/123 || echo "error234"
cd /home/PyTest/123 | echo "error234"