Category Archives: How to Fix

[Keras] ImportError: Failed to import pydot. You must install pydot and graphviz for `pydotprint` to

problem description

what happened was, when I was happily building a model with Keras, I found that there was an official function for drawing the model plot_model(), so I happily called the function keras.utils.plot_model(model, 'model.png', show_shapes=True), and the result was the following error:

InvocationException: GraphViz's executables not found
...
ImportError: Failed to import pydot. You must install pydot and graphviz for `pydotprint` to work.

I thought, was it because I didn’t install , pydot and graphviz?So I happily turned on PyCharm and loaded my virtual environment with pydot and graphviz, but it was still reporting an error.

then I shut myself up for a while. After I closed myself up, I went to baidu and Google to find a solution. Sure enough, many people met the same problem as me. According to the big guy [1], this is an environmental problem, the solution is to PIP install graphviz or something, or manually download the graphviz installation package on the official website, and then add the system environment variable Path, such as C:\Program Files (x86)\Graphviz2.38\bin something.

I thought this solution made sense, and I happily tried it out, and still got an error.

and then I shut myself down again and went back to looking for a solution. Some people [2] say that the order of installation is very important. First install pydot, then install graphviz; Someone [3] said to use keras.utils.vis_utils.plot_model instead of keras.utils.plot_model. In short, the feeling is not reliable.

finally, you guessed it, I uninstalled PyCharm and pydot in pydot ( PIP install pydot0) in PyCharm and pydot) in the pydot). Success!

then I thought about what was causing the error for a while, I tried to delete the system variable of graphviz, but the error didn’t occur. Oh, calculate, calculate, just work!

environment

  • Windows 10
  • Python 3.6
  • TensorFlow 2.0 Beta (built-in Keras)
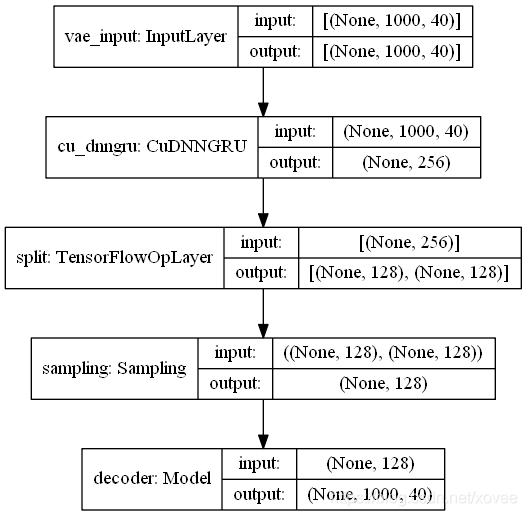
effect

Reference

  1. Rob. (August 25, 2018). Graphviz and Pydotplus not working. Retrieved from https://datascience.stackexchange.com/questions/37428/graphviz-and-pydotplus-not-working
  2. web_ninja. (August 26, 13). Why is pydot unable to find GraphViz’s Executables in Windows 8?Retrieved from https://stackoverflow.com/questions/18438997/why-is-pydot-unable-to-find-graphvizs-executables-in-windows-8
  3. XifengGuo. (November, 6, 2017). pydot issue. Retrieved from https://github.com/XifengGuo/CapsNet-Keras/issues/7

Cursor window allocation of 2048 kb failed


cannot create Cursor because the system is out of memory. The following is the block of code

that is in question

public void insertCBJL(ArrayList<CBJLBean> cbjlList) {
        if (cbjlList.size() > 0) {
            mysql.beginTransaction();
            for (CBJLBean bean : cbjlList) {
                Cursor cursor = mysql.rawQuery(
                "select * from cbjl_table where yhh=?", 
                new String[] { bean.getYhh()});
                if (cursor.getCount() > 0) {
                    continue;
                }
                mysql.execSQL("insert into     cbjl_table(cbcid,...,scsyql) values (?,...,?)",
            new Object[] { bean.getCbcid(),...,bean.getScsyql() });
            }
            mysql.setTransactionSuccessful();
            mysql.endTransaction();
        }
    }

After the

for loop, there is a query statement that was originally inserted into the database in order for the data to be repeated. However, there is a big mistake. After being used, it is not closed, which causes the memory overflow.

Solve the error of POM file failed to read artifact descriptor for XXX under IntelliJ idea

I tried to run one of the company’s self-developed projects today, but found that the pom file always Failed to read the artifact descriptor for XXX ; The diagram below

but a closer look, the some briefcases have ah, why there will be such a mistake?So search the Internet for various solutions,

try mvn-u clean install and maven Reimport even change maven setting. XML file .

finally found a feasible scheme, the specific operation is as follows:

in idea interface click File -> Settings… -> Build, Execution, Deployment -> Build Tools Maven

on the right hand side

Maven home directory select your own real Maven directory;

User Settings file select your own custom setting.xml file (if you have one, choose the one that comes with mavan)

Local repository > >

after the change, save exit setup interface, error no longer!

command ‘x86_64-linux-gnu-gcc’ failed with exit status 1

is when PIP installs mysqlclient, the main error message

is reported

Building wheels for collected packages: mysqlclient
  Building wheel for mysqlclient (setup.py) ... error
  ERROR: Command errored out with exit status 1:
   command: /root/python/env/djangoblog/bin/python3 -u -c 'import sys, setuptools, tokenize; sys.argv[0] = '"'"'/tmp/pip-install-6sotli60/mysqlclient/setup.py'"'"'; __file__='"'"'/tmp/pip-install-6sotli60/mysqlclient/setup.py'"'"';f=getattr(tokenize, '"'"'open'"'"', open)(__file__);code=f.read().replace('"'"'\r\n'"'"', '"'"'\n'"'"');f.close();exec(compile(code, __file__, '"'"'exec'"'"'))' bdist_wheel -d /tmp/pip-wheel-dg9bckvv --python-tag cp36
       cwd: /tmp/pip-install-6sotli60/mysqlclient/
  Complete output (31 lines):
  running bdist_wheel
  running build
  running build_py
  creating build
  creating build/lib.linux-x86_64-3.6
  creating build/lib.linux-x86_64-3.6/MySQLdb
  copying MySQLdb/__init__.py -> build/lib.linux-x86_64-3.6/MySQLdb
  copying MySQLdb/_exceptions.py -> build/lib.linux-x86_64-3.6/MySQLdb
  copying MySQLdb/compat.py -> build/lib.linux-x86_64-3.6/MySQLdb
  copying MySQLdb/connections.py -> build/lib.linux-x86_64-3.6/MySQLdb
  copying MySQLdb/converters.py -> build/lib.linux-x86_64-3.6/MySQLdb
  copying MySQLdb/cursors.py -> build/lib.linux-x86_64-3.6/MySQLdb
  copying MySQLdb/release.py -> build/lib.linux-x86_64-3.6/MySQLdb
  copying MySQLdb/times.py -> build/lib.linux-x86_64-3.6/MySQLdb
  creating build/lib.linux-x86_64-3.6/MySQLdb/constants
  copying MySQLdb/constants/__init__.py -> build/lib.linux-x86_64-3.6/MySQLdb/constants
  copying MySQLdb/constants/CLIENT.py -> build/lib.linux-x86_64-3.6/MySQLdb/constants
  copying MySQLdb/constants/CR.py -> build/lib.linux-x86_64-3.6/MySQLdb/constants
  copying MySQLdb/constants/ER.py -> build/lib.linux-x86_64-3.6/MySQLdb/constants
  copying MySQLdb/constants/FIELD_TYPE.py -> build/lib.linux-x86_64-3.6/MySQLdb/constants
  copying MySQLdb/constants/FLAG.py -> build/lib.linux-x86_64-3.6/MySQLdb/constants
  running build_ext
  building 'MySQLdb._mysql' extension
  creating build/temp.linux-x86_64-3.6
  creating build/temp.linux-x86_64-3.6/MySQLdb
  x86_64-linux-gnu-gcc -pthread -DNDEBUG -g -fwrapv -O2 -Wall -g -fstack-protector-strong -Wformat -Werror=format-security -Wdate-time -D_FORTIFY_SOURCE=2 -fPIC -Dversion_info=(1,4,4,'final',0) -D__version__=1.4.4 -I/usr/include/mysql -I/usr/include/python3.6m -I/root/python/env/djangoblog/include/python3.6m -c MySQLdb/_mysql.c -o build/temp.linux-x86_64-3.6/MySQLdb/_mysql.o
  x86_64-linux-gnu-gcc -pthread -shared -Wl,-O1 -Wl,-Bsymbolic-functions -Wl,-Bsymbolic-functions -Wl,-z,relro -Wl,-Bsymbolic-functions -Wl,-z,relro -g -fstack-protector-strong -Wformat -Werror=format-security -Wdate-time -D_FORTIFY_SOURCE=2 build/temp.linux-x86_64-3.6/MySQLdb/_mysql.o -lmysqlclient -lpthread -lz -lm -lrt -latomic -lssl -lcrypto -ldl -o build/lib.linux-x86_64-3.6/MySQLdb/_mysql.cpython-36m-x86_64-linux-gnu.so
  /usr/bin/ld: cannot find -lssl
  /usr/bin/ld: cannot find -lcrypto
  collect2: error: ld returned 1 exit status
  error: command 'x86_64-linux-gnu-gcc' failed with exit status 1
  ----------------------------------------
  ERROR: Failed building wheel for mysqlclient
  Running setup.py clean for mysqlclient
Failed to build mysqlclient
Installing collected packages: mysqlclient, olefile, pyparsing, packaging, Pillow, Pygments, pylint, python-logstash, python-memcached, raven, requests, Unidecode, webencodings, xmltodict, WeRoBot, Whoosh
    Running setup.py install for mysqlclient ... error
    ERROR: Command errored out with exit status 1:
     command: /root/python/env/djangoblog/bin/python3 -u -c 'import sys, setuptools, tokenize; sys.argv[0] = '"'"'/tmp/pip-install-6sotli60/mysqlclient/setup.py'"'"'; __file__='"'"'/tmp/pip-install-6sotli60/mysqlclient/setup.py'"'"';f=getattr(tokenize, '"'"'open'"'"', open)(__file__);code=f.read().replace('"'"'\r\n'"'"', '"'"'\n'"'"');f.close();exec(compile(code, __file__, '"'"'exec'"'"'))' install --record /tmp/pip-record-m68ogl6h/install-record.txt --single-version-externally-managed --compile --install-headers /root/python/env/djangoblog/include/site/python3.6/mysqlclient
         cwd: /tmp/pip-install-6sotli60/mysqlclient/
    Complete output (31 lines):
    running install
    running build
    running build_py
    creating build
    creating build/lib.linux-x86_64-3.6
    creating build/lib.linux-x86_64-3.6/MySQLdb
    copying MySQLdb/__init__.py -> build/lib.linux-x86_64-3.6/MySQLdb
    copying MySQLdb/_exceptions.py -> build/lib.linux-x86_64-3.6/MySQLdb
    copying MySQLdb/compat.py -> build/lib.linux-x86_64-3.6/MySQLdb
    copying MySQLdb/connections.py -> build/lib.linux-x86_64-3.6/MySQLdb
    copying MySQLdb/converters.py -> build/lib.linux-x86_64-3.6/MySQLdb
    copying MySQLdb/cursors.py -> build/lib.linux-x86_64-3.6/MySQLdb
    copying MySQLdb/release.py -> build/lib.linux-x86_64-3.6/MySQLdb
    copying MySQLdb/times.py -> build/lib.linux-x86_64-3.6/MySQLdb
    creating build/lib.linux-x86_64-3.6/MySQLdb/constants
    copying MySQLdb/constants/__init__.py -> build/lib.linux-x86_64-3.6/MySQLdb/constants
    copying MySQLdb/constants/CLIENT.py -> build/lib.linux-x86_64-3.6/MySQLdb/constants
    copying MySQLdb/constants/CR.py -> build/lib.linux-x86_64-3.6/MySQLdb/constants
    copying MySQLdb/constants/ER.py -> build/lib.linux-x86_64-3.6/MySQLdb/constants
    copying MySQLdb/constants/FIELD_TYPE.py -> build/lib.linux-x86_64-3.6/MySQLdb/constants
    copying MySQLdb/constants/FLAG.py -> build/lib.linux-x86_64-3.6/MySQLdb/constants
    running build_ext
    building 'MySQLdb._mysql' extension
    creating build/temp.linux-x86_64-3.6
    creating build/temp.linux-x86_64-3.6/MySQLdb
    x86_64-linux-gnu-gcc -pthread -DNDEBUG -g -fwrapv -O2 -Wall -g -fstack-protector-strong -Wformat -Werror=format-security -Wdate-time -D_FORTIFY_SOURCE=2 -fPIC -Dversion_info=(1,4,4,'final',0) -D__version__=1.4.4 -I/usr/include/mysql -I/usr/include/python3.6m -I/root/python/env/djangoblog/include/python3.6m -c MySQLdb/_mysql.c -o build/temp.linux-x86_64-3.6/MySQLdb/_mysql.o
    x86_64-linux-gnu-gcc -pthread -shared -Wl,-O1 -Wl,-Bsymbolic-functions -Wl,-Bsymbolic-functions -Wl,-z,relro -Wl,-Bsymbolic-functions -Wl,-z,relro -g -fstack-protector-strong -Wformat -Werror=format-security -Wdate-time -D_FORTIFY_SOURCE=2 build/temp.linux-x86_64-3.6/MySQLdb/_mysql.o -lmysqlclient -lpthread -lz -lm -lrt -latomic -lssl -lcrypto -ldl -o build/lib.linux-x86_64-3.6/MySQLdb/_mysql.cpython-36m-x86_64-linux-gnu.so
    /usr/bin/ld: cannot find -lssl
    /usr/bin/ld: cannot find -lcrypto
    collect2: error: ld returned 1 exit status
    error: command 'x86_64-linux-gnu-gcc' failed with exit status 1
    ----------------------------------------
ERROR: Command errored out with exit status 1: /root/python/env/djangoblog/bin/python3 -u -c 'import sys, setuptools, tokenize; sys.argv[0] = '"'"'/tmp/pip-install-6sotli60/mysqlclient/setup.py'"'"'; __file__='"'"'/tmp/pip-install-6sotli60/mysqlclient/setup.py'"'"';f=getattr(tokenize, '"'"'open'"'"', open)(__file__);code=f.read().replace('"'"'\r\n'"'"', '"'"'\n'"'"');f.close();exec(compile(code, __file__, '"'"'exec'"'"'))' install --record /tmp/pip-record-m68ogl6h/install-record.txt --single-version-externally-managed --compile --install-headers /root/python/env/djangoblog/include/site/python3.6/mysqlclient Check the logs for full command output.

is presumably the absence of a dependent environment

solution:

sudo apt-get update
sudo apt-get install libffi-dev g++ libssl-dev

then run your PIP installation, which should be fine.

reference: click

Win10-64 installing pygraphviz

when you recently deployed a project, the PIP install requirements required a pygraphviz package. This package is for graphical data.
requirements
requirements
requirements
requirements
requirements
requirements
requirements
is the associated error message as shown below.

error: Microsoft Visual C++ 10.0 is required. Get it with "Microsoft Windows SDK 7.1": www.microsoft.com/download/details.aspx?id=8279

  ----------------------------------------
  Failed building wheel for pygraphviz
  Running setup.py clean for pygraphviz
Successfully built dominate Flask-Bootstrap flask-nav Flask-Uploads itsdangerous MarkupSafe visitor
Failed to build pygraphviz
Installing collected packages: appdirs, chardet, click, dominate, MarkupSafe, Jinja2, itsdangerous, Werkzeug, Flask, visitor, Flask-Bootstrap, Flask-Login, flask-nav, Flask-Uploads, WTForms, Flask-WTF, gunicorn, iso8601, numpy, pyparsing, six, packaging, pytz, requests, decorator, networkx, graphviz, pygraphviz
  Running setup.py install for pygraphviz ... error
    Complete output from command f:\fiat_dev\venv\scripts\python.exe -u -c "import setuptools, tokenize;__file__='C:\\Users\\JIANGM~1.FNS\\AppData\\Local\\Temp\\pip-install-b3cfvse8\\pygraphviz\\setup.py';f=getattr(tokenize, 'open', open)(__file__);code=f.read().replace('\r\n', '\n');f.close();exec(compile(code, __file__, 'exec'))" install --record C:\Users\JIANGM~1.FNS\AppData\Local\Temp\pip-record-h2160l90\install-record.txt --single-version-externally-managed --compile --install-headers f:\fiat_dev\venv\include\site\python3.4\pygraphviz:
	...
    running build_ext
    building 'pygraphviz._graphviz' extension
    error: Microsoft Visual C++ 10.0 is required. Get it with "Microsoft Windows SDK 7.1": www.microsoft.com/download/details.aspx?id=8279

    ----------------------------------------
Command "f:\fiat_dev\venv\scripts\python.exe -u -c "import setuptools, tokenize;__file__='C:\\Users\\JIANGM~1.FNS\\AppData\\Local\\Temp\\pip-install-b3cfvse8\\pygraphviz\\setup.py';f=getattr(tokenize, 'open', open)(__file__);code=f.read().replace('\r\n', '\n');f.close();exec(compile(code, __file__, 'exec'))" install --record C:\Users\JIANGM~1.FNS\AppData\Local\Temp\pip-record-h2160l90\install-record.txt --single-version-externally-managed --compile --install-headers f:\fiat_dev\venv\include\site\python3.4\pygraphviz" failed with error code 1 in C:\Users\JIANGM~1.FNS\AppData\Local\Temp\pip-install-b3cfvse8\pygraphviz\

in normal fashion, I started Posting this error message to Google. Found some so-called solutions, including pyGraphviz’s Github community, and other blog posts. The solution:
1. Let you install graphviz, then set the environment variable. Then specify at installation time a parameter such as Pip’s inlude path
2. Let you install a 32-bit python, then go to 1, recompile and install pygraphviz
3. Just get out of Windows Binaries for Python Extension Packages.
I’ve tried all of the above solutions. However, when I was compiling, there were a lot of c compilation errors. Format conversion errors and so on. doesn’t solve the real problem . I feel suspicious, these posts on the Net clearly say that doing so can solve ah!

when I received a useful message saying that pygraphviz does not support python3.4 or above . So I reinstalled Python 3.4 and changed the system’s Python environment variable. When I re-installed PIP Install Pygraphviz-xxx-.whl in the CMD, I was notified that the installation was successful.
but for this project I used vitrualenv to manage the packages it needed. I just wrapped this in the system Python library. So I activate the current venv,
and run PIP install pygraphviz-xxx-.whl again, a familiar error message appears:

(venv) F:\pygraphviz-1.3.1>pip install pygraphviz-1.3.1-cp34-none-win_amd64.whl
pygraphviz-1.3.1-cp34-none-win_amd64.whl is not a supported wheel on this platform.
You are using pip version 10.0.1, however version 18.0 is available.
You should consider upgrading via the 'python -m pip install --upgrade pip' command.

wait, didn’t you just install it?What’s the problem?
after some thinking, I found that the virtual python environment built in venv was set up a week ago. At that time, the python version of the system was 3.5.
, so the python version in this virtual environment was also 3.5. So the installation failed. To prove my point, I deleted Venv, re-opened a CMD, and reinstalled a virtual environment.
when I type PIP install pygraphviz-xxx-.whl again, the command line indicates that the installation was successful.

WHL is not a supported wheel on this platform.
is not supported on this platform. WHL is not a supported wheel on this platform. I always thought this meant that this version of the WHL file was not supported by my system version. Now, in retrospect, what it’s really saying is, the Python version doesn’t support, right?

and the last thing to notice is

pygraphviz package can be used on the premise that the software graphviz has been installed on the system, visit the official website to download the installation package, and install it. After installation, add the bin directory to the system path.


to summarize:

  • pygraphviz does not support python3.4 or above,
    when you install this package, try switching to a lower version of python
  • venv the python environment is based on the system python version,
    but after venv is installed, It is to some extent independent of the system python
  • is not a supported wheel on this platform
    platform is not only the operating system platform, but also the development environment, etc.

is also attached to install pygraphviz may useful connection :

  • installation steps in detail reference post: https://blog.csdn.net/churximi/article/details/51059285

  • Unofficial Windows Binaries for Python Extension Packages

    and finally, good luck ~

Ambari OpenSSL version problem: sslerror: failed to connect. Please check OpenSSL library versions

centos使用Ambari搭建Hadoop集群
ambari --Confirm Hosts报错
 
Command start time 2018-08-13 10:32:23
bash: /var/lib/ambari-agent/bin/ambari-agent: Is a directory
('INFO 2018-08-10 11:03:19,614 NetUtil.py:70 - Connecting to https://node-1:8440/ca
ERROR 2018-08-10 11:03:19,618 NetUtil.py:96 - EOF occurred in violation of protocol (_ssl.c:579)
ERROR 2018-08-10 11:03:19,618 NetUtil.py:97 - SSLError: Failed to connect. Please check openssl library versions. 

solution:

1. Check if OS openssl is the latest version, if not, please update.

[root@node-1 ~]# rpm -qa | grep openssl 
openssl-1.0.1e-57.el6.x86_64
openssl-devel-1.0.1e-57.el6.x86_64

更新openssl
[root@node-1 ~]# yum update openssl

重启ambari-server
[root@node-1 ~]#  ambari-server restart

2. If not possible, modify /etc/pyth/cert-verification. CFG configuration file

verify=disable

modify /etc/ambari-agent/conf/ambari-agent.ini and add the following

in [security]

force_https_protocol=PROTOCOL_TLSv1_2

restart ambari-agent

[root@node-1 ~]#  ambari-agent restart

reference:

https://community.hortonworks.com/questions/145/openssl-error-upon-host-registration.html

[solved] DNET: failed to open device eth5

before the Windows of nmap were all good, today suddenly out of the problem, all kinds of reinstall can not be solved, do a night, finally solved, record the way

1, uninstall, reinstall the latest version of nmap, all default configuration go

2. Uninstall npcap

3. Install the latest version of npcap
https://nmap.org/npcap/#download

check the first one (the one related to nmap) to install

After

, you can normally use nmap

Android Studio: Application Installation Failed (How to Fix)

using Android Studio to run programs on emulators reported this error, there are many reasons for this problem, so there are many solutions, here are some mainstream solutions to solve most of the problems.

Installation error: INSTALL_FAILED_NO_MATCHING_ABI.

Installation error: INSTALL_FAILED_NO_MATCHING_ABI. For this case, please refer to the following Installation error: INSTALL_FAILED_NO_MATCHING_ABIS

scheme 2: it may be that an app with the same name was originally installed on the simulator (mobile phone) but the signature is different, so just delete the app on the mobile phone.

scheme 3: click build-& gt; Clean Project, then Build-> Rebuild Project is sufficient.

scheme 4: click File-> Setting-> Build,Execution,Deployment-> Instant Run, will enable Instant Run... The check for is removed.


Welcome to join the QQ group for discussion.
YinyouPoet – YinyouPoet

Installation and use of XmR stak CPU

XMR stak – CPU install

xmr-stak-cpu is an open source software used for calculation of CPU , the following is recorded in the installation process

under ubuntu17.04

sudo apt-get -y install git
git clone https://github.com/fireice-uk/xmr-stak-cpu.git
sudo apt-get -y install libmicrohttpd-dev libssl-dev cmake build-essential
cd xmr-stak-cpu/

at this point you can select the proportion of contributors to donate
edit donate-level. H

After the

changes are complete, compile and install

cmake -DHWLOC_ENABLE=OFF .
make install

XMR stak – CPU use

edit XMR - stak - CPU/bin/config. TXT

cat /proc/cpuinfo | grep processor view total number of threads n

change cpu_threads_conf into the following content, threads quantity is about CPU total number of threads 2/3,
to use e5-2665 for example, a total of 0 161 threads, using 2 103 threads with the highest efficiency.

"cpu_threads_conf" :
[
   { "low_power_mode" : false, "no_prefetch" : true, "affine_to_cpu" : 0 },
   { "low_power_mode" : false, "no_prefetch" : true, "affine_to_cpu" : 1 },
   { "low_power_mode" : false, "no_prefetch" : true, "affine_to_cpu" : 2 },
   { "low_power_mode" : false, "no_prefetch" : true, "affine_to_cpu" : 3 },
   { "low_power_mode" : false, "no_prefetch" : true, "affine_to_cpu" : 4 },
   { "low_power_mode" : false, "no_prefetch" : true, "affine_to_cpu" : 5 },
   { "low_power_mode" : false, "no_prefetch" : true, "affine_to_cpu" : 6 },
   { "low_power_mode" : false, "no_prefetch" : true, "affine_to_cpu" : 7 },
   { "low_power_mode" : false, "no_prefetch" : true, "affine_to_cpu" : 8 },
   { "low_power_mode" : false, "no_prefetch" : true, "affine_to_cpu" : 9 },
],

if using nicehash, it is recommended to set "nicehash_nonce" : true,

change address and other information (nicehash for example)

"pool_address" : "cryptonight.hk.nicehash.com:3355",
"wallet_address" : "your-bitcoin-wallet-address.any-name-you-like",
"pool_password" : "x",

then, under xmr-stak-cpu/bin folder execute ./xmr-stak-cpu is ready to calculate
press h key display rate (the first few seconds may be 0, don't worry)

MEMORY ALLOC FAILED: mmap failed

may show that MEMORY ALLOC FAILED: mmap FAILED
problem does not need to be solved, because the measurement on the author's machine has no effect, but the following solution is still provided.
solution:

sudo sysctl -w vm.nr_hugepages=128

in addition, the /etc/security/limits the conf add

* soft memlock 262144
* hard memlock 262144

exit and log back in

background run

everything is in place, let the program run in the background
nohup./xmr-stak-cpu &
and then CTRL c exit

run top to see

  PID USER      PR  NI    VIRT    RES    SHR S  %CPU %MEM     TIME+ COMMAND     
25706 svr       20   0 1044224  20616   7136 S 998.7  0.3   8:42.80 xmr-stak-cpu
25720 svr       20   0   46076   4224   3464 R   0.3  0.1   0:00.23 top         
    1 root      20   0  205088   7436   5436 S   0.0  0.1   0:05.40 systemd  

The

program is running correctly in the background.