STM32 Error occurs when downloading the program: Flash Download failed – Target DLL has been cancelled.
solution: 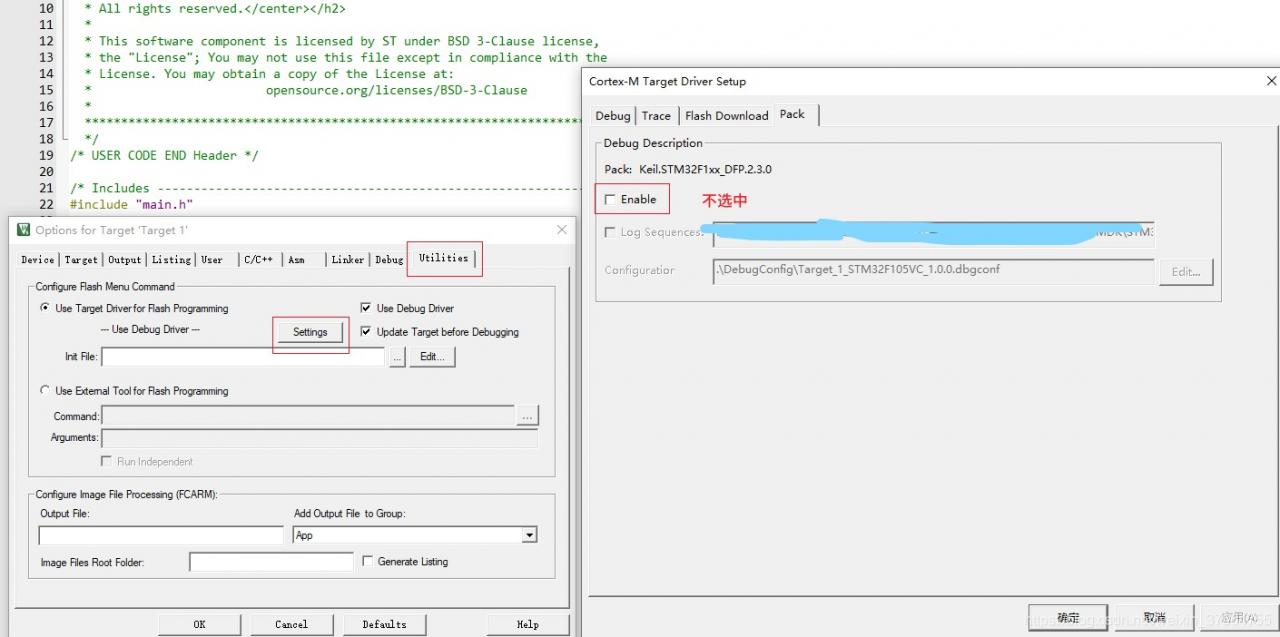
STM32 Error occurs when downloading the program: Flash Download failed – Target DLL has been cancelled.
solution:
if Cuda and Nvidia drivers mismatch, the nvidia-smi command mismatches with Nvidia NVML Driver/library version mismatch, and needs to check the version of the Nvidia Driver to see if it matches.
enter the command as follows:
ubuntu-drivers deviceswill show:
driver: nvidia-driver-418-server-distro non-free
driver: nvidia-driver-440-server-distro non-free:
driver: nvidia-driver-435-distro non-free
driver: nvidia-driver-440-distro non-free
Distro free builtin
driver: xserver-xorg-video-nouveau-distro free builtin
directly install all, command as follows:
sudo ubuntu-drivers autoinstallthen reboot
sudo rebootuse nvidia-smi command, found that you can see the graphics card information, and CUDA model 10.2, Driver version 440, successful match.
Tue Aug 4 21:05:21 2020
+—————————————————————————–+
Driver Version: 440.95.01 CUDA Version: 10.2 |
|——————————-+———————-+———————-+
| GPU Name Persistence-M| bb-id disp.a | Volatile uncorr.ecc |
| Fan Temp Perf Pwr:Usage/Cap| memory-usage | gpu-util Compute m. |
|===============================+======================+======================|
| 0 GeForce RTX 208… Off | 00000000:7 p.m. Off | 0 N/A |
23 c | 41% P8 2 12 mib/11019 w/260 w | mib | 0% Default |
+——————————-+———————-+———————-+
is now ubiquitous for sites that begin with HTTPS, and urllib2 can request SSL certificates for HTTPS, just like a web browser, if the site’s SSL certificate is CA certified, it can be accessed normally,
if SSL certificate authentication fails, or if the operating system does not trust the server’s security certificate, such as when the browser visits the 12306 site, it warns the user that the certificate is not trusted. (it is said that 12306 website certificate is done by oneself, did not pass CA authentication)
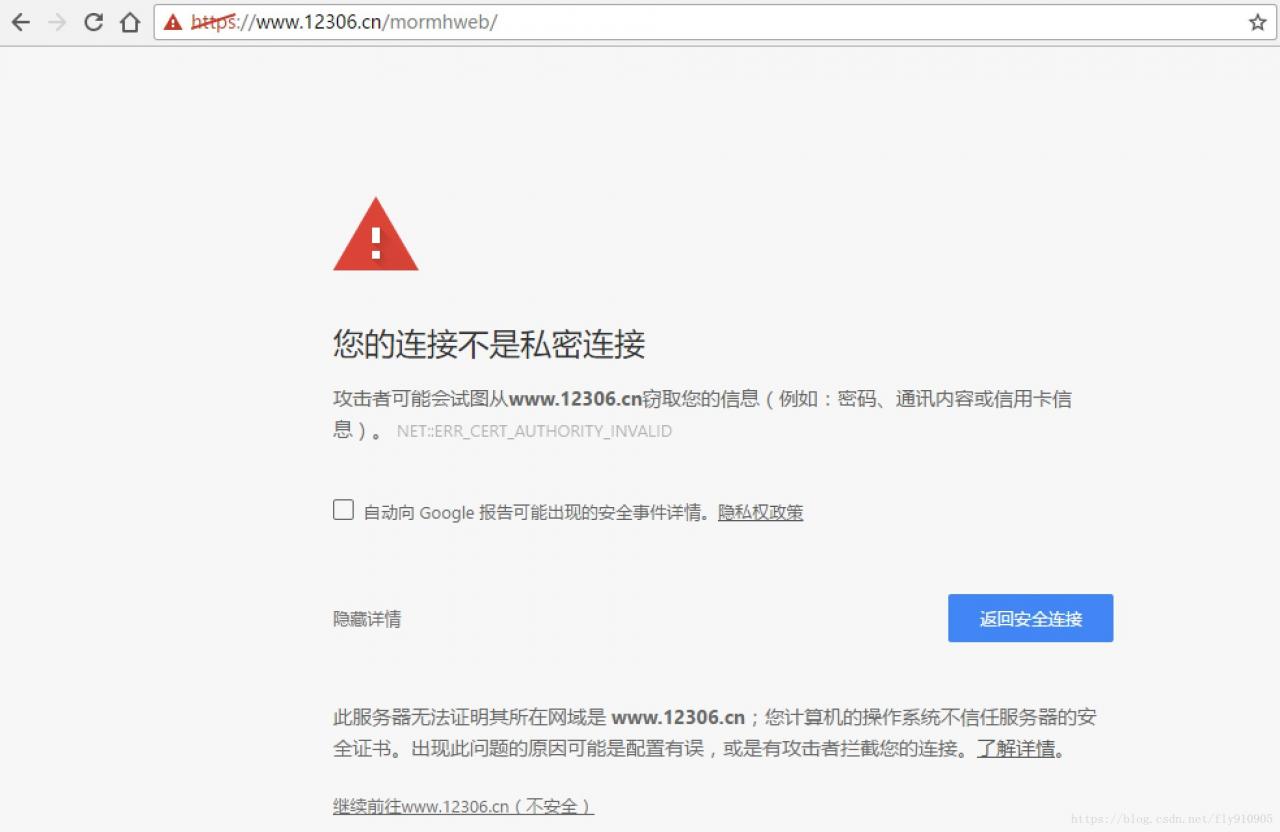
warns the user that the certificate is not trusted
urllib2 will report SSLError when accessing:
import urllib2
url = "https://www.12306.cn/mormhweb/"
headers = {"User-Agent": "Mozilla/5.0 (Windows NT 10.0; Win64; x64) AppleWebKit/537.36 (KHTML, like Gecko) Chrome/54.0.2840.99 Safari/537.36"}
request = urllib2.Request(url, headers = headers)
response = urllib2.urlopen(request)
print response.read()
operation results:
urllib2.URLError: < urlopen error [SSL: CERTIFICATE_VERIFY_FAILED] certificate verify failed (_ssl.c:590)>
therefore, if we encounter such a site in the future, we need to process SSL certificates separately, let the program ignore SSL certificate validation errors, can be normal access.
import urllib
import urllib2

# 1. 导入Python SSL处理模块
import ssl

# 2. 表示忽略未经核实的SSL证书认证
context = ssl._create_unverified_context()

url = "https://www.12306.cn/mormhweb/"
headers = {"User-Agent": "Mozilla/5.0 (Windows NT 10.0; Win64; x64) AppleWebKit/537.36 (KHTML, like Gecko) Chrome/54.0.2840.99 Safari/537.36"}
request = urllib2.Request(url, headers = headers)

# 3. 在urlopen()方法里 指明添加 context 参数
response = urllib2.urlopen(request, context = context)
print response.read()
Summary: the solution includes the following two ways:
1. Use SSL to create an unauthenticated context, passing in the context parameter
in urlopen
import ssl
import urllib2
context = ssl._create_unverified_context()
print urllib2.urlopen("https://www.12306.cn/mormhweb/", context=context).read()
2. Global cancel certificate validation
import ssl
import urllib2

ssl._create_default_https_context = ssl._create_unverified_context
print urllib2.urlopen("https://www.12306.cn/mormhweb/").read()
About CA
CA(Certificate Authority) is the short name of digital Certificate certification Authority, which refers to a trusted third-party organization that issues, manages and abolishes digital certificates,
The
CA checks the legitimacy of the certificate holder’s identity and issues certificates to prevent certificates from being forged or tampered with, as well as to manage certificates and keys.
id can be used to prove identity in real life, so in the network world, digital certificate is id. Different from the real life, not every Internet user has a digital certificate, often only when a person needs to prove their identity to use the digital certificate.
the average user generally does not need, because the website does not care who visits the website, now the website only CARES about the traffic. But in turn, the site needs to prove its identity.
Three solutions:
(1) In a Word document, go to File > Print and select the Microsoft Print to PDF option.
(2) Upload your document to OneDrive, open it in Word Online, then click File >Save as in Download as PDF.
(3) Use a free third-party PDF converter to install yourself as a printer.
2019 unicorn enterprise to recruit Python engineer standard > > > ![]()
record import Google android case error solution is as follows: the android. Builder. Internal. The aapt. V2. Aapt2Exception: android resource linking failed
is as follows:
Android resource linking failed
Output:  /Users/chmy/git/android/googlesamples/android-MessagingService/Application/build/intermediates/incremental/mergeDebugResources/merged.dir/values/values.xml:221: error: resource android:attr/fontStyle not found.
/Users/chmy/git/android/googlesamples/android-MessagingService/Application/build/intermediates/incremental/mergeDebugResources/merged.dir/values/values.xml:222: error: resource android:attr/font not found.
/Users/chmy/git/android/googlesamples/android-MessagingService/Application/build/intermediates/incremental/mergeDebugResources/merged.dir/values/values.xml:223: error: resource android:attr/fontWeight not found.
/Users/chmy/git/android/googlesamples/android-MessagingService/Application/build/intermediates/incremental/mergeDebugResources/merged.dir/values/values.xml:224: error: resource android:attr/fontVariationSettings not found.
/Users/chmy/git/android/googlesamples/android-MessagingService/Application/build/intermediates/incremental/mergeDebugResources/merged.dir/values/values.xml:225: error: resource android:attr/ttcIndex not found.
error: failed linking references.

Command: /Users/chmy/.gradle/caches/transforms-1/files-1.1/aapt2-3.2.0-4818971-osx.jar/cc4633529fe8cee26cd686b6b28203cf/aapt2-3.2.0-4818971-osx/aapt2 link -I\
        /Users/chmy/Library/Android/sdk/platforms/android-24/android.jar\
        --manifest\
        /Users/chmy/git/android/googlesamples/android-MessagingService/Application/build/intermediates/merged_manifests/debug/processDebugManifest/merged/AndroidManifest.xml\
        -o\
        /Users/chmy/git/android/googlesamples/android-MessagingService/Application/build/intermediates/processed_res/debug/processDebugResources/out/resources-debug.ap_\
        -R\
        @/Users/chmy/git/android/googlesamples/android-MessagingService/Application/build/intermediates/incremental/processDebugResources/resources-list-for-resources-debug.ap_.txt\
        --auto-add-overlay\
        --java\
        /Users/chmy/git/android/googlesamples/android-MessagingService/Application/build/generated/not_namespaced_r_class_sources/debug/processDebugResources/r\
        --custom-package\
        com.example.android.messagingservice\
        -0\
        apk\
        --output-text-symbols\
        /Users/chmy/git/android/googlesamples/android-MessagingService/Application/build/intermediates/symbols/debug/R.txt\
        --no-version-vectors
Daemon:  AAPT2 aapt2-3.2.0-4818971-osx Daemon #0
there is a lot of talk on the web about adding a configuration to gradle.properties, but the addition is not solved.
solution: the compiled version is not configured correctly. Original version number:
android {
    //
    compileSdkVersion 24

    buildToolsVersion '28.0.3'

    defaultConfig {
        minSdkVersion 21
        targetSdkVersion 24

    }
...
after modification:
android {
    //
    compileSdkVersion 28

    buildToolsVersion '28.0.3'

    defaultConfig {
        minSdkVersion 21
        targetSdkVersion 28

    }
compiles again, and the problem is resolved. This is the solution I came across, others are not met for the time being.
reproduced in: https://my.oschina.net/who7708/blog/2236811
I am learning django these days, the project is to do my own blog, and then the shell command to create a new blog when the following error
django.db.utils.IntegrityError: NOT NULL constraint failed: blog_blog.author_id
is known from the error message that the non-null constraint of the database is the problem, and it is in blog.auther_id that the problem is
and then look at my creation process, first go back to my models model, the source code is as follows
from django.db import models
from django.contrib.auth.models import User

#  创建博客分类模型
class BlogType(models.Model):
    type_name = models.CharField(max_length=15)
    def __str__(self):
        return self.type_name

#  创建博客模型
class Blog(models.Model):
    title = models.CharField(max_length=50)
    blog_type = models.ForeignKey(BlogType, on_delete=models.DO_NOTHING)
    content = models.TextField()
    author = models.ForeignKey(User, on_delete=models.DO_NOTHING)
    created_time = models.DateTimeField(null=True, auto_now_add=True)
    last_updated_time = models.DateTimeField(null=True, auto_now=True)
    def __str__(self):
        return "<Blog: %s>" % self.title
can tell me the foreign key I used in the author, and the author class I didn’t define in the model, so my shell code is as follows:
> > > from django.contrib.auth.models import User
> > > User.objects.all()
< QuerySet [<User: xxz>] >
> > > blog.auther = User.objects.all()[0]
> > > blog.save()
sqlite3.IntegrityError: NOT NULL constraint failed: blog_blog.author_id
and then there’s the problem, and the solution to that is very simple, is just to type
again
> > > blog.author_id = 1
> > > blog.save()
problem solved, so now let’s talk about how the problem came to be
https://docs.djangoproject.com/en/1.11/ref/models/instances/
here in the django document is the sentence
Model. pk 
Regardless of whether you define a primary key field yourself, or let Django supply one for you, each model will have a property called pk. It behaves like a normal attribute on the model, but is actually an alias for whichever attribute is the primary key field for the model. You can read and set this value, just as you would for any other attribute, and it will update the correct field in the model.
translation is
whether you define your own primary key field or let Django provide one for you, each model has a property called pk. It behaves like a normal property on the model, but is actually an alias for an alias that belongs to the model's primary key field. You can read and set this value as you would any other property, and it updates the correct fields in the model.
general meaning is that you defined in the models of all the classes (as a table in the database), there will be a primary key id, every time you create an object, like write blog = blog () above, will automatically assign an id in the blog, and the increment, by the same token, the auther in the blog, to define a id, but not defined before, so this manual are defined.
first step: enter your service, see vmware authorization service service will start
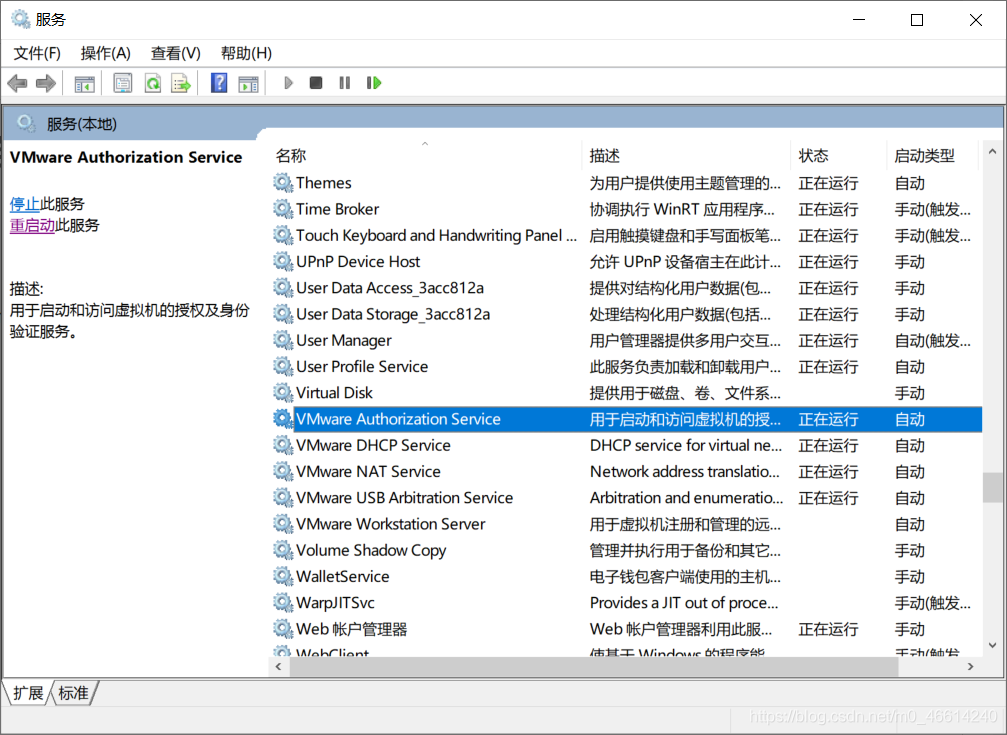
step 2: if the double-click service is started, see if it is started automatically. If not, change it to start automatically
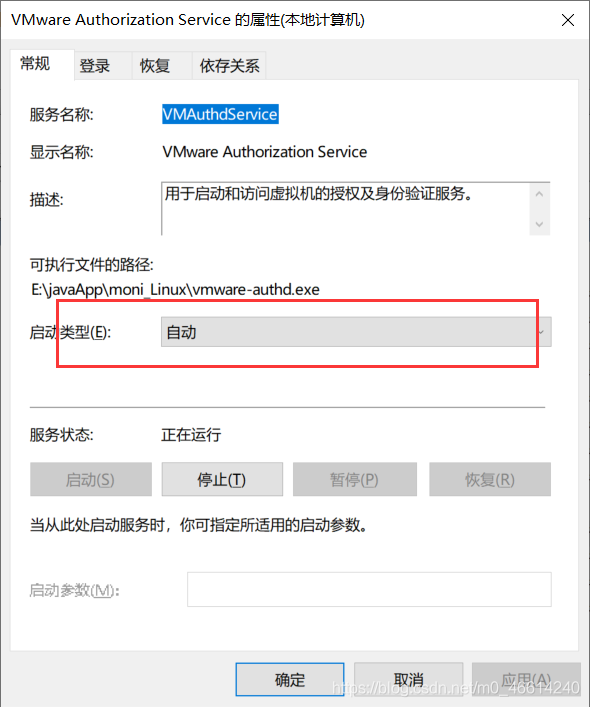
step 3: if none of this is a problem, check to see if the executable path is correct, perhaps because the folder has been changed so that it cannot find the execution path
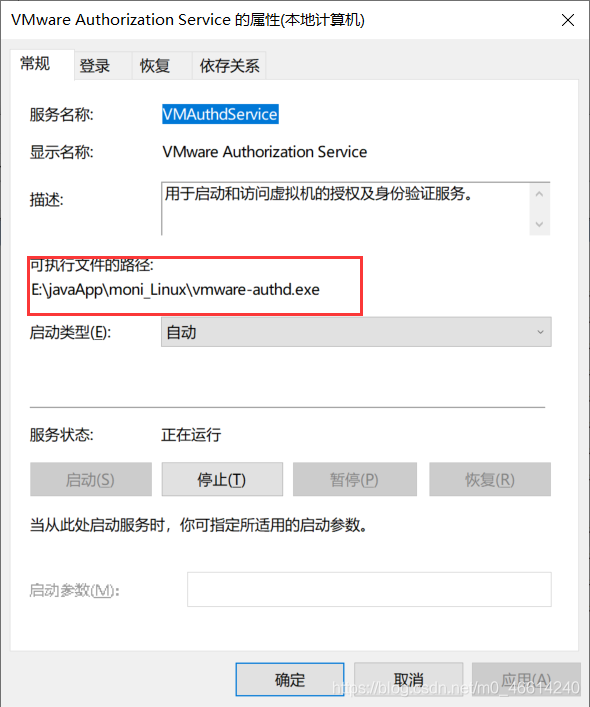
there are two ways to do it if the execution path is wrong:
the first: simple and crude uninstall reinstall
second path
first use the computer to search the registry to edit
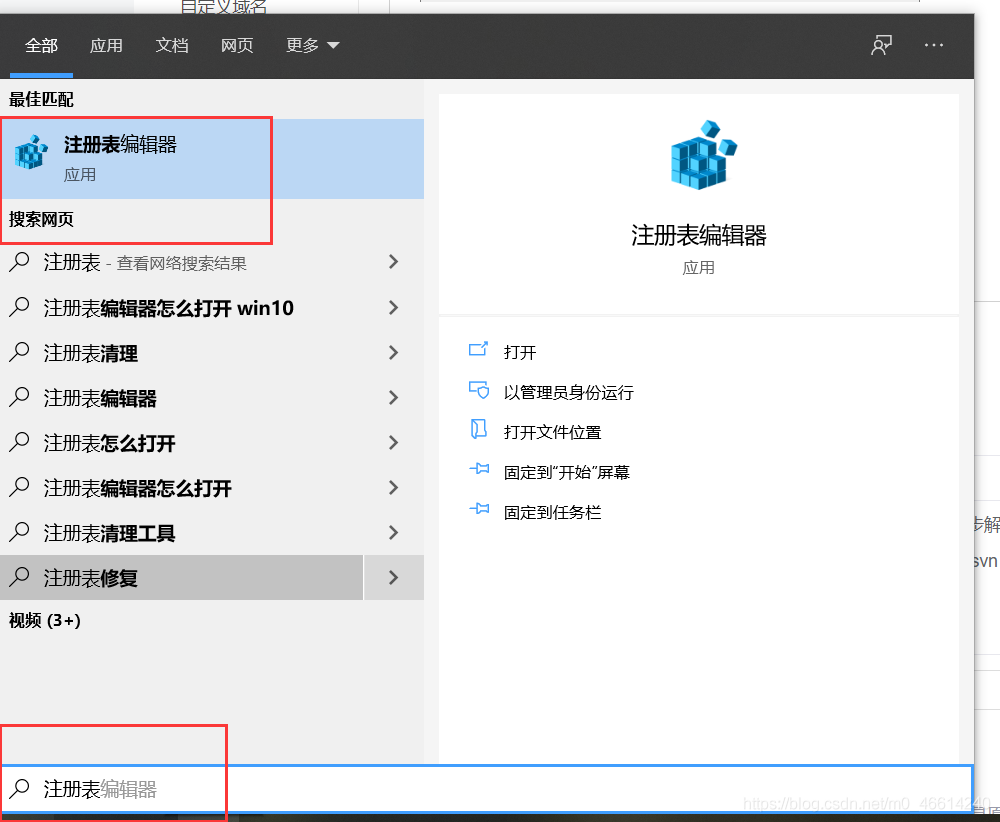
open according to the path :HKEY_LOCAL_MACHINE\SYSTEM\CurrentControlSet\Services vmware authorization service
modify the path to
of course I still recommend uninstall reinstall, but must be unloaded clean!
hope everyone can solve the problem!
SVN RA layer request failed
is unable to connect to a repository
solution:
1, delete AppData\ Subversion\auth folder, or go TortoiseSVN to save data in order to clear authentication data
2, go to eclipse-> preference-> team-> svn-> SVN interface – & gt; Switch to another SVNKit (if you do not have this option refer to the end of the reference file)
reference reading:
eclipse install SVN plug-in the two ways of
https://www.cnblogs.com/alamps/p/6155963.html you will be best subclipse and SVNKit are set on the
subclipse 1.8
subclipse.tigris.org/update_1.8.x
Other reading:
https://stackoverflow.com/questions/8990544/cannot-connect-to-repo-with-tortoisesvn http://bbs.csdn.net/topics/390951109?page=1
I am a student in school, and I usually use Unity to directly open some projects I created before. After a winter vacation, when I opened a Unity project as usual, I somehow reported Assertion failed: Assertion failed on expression: ‘! GetMainEditorWindow() ‘. After careful consideration, I found that my Unity account had expired and I needed to log in again. After logging in again, I finished filling in the relevant options, and the error would disappear. (Supplement: When this error existed, the original Unity project was not impossible to run, but after I ran the project, the Game interface would be stuck and unable to move the interface. This problem has been bothering me for a long time before, and then inexplicably disappeared. Now I find that I just logged in the Unity account… 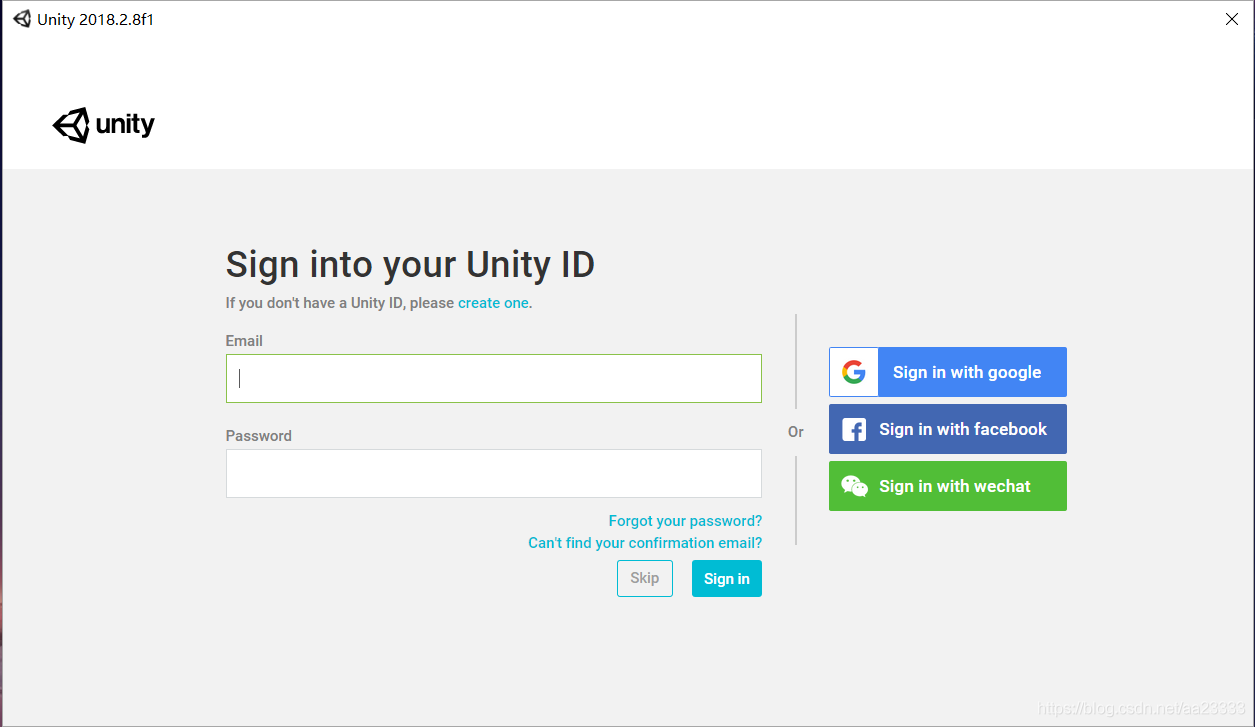 )
)
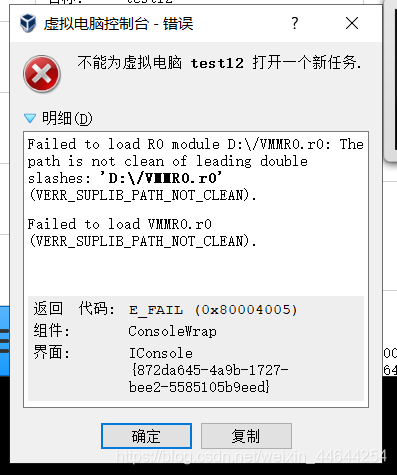
I am window10 system, directly put the software into D disk, no folder package
causes the problem, there may be two reasons, 1 did not open the administrator identity, 2 virtual machine directly under D disk, the path has problems
address:
1, uninstall virtual machine
delete not clean will be very trouble, is said to be completely delete please refer to the bosses:
https://blog.csdn.net/lizhen8285/article/details/80143570
2, after completely uninstall, open an administrator, it is said that must be an administrator to run only that
how to open the administrator: https://baijiahao.baidu.com/s?id=1620557606146696792& wfr=spider& for=pc
3, open the status of administrator, install, put the virtual machine in a folder without Chinese name
is good
execute/usr/local/apache/bin/apachectl start times wrong

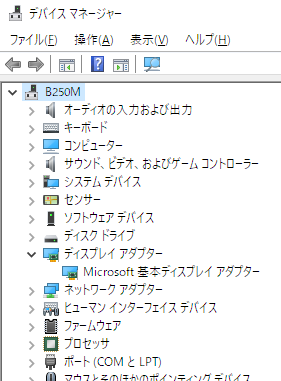
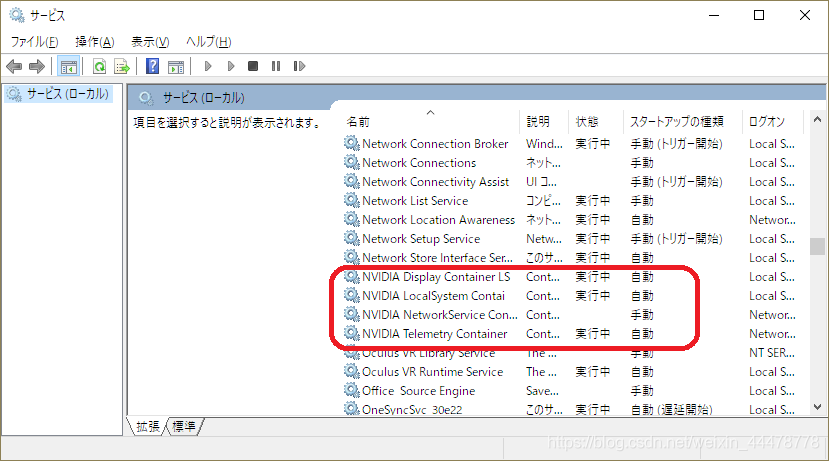
is basically due to a visual studio integration installation failure. As shown in the figure. 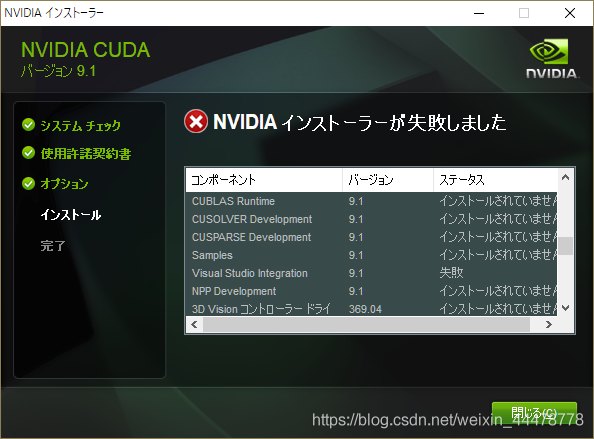
solution 1
. Find the graphics card related options in the driver management
2. Stop associated service
3. Delete all folders associated with NVIDIA (C:\ data, C:\Program Files, C:\Program Files(x86)NVIDIA associated folders). 4. Restart
. If the problem cannot be solved
is largely because the installation of visual studio version is incompatible with CUDA10.0 version, it can be solved by installing CUDA9.0 version. This installment was successfully installed with visual studio2015.
there is also a way to uninstall visual studio integration by selecting custom installation at installation time. However, after this installation, you will not be able to create CUDA if you create Pj with Visual Studio. Solution reference links: https://blog.csdn.net/zzpong/article/details/80282814
Reference URL:https://devtalk.nvidia.com/default/topic/1033111/cuda-setup-and-installation/cuda-9-1-cannot-install-due-to-failed-visual-studio-integration/