Today I finished a function Want to direct input in the address bar servletA class and parameters to test the servlet code
an error 404. But I tested a new servletB class and it worked exactly the same way.
I was puzzled because both classes were servlets I created directly from Eclipse, and the web.xml was configured automatically. Even if the configuration is wrong it should be both wrong. Want to for a long time, suddenly think of you just created ServletA class, put the wrong to service pack, dragged her into the servlet found directly after the bag, but the web. The XML configuration path has been in the service package
as shown in figure 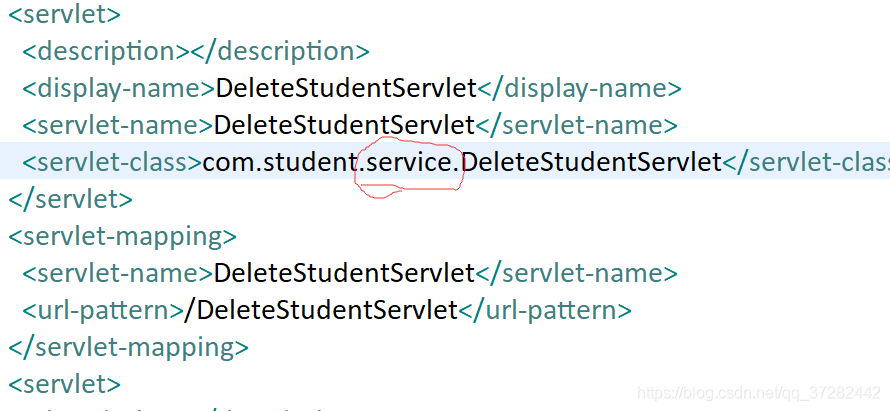
and the actual class names should be com. Student. Servlet. DeleteStudentServlet
for simple reason is:
I just begin to create the servlet misplacing to service the bag (actually should put the servlet bag), but to create the eclipse will help me get web. The XML class name is automatically configured (the name of the class is the route of the distribution of com. Student. Service. DeleteStudentServlet) and I treat the servlet to tow the servlet packages, web, XML is not modified, lead to the web. The path name of the class error in the XML. So when he visited the Servlet can’t find the correct path, to be an error 404.
so the Servlet error 404, must be sure to check the path name is correct, also want to check the web, XML configuration information is incorrect.
Summary: Make sure to go to web.xml to change the configuration if the package you created the Servlet contains changes.
Category Archives: How to Fix
Exception of browser accessing servlet404
* *
Error about creating a servlet when viewed in a browser
**

user initiates a request, which is received by the server, and finds out if the requested resource exists according to the configuration information in the web.xml file. If it does not exist, a 404 error is returned.
After the resource is found (the servlet is found), the servlet object is checked to see if it exists, if not, the object is created, and if it does, the corresponding processing method is executed.
After the execution of the processing method, the processing result will be returned to the Web server. After the Web server carries out relevant processing according to the result, it will be returned to the browser, and the browser will display the corresponding processing result.
————————————————
lution for link
Reasons for appearing:
In 404 because the
in the create project is not changed when buildpath WebContent/WEB – INF/classes
cause no class file
so error
Second, if there is no @WebServlet(“/test”) link, you should configure the web.xml file
in the WebContent/ web-inf directory
<servlet>
    <servlet-name>xxx</servlet-name>
    <servlet-class>day2ByServlet.Servlet$One</servlet-class>
    <init-param>
      <param-name>p</param-name>
      <param-value>xixi</param-value>
    </init-param>
  </servlet>
  <servlet-mapping>
    <servlet-name>xxx</servlet-name>
    <url-pattern>/Servlet$One</url-pattern>
  </servlet-mapping>
  <servlet>
    <servlet-name>yyy</servlet-name>
    <servlet-class>day2ByServlet.HttpServlet_two</servlet-class>
  </servlet>
  <servlet-mapping>
    <servlet-name>yyy</servlet-name>
    <url-pattern>/ServletTwo</url-pattern>
  </servlet-mapping>
404 error in browser accessing Servlet
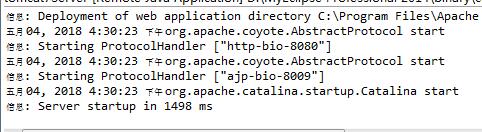
The first Servlet program written with the MyEclipse tool — HelloWorld (refer to Section 4.1 of Java Web Programming). After the Web project is created, Tomcat is started through the MyEclipse development tool. See the Console window to output the server startup information as follows:
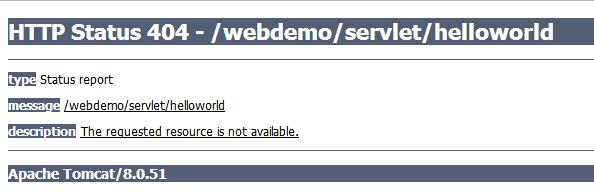
Then, when testing the program by typing the URL in the browser address bar, a 404 error occurs, as shown below:
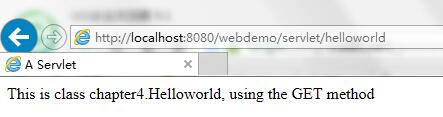
My development environment is MyEclipse 2014+Tomcat 8.0. Previously, there were some new features in MyEclipse that did not support JDK 1.8. Later, I wondered if there was a version mismatch between development environments, so I tried to change Tomcat 8.0 to Tomcat 7.0.
Then, when testing the program by typing the URL in the browser address bar, a 404 error occurs, as shown below:
My development environment is MyEclipse 2014+Tomcat 8.0. Previously, there were some new features in MyEclipse that did not support JDK 1.8. Later, I wondered if there was a version mismatch between development environments, so I tried to change Tomcat 8.0 to Tomcat 7.0.
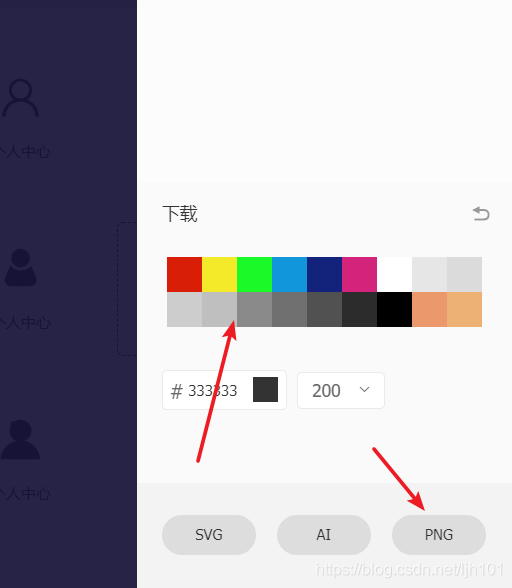
How to convert iconfont to PNG transparent image
1. Enter the IconFont icon library and log in. http://www.iconfont.cn/
2. Select the desired icon and add it to the shopping cart.
3. Select the download icon as PNG format.
https://blog.csdn.net/weixin_30788619/article/details/95338105
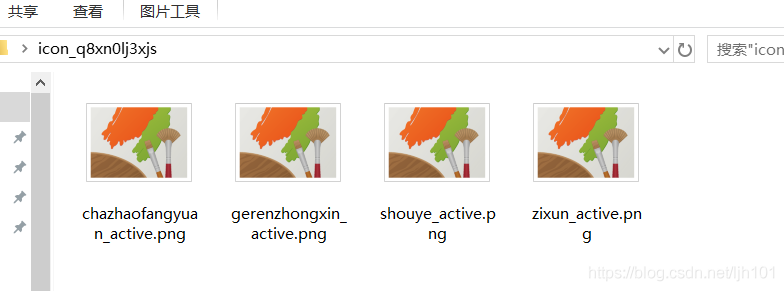
Selected state: download after changing the color, and then rename all activated items to complete the matching effect
Two deformation methods of tensorflow image
There is also the padding, which can prevent the image from deforming, but the result is not good, because there are too many irrelevant factors on the pad, so we don’t use this.
1. For labels, fill with the nearest neighbor’s value:
1. For labels, fill with the nearest neighbor’s value:
tf.image.resize_nearest_neighbor(
        tf.expand_dims(label, 0),
        new_dim,
        align_corners=True)
2. Apply to images, using bilinear interpolation
tf.image.resize_bilinear(
      tf.expand_dims(image, 0),
      new_dim,
      align_corners=True)
Because both of the above methods require four dimensions, expand_dim
Capital water. But I’m actually writing code for myself for easy review, funny.
Tensorflow image random_ There seems to be something wrong with the shift function
Environment: Python 3.6, TensorFlow 1.15
Hope for augmentation, using tf keras. Preprocessing. Image. Random_shift function
Unsupported operand type(s) for *: ‘Dimension’ and ‘float’
Line 446 in tensor_shape.py is return self * other
Return self * other –> return self * other –> return self * int(other)
The random_shift function does not work, and the image does not have any shift effects
As a last resort, change the design function to achieve random_shift function function
According to my requirements, first of all, two random numbers are generated by TF.Random. Uniform, which are used as the translation pixels of the width and height dimensions of the image. Then use tf.roll to translate the image in two dimensions of height and width. The code is as follows:
shift_num = tf.random.uniform(shape=[2], minval=-img_height/2, maxval=img_height/2, dtype=tf.dtype.int32)

img_out = tf.roll(img_in, shift=shift_num, axis=[1,2])
This code does what I need the random_shift function to do, but it’s slow
over
Oracle 12C installation process related errors and Solutions
For the latest version of Oracle 12c database, we will encounter many problems in the process of installing and building the database. Here I will summarize the problems I encountered, and give the corresponding solutions.
1.ORA-12500: TNS: Listener could not start the dedicated server process
As the name implies, this type of problem relates to the associated listening service
sqlplus/noolog
nn /as sysdba
s>up
conn /as sysdba
startup
conn /as sysdba
startup ORCL database associated with the service, if not opened in the CMD check can be through the task manager in the service column to find the relevant service to open the restart, ORACLESSWrite – ORACLESService – Listener – ORACLEScheduler -, generally is one of the service and Listener did not start, the service can be resolved after the restart. To reconfigure listeners, open the Net Configuration Assistant and reconfigure existing listeners. Open the netmanager and check whether the user’s localhost port 1521 is not abnormal.
ORA-12560:TNS: Protocol oracer error
Error problems can be caused by three factors:
The listening service is not up.
Windows platform a operation as follows: Start – Program – Management Tools – Services, open the Services Panel, start OracleHome92TNSListener service. The database instance is not up.
Windows platform: Start – Programs – Management Tools – Services, open the Services panel, launch Oracle Server XXXX,XXXX is your Database SID. Registry problems.
regedit, then go to HKEY_LOCAL_MACHINE\SOFTWARE\ORACLE\HOME0 and set the environment variable ORACLE_SID to XXXX. XXXX is your database SID. Or just to the right of My Computer, Properties — Advanced — Environment Variable — System Variable — New, Variable Name = ORACLE_SID, Variable Value =XXXX,XXXX is your Database SID. ORACLE_SID =XXXX. ORACLE_SID =XXXX. ORACLE_SID =XXXX.
3. Port occupancy problem
CMD to perform netstat ano | findstr searches in 1521 CMD perform netstat – ano find localaddress port
Query to the PID of the executing process
Taskkill /pid ** /f Open the services panel, find the running pid process and terminate it
End the process, and the occupied port will be released
4.ORA-12505 Listener refused the connection
- sid, user name, etc. Make sure it matches the database you created — restart your computer, release the used port 1521 — restart Oracle Develpoer — then run CMD, open a command prompt, and type LSNRCTL to run stop first. Then start — Open Resource Manager
and run C:\ Oraclexe \app\ Oracle \product\10.2.0\ Server \BIN\tnslsnr.exe
ey_local_machine \ System \CurrentControlSet\Services\ OraclexetNSListener
I>Path key value: C: \ oraclexe \ app \ oracle \ product \ 10.2.0 \ server \ BIN \ TNSLSNR exe
Temarily sorted out the above four problems, in general, to ensure that the associated monitoring service is normally opened, the server SID and other configurations are correct, can test the successful connection.
When installing oracle12c, the problem of “unable to check whether the specified location is on CFS” appears
This problem occurred after uninstalling Oracle12c.
others said need to modify the host file, restart the works after modification. Then changed the computer name, after reboot easy to use.
In other cases, the installation of Oracle will get stuck. When exiting and reinstalling Oracle, select “New System User”, which is easy to use.
Solutions to the failure of importing Python 3.7 SSL module
There are a lot of articles on the Internet about how to solve the failure of Python3.7 import _SSL module, but most of the actual operation is not successful. The following method can be used in a practical test.
First, install dependencies
OpenSSL or Libressl (either optional) is required to install the SSL module. OpenSSL is installed in version 1.0.1, which does not meet the requirements of Python3.7. The version requirements for the SSL library are as follows:
openssl > = 1.0.2 libressl & gt; = 2.6.4
My working environment:
14.04 Python3.7.3 Ubutun download link: https://www.python.org/ftp/python/3.7.3/Python-3.7.3.tgz
Download and install Libressl
Website: https://www.libressl.org/, download link: https://ftp.openbsd.org/pub/OpenBSD/LibreSSL/libressl-2.9.1.tar.gz./config – prefix =/usr/local/SSL make sudo make intallmv/usr/bin/openssl/usr/bin/openssl. Bak (if not installed SSL before, /usr/include/openssl.bak /usr/include/openssl.bak This step can be skipped) ln -s/usr/local/SSL/bin/openssl/usr/bin/openssl ln -s/usr/local/SSL/include/openssl/usr/include/openssl in/etc/ld. So. Conf., d directory to create libressl – 2.9.1. Conf file, add/usr/local/SSL/libsudo ldconfig
Install Python3.7
Configure environment variables
Export LDFLAGS = “-l/usr/local/SSL/lib”
export CPPFLAGS = “-i/usr/local/SSL/include”
export PKG_CONFIG_PATH = “/ usr/local/SSL/lib/pkgconfig”
Unzip the Python installation package and execute the configure file:
./configure — enable – Shared
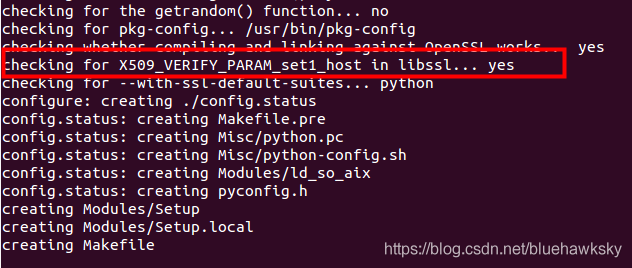
Check that the SSL configuration is working
Verifies that the SSL module was successfully installed in /usr/local/bin/python3.7

3. Other errors
Failed to compile the SSL module

Solutions:
Go to the libressl compilation directory libressl-2.9.1
Sudo cp SSL/libs/libssl. So the 47.0.5 – gnu/Linux/lib/x86_64 –
sudo cp crypto/libs/libcrypto. So the 45.0.4/lib/x86_64 – – the gnu/Linux
Sudo ln-s /lib/x86_64-linux-gnu/libcrypto.so.47.0.5 /lib/x86_64-linux-gnu/libcrypto.so.47
sudo ln-s /lib/x86_64-linux-gnu/libcrypto.so.45.0.4 /lib/x86_64-linux-gnu/libcrypto.so.45
recompile
Failed to compile the _ctypes module
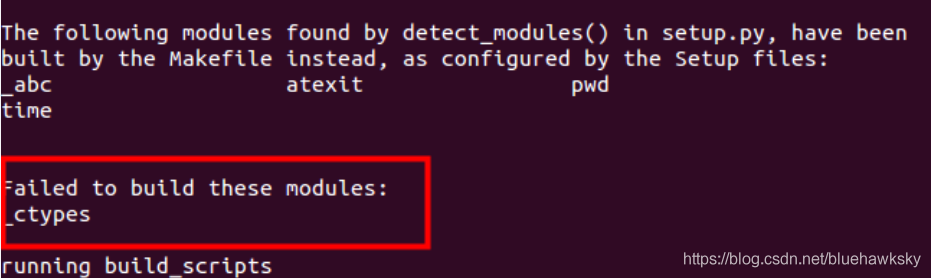
Sudo apt-get install libffi-dev, install libffi-dev, install libffi-dev
First, install dependencies
OpenSSL or Libressl (either optional) is required to install the SSL module. OpenSSL is installed in version 1.0.1, which does not meet the requirements of Python3.7. The version requirements for the SSL library are as follows:
openssl > = 1.0.2 libressl & gt; = 2.6.4
My working environment:
14.04 Python3.7.3 Ubutun download link: https://www.python.org/ftp/python/3.7.3/Python-3.7.3.tgz
Download and install Libressl
Website: https://www.libressl.org/, download link: https://ftp.openbsd.org/pub/OpenBSD/LibreSSL/libressl-2.9.1.tar.gz./config – prefix =/usr/local/SSL make sudo make intallmv/usr/bin/openssl/usr/bin/openssl. Bak (if not installed SSL before, /usr/include/openssl.bak /usr/include/openssl.bak This step can be skipped) ln -s/usr/local/SSL/bin/openssl/usr/bin/openssl ln -s/usr/local/SSL/include/openssl/usr/include/openssl in/etc/ld. So. Conf., d directory to create libressl – 2.9.1. Conf file, add/usr/local/SSL/libsudo ldconfig
Install Python3.7
Configure environment variables
Export LDFLAGS = “-l/usr/local/SSL/lib”
export CPPFLAGS = “-i/usr/local/SSL/include”
export PKG_CONFIG_PATH = “/ usr/local/SSL/lib/pkgconfig”
Unzip the Python installation package and execute the configure file:
./configure — enable – Shared
Check that the SSL configuration is working
Verifies that the SSL module was successfully installed in /usr/local/bin/python3.7
3. Other errors
Failed to compile the SSL module
Solutions:
Go to the libressl compilation directory libressl-2.9.1
Sudo cp SSL/libs/libssl. So the 47.0.5 – gnu/Linux/lib/x86_64 –
sudo cp crypto/libs/libcrypto. So the 45.0.4/lib/x86_64 – – the gnu/Linux
Sudo ln-s /lib/x86_64-linux-gnu/libcrypto.so.47.0.5 /lib/x86_64-linux-gnu/libcrypto.so.47
sudo ln-s /lib/x86_64-linux-gnu/libcrypto.so.45.0.4 /lib/x86_64-linux-gnu/libcrypto.so.45
recompile
Failed to compile the _ctypes module
Sudo apt-get install libffi-dev, install libffi-dev, install libffi-dev
Python Report OpenSSL.SSL.SysCallError (10054 WSAECONRESET)
Python to OpenSSL. SSL. SysCallError: (10054, ‘WSAECONNRESET)
2. The solution
1: Rerun, but still maintained.
2: disable SSL authentication with verify=False

2. The solution
1: Rerun, but still maintained.
2: disable SSL authentication with verify=False
Python error open SSL.SSL.SysCallError :(-1,‘Unexpected EOF‘)
Ssl. syscallError :(-1,’Unexpected EOF’)
Verify = False: verify = False: verify = False: verify = False
Request, when using a proxy to crawl a web page
Verify = False; verify = False
code
URL = "https://docs.google.com/uc?export=download"

session = requests.Session()

response = session.get(URL, params = { 'id' : id }, stream = True )
Verify = False
URL = "https://docs.google.com/uc?export=download"

session = requests.Session()

response = session.get(URL, params = { 'id' : id }, stream = True, verify = False )
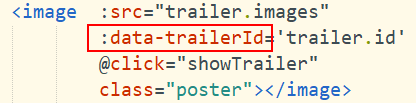
uniapp e. currentTarget.dataset Pay attention
There is a problem with uniapp. When you compile to H5, you can get the data, but you can’t get the data in the WeChat applet
As shown in figure:


Then, at the prompt, add console.log to the relevant code to see the output
It turns out that there was an error adding a label to the element
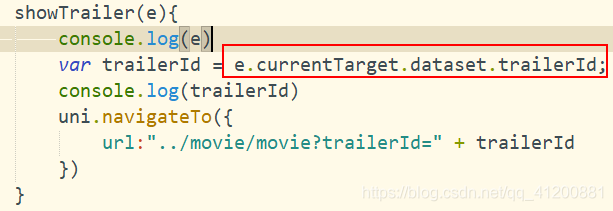
Look at both sides of the console to find the reason:
H5:
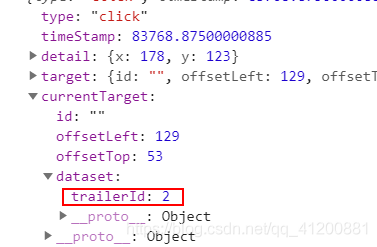
WeChat applet:
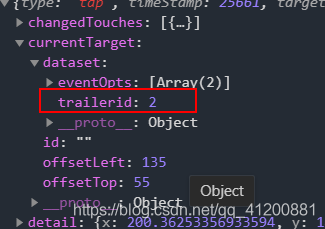
The WeChat applet converts uppercase letters to lowercase
Fix: Change the data-trailerID in HBuilderX to all lowercase
As shown in figure:
Then, at the prompt, add console.log to the relevant code to see the output
It turns out that there was an error adding a label to the element
Look at both sides of the console to find the reason:
H5:
WeChat applet:
The WeChat applet converts uppercase letters to lowercase
Fix: Change the data-trailerID in HBuilderX to all lowercase