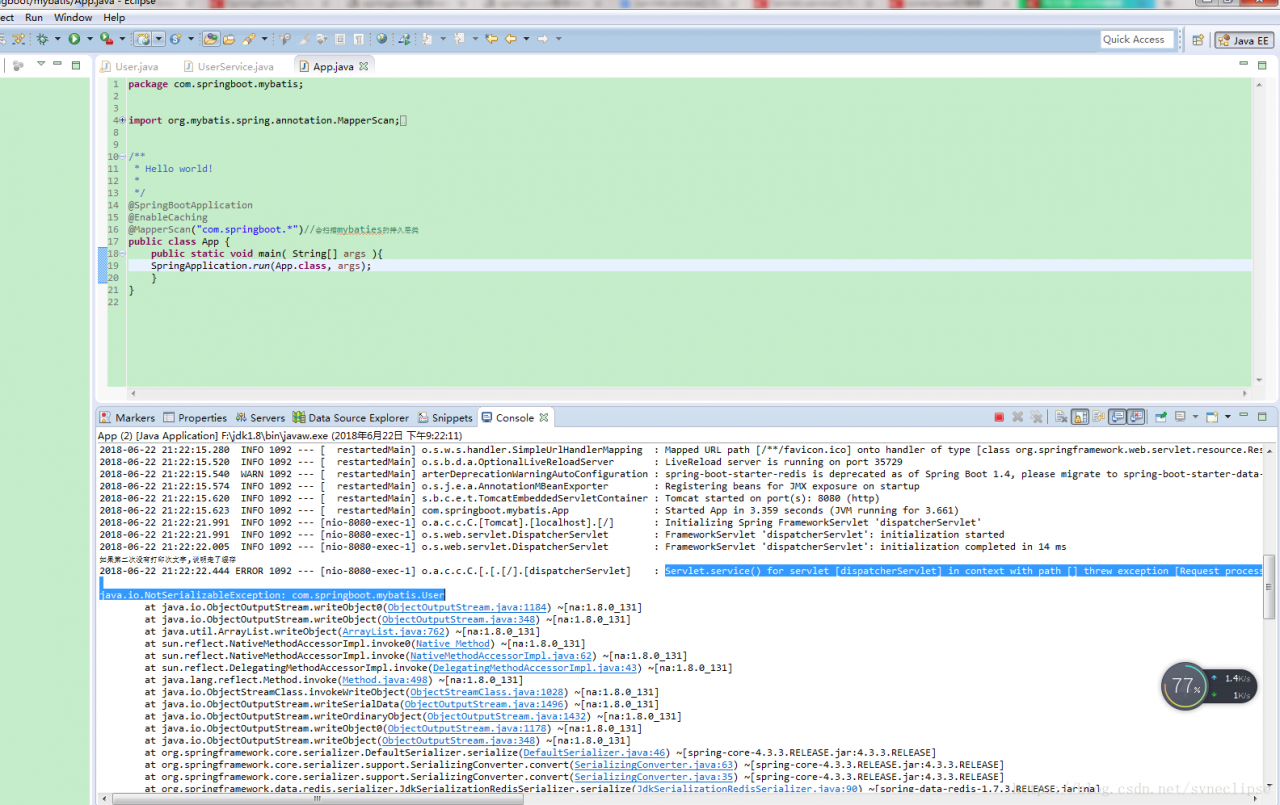
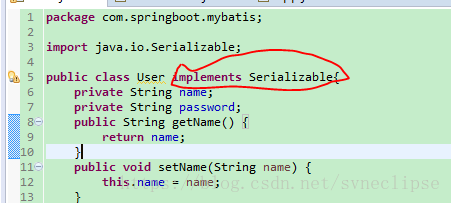
Cause: Serialization exception.
Solution: Serialize the POJO implementation
spring boot
spring boot
spring boot
spring boot
spring boot
spring boot
Error output from console:
2020-06-29 12:25:44.780 ERROR 1968 --- [nio-8080-exec-4] o.a.c.c.C.[.[.[/].[dispatcherServlet]    : Servlet.service() for servlet [dispatcherServlet] threw exception

java.lang.StackOverflowError: null
	at javax.servlet.http.HttpServletRequestWrapper.getSession(HttpServletRequestWrapper.java:244) ~[tomcat-embed-core-9.0.36.jar:9.0.36]
	at org.apache.catalina.core.ApplicationHttpRequest.getSession(ApplicationHttpRequest.java:583) ~[tomcat-embed-core-9.0.36.jar:9.0.36]
	at javax.servlet.http.HttpServletRequestWrapper.getSession(HttpServletRequestWrapper.java:244) ~[tomcat-embed-core-9.0.36.jar:9.0.36]
	at org.apache.catalina.core.ApplicationHttpRequest.getSession(ApplicationHttpRequest.java:583) ~[tomcat-embed-core-9.0.36.jar:9.0.36]
	at javax.servlet.http.HttpServletRequestWrapper.getSession(HttpServletRequestWrapper.java:244) ~[tomcat-embed-core-9.0.36.jar:9.0.36]
	at org.apache.catalina.core.ApplicationHttpRequest.getSession(ApplicationHttpRequest.java:583) ~[tomcat-embed-core-9.0.36.jar:9.0.36]
	at javax.servlet.http.HttpServletRequestWrapper.getSession(HttpServletRequestWrapper.java:244) ~[tomcat-embed-core-9.0.36.jar:9.0.36]
	at org.apache.catalina.core.ApplicationHttpRequest.getSession(ApplicationHttpRequest.java:583) ~[tomcat-embed-core-9.0.36.jar:9.0.36]
	at javax.servlet.http.HttpServletRequestWrapper.getSession(HttpServletRequestWrapper.java:244) ~[tomcat-embed-core-9.0.36.jar:9.0.36]
	at org.apache.catalina.core.ApplicationHttpRequest.getSession(ApplicationHttpRequest.java:583) ~[tomcat-embed-core-9.0.36.jar:9.0.36]
	at javax.servlet.http.HttpServletRequestWrapper.getSession(HttpServletRequestWrapper.java:244) ~[tomcat-embed-core-9.0.36.jar:9.0.36]
	at org.apache.catalina.core.ApplicationHttpRequest.getSession(ApplicationHttpRequest.java:583) ~[tomcat-embed-core-9.0.36.jar:9.0.36]
	at javax.servlet.http.HttpServletRequestWrapper.getSession(HttpServletRequestWrapper.java:244) ~[tomcat-embed-core-9.0.36.jar:9.0.36]
	at org.apache.catalina.core.ApplicationHttpRequest.getSession(ApplicationHttpRequest.java:583) ~[tomcat-embed-core-9.0.36.jar:9.0.36]
	at javax.servlet.http.HttpServletRequestWrapper.getSession(HttpServletRequestWrapper.java:244) ~[tomcat-embed-core-9.0.36.jar:9.0.36]
	at org.apache.catalina.core.ApplicationHttpRequest.getSession(ApplicationHttpRequest.java:583) ~[tomcat-embed-core-9.0.36.jar:9.0.36]
	at javax.servlet.http.HttpServletRequestWrapper.getSession(HttpServletRequestWrapper.java:244) ~[tomcat-embed-core-9.0.36.jar:9.0.36]
: The @Autowired annotation is not added to the implementation class in the Service layer. This will cause the implementation class to lack dependencies. An error will occur if the dependencies cannot be found after the project is started.
Original code:
private EmployeeDao employeeDao;
Modified code after adding annotations:
 @Autowired
   private EmployeeDao employeeDao;
The problem is resolved by adding the @Autowired annotation.
steps
1. In default environment:
conda install nb_conda_kernels
2. Then activate different virtual environments and install IpyKernel
conda install ipykernel
3. Restart Jupyter Notebook
After create the virtual environment, start jupyter can’t find the environment, the solution is as follows:
1. First activate the virtual environment
activate py3
2. Install ipykernel
conda install ipykernel
3. Create the kernel file
conda install -n py3 ipykernel
4. Write the environment into the Notebook kernel
python -m ipykernel install --user --name py3 --display-name "py3"
The first Py3 is the name of the virtual environment, and the second Py3 is the name displayed in the Jupyter.
The process of creating the virtual environment is really bumpy. I just encountered another problem. After creating a new Notebook, it keeps showing that it is connecting to the service. pip uninstall tornado
pip install tornado==5.0.0
Reference links
add conda jupyter environment jupyter notebook open file times wrong: the connection to backend service failed to build a…
Topic describes
Determine whether a linked list is a palindrome list.
// 1 2 nil
// 1 2 1 nil
// 1 2 2 1 nil
Thought analysis
The fast and slow pointer finds the midpoint of the linked list and splits the midpoint and reverses the tail list to compare whether the values of the head and tail list are equal in turn
Code implementation
func isPalindrome(head *ListNode) bool {
	if head == nil {
		return true
	}
	fast := head.Next
	slow := head
	for fast != nil && fast.Next != nil {
		fast = fast.Next.Next
		slow = slow.Next
	}

	tail := reverse(slow.Next)
	slow.Next = nil

	for head != nil && tail != nil {
		if head.Val != tail.Val {
			return false
		}
		head = head.Next
		tail = tail.Next
	}
	return true
}

func reverse(head *ListNode) *ListNode {
	if head == nil {
		return head
	}
	var pre *ListNode
	for head != nil {
		temp := head.Next
		head.Next = pre
		pre = head
		head = temp
	}
	return pre
}
Mysql export
Several Methods of Database
Methods a
Mysql> mysqldump — opt-h192.168.0.156-uusername-ppassword –skip-lock-tables databasename> The database. SQL
Change the IP address to localhost and you can use www.2cto.com
If Navicate is installed, then it is even easier to connect to the database, select the database, and then dump the SQL
Method 2
Enter CMD (note in OS CMD and not in MySQL)
= = = = = = = = = = = = = = = = = = =
1. Export database (SQL script)
Mysqldump -u username -p database name> Export filename
mysqldump -u root -p db_name > test_db.sql
Mysql> export a table from mysql
Mysql> mysqldump -u -p; Export filename
mysqldump -u wcnc -p test_db users> Test_users.sql (no semicolon at the end)
Methods three
Mysql> start mysql
/etc/init.d/mysql start
Export the entire database
mysqldump dbname > C: mydb. SQL -u root -p
Import the database
source mydb.sql
Mysql -u username -p database name < Database name.sql
More detailed database import tutorial
www.2cto.com
2.1. Export SQL Scripts
From the original database server, you can export SQL scripts using the PHP tutorial myadmin tool or the mysqldump command line (mysqldump command is located in the mysql/bin/ directory).
2.1.1 Use the phpMyAdmin tool
In the export options, select export “structure” and “data” and do not add “drop database” and “drop table” options.
Select the “save as file” option, or if you have a lot of data, select the “gzipped” option.
Save the exported SQL file.
2.1.2 Use the mysqldump command line
The command format
Mysqldump -u username -p database name> Database name.sql
Example:
mysqldump -uroot -p abc > abc.sql
Export database ABC to ABC. SQL file
When prompted for a password, enter the password for the user name of the database.
2.2. Create an empty database
From the master interface/control panel, create a database. Assume that the database name is ABC and the database full user is ABC_F.
2.3. Import SQL script for execution
There are also two methods, one using phpMyAdmin (my)
SQL database management tools, or
MySQL command line.
2.3.1 Use the phpMyAdmin tool
From the control panel, select the empty database to create, and click “Manage” to go to the admin tools page.
In the “SQL” menu, browse and select the exported SQL file, and click “Execute” to upload and execute.
Note: phpMyAdmin has a limit on the size of uploaded files, and PHP itself has a limit on the size of uploaded files, if the original SQL file is used
It is relatively large, you can use gzip to compress it first, for text files such as SQL files, you can get 1:5 or more compression ratio.
How to use gzip: www.2cto.com
# gzip xxxxx.sql
get
XXXXX. SQL. Gz file.
2.3.2 Use the MySQL command line
The command format
Mysql -u username -p database name < Database name.sql
Example:
mysql -uabc_f -p abc < abc.sql
Import database ABC from ABC. SQL file
When prompted for a password, enter the password for the user name of the database.
Usually, you may use a lot of MySQL import and export methods, today I will introduce you several import and export MySQL data methods, convenient for you to use in work.
Here’s what Baidu got:
Mysql> import files or data or execute related SQL
1
Mysql -h host address -u user name -p user password mysql -h host address -u user name -p user password (shell command line)
mysql -u root -p dbname < filename.sql
2
Execute an SQL
directly on the command line (shell command line)
mysql -hhostname -uusername -p dbname -e ‘select * from tbname limit 1’
After execution, the command line will prompt for the database password.
3
echo ‘select id from dbname.tbname where id = 1; ‘ | mysql -hhostname -ureadonly -preadonly dbname > xxxx.sql
4
Enter the MySQL database (where the SQL file is executed)
> source xxx.sql
END
Mysqldump = mysqldump;
1
Mysqldump -u user name -p password -h host database a-w “SQL condition” — lock-all-tables>; Path
mysqldump -hhostname -uusername -p dbname tbname> xxxx.sql
2
** Export the contents of the database table on the specified criteria. (-w option — where)
mysqldump -hhostname -uusername-p dbname tbname -w’id > = 1 and id< = 10000′–skip-lock-tables > xxxx.sql
3
Or the next line is
mysqldump -hhostname -uusername -p dbname tbname –where=’unit_id > = 1 and unit_id < = 10000′> ~/xxxx.sql
END
Mysqldump Export Database Table
1
mysqldump -u username -p database name> Export file name
> mysqldump -u breezelark-p mydb > mydb.sql
2
mysqldump -u username -p database name>
mysqldump -u username -p database name> Export file name
mysqldump -u lingxi -p mydb mytb> mytb.sql
3
Export a database structure (no data only structure)
mysqldump -u lingxi -p -d –add-drop-table mydb > mydb.sql
– d no data – add – drop – table before each the create statement adds a drop table
of course this is just one way of import and export, you can feel the choice suits own method.

Element ‘dependency’ cannot have character [children], because the type’s content type is element-on
Note when the problem is solved and copied. I have an extra> space and symbol problem. No.

When using the SCSS style in a VUE project,
<style lang="scss" scoped>
	 ........
</style>
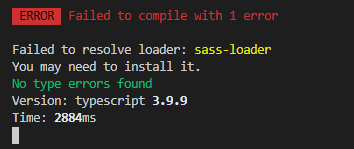
br> p>ge. json
devDepe>cies

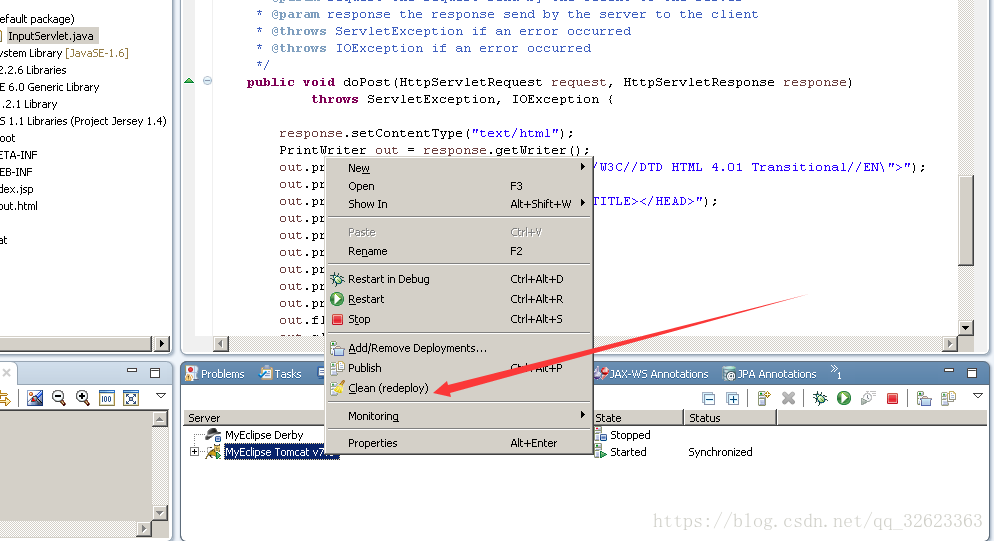
Sometimes, when accessing a servlet in MyEclipse, a 404 page will appear. I won’t go into this if the web.xml is not configured properly or the URL is wrong, but I will talk about the situation where everything seems to be correct but I still can’t access it.
All you need to do is find the container where the servlet is running, in this case Tomcat, close it first, then locate the corresponding project in Tomcat, click ReDeploy, and then start Tomcat.