Author Archives: Robins

Vs2012 compiling PCL dependency library vtk7.0

Software preparation:
1. Download the source code compression package VTK-7.0.0.zip from the VTK official website and extract it.
2. Download the installation package QT-Opensource-Windows-x86-MSVC2012_OpenGL-5.3.2. exe from the Qt official website, and install it by default.
3. Download the installation package cmake-3.0.2-win32-x86.exe from the official website of CMake, and install it by default.
Cmake set
1. Check Groupd and Advanced, and set the source code directory and build directory.
2. Press the Configure button, select VisualStudio 11 2012, click OK, and wait for the configuration to complete.
3. At the VTK node, locate and check VTK_GROUP_QT. Press the Configure button and wait for the configuration to complete. When done, CMake will report an error and click OK.
4. In the UngroundedEntries node with a red background, locate and change the value of VTK_QT_VERSION to 5. Set the value of QT_QMAKE_EXECUTABLE to C:/Qt/Qt5.3.2/5.3/msvc2012_opengl/bin/qmake. Exe. Press the Configure button and wait for the configuration to complete. When done, CMake will report an error and click OK.
5. In the UngroundedEntries node with red background, set the value of Qt5_DIR to C:/Qt/ qt5.3.2/5.3/msvc2012_opengl/lib/cmake/Qt5. Press the Configure button and wait for the configuration to complete. When done, CMake will no longer report errors.
6. On the CMAKE node, locate the CMAKE_INSTALL_PREFIX node and use the default Settings. This value is the installation directory of the VTK after compilation.
7. Click Add Entry button, set Name to CMAKE_DEBUG_POSTFIX, Type to STRING, Value to -GD, and click OK after setting. Press the Configure button and wait for the configuration to complete. Set this to ensure that the debug version of lib, DLL and release version of lib, the DLL name is different, to prevent later installation, both overwrite.
8. Click the Generate button and wait for the project VS file to be generated.
9. Locate the plugininstall. cmake file in the GUISupport\Qt folder of the build directory. Open it with Notepad and take line 5
SET (VTK_INSTALL_QT_PLUGIN_FILE QVTKWidgetPlugin. DLL)
Replace with
IF(BUILD_TYPE MATCHES Debug)
SET (VTK_INSTALL_QT_PLUGIN_FILE “QVTKWidgetPlugin – gd. DLL)”
ELSE()
SET (VTK_INSTALL_QT_PLUGIN_FILE QVTKWidgetPlugin. DLL)
ENDIF()
Note: Make sure that qvtkwidgetPlugin-gd.dll and qvtkwidgetPlugin.dll are surrounded by double quotation marks after substitution. Otherwise, subsequent compilation will return an error.
Save. This modification can prevent the QVTKWidgetPlugin file from being found when installing Qt plugin during debugging.

VS2012 compilation

1. Run VS as an administrator, click File, Open, and the dialog box pops up. Find the vtk.sln file in the path and open it.
2. In Solution Manager, go to ALL_BUILD, right-click, and click Build. Wait for VS to compile. When finished, find Install, click the right mouse button, and click Create.
3. Change the solution configuration to Release. In Solution Manager, go to ALL_BUILD, right-click, and click Build. Wait for VS to compile. When finished, find Install, click the right mouse button, and click Create.
4. After the above steps are completed, the compiled file will be in the path set by CMAKE_INSTALL_PREFIX.


Error lnk1120: 2 unresolved external commands: vtkrenderingopengl_ Autoinit (construct, destroy), which is referenced in

PCLS minimum bounding box calculation, using the https://blog.csdn.net/WillWinston/article/details/80196895 program.
In PCL1.8.0 + VS2013 + Win10 environment, debug error report:
(1) ERROR LNK1120: 2 external commands that cannot be resolved;
(2) ERROR LNK2019: Unable to parse the external symbol “VTKRENDERINGOPGL_AUTOINIT (CONSTRUCT)” at….. Is cited in;
(3) error LNK2019: Unable to resolve external symbol “vtkRenderingOpenGL_AutoInit(Destruct)” at….. Is referenced in.
Search the problem’s reason said: there is a header file, but can’t find the implementation (https://blog.csdn.net/ydc_ss/article/details/53227732) :
(1) contains only the header files, only the function of statement that does not contain the function implementation (implemented generally in the CPP file). So only through the compile, the connection is not successful.
(2) another reason is the function of the declarations and implementations in the header file, generally want to put the declarations in the header file, implementation in the CPP file. Each #include header file will have an implementation of the function. When connecting, the linker will not know which implementation to connect to and will report an error.
Therefore, I searched the file vtkrenderingOpenGL in the installed file and found that I was using vtkrenderingOpenGL2, so I could not find it. After modification, I reported an error to solve the problem.

VTK installation

1. Install visual cmake-gui
sudoapt-get install cmake-curses-gui
2 install Qt5
See Section 3.1 of the following link for the installation process
http://blog.csdn.net/lql0716/article/details/54564721
3 to install X11
sudoapt-get install libx11-dev libxext-dev libxtst-dev libxrender-dev libxmu-devlibxmuu-dev
4 to install OpenGL
sudoapt-get install build-essential libgl1-mesa-dev libglu1-mesa-dev libglut-dev

sudo apt-get install freeglut3-dev
5 compile VTK6.3
After download VTK6.3 and extract, extract the file name is commonly VTK – 6.3.0
download url: http://www.vtk.org/download/
open cmake – GUI interface in terminal input: cmake – GUI in cmake – GUI interface does the following:
1. Set the path of “Where is the source code:” to the path of the folder vtk-6.3.0, such as /home/vtk-6.3.0; 2. Set the path “Where to build the binaries:” to /home/vtk-6.3.0/build. Create a new folder called build under /home/vtk-6.3.0. 3. Click “Configure” and select “Current Generator” as “UNIX Makefiles” in the pop-up dialog box. When completed, it will prompt “Configuring Done”. 4. Because you are installing QT5 and VTK-6.3.0 default is Qt 4, you need to find Qt Version after the completion of Step 3, change 4 to 5, and then click “Configure” again. It will prompt “Configuring done” after completion. 5. Click “Generate”, and it will prompt “Generate done” after completion; 6, the terminal into the folder under the build path, type the following command:
sudo make
sudo make install 7, here is the
here refer to the following opencv icon after performing the above steps, VTK – 6.3.0 installation is complete.

Howto Install and Configure VTK on Ubuntu

Howto Install and Configure VTK on Ubuntu

    Download vtk-5.10.1.tar.gz fromhttp://vtk.org/VTK/resources/software.html#latestand extract; $cd/home/chen/Downloads/VTK5.10.1/ $mkdir VTKBin $cd VTKBin $cmake .. $ccmake .. configure as follows:
    press c to configure, and press g togenerate and exit;
    $make copy the include files andlibraries to system directories: $sudo make install copy the plugin to qt:

      $cd /usr/lib/qt4 sudo mkdir plugins cd plugins sudo mkdir designer sudo cp~/Downloads/VTK5.10.1/VTKBin/bin/libQVTKWidgetPlugin. so/usr/lib/qt4/plugins/designer open qtcreator (can be installedfrom Ubuntu Software Center) create one Gui application and open the ui by qtdesigner tocheck QVTKWidget.

To use VTK in your own project, addfollowing to the CMakeLists.txt in your project:
########################################################
#VTK
#set(VTK_DIR”~/Downloads/vtk/VTK5.10.1/build”)
set(VTK_DIR “/usr/local/lib/vtk-5.10”)
find_package(VTK REQUIRED)
include(${VTK_USE_FILE})
########################################################

add target link libraries to yourproject: ${VTK_LIBRARIES} QVTK

A complete example of using VTKtogether with Qt in a CMake project can be found at:
http://blog.csdn.net/owldestiny/article/details/8806128.

Herewe give a complete CMake project using both Qt and VTK, the completeprogram can be download athttp://download.csdn.net/detail/owldestiny/5262489:
Theproject structure is:
└──QtVtkTest
├──bin
│  └── QtVtkTest
├──build
├──CMakeLists.txt
├──include
│  └── QtVtkTest.h
├──qrc
├──src
│  ├── main.cpp
│  └── QtVtkTest.cpp
└──ui
└── QtVtkTest.ui

Inthis project we do not use qrc.
TheCMakeLists.txt is:
======================================================================
cmake_minimum_required(VERSION2.8)
project(QtVtkPCLTest)

set(CMAKE_BUILD_TYPEdebug)
########################################################
#Qt
find_package(Qt4REQUIRED)
include(${QT_USE_FILE})
add_definitions(${QT_DEFINITIONS})
########################################################

########################################################
#VTK
#set(VTK_DIR”~/Downloads/vtk/VTK5.10.1/build”)
set(VTK_DIR”/usr/local/lib/vtk-5.10″)
find_package(VTKREQUIRED)
include(${VTK_USE_FILE})
#MESSAGE(STATUS${VTK_LIBRARIES})
########################################################

########################################################
#PCL
find_package(PCL1.3 REQUIRED)
include_directories(${PCL_INCLUDE_DIRS})
link_directories(${PCL_LIBRARY_DIRS})
add_definitions(${PCL_DEFINITIONS})
########################################################

########################################################
#Projectsettings
#set(PROJECT_SOURCESmain.cpp)#all sources files
set(LIBRARY_OUTPUT_PATH${PROJECT_SOURCE_DIR}/lib)
set(EXECUTABLE_OUTPUT_PATH${PROJECT_SOURCE_DIR}/bin)
include_directories(${PROJECT_SOURCE_DIR}/include${CMAKE_CURRENT_BINARY_DIR})#to include ui_*.h generated byQT4_WRAP_UI, you should include ${CMAKE_CURRENT_BINARY_DIR}
aux_source_directory(${PROJECT_SOURCE_DIR}/src/PROJECT_SOURCES)
########################################################

########################################################
#GenerateQt files
set(PROJECT_HEADERS${PROJECT_SOURCE_DIR}/include/QtVtkPCLTest.h)#only headers includeQ_OBJECT
QT4_WRAP_CPP(PROJECT_HEADERS_MOC${PROJECT_HEADERS})

set(PROJECT_UI${PROJECT_SOURCE_DIR}/ui/QtVtkPCLTest.ui)#ui file
QT4_WRAP_UI(PROJECT_UI_UIC${PROJECT_UI})
#file(COPY${PROJECT_UI_UIC} DESTINATION ${PROJECT_SOURCE_DIR}/include/)#copyui_.h file to include
#message(STATUSPROJECT_UI: ${PROJECT_UI})
#message(STATUSPROJECT_UI_UIC: ${PROJECT_UI_UIC})
#message(STATUSCMAKE_BINARY_DIR: ${CMAKE_BINARY_DIR})
#message(STATUSPROJECT_BINARY_DIR: ${PROJECT_BINARY_DIR})
#message(STATUSCMAKE_SOURCE_DIR: ${CMAKE_SOURCE_DIR})
#message(STATUSPROJECT_SOURCE_DIR: ${PROJECT_SOURCE_DIR})
#message(STATUSCMAKE_CURRENT_BINARY_DIR: ${CMAKE_CURRENT_BINARY_DIR})

#set(PROJECT_RC${PROJECT_SOURCE_DIR}/qrc)#resource files
#QT4_WRAP_RESOURCES(PROJECT_RC_RCC${PROJECT_RC})
########################################################

########################################################
#generateexecutables and link libraries
add_executable(QtVtkPCLTest${PROJECT_SOURCES} ${PROJECT_HEADERS_MOC} ${PROJECT_UI_UIC})#${PROJECT_RC_RCC})
target_link_libraries(QtVtkPCLTest${QT_LIBRARIES} ${VTK_LIBRARIES} QVTK ${PCL_LIBRARIES})#QVTKQVTKWidget for VTK in Qt
======================================================================

The QtVtkTest. ui(only including one QVTKWidget) can be generated and edited by QtDesigner as:
======================================================================

<?xml version="1.0"encoding="UTF-8"?>
<ui version="4.0">
<class>mainWindow</class>
<widget class="QMainWindow"name="mainWindow">
<property name="geometry">
<rect>
<x>0</x>
<y>0</y>
<width>722</width>
<height>512</height>
</rect>
</property>
<property name="windowTitle">
<string>Qt VTK Test</string>
</property>
<widget class="QWidget"name="centralwidget">
<widget class="QVTKWidget"name="qvtkWidget">
<property name="geometry">
<rect>
<x>20</x>
<y>10</y>
<width>691</width>
<height>471</height>
</rect>
</property>
</widget>
</widget>
<widget class="QStatusBar"name="statusbar"/>
</widget>
<customwidgets>
<customwidget>
<class>QVTKWidget</class>
<extends>QWidget</extends>
<header>QVTKWidget.h</header>
</customwidget>
</customwidgets>
<resources/>
<connections/>
</ui>

======================================================================

The main.cpp is:
======================================================================

#include <QApplication>
#include "QtVtkTest.h"


int main(int argc, char**argv)
{
QApplication app(argc,argv);
Qt_QtVtkTest qtTest;
qtTest.show();

return app.exec();
}

======================================================================

TheQtVtkTest.h is:
======================================================================

#include <QtGui/QMainWindow>
#include "ui_QtVtkTest.h"

class Qt_QtVtkTest: publicQMainWindow
{
Q_OBJECT
public:
Qt_QtVtkTest()
{
ui.setupUi(this);
}
public:
Ui::mainWindow ui;

};

======================================================================

Installation of Ubuntu + VTK

Sudo apt-get install libvtk5.2 libvtk5-qt4-dev sudo apt-get install libvtk5.2 libvtk5-qt4-dev
Different Ubuntu versions support different versions of VTK, here is Ubuntu 10.04, followed by QT4 support.
 
two
1. Download source code
Address: http://www.vtk.org/VTK/resources/software.html
The version is the latest
2. Unzip
The tar ZXVF… .
A VTK folder is created in the current directory
3. Install OpenGL
apt-get install mesa-common-dev libgl1-mesa-dev
4. Install ccmake
sudo apt-get install cmake-curses-gui
5.cd VTK
6.mkdir VTK-build
7.cd VTK-build
8.ccmake .. /
9. Press C to start the configuration and set VTK_USE_QT to ON. BUILD_SHARED_LIBS is set to ON
10. Press T to enter detailed setup, then locate QT_QMake_Executable, press ENTER to modify, and change QMAKE
The path of the input, for example:/home/zhang/QtSDK/Desktop/Qt/4.8.0/GCC/bin/qmake. Confirm and press Enter to exit the modification.
11. Press C to check the Settings.
12. Confirm by C.
13. Press G to generate makefile and exit CCMAKE automatically
14.make
15.sudo make install.
 
Add (.pro file) to the project
INCLUDEPATH =/usr/local/include/VTK to 5.10
LIBS + = L/usr/local/lib/VTK – 5.10 \
 
5.2
INCLUDEPATH =/usr/include/VTK to 5.2
LIBS += -L/usr/lib \
Select as needed at the end
-lvtkCommon -lvtksys -lQVTK -lvtkViews -lvtkWidgets -lvtkInfovis -lvtkRendering -lvtkGraphics -lvtkImaging -lvtkIO -lvtkFiltering -lvtklibxml2 -lvtkDICOMParser -lvtkpng -lvtkpng -lvtktiff -lvtkzlib -lvtkjpeg -lvtkalglib -lvtkexpat -lvtkverdict -lvtkmetaio -lvtkNetCDF -lvtksqlite -lvtkexoIIc -lvtkftgl -lvtkfreetype -lvtkHybrid
 
Command line compilation
G + + – o Cylinder – O3 – I/usr/include/VTK – 5.2 – L/usr/local/lib – Wno – deprecated – lvtkCommon lvtkDICOMParser – lvtkexoIIc – lvtkFiltering – LVTKFTGL – lvtkGenericFiltering lvtkGraphics — lvtkHybrid -lvtkImaging -lvtkIO -lvtkNetCDF -lvtkRendering -lvtksys -lvtkVolumeRendering -lvtkWidgets Cylinder.cxx


VTK (1) — compile and install

Project environment: QT+VTK+ CMAKE


The file packages used in this article are:

    visual studio 2013
    DXSDK_Jun10
    Cmake – 3.3.2 rainfall distribution on 10-12 – win32 – x86
    Qt5.7
    Qt – v – system.addin – 1 – opensource
    TBB (Thread Building Blocks)
    VTK 7.1

1. Install Visual Studio 2013 Community

    Download https://www.visualstudio.com/downloads/download-visual-studio-vs
    Select Visual Studio 2013 ->; Community 2013
    Download and install community default locations and default optional features (takes about half an hour to complete)

Brief introduction of cmake generating all in vs Project_ BUILD、INSTALL、ZERO_ Check function!!

ALL_BUILD is used to compile the entire project. ALL_BUILD is the default target in a Makefile and builds the entire project, excluding install, unit tests, etc.
Zero_check monitors cmakelists.txt and tells the compiler to rebuild the entire project environment if cmakelists.txt changes. Zero_check is the first build target to execute, checking whether the generated VS project is expired compared to cMakelists.txt, and if it is, the VS project will be regenerated first. All other targets depend on this ZERO_CHECK, so building the other targets takes the ZERO_CHECK first, ensuring the immediacy of the generated project. Of course, you can also run this goal by hand.
Install CMAKE_INSTALL_DIR = INSTALL CMAKE_INSTALL_DIR = INSTALL CMAKE_INSTALL_DIR = INSTALL CMAKE_INSTALL_DIR = INSTALL CMAKE_INSTALL_DIR = INSTALL cmake See CMake’s INSTALL directive for details.

Vs compile VTK, only generate install error, stop, ask God how to solve?

VS2015 compiled VTK8.1, the previous was also successful, to the last step, only generate the install step error, error MSB3073 command “setlocal…
What is the meaning of this error and how to solve it?Thank you very much!
 
Attach an error message:
The severity code indicates that the project file line is prohibited from displaying status
Error MSB3073 command “setLocal
D:\cmake\ cmak.exe-dbuild_type = debug-p cmake_install. Cmake
%errorlevel% neq 0 goto :cmEnd
:>nd
endLoca>amp; call :cmErrorLevel %errorlevel% & Goto :cmDone
exit /b %1
cmdone
i>errorlevel % neq 0 goto :VCEnd
: vcend> INSTALL the C: \ Program Files \ MSBuild \ Microsoft (x86) Cpp \ v4.0 \ V140 \ Microsoft CppCommon. The targets 133

error lines of code:
& lt; Exec Command=”%(PostBuildEvent.Command)$(_BuildSuffix)” Condition=”‘%(PostBuildEvent.Command)’ ! = ””/>
 
———————————————–
The problem has been solved, the unified answer. I also stumbled upon the solution by accident.
Solution:
The versions of these software do not match, use:
VS2015 + VTK6.3.0 + cmake – 3.11.0 – win32 – x86
Just use these versions and follow the tutorial, and on my computer, VTK builds without any problems.
I computer Inspiron 7577, Windows7 system

Some errors in VTK compilation

1, error MSB6006: “cmd.exe” exited with code 1
The error description is shown below:

Reasons for error reported in VS2013 Output:
28> CMake Error at F:/vtk7.0/VTKsrc/CMake/ExternalData CMake: 1005 (the message) :
28 & gt; Object MD5=b7d4fa1943ca47ef537e6847886e3935 not found at:
28> http://midas3.kitware.com/midas/api/rest?method=midas.bitstream.download& checksum=b7d4fa1943ca47ef537e6847886e3935& Algorithm =MD5 (” Timeout was reached “)
; http://www.vtk.org/files/ExternalData/MD5/b7d4fa1943ca47ef537e6847886e3935 (” Failure when identifiers data from the peer “)
28 & gt; Call Stack (most recent call first):
28> F:/vtk7.0/VTKsrc/CMake/ExternalData CMake: 1027 (_ExternalData_download_object)
28 & gt; C: \ Program Files \ MSBuild \ Microsoft (x86) Cpp \ v4.0 \ V120 \ Microsoft CppCommon. The targets (170, 5) : error MSB6006: “CMD. Exe” exited with code 1.
Error reason:
This error is caused by the incorrect setting of VTK_DATA_ROOT in CMAKE, which is the BUILD_TESTING option, and the need to download the VTKDATA data at compile time. The time to download the data exceeds the maximum waiting time set due to the network speed or lack of scientific Internet surfing.
Solution:
Download the vtkdata.zip data and overwrite the MD5 file in the unzipper file \ExternalData\Objects\MD5 file in the binary directory.

Using vtk8.1 in qcreator

VS development VTK and ITK package setup is relatively complex, so we chose a lightweight IDE as the development tool.

Here Qt and VTK installation can refer to my previous article Win10 installation VS2017 + QT5.11 + VTK8.1.1 + ITK4.13, here focuses on how to use QCreator to use VTK.
This project’s GitHub address: Alxemade/VTK_ITK_SimpleTest/test_vtk/ Welcome Star and Fork.
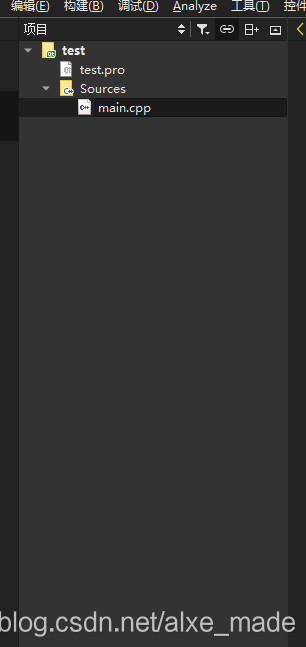
1. Create a new Qt Console Application in QTCreator
The project structure is shown in the figure below:

Then we enter the following code in main.cpp:

#include <QCoreApplication>

#include <vtkSmartPointer.h>
#include <vtkSphereSource.h>
#include <vtkPolyDataMapper.h>
#include <vtkActor.h>
#include <vtkImageViewer.h>
#include <vtkRenderWindowInteractor.h>
#include <vtkInteractorStyleImage.h>
#include <vtkJPEGReader.h>
#include <vtkRenderer.h>

#include<QVTKWidget.h>

int main(int argc,char **argv)
{
    QCoreApplication a(argc, argv);
    QVTKWidget widget;
    widget.resize(256,256);
    //Setupsphere
    vtkSmartPointer<vtkSphereSource>sphereSource=vtkSmartPointer<vtkSphereSource>::New();
    sphereSource->Update();
    vtkSmartPointer<vtkPolyDataMapper>sphereMapper=vtkSmartPointer<vtkPolyDataMapper>::New();
    sphereMapper->SetInputConnection(sphereSource->GetOutputPort());
    vtkSmartPointer<vtkActor>sphereActor= vtkSmartPointer<vtkActor>::New();
    sphereActor->SetMapper(sphereMapper);
    //Setupwindow
    vtkSmartPointer<vtkRenderWindow>renderWindow=vtkSmartPointer<vtkRenderWindow>::New();
    //Setuprenderer
    vtkSmartPointer<vtkRenderer>renderer=vtkSmartPointer<vtkRenderer>::New();
    renderWindow->AddRenderer(renderer);
    renderer->AddActor(sphereActor);
    renderer->ResetCamera();
    widget.SetRenderWindow(renderWindow);
    //mainWindow.setCentralWidget(widget);

    //mainWindow.show();
    widget.show();
    app.exec();
    return EXIT_SUCCESS;

}

Note: this is only an initial version and will need to be revised in the end.
CMAKE, compile, run and find a bunch of errors. Never mind, we need to add the VTK header and lib files.
Add the following code:

INCLUDEPATH += $$quote(C:/Program Files/VTK/include/vtk-8.1)
LIBS +=  $$quote(C:/Program Files/VTK/lib/vtk*.lib)

In this case, the path is the path where the output has been compiled by VTK.
2. Run the program above
Error: cannot open QApplication
QT += widgets
2. 2 Qwidget Must constuct a Qappliaction before Qwidget
We separate the Debug and Release versions. Modify the PRO file as follows:

QT -= gui

CONFIG += c++11 console
CONFIG -= app_bundle
QT += widgets
DEFINES += QT_DEPRECATED_WARNINGS
SOURCES += \
        main.cpp

SysStatus = $$system(if exist %windir%/SysWOW64 echo x64)  ## if contains SysWOW64 prove the windows is 64 bit

win32 {
    ## Windows common build here
    !contains(SysStatus, x64) {
        message("x86 build ")
        ## Windows x86 (32bit) specific build here

    } else {
        message("x86_64 build")
        ## Windows x64 (64bit) specific build here
        LABMR_PREFIX = E:/XC/vtk/vtk-8.1.1/build/lib
        ## TOOLS_PREFIX = quote(C:/Program Files)
    }
}
##VTK INCLUDEPATH Starts
INCLUDEPATH += $$quote(C:/Program Files/VTK/include/vtk-8.1)
##VTK Ends

CONFIG(debug, debug|release) {

## VTK Debug LIB Starts
LIBS += $${LABMR_PREFIX}/Debug/vtk*.lib
## VTK Debug LIB Ends

} else {

## VTK Release LIB Starts
LIBS += $${LABMR_PREFIX}/Release/vtk*.lib
## VTK Release LIB Ends
}

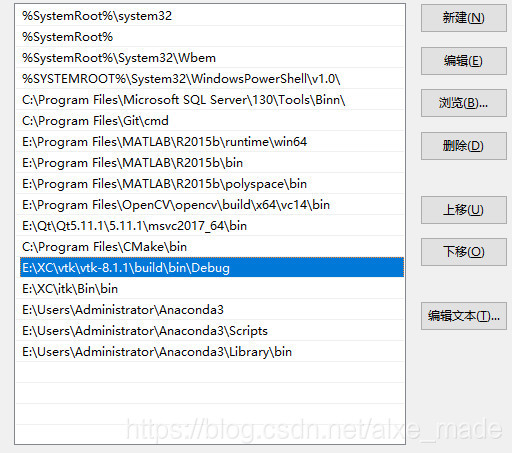
Also modify the system environment variable to:

2. 3 still can not open the normal file.
We have modified the CPP file:

    # include & lt; QCoreApplication> and oreApplication a(argc, argv); with Core removed. Add two lines:
#include <vtkAutoInit.h>
VTK_MODULE_INIT(vtkRenderingOpenGL2);

The final CPP file is as follows:

#include <QApplication>
#include <vtkAutoInit.h>
VTK_MODULE_INIT(vtkRenderingOpenGL2);

#include <vtkSmartPointer.h>
#include <vtkSphereSource.h>
#include <vtkPolyDataMapper.h>
#include <vtkActor.h>
#include <vtkImageViewer.h>
#include <vtkRenderWindowInteractor.h>
#include <vtkInteractorStyleImage.h>
#include <vtkJPEGReader.h>
#include <vtkRenderer.h>

#include<QVTKWidget.h>

int main(int argc,char **argv)
{
    //QCoreApplication a(argc, argv);
    QApplication app(argc, argv);
    QVTKWidget widget;
    widget.resize(256,256);
    //Setupsphere
    vtkSmartPointer<vtkSphereSource>sphereSource=vtkSmartPointer<vtkSphereSource>::New();
    sphereSource->Update();
    vtkSmartPointer<vtkPolyDataMapper>sphereMapper=vtkSmartPointer<vtkPolyDataMapper>::New();
    sphereMapper->SetInputConnection(sphereSource->GetOutputPort());
    vtkSmartPointer<vtkActor>sphereActor= vtkSmartPointer<vtkActor>::New();
    sphereActor->SetMapper(sphereMapper);
    //Setupwindow
    vtkSmartPointer<vtkRenderWindow>renderWindow=vtkSmartPointer<vtkRenderWindow>::New();
    //Setuprenderer
    vtkSmartPointer<vtkRenderer>renderer=vtkSmartPointer<vtkRenderer>::New();
    renderWindow->AddRenderer(renderer);
    renderer->AddActor(sphereActor);
    renderer->ResetCamera();
    widget.SetRenderWindow(renderWindow);
    //mainWindow.setCentralWidget(widget);

    //mainWindow.show();
    widget.show();
    app.exec();
    return EXIT_SUCCESS;

}

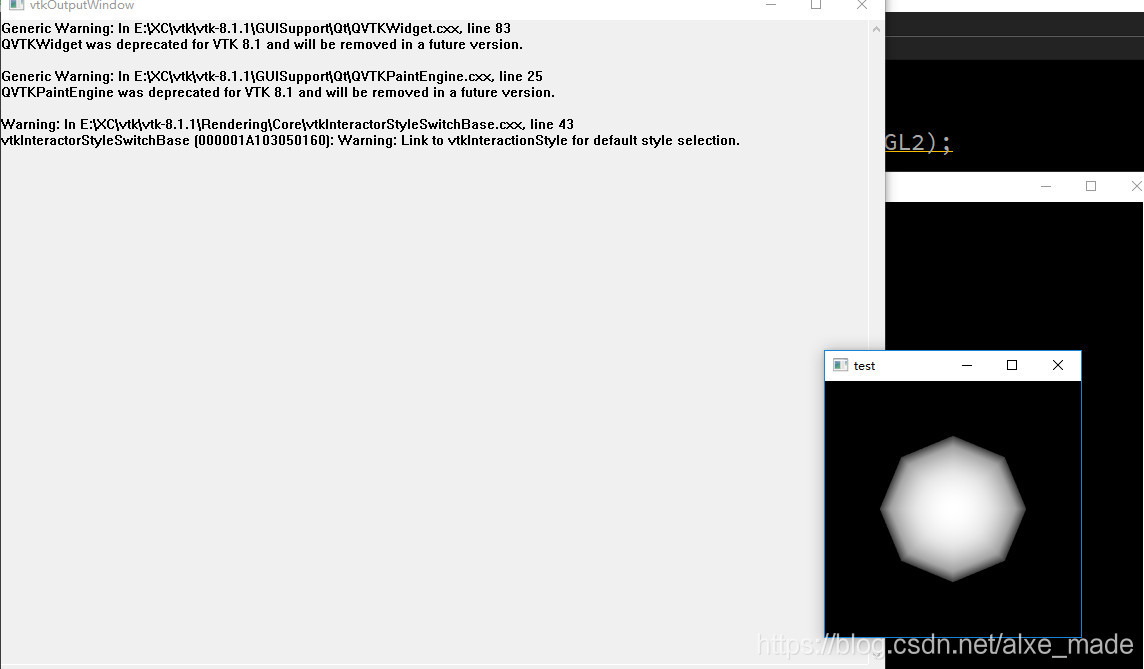
Then cmake, compile, and run:

Over

The word that writes this basically is the word that oneself need to check later is more convenient.

Solutions to several VTK compilation errors (vtk5.8 + VS2010)

There are several common errors that can occur during the compilation of a VTK project. The solutions are as follows:
error 1:
fatal error C1189: #error : This file requires _WIN32_WINNT to be #defined at least to 0x0403
cause:
The minimum version of the system set for version migration is too low
Visual C++ 2010 no longer supports targeting Windows 95, Windows 98, Windows ME, or Windows NT. If your WINVER or _WIN32_WINNT macros are assigned to one of these versions of Windows, you must modify the macros. When you upgrade a project that was created by using an earlier version of Visual C++, You may see compilation errors related to the WINVER or _WIN32_WINNT macros if they are assigned to a version of Windows that is no longer supported (From MSDN)
The immediate cause – there are three lines of code in atlcore.h:
#if _WIN32_WINNT < 0x0403
#error This file requires _WIN32_WINNT to be #defined at least to 0x0403. Value 0x0501 or higher is recommended.
#endif
> bbb>
All in VTK directory stdafx. H file reference to modify WINVER, http://msdn.microsoft.com/en-us/library/aa383745.aspx _WIN32_WINNT, _WIN32_WINDOWS and _WIN32_IE definition, for example: # define WINVER 0 x0501


error 2:
error C2371: ‘char16_t’ : redefinition
:
In VTK project files are generated in the process of choosing the Matlab support (tex-mex), and adopted the VS2010 and above programming environment (http://connect.microsoft.com/VisualStudio/feedback/details/498952/vs2010-iostream-is-incompatible-with-matlab-matrix-h) :
I looked at the source code for matrix.h < core/matlab/include/matrix.h>
It has a definition for char16_t
typedef char16_t char16_t;” . Also the C++ header “Microsoft Visual Studio 10.0\VC\ Include \ YVALS. H “Also defines the same identifier(CHAR16_T). Because of these two definitions we get the redefinition error when matrix iostream.h(it internally includes yvals.h) are included in some cpp file.
Declaration of char16_t in the yvals.h is newly introduced in dev10 and was not there in VS2008. Therefore you are getting this redefinition error now on VS 2010(Dev10).

> solution 1 (without follow-up test) : BBB>
//added by John for solving conflict with VS2010
#if (_MSC_VER) < 1600 //VS2010
# ifndef __STDC_UTF_16__
# ifndef CHAR16_T
# if defined(_WIN32) & & defined(_MSC_VER)
# define CHAR16_T wchar_t
# else
# define CHAR16_T UINT16_T
# endif
typedef CHAR16_T char16_t;
# endif
#endif
#else
#include < yvals.h>
#endif//VS2010
> solution 2 (without follow-up test) : BBB>
Rename all char16_t in matrix.h
 
error 3:
LNK4199: /DELAYLOAD:vtkIO.dll ignored; no imports found from vtkIO.dll
cause:
DelayLoad (selected from the in-depth analysis DelayLoad “http://blog.csdn.net/panda1987/article/details/5936770).
As we know, there are two basic methods of DLL loading: implicit loading and explicit loading. Implicit loading is the method introduced in the previous article, where the input table of a PE loads the DLL into the memory space before entering the entry function. Explicit loading uses methods like LoadLibrary and GetProAddress to load the DLL into the process space when needed. Both of these methods are the ones we use most often. So what is delay load?
A DLL designated as Delay Load will not actually load the process space until it is needed, which means that the DLL will not be loaded if no function located in the DLL is called. The loading process is done by LoadLibrary and GetProcAddress, which is, of course, transparent to the programmer.
What are the benefits of this?There is no doubt that the program starts faster, because many DLLs may not be used at startup. Even some DLLs may not be used in the entire life cycle, so with Delay Load, the DLL does not need any memory.
> bbb>
Because for dynamic libraries, the load information is still recorded in the corresponding lib file, so in the properties of the project Linker->; Input-> Additional Depandencies may also have #pragma comment(lib, “vtkio. lib”) at the beginning of the Cpp. If the file is not found by the compile prompt, it is also required in the Linder->; General-> Add the location of the file in the Additional Library Directory.
If someone is the difference between the Lib and Dll unclear, see: http://www.cppblog.com/amazon/archive/2011/01/01/95318.html

Reproduced in: https://www.cnblogs.com/johnzjq/archive/2011/12/14/2287823.html