Author Archives: Robins

Centos-7 set boot to enter the text interface (not enter the graphical interface)

Centos-7 Settings Boot to the text interface (not to the graphical interface)
: /etc/inittab = /etc/inittab = /etc/inittab = /etc/inittab = /etc/inittab = /etc/inittab = /etc/inittab = /etc/inittab

# Default runlevel. The runlevels used are:
#   0 - halt (Do NOT set initdefault to this)
#   1 - Single user mode
#   2 - Multiuser, without NFS (The same as 3, if you do not have networking)
#   3 - Full multiuser mode
#   4 - unused
#   5 - X11
#   6 - reboot (Do NOT set initdefault to this)
#
id:3:initdefault:

This file does not look the same in centos-6 as it does in centos-7:

[root@localhost ~]# uname -a
Linux localhost.localdomain 3.10.0-327.el7.x86_64 #1 SMP Thu Nov 19 22:10:57 UTC 2015 x86_64 x86_64 x86_64 GNU/Linux
[root@localhost ~]# ll /etc/inittab
-rw-r--r--. 1 root root 511 Nov 19  2015 /etc/inittab
[root@localhost ~]# cat /etc/inittab 
# inittab is no longer used when using systemd.
#
# ADDING CONFIGURATION HERE WILL HAVE NO EFFECT ON YOUR SYSTEM.
#
# Ctrl-Alt-Delete is handled by /usr/lib/systemd/system/ctrl-alt-del.target
#
# systemd uses 'targets' instead of runlevels. By default, there are two main targets:
#
# multi-user.target: analogous to runlevel 3
# graphical.target: analogous to runlevel 5
#
# To view current default target, run:
# systemctl get-default
#
# To set a default target, run:
# systemctl set-default TARGET.target
#

There is no place to set the level.
In fact, in Centos-7, you can directly enter the text interface without entering the graphical interface by using the command setup:

[root@localhost ~]# which systemctl
/usr/bin/systemctl

You can use your own man systemctl, but don’t go too far
Here is how to set it:

[root@localhost ~]# systemctl get-default
graphical.target
[root@localhost ~]# systemctl set-default multi-user.target
Removed symlink /etc/systemd/system/default.target.
Created symlink from /etc/systemd/system/default.target to /usr/lib/systemd/system/multi-user.target.
[root@localhost ~]# systemctl get-default
multi-user.target

Systemctl get-default is used to get the current default target.
use systemctl set – the default can be set the default target, the target can be graphical, target, multi – user. Target.
Well, that’s basically it, reboot and you’ll go straight to the text interface.
Reference source
Centos7 installation interface without interface


Centos7 unbounded installation interface
Centos7 unbounded below installation interface

https://blog.csdn.net/qq_39112646/article/details/109444462
1 install a graphical interface. Boot root login
2. Install X (X Window System) as follows:
Yum groupinstall “X Window System”
Complete
3. Then install the GNOME Desktop command as follows
Yum groupinstall “GNOME Desktop”
the software group is bigger, the installation process is slower, also can appear the words complete after the installation is complete.
4. After the installation is complete, enter startx to enter the graphical interface

1.Ctrl+ Alt + F2 toggle to command line mode
2. Enter the following command to view the current boot mode
Systemctl get-default
graphical. Target represents the graphical interface to boot
Multi-User. target means to start the DOS interface at boot time
3. Enter the following commands to set up the startup graphical interface
Systemctl set – the default graphical. Target
in the same way if you want to start the DOS boot interface should enter the following command
Systemctl set-default multi-user. Target
DOS interface with graphical toggle shortcut
aphics to DOS: Ctrl+ Alt + F2
DOS to graphics: type startx
or
Switch to the DOS interface by typing init 3 on the command
Type init 5 to switch to the graphical interface

composer Error: The requested PHP extension ext-bcmath * is missing from your system. Install or enable

The requested PHP extension exit-BCMath * is missing from your system. Install or enable PHP’s BCMath extension. The requested PHP extension exit-BCMath * is missing from your system.
Install the PHP BCMath extension 1. First check your own PHP version 2. After the installation is complete, restart php4. Check to see if the PHP extension is installed successfully

An error

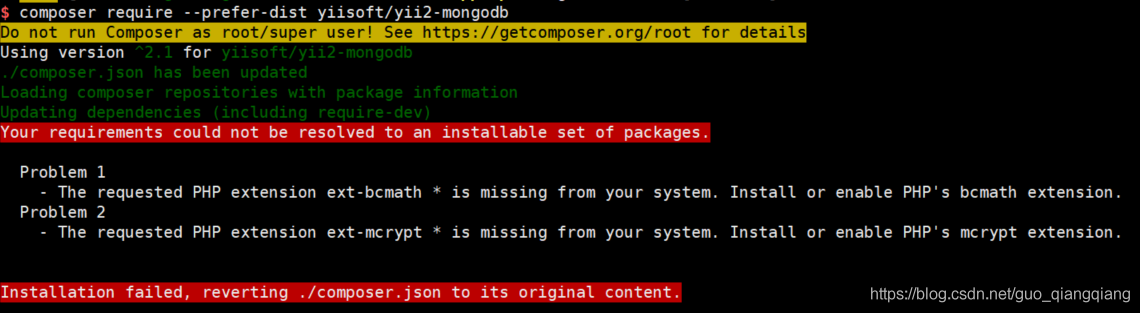
$ composer require --prefer-dist yiisoft/yii2-mongodb                            
Do not run Composer as root/super user! See https://getcomposer.org/root for details
Using version ^2.1 for yiisoft/yii2-mongodb
./composer.json has been updated
Loading composer repositories with package information
Updating dependencies (including require-dev)
Your requirements could not be resolved to an installable set of packages.

  Problem 1
    - The requested PHP extension ext-bcmath * is missing from your system. Install or enable PHP's bcmath extension.
  Problem 2
    - The requested PHP extension ext-mcrypt * is missing from your system. Install or enable PHP's mcrypt extension.


Installation failed, reverting ./composer.json to its original content.

Solution: Install the BCMath extension for PHP
1. Check your own version of PHP first

php -v

2. Install the corresponding version of the extension

yum  -y install php72w-bcmath

Note: 72W represents version 7.2. Please specify the version number when installing
3. After the installation is complete, restart PHP

service php-fpm restart  或  systemctl restart php-fpm

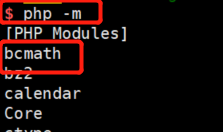
4. Check to see if the PHP extension was installed successfully

php -m

laravel Error mews/captcha is locked to version 3.2.4 and an update of this package was not requested.

Your requirements could not be resolved to an installable set of packages.

  Problem 1
    - mews/captcha is locked to version 3.2.4 and an update of this package was not requested.
    - mews/captcha 3.2.4 requires php ^7.2 -> your php version (8.0.1) does not satisfy that requirement.


Installation failed, reverting ./composer.json and ./composer.lock to their original content.

Resolve the version and ignore the version directly
Just follow this after your composer directive

--ignore-platform-reqs

For example, I installed BarryVDH/Laravel -debugbar appeared
Originally is:

composer require barryvdh/laravel-debugbar --dev

Change to install dependencies on success

composer require barryvdh/laravel-debugbar --dev --ignore-platform-reqs

Vue Error compiling template: Component template should contain exactly one root element. If you

Error Compiling Template:
Component template should contain exactly one root element. If you are using V-if on multiple elements, use V-else-if to chain them instead.
Component template should contain exactly one root element.
Component template should contain exactly one root element. If you use V-if in multi-element templates, instead use V-else-if to link them…
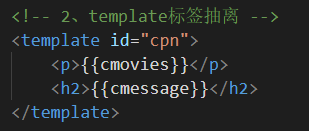
Problem code:

solution: so here under the template template should contain only one label element, rather than two or even more. The correct code after modification is as follows:

<template id="cpn">
    <div>
        <p>{{cmovies}}</p>
        <h2>{{cmessage}}</h2>
    </div>
</template>

Git authentication failure solution, due to the problem of password modification

fatal: Authentication failed for ‘http:xxxxxxxxxx.git/’

The solution

1. git config –global user.name “username”

Git config –global user.email “email” git config –global user.email


2. Git config –system –unset credential


3. Control Panel – User Account – Voucher Manager – Ordinary Voucher, modify and delete the git password in it

Reproduced in: https://www.cnblogs.com/ChineseLiao/p/9400191.html

Git authentication failed

Enter the command to clear the login and password

git config --system --unset credential.helper

And then when you push
it’s going to pop up the login window again
Use the following command to configure login free

 git config  credential.helper store

Git failed to authenticate

Git config –system –unset credential
Git config –global credential. Helper store
Git Config Credential. Helper Store (preferably this)
3, git pull pull code, will prompt for user name and password

Solved – problem cannot find module ‘webpack / bin / config yargs’

1. The question is:

module.js:538
    throw err;
    ^

Error: Cannot find module 'webpack/bin/config-yargs'
    at Function.Module._resolveFilename (module.js:536:15)
    at Function.Module._load (module.js:466:25)
    at Module.require (module.js:579:17)
    at require (internal/module.js:11:18)
    at Object.<anonymous> (D:\saic\dev\expressVue\node_modules\[email protected]@webpack-dev-server\bin\webpack-dev-server.js:54:1)
    at Module._compile (module.js:635:30)
    at Object.Module._extensions..js (module.js:646:10)
    at Module.load (module.js:554:32)
    at tryModuleLoad (module.js:497:12)
    at Function.Module._load (module.js:489:3)

 
Reason 2.
The above error occurs when webpack does not match the webpack-dev-server version. The specific version is as follows:
“Webpack” : “^ 4.35.0,”
“webpack – cli” : “^ 3.3.5”,
“webpack – dev – server” : “^ 2.11.5”
Webpack-dev-server should be used in pairs with Webpack, with versions 2.2.0 to 3.0.0 for 2.11.5 of Webpack.
Webpack is version 4.35.0 in this project, which is ahead of webpack-dev-server, so you should upgrade webpack-dev-server.
 
3. Solutions
3.1 Uninstall the old package and then upgrade

cnpm uninstall --save-dev webpack-dev-server

cnpm install --save-dev [email protected]

It is also possible to replace CNPM with NPM.
3.2 Modify package.json and then CNPM install or NPM install
The method for root 3.1 is essentially the same
 

Error: solution to the problem of cannot find module ‘webpack / bin / config yargs’

In terminal use of VSCode, using NPM run dev causes an error

Error: Cannot find module 'webpack/bin/config-yargs

It is possible that the webpack-dev-server version number is too low
The solution
Uninstall webpack-dev-server globally first

npm uninstall webpack-dev-server -g

Then install the latest version

npm install webpack-dev-server@latest

NPM run dev error: cannot find module ‘webpack cli / bin / config yargs‘

1- Open your package.json file

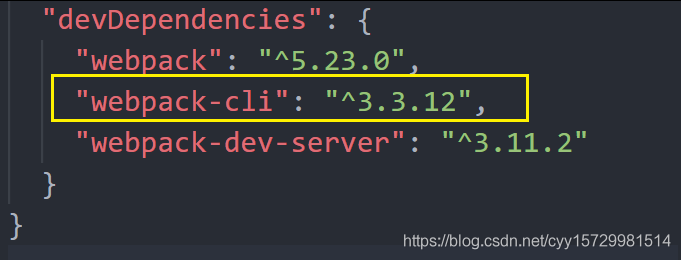
"devDependencies": {
    "webpack": "^5.2.0",
    "webpack-cli": "^4.1.0",
    "webpack-dev-server": "^3.11.0"
}

Webpack-cli: “^4.1.0”, which is version 4.*
2- Uninstall the current webpack-cli directive: NPM uninstall webpack-cli
3.* version directive: NPM install webpack-cli@3 -d

Just run NPM run dev!
 

Fatal error: Uncaught Error: Call to undefined function mysql_connect()

If this problem occurs, you can follow the following steps.
1. First of all, you should make sure that you are using the version of PHP. If it’s version 7.x, you should use mysqli_connect(), since mysqli_connect() has been dropped in version 7.x, or you can use PDO instead. The 5.x version of mysql_connect() and mysqli_connect() are both available.
2. If you don’t succeed in the first step, you can do the following:
Mysql> create extension=php_mysqli. DLL with extension=php_mysqli. DLL with extension=php_mysqli. DLL with extension=php_mysqli. DLL with extension=php_mysqli. DLL; ‘removed. Php_mysqli. DLL =php_mysqli. DLL = ‘; ‘and you find that there is no extension=php_mysql. DLL because it has been deprecated.)
(2) Then look for extension_dir = “ext”. ‘Remove it. 5.x is the same as 7.x.
(3) Then restart Apache.