Prepare files: windows8.1-kb2919442-x64.msu and windows8.1-kb2919355-x64.msu
 first install windows8.1-kb2919442-x64.msu, then install windows8.1-kb2919255-x64.msu, and restart the system after installation. Install vmware tools.
Author Archives: Robins
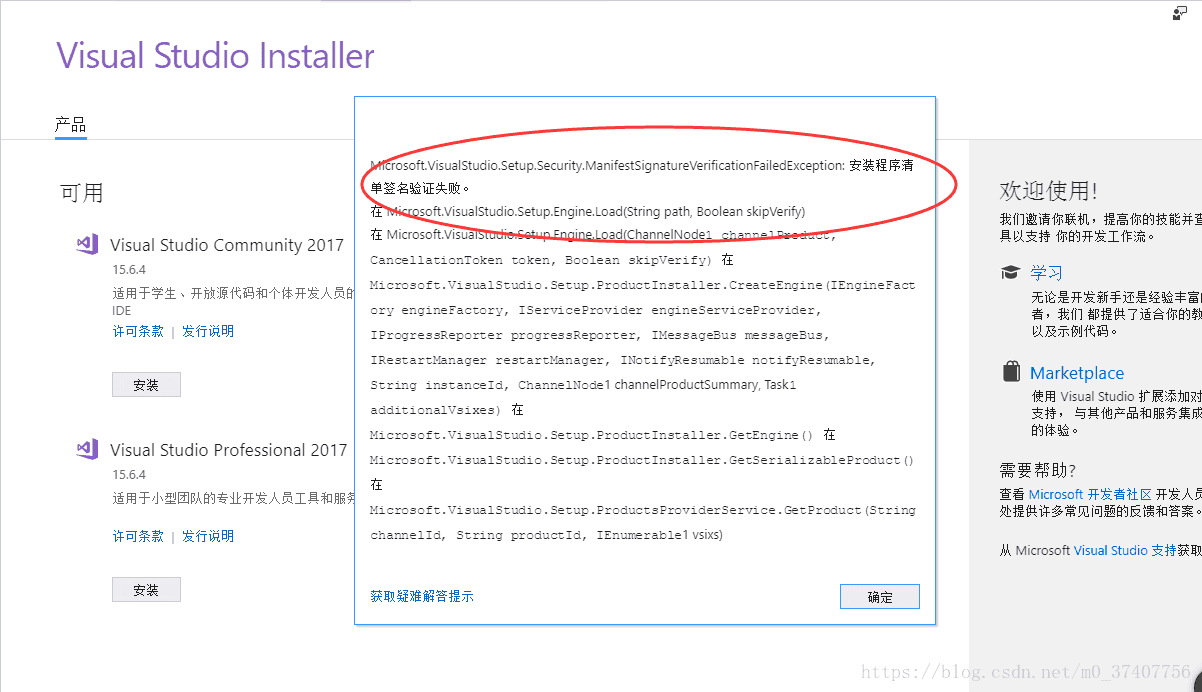
An error occurred when installing vs2017: failed to verify the signature of the installation program list
Problem Description: installation error: the signature verification of the installation program list failed!
Online mainstream solution 1:
Win + R – & gt; input“ gpedit.msc ”-≫ confirm
Computer configuration – & gt; Windows settings – & gt; security settings – & gt; local policies – & gt; security options – & gt; system Cryptography: use FIPS computer algorithms, modified to disabled.
Do you think that will solve the problem?It’s not that simple. Most people’s option is disabled, so this method is invalid.
2. Mainstream online solutions:
Win + R – & gt; enter “regedit” – & gt; OK
Modify the registry HKEY_ LOCAL_ Machine/system/currentcontrolset/control/Lisa/fipsalgorithmpolicy change 1 to 0.
Because the system is set in this way by default, the above scheme is useless.
My solution:
Install the certificates file offline. I have uploaded the file. Click to download the certificates file.
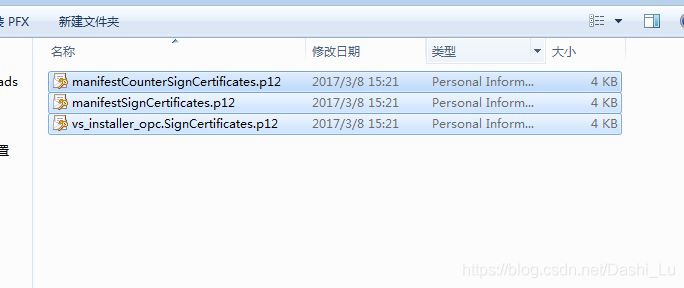
There are three files after decompression, double-click in turn, the default installation line, problem solving, pro test effective!

Wechat scan code, welcome to pay attention!

Git clone appears fatal: unable to access’ https://github.com/… The solution to the problem
As shown in the figure below, this error occurs when I try to clone someone else’s repo. When I clone from git: /, instead of HTTPS://, it works well.
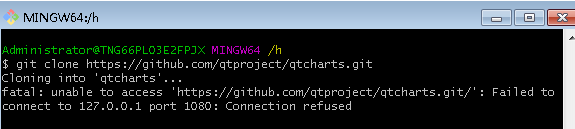
This happens because the agent is configured in GIT. Since it’s an HTTPS proxy (not HTTP) git config http.proxy And git config — Global http.proxy It doesn’t help.
Solution 1
1. Look at your git configuration
git config –global -l
If you don’t have any content related to the HTTPS proxy, such as HTTPS_ Proxy =… That’s not the problem.
If you have any content related to the HTTPS proxy, please remove it from the ~ /. Gitconfig file and try again.
2. If it still doesn’t work, unset the environment variable
env|grep -i proxy
You should have one or more lines_ proxy = …
Use the following to cancel settings one by one: cancel settings_ Proxy (or HTTPS)_ Proxy, depending on the name of the variable)
3. Check the environment variables again
env|grep -i proxy
If it doesn’t show anything, you should be good.
Note: this solution can be applied to HTTP and HTTPS proxy problems. Only the variable name is changed from HTTPS to http.
Solution 2
On the premise of opening shadowlocks, manually configure git agent. Git client can input the following two commands.
git config –global http.proxy http://127.0.0.1 :1080
git config –global https.proxy http://127.0.0.1 :1080
Http:// can also be changed to sockets5://, but the difference is that Socks5 does not support password free login to GitHub through pubkey, and only user name and password can be entered for each code submission. HTTP can support password free login.
Cancel agent:
git config –global –unset http.proxy
git config –global –unset https.proxy
In fact, plan 1 and plan 2 are the same method, but plan 2 is more specific. Most problems can be solved by plan 2. When plan 2 is invalid, plan 1 should be considered.
reference: https://stackoverflow.com/questions/24543372/git-cannot-clone-or-push-failed-to-connect-connection-refused
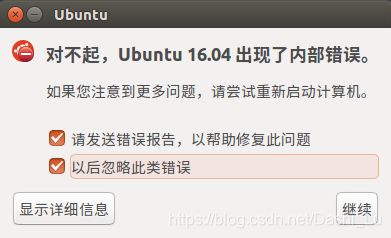
Solution: ubantu has an internal error
This often happens when Ubuntu is turned on.
Why
Ubuntu desktop version is pre installed with app, which is an error collection system. It collects software crashes, unhandled exceptions and other information, including program bugs, and generates crash reports for debugging purposes. When an application crashes or a bug occurs, the app will alert the user through a pop-up window and ask the user whether to submit a crash report
“Sorry, the application XXX has closed unexpectedly.”
“sorry, the application XXX has closed unexpectedly.”
“Sorry, Ubuntu XX.XX Has experienced an internal error.
“sorry, Ubuntu XX.XX An internal error has occurred. ”
“system program problem detected.”
“system program problem detected.”
The actual situation is not that Ubuntu is prone to internal errors, but that once the program crashes once, a. Crash file will be generated to record the crash information, which is stored in the directory:
/var/crash/
As long as you don’t deal with it, every time you turn on it, you will be prompted with an error. That is to say: the error report is not necessarily something wrong, but there have been errors, and you did not deal with them. Usually, go to the/var/crash/directory to view the crash file. If it’s not a big problem (usually no big problem), delete the crash file in the directory, and then no more errors will be reported.
Solution:
Error report for permanently closing the app
to permanently close the app, edit/etc/default/APP and modify the following parameters
enabled=0
Restart your Ubuntu system, and the app will shut down automatically
if you never use it again, there is a simple way to remove it completely
$ sudo apt-get purge apport
Even if I removed the app directly, there was no problem.
Vs error: there is an error in the script of the current page
This happens after vs update:
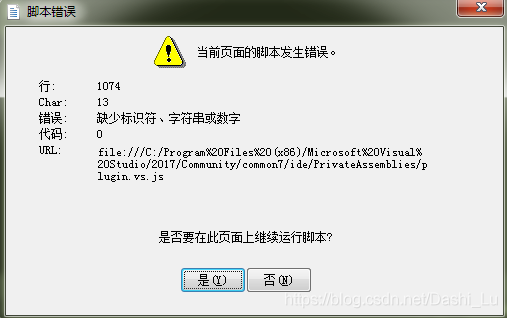
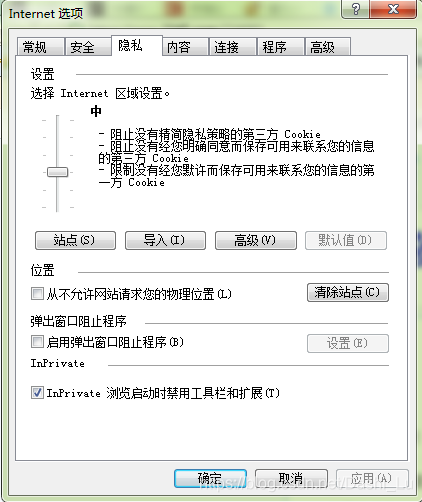
Solution:
Check the “stop Internet” option in the pop-up control panel to open the Internet privacy menu.
Note: when the above method fails, you can try to close “start diagnostic tool during debugging”;
Tools – & gt; options – & gt; debug – & gt; start the diagnostic tool while debugging; just remove the previous tick.
When opencv is used, vs is stuck and other software works normally
Problem: when using OpenCV, when the mouse is on mat, vs2017 often gets stuck, the computer doesn’t get stuck, and other software works normally.
Solution:
1. Tools – & gt; options – & gt; text editor – & gt; C/C + + – & gt; advanced – & gt; intelisense – & gt; automatically change quick information to false
2. Right click in any of the definitions in Mat & gt
3. Class CV_ Delete or cut the lengthy passage above exports mat to another place
4. Tools – & gt; options – & gt; text editor – & gt; C/C + + – & gt; advanced – & gt; intelisense – & gt; automatically change quick information back to true
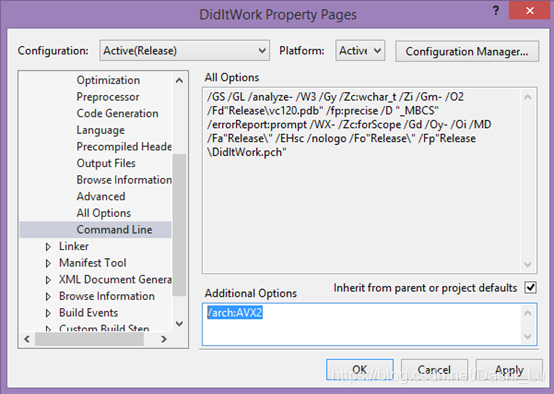
your compiler does not support AVX
As shown in the figure:
The initial value is/bigobj/wd4430
To read:/ arch:AVX2
How to Solve Error: Cannot find the declaration of element ‘beans’.
Question: org.xml.sax .SAXParseException: cvc-elt.1: Cannot find the declaration of element ‘beans’.
Solution: first, if the exception is encountered in the project, it is usually the problem that the project cannot download to the spring-beans-2.5.xsd file. The version number here varies with the project version.
Here you need to configure the local XSD file as follows:
Find the core package of spring referenced in your project, spring.jar
Open it with a compressed file and find the path
org/springframework/beans/factory/xml/
And configure the XSD file in this path to applicationContext.xml If there are more than one configuration file, all of them will be replaced
That is to say,
is the best choice
classpath:/org/springframework/beans/factory/xml/spring-beans-2.5.xsd
Instead of
http://www.springframework.org/schema/beans/spring-beans-2.5.xsd
Enables the configuration file to be read directly from the local
Reprint address: http://blog.csdn.net/wengang285/article/details/7587264
Method 2:
Modify spring applicationContext.xml Change the name space of the XML file to the following code:
<?xml version=”1.0″ encoding=”utf-8″?>
<!DOCTYPE beans PUBLIC “-//SPRING//DTD BEAN 2.0//EN” ” http://www.springframework.org/dtd/spring-beans-2.0.dtd “>
<beans>
Problem solving address: http://www.myexception.cn/vc-mfc/627052.html
The first method seems to have no effect, so I use the second method to solve the problem
Twitter’s distributed self increasing ID algorithm snowflake (Java version)
summary
In distributed systems, there are some scenarios where a globally unique ID is needed. In this case, in order to prevent ID conflicts, a 36 bit UUID can be used. However, UUID has some disadvantages. First, it is relatively long. In addition, UUID is generally unordered.
Sometimes we want to use a simpler ID, and we want the ID to be generated in time order.
Twitter’s snowflake solved this problem. At first, twitter migrated the storage system from Mysql to Cassandra. Because Cassandra had no sequential ID generation mechanism, it developed such a global unique ID generation service.
structure
The structure of each part is as follows:
0 – 0000000000 0000000000 0000000000 0000000000 0 – 00000 – 00000 – 000000000000
The first bit is unused, the next 41 bits are milliseconds (the length of 41 bits can be used for 69 years), then 5-bit datacenterid and 5-bit workerid (the length of 10 bits can support deployment of 1024 nodes at most), and the last 12 bits are counts within milliseconds (the 12 bit counting sequence number supports 4096 ID serial numbers per millisecond for each node)
A total of 64 bits, a long type. (length of converted string is 18)
The IDs generated by snowflake are sorted according to the time increment, and there is no ID collision (distinguished by datacenter and workerid) in the whole distributed system, and the efficiency is high. It is said that snowflake can generate 260000 IDS per second.
Source code
(Java version of the source)

/**
 * Twitter_Snowflake<br>
 * The structure of SnowFlake is as follows (each part is separated by -):<br>
 * 0 - 0000000000 0000000000 0000000000 0000000000 0 - 00000 - 00000 - 000000000000 <br>
 * 1-bit identifier, as the long basic type is signed in Java, the highest bit is the sign bit, positive numbers are 0, negative numbers are 1, so the id is generally positive, the highest bit is 0 <br>
 * 41-bit time intercept (milliseconds), note that the 41-bit time intercept is not a time intercept to store the current time, but the difference between the time intercept (current time intercept - start time intercept)
 * the value obtained), where the start time intercept, generally our id generator to start using the time specified by our program (the following program IdWorker class startTime property). 41-bit time intercept, you can use 69 years, year T = (1L << 41)/(1000L * 60 * 60 * 24 * 365) = 69<br>
 * 10-bit data machine bits that can be deployed in 1024 nodes, including 5-bit datacenterId and 5-bit workerId<br>
 * 12-bit sequential, millisecond counting, 12-bit counting sequence number supports 4096 ID sequential numbers per node per millisecond (same machine, same time cutoff)<br>
 * Add up to exactly 64 bits for a Long type. <br>
 * The advantage of SnowFlake is that the overall self-increasing sorting by time and no ID collision within the whole distributed system (distinguished by data center ID and machine ID), and high efficiency, tested, SnowFlake can generate about 260,000 IDs per second.
 */
public class SnowflakeIdWorker {

    // ==============================Fields===========================================
    /** Start time cutoff (2015-01-01) */
    private final long twepoch = 1420041600000L;

    /* The number of bits occupied by the machine id */
    private final long workerIdBits = 5L;

    /* The number of bits occupied by the data identifier id */
    private final long datacenterIdBits = 5L;

    /* The maximum machine id supported, resulting in 31 (this shift algorithm can quickly calculate the maximum number of decimal digits that can be represented by a few binary digits) */
    private final long maxWorkerId = -1L ^ (-1L << workerIdBits);

    /* The maximum supported data identifier id, resulting in 31 */
    private final long maxDatacenterId = -1L ^ (-1L << datacenterIdBits);

    /** The number of bits in the id that the sequence occupies */.
    private final long sequenceBits = 12L;

    /** The machine ID is shifted 12 bits to the left */.
    private final long workerIdShift = sequenceBits;

    /** The data identifier id is shifted to the left by 17 bits (12+5)*/.
    Private final long datacenterIdShift = sequenceBits + workerIdBits。

    /** The time truncation is shifted to the left by 22 bits (5+5+12) */.
    private final long timestampLeftShift = sequenceBits + workerIdBits + datacenterIdBits。

    /** Generate the mask for the sequence, here 4095. (0b111111111111=0xfff=4095) */
    private final long sequenceMask = -1L ^ (-1L << sequenceBits);

    /** Work machine ID(0~31) */
    private long workerId;

    /** Work machine ID(0~31) */
    private long datacenterId;

    /** Intra-millisecond sequence (0~4095) */
    private long sequence = 0L;

    /** Time cutoff of the last generated ID */
    private long lastTimestamp = -1L;

    //==============================Constructors=====================================
    /**
     * Constructor
     * @param workerId Job ID (0~31)
     * @param datacenterId datacenterId (0~31)
     */
    public SnowflakeIdWorker(long workerId, long datacenterId) {
        if (workerId > maxWorkerId || workerId < 0) {
            throw new IllegalArgumentException(String.format("worker Id can't be greater than %d or less than 0", maxWorkerId));
        }
        if (datacenterId > maxDatacenterId || datacenterId < 0) {
            throw new IllegalArgumentException(String.format("datacenter Id can't be greater than %d or less than 0", maxDatacenterId));
        }
        this.workerId = workerId;
        this.datacenterId = datacenterId;
    }

    // ==============================Methods==========================================
    /**
     * Get the next ID (this method is thread-safe)
     * @return SnowflakeId
     */
    public synchronized long nextId() {
        long timestamp = timeGen();

        //If the current time is less than the timestamp of the last ID generation, it means that the system clock is backed off and an exception should be thrown at this time
        if (timestamp < lastTimestamp) {
            throw new RuntimeException(
                    String.format("Clock moved backwards.  Refusing to generate id for %d milliseconds", lastTimestamp - timestamp));
        }

        //If it was generated at the same time, then perform a sequence within milliseconds
        if (lastTimestamp == timestamp) {
            sequence = (sequence + 1) & sequenceMask;
            // sequence overflow in milliseconds
            if (sequence == 0) {
                //Block until the next millisecond, get the new timestamp
                timestamp = tilNextMillis(lastTimestamp);
            }
        }
        //Timestamp change, sequence reset in milliseconds
        else {
            sequence = 0L;
        }

        //Time cutoff of the last generated ID
        lastTimestamp = timestamp;

        //Shifted and put together by orthogonal operations to form a 64-bit ID
        return ((timestamp - twepoch) << timestampLeftShift) //
                | (datacenterId << datacenterIdShift) //
                | (workerId << workerIdShift) //
                | sequence;
    }

    /**
     * Block to the next millisecond until the new timestamp is obtained
     * @param lastTimestamp Time cutoff of the last generated ID
     * @return currentTimestamp
     */
    protected long tilNextMillis(long lastTimestamp) {
        long timestamp = timeGen();
        while (timestamp <= lastTimestamp) {
            timestamp = timeGen();
        }
        return timestamp;
    }

    /**
     * Returns the current time in milliseconds
     * @return current time in milliseconds
     */
    protected long timeGen() {
        return System.currentTimeMillis();
    }

    //==============================Test=============================================
    /** TEST */
    public static void main(String[] args) {
        SnowflakeIdWorker idWorker = new SnowflakeIdWorker(0, 0);
        for (int i = 0; i < 1000; i++) {
            long id = idWorker.nextId();
            System.out.println(Long.toBinaryString(id));
            System.out.println(id);
        }
    }
}
“21442;” 32771;
Tensorflow C++:You must define TF_LIB_GTL_ALIGNED_CHAR_ARRAY for your compiler
When using the tensorflow C++ API, the error You must define TF_LIB_GTL_ALIGNED_CHAR_ARRAY for your compiler.
The reason is as follows (see reference).
If you omit the
COMPILER_MSVCdefinition, you will run into an error saying “You must defineTF_LIB_GTL_ALIGNED_CHAR_ARRAYfor your compiler.” If you omit theNOMINMAXdefinition, you will run into a number of errors saying “’(‘: illegal token on right side of ‘::’”. (The reason for this is that<Windows.h>gets included somewhere, and Windows has macros that redefineminandmax. These macros are disabled withNOMINMAX.)
Solution 1:
Add at the beginning of the code
#pragma once

#define COMPILER_MSVC
#define NOMINMAX
Solution 2:
Take vs2017 as an example: attribute Manager — > C/C + + –> preprocessor definition
Paste in the following
COMPILER_ MSVC
NOMINMAX
put things right once and for all!
ValueError: Input 0 of node import/save/Assign was passed float from import/beta1_power:0 incompatib
Exception encountered while importing optimized frozen graph.
# read pb into graph_def
with tf.gfile.GFile(pb_file, "rb") as f:
    graph_def = tf.GraphDef()
    graph_def.ParseFromString(f.read())

# import graph_def
with tf.Graph().as_default() as graph:
    tf.import_graph_def(graph_def)
Get exception in this line:
tf.import_ graph_ def(graph_ def)
ValueError: Input 0 of node import/save/Assign was passed float from import/beta1_ power:0 incompatible with expected float_ ref.
The solution: make sure your_ The file format is correct (similar to this), and try to_ graph_ Set some values in the ‘name’ parameter of def() to try to override the default value of ‘import’, as follows:
import tensorflow as tf

from tensorflow.python.platform import gfile
model_path="/tmp/frozen/dcgan.pb"

# read graph definition
f = gfile.FastGFile(model_path, "rb")
gd = graph_def = tf.GraphDef()
graph_def.ParseFromString(f.read())

# fix nodes
for node in graph_def.node:
    if node.op == 'RefSwitch':
        node.op = 'Switch'
        for index in xrange(len(node.input)):
            if 'moving_' in node.input[index]:
                node.input[index] = node.input[index] + '/read'
    elif node.op == 'AssignSub':
        node.op = 'Sub'
        if 'use_locking' in node.attr: del node.attr['use_locking']

# import graph into session
tf.import_graph_def(graph_def, name='')
tf.train.write_graph(graph_def, './', 'good_frozen.pb', as_text=False)
tf.train.write_graph(graph_def, './', 'good_frozen.pbtxt', as_text=True)fatal error LNK2019[UNK]fatalerror LNK1120
The reason for the error is as follows:
① You use other people’s libraries, such as opencv library, OpenGL library and other third-party libraries. The common situation is that you only include the header file, but there is no import file
② You don’t use other people’s libraries. Some of Microsoft’s own libraries may also have such problems. At this time, the common situation is that the header file of the failed function is in the included directory of the project property, but the corresponding library file is not in the default library directory of the project property. For example, create view glcontext (struct HDC) in FAQ style__ *) function is such a case. This function is defined in the header file wingdi. H. This header file is in the default included directory in the project properties, but the corresponding library file opengl32. Lib is not in the library directory
③ You use your own library file. I haven’t tried this situation. I’ve seen some comments on the Internet
Fatal error lnk1120 cause:
① . contains only the header file, only the declaration of this function, but not the implementation of this function (the implementation is generally placed in the cpp file). So it can only be compiled, and the connection is not successful.
② Another reason is that the declaration and implementation of the function are put in the header file. Generally, the declaration should be put in the header file and the implementation in the cpp file. In this way, each file that contains the header file will have an implementation of the function. When connecting, the connector does not know which implementation to connect, so an error is reported.