Author Archives: Robins

[Solved] pycuda._driver.LogicError: cuFuncSetBlockShape failed: invalid resource handle

Invalid resource handle error in pycuda code

When running CUDA code, the following error occurs:

File "/mnt/lustre/demo/extract_disp_newtopo/face_registration-master/code/poisson.py", line 147, in blend_gs_cuda
    block = (1024, 1, 1))
  File "/mnt/lustre/miniconda3/envs/pycuda/lib/python3.6/site-packages/pycuda/driver.py", line 436, in function_call
    func._set_block_shape(*block)
pycuda._driver.LogicError: cuFuncSetBlockShape failed: invalid resource handle

Solution:
find the CUDA function part with the problem:

mod = SourceModule("""
			#include <stdint.h>
			__global__ void construct_b(
				const uint8_t* src, const int16_t* u, const int16_t* v,
				float* b,
				int pix_num, int size
			)

You can add any sentence in the following code before the function declaration

src = torch.cuda.ByteTensor(8)# Fill in the numbers at will, and the matrix is also fine, but the data type should be consistent with the data type in C++
b   = torch.cuda.FloatTensor(9)

The complete code is as follows:

src = torch.cuda.ByteTensor(8)
mod = SourceModule("""
			#include <stdint.h>
			__global__ void construct_b(
				const uint8_t* src, const int16_t* u, const int16_t* v,
				float* b,
				int pix_num, int size
			)

The specific reason is unknown because it occurs occasionally.

[Solved] Sqoop Error: ERROR tool.ImportTool: Import failed: java.io.IOException

21/11/08 12:13:10 ERROR tool.ImportTool: Import failed: java.io.IOException: Cannot initialize Cluster. Please check your configuration for mapreduce.framework.name and the correspond server addresses.
        at org.apache.hadoop.mapreduce.Cluster.initialize(Cluster.java:143)
        at org.apache.hadoop.mapreduce.Cluster.<init>(Cluster.java:108)
        at org.apache.hadoop.mapreduce.Cluster.<init>(Cluster.java:101)
        at org.apache.hadoop.mapreduce.Job$10.run(Job.java:1311)
        at org.apache.hadoop.mapreduce.Job$10.run(Job.java:1307)
        at java.security.AccessController.doPrivileged(Native Method)
        at javax.security.auth.Subject.doAs(Subject.java:422)
        at org.apache.hadoop.security.UserGroupInformation.doAs(UserGroupInformation.java:1844)
        at org.apache.hadoop.mapreduce.Job.connect(Job.java:1306)
        at org.apache.hadoop.mapreduce.Job.submit(Job.java:1335)
        at org.apache.hadoop.mapreduce.Job.waitForCompletion(Job.java:1359)
        at org.apache.sqoop.mapreduce.ImportJobBase.doSubmitJob(ImportJobBase.java:200)
        at org.apache.sqoop.mapreduce.ImportJobBase.runJob(ImportJobBase.java:173)
        at org.apache.sqoop.mapreduce.ImportJobBase.runImport(ImportJobBase.java:270)
        at org.apache.sqoop.manager.SqlManager.importTable(SqlManager.java:692)
        at org.apache.sqoop.manager.MySQLManager.importTable(MySQLManager.java:127)
        at org.apache.sqoop.tool.ImportTool.importTable(ImportTool.java:520)
        at org.apache.sqoop.tool.ImportTool.run(ImportTool.java:628)
        at org.apache.sqoop.Sqoop.run(Sqoop.java:147)
        at org.apache.hadoop.util.ToolRunner.run(ToolRunner.java:76)
        at org.apache.sqoop.Sqoop.runSqoop(Sqoop.java:183)
        at org.apache.sqoop.Sqoop.runTool(Sqoop.java:234)
        at org.apache.sqoop.Sqoop.runTool(Sqoop.java:243)
        at org.apache.sqoop.Sqoop.main(Sqoop.java:252)

The above error occurs when running the sqoop script (the content of the script is to import MySQL data into HDFS). It is found that there is a lack of dependency. I still report an error after copying the two jar packages hadoop-mapreduce-client-common-2.8.5.jar and hadoop-mapreduce-client-core-2.8.5.jar to the Lib directory of sqoop, Then I copied all the jar packages in the hadoop-2.8.5/share/hadoop/mapreduce directory of Hadoop to solve the problem and run the script successfully. It was simple and violent.

[Solved] TensorFlow Error: GetNext() failed because the iterator has not been initialized

Error Messages:
FailedPreconditionError (see above for traceback): GetNext() failed because the iterator has not been initialized. Ensure that you have run the initializer operation for this iterator before getting the next element. [[Node: IteratorGetNext = IteratorGetNextoutput_shapes=[, ], output_types=[DT_UINT8, DT_UINT8], _device=”/job:localhost/replica:0/task:0/device:CPU:0″]]

Solution:
Iterator is not initialized
Add before the error code: sess.run(iterator.initializer)

refer to: https://stackoverflow.com/questions/48443203/tensorflow-getnext-failed-because-the-iterator-has-not-been-initialized

[Solved] YUM Error: error: rpmdb: BDB0113 Thread/process 11498/140107732375616 failed

Problem description

An error occurred while installing the software using yum

[root@localhost ~]# yum install pv -y
error: rpmdb: BDB0113 Thread/process 11498/140107732375616 failed: BDB1507 Thread died in Berkeley DB library
error: db5 error(-30973) from dbenv->failchk: BDB0087 DB_RUNRECOVERY: Fatal error, run database recovery
error: cannot open Packages index using db5 -  (-30973)
error: cannot open Packages database in /var/lib/rpm
CRITICAL:yum.main:

Error: rpmdb open failed
[root@localhost ~]# 

Problem analysis

Yum was unable to open the package index using db5 – (- 30973) and the package database in/var/lib/rpm
according to the prompt yumrpmdb: bdb0113 thread/process 11498/140107732375616 failed, enter/var/lib/rpm to delete the corresponding DB file, and then rebuild yum

Solution:

1. View the/var/lib/RPM directory and delete it__DB * file

$ /var/lib/rpm
$ ls
Basenames     __db.001  __db.003  Group       Name          Packages     Requirename  Sigmd5
Conflictname  __db.002  Dirnames  Installtid  Obsoletename  Providename  Sha1header   Triggername
$ rm -rf __db.*

2. Refactoring yum

$ rpm --rebuilddb

3. Clear Yum cache

$ yum clean all

4. Update the software chain of Yum

$  yum repolist

[Solved] Failed to load class org.slf4j.impl.StaticLoggerBinder

The version of slf4j-log4j12 I used is 1.7.30, and I encountered an error when using Failed to load class org.slf4j.impl.StaticLoggerBinder:
Failed to load class org.slf4j.impl.StaticLoggerBinder
This warning message is reported when the org.slf4j.impl.StaticLoggerBinder class could not be loaded into memory. This happens when no appropriate SLF4J binding could be found on the class path. Placing one (and only one) of slf4j-nop.jar slf4j-simple.jar, slf4j-log4j12.jar, slf4j-jdk14.jar or logback-classic.jar on the class path should solve the problem.
According to the original statement, any one (and only one) of slf4j-nop.jar slf4j-simple.jar, slf4j-log4j12.jar, slf4j-jdk14.jar or logback-classic.jar can be in the class path, But this is the situation when the error is reported. My solution is to add slf4j-simple.jar 1.7.30 to the Maven dependency, and this error no longer appears.

[Solved] Docker: Error response from daemon: driver failed programming external connectivity on endpoint mysq

docker: Error response from daemon: driver failed programming external connectivity on endpoint mysql (3d8d89f260c9258467f589d4d7d0c27e33ab72d732d1115d1eb42d708606edc4):
So far, the container is occupied

# docker ps -a
CONTAINER ID   IMAGE       COMMAND                  CREATED              STATUS    PORTS     NAMES
a57959032cc9   mysql:5.7   "docker-entrypoint.s…"   About a minute ago   Created             mysql
# docker rm a57959032cc9
a57959032cc9

Error starting userland proxy: listen tcp4 0.0.0.0:3306: bind: address already in use.
the following is the occupied port number

# netstat -tanlp
Active Internet connections (servers and established)
Proto Recv-Q Send-Q Local Address           Foreign Address         State       PID/Program name    
tcp        0      0 0.0.0.0:22              0.0.0.0:*               LISTEN      948/sshd            
tcp        0      0 0.0.0.0:3306            0.0.0.0:*               LISTEN      9217/mysqld         
tcp        0      0 172.18.7.111:39412      100.100.45.106:443      TIME_WAIT   -                   
tcp        0      0 172.18.7.111:22         58.100.92.78:9024       ESTABLISHED 6899/sshd: root@pts 

See for yourself which is occupied, and then delete it with kill + port number

[Solved] Ubuntu Error: Failed to connect to 127.0.0.1 port xxxxx: Connection refused

Method 1

Check the agent

git config --global http.proxy
git config --global https.proxy

Cancel if you have one, or change another method if you don’t

git config --global --unset http.proxy
git config --global --unset https.proxy

Method 2

Check whether the system environment uses agents

env|grep -I proxy

The following similar configuration appears

If there is a corresponding agent, cancel it

unset http_proxy
unset https_proxy

Method 3

Manually operate the Ubuntu agent and cancel the agent in the settings.

Vue-cli Failed to download repo vuejs-templates/webpack [How to Solve]

Error reason:
as shown in the title, command Vue init webpack Vue through Vue cli tool_ An error is reported when the portal creates a Vue project, indicating that the connection timed out because the intranet cannot be downloaded. The screenshot of the timeout error is as follows:

Solution:
to create offline, we need to download Vue templates/webpack in GitHub warehouse, and then extract it locally.

1. First, create a new .Vue templates directory under the root directory of each user. Note the dot (.)

2. Go to the Internet to download webpack
the download address is: https://github.com/vuejs-templates/webpack After downloading, unzip it to the. Vue templates directory under the local user directory.

3. The downloaded compressed package is webpack-development.zip. After decompression, we need to change the directory name to webpack

4. In this way, we will conduct Vue init webpack When using the Vue_portal command, you need to bring the parameter — offline, which means offline initialization

error: (-5:Bad argument) in function ‘seamlessClone‘ and error: (-215:Assertion failed) 0 <= roi.x && 0 [How to Solve]

Error code in this document

# Pay attention to modify the path!
import cv2
import numpy as np

# Read images : src image will be cloned into dst
obj= cv2.imread("src.jpg")
im = cv2.imread("dst.jpg")

# Create an all white mask
mask = 255 * np.ones(obj.shape, im.dtype)

# The location of the center of the src in the dst
width, height, channels = im.shape
center = (height/2, width/2)

# Seamlessly clone src into dst and put the results in output
normal_clone = cv2.seamlessClone(obj, im, mask, center, cv2.NORMAL_CLONE)
mixed_clone = cv2.seamlessClone(obj, im, mask, center, cv2.MIXED_CLONE)

# Write results
cv2.imwrite("normal.jpg", normal_clone)
cv2.imwrite("mixed.jpg", mixed_clone)

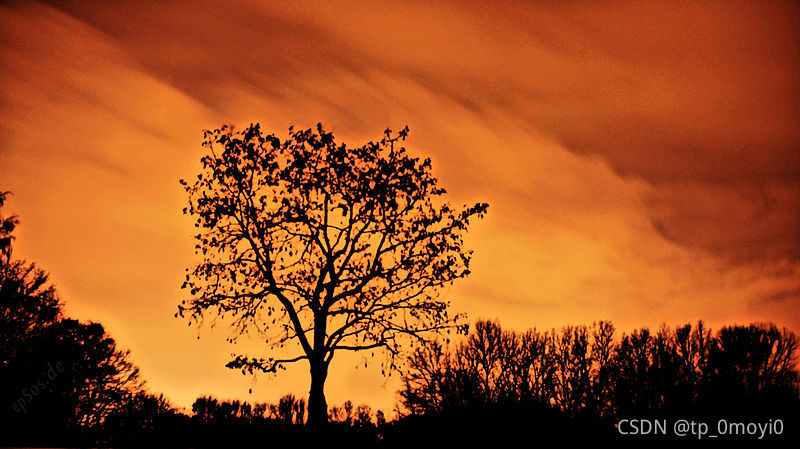
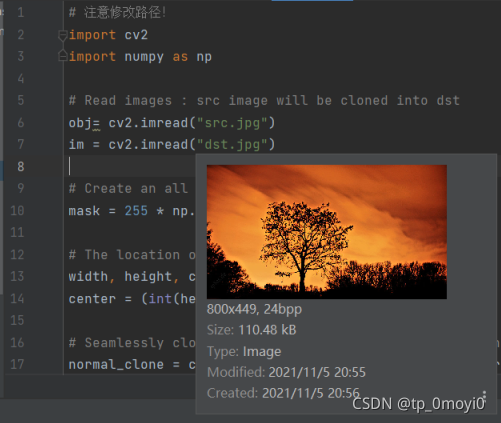
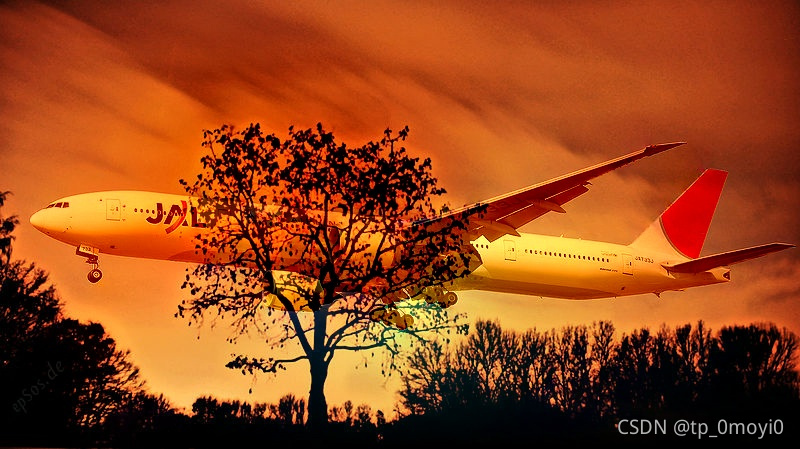
The picture is as follows among dst.jpg:

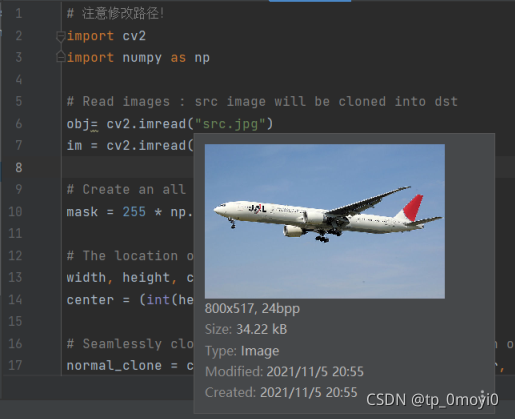
The picture (src.jpg) is as follows

Error message:

cv2.error: OpenCV(4.5.3) :-1: error: (-5:Bad argument) in function 'seamlessClone'

The screenshot is as follows:
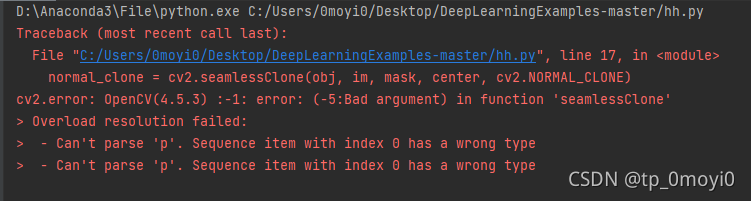
Analysis reason:

The reason for finding the error is that the coordinates of the two input into the CV2. Rectangle () function cannot be the type of floating point number, but must be converted to an integer. Therefore, int () is used to force type conversion. After that, the code successfully has this bug and becomes another bug.

Solution:

Add int() Strong return of floating point numbers  Int type

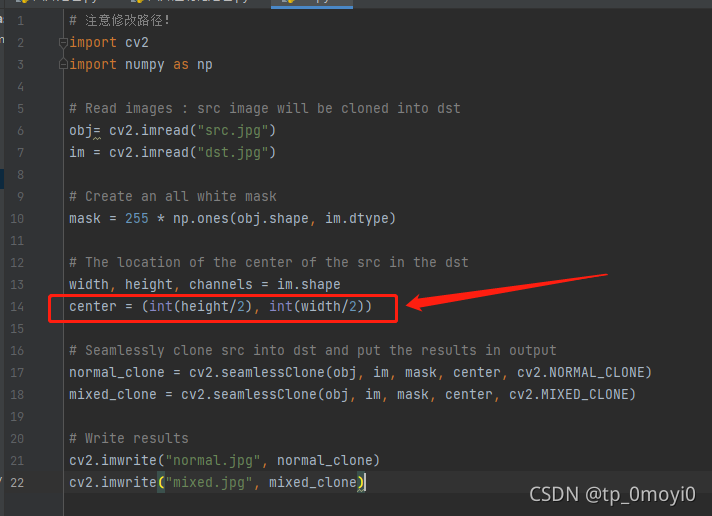
The modified code is as follows

# Pay attention to modify the path!
import cv2
import numpy as np

# Read images : src image will be cloned into dst
obj= cv2.imread("src.jpg")
im = cv2.imread("dst.jpg")

# Create an all white mask
mask = 255 * np.ones(obj.shape, im.dtype)

# The location of the center of the src in the dst
width, height, channels = im.shape
center = (int(height/2), int(width/2))

# Seamlessly clone src into dst and put the results in output
normal_clone = cv2.seamlessClone(obj, im, mask, center, cv2.NORMAL_CLONE)
mixed_clone = cv2.seamlessClone(obj, im, mask, center, cv2.MIXED_CLONE)

# Write results
cv2.imwrite("normal.jpg", normal_clone)
cv2.imwrite("mixed.jpg", mixed_clone)

Then run

Found another more exotic bug

cv2.error: OpenCV(4.5.3) C:\Users\runneradmin\AppData\Local\Temp\pip-req-build-q3d_8t8e\opencv\modules\core\src\matrix.cpp:811: error: (-215:Assertion failed) 0 <= roi.x && 0 <= roi.width && roi.x + roi.width <= m.cols && 0 <= roi.y && 0 <= roi.height && roi.y + roi.height <= m.rows in function 'cv::Mat::Mat'

The screenshot of error reporting is as follows

D:\Anaconda3\File\python.exe C:/Users/0moyi0/Desktop/DeepLearningExamples-master/hh.py
Traceback (most recent call last):
  File "C:/Users/0moyi0/Desktop/DeepLearningExamples-master/hh.py", line 17, in <module>
    normal_clone = cv2.seamlessClone(obj, im, mask, center, cv2.NORMAL_CLONE)
cv2.error: OpenCV(4.5.3) C:\Users\runneradmin\AppData\Local\Temp\pip-req-build-q3d_8t8e\opencv\modules\core\src\matrix.cpp:811: error: (-215:Assertion failed) 0 <= roi.x && 0 <= roi.width && roi.x + roi.width <= m.cols && 0 <= roi.y && 0 <= roi.height && roi.y + roi.height <= m.rows in function 'cv::Mat::Mat'

I read the error report carefully   It feels like a boundary error   Feeling beyond the boundary

Then I tried to find the bug   The path found in the prompt message cannot be found

Re analysis may be due to the wrong size in the parameters, resulting in the ROI area of the image exceeding the size of the image, i.e

0 <= roi.x && 0 <= roi.width && roi.x + roi.width <= m.cols && 0 <= roi.y && 0 <= roi.height && roi.y + roi.height <= m.rows

Then I looked at the size of the two pictures carefully

First   src.jpg   What is the size of the   800 * 517

And then the size of dst.jpg is 800 * 449

Then you see the the mask part feels like it should be used in this place   obj.shape   Too big a mistake, and then replace it with im.shape, The bug has been found and solved. It can run normally

Modified code

# Pay attention to modify the path!
import cv2
import numpy as np

# Read images : src image will be cloned into dst
obj= cv2.imread("src.jpg")
im = cv2.imread("dst.jpg")

# Create an all white mask
mask = 255 * np.ones(im.shape, im.dtype)

# The location of the center of the src in the dst
width, height, channels = im.shape
center = (int(height/2), int(width/2))

# Seamlessly clone src into dst and put the results in output
normal_clone = cv2.seamlessClone(obj, im, mask, center, cv2.NORMAL_CLONE)
mixed_clone = cv2.seamlessClone(obj, im, mask, center, cv2.MIXED_CLONE)

# Write results
cv2.imwrite("normal.jpg", normal_clone)
cv2.imwrite("mixed.jpg", mixed_clone)

Screenshot of successful operation after modification

Normal.jpg generated successfully

and mixed.jpg

The parameters of this experiment are not set well, and will be modified later. I hope you can help with the same bug. Thank you

[Solved] Xcode13.1 Upgrade Error: CocoaPods installed but not working Failed to build gem native extension

After upgrading Xcode, you need to update cocoapods.

Cocoapods installed but not working appears when executing the shuttle doctor. This means that cocoapods is not installed locally. It may have been cleaned up during the upgrade. Reinstallation required

Problems also occur during installation. Failed to build gem native extension

First check whether cocoapods is installed

pod --version

perhaps

gem list --local | grep cocoapods

If not, perform the installation

sudo gem install -n /usr/local/bin cocoapods

If there is an error:

Building native extensions. This could take a while…
ERROR: Error installing cocoapods:
ERROR: Failed to build gem native extension.

Direct use installation
brew install cocoapodsor sudo gem install cocoapods
Wait until it is over and then run

pod --version

If an error is reported, restart the terminal

Installs the specified version of ruby

rvm reinstall ruby-2.6.6

After installation, view all versions

rvm list

Switch Ruby Version

rvm use <version>

Install the specified version of cocoapods

sudo gem install cocoapods -v <version>

Uninstall other versions of cocoapods

sudo gem uninstall cocoapods -v <version>

[Solved] RHEL 7 installs Oracle RAC 11.2.0.4, executes root.sh error ohasd: failed to start

RHEL 7 installs Oracle RAC 11.2.0.4, executes root.sh and reports an error ohasd failed to start

Error reporting reason:

Because RHEL 7 uses SYSTEMd instead of initd to run and restart processes, while root.sh runs ohad processes through traditional initd.

Solution:
in RHEL 7, ohasd needs to be set as a service before running the script root.sh
the steps are as follows:

1. Create service file as root user
[root@rac1 ~]# touch /usr/lib/systemd/system/ohas.service
[root@rac1 ~]# chmod 777 /usr/lib/systemd/system/ohas.service
2. Add the following to the newly created ohas.service file
[root@rac1 init.d]# cat /usr/lib/systemd/system/ohas.service
[Unit]
Description=Oracle High Availability Services
After=syslog.target

[Service]
ExecStart=/etc/init.d/init.ohasd run >/dev/null 2>&1 Type=simple
Restart=always

[Install]
WantedBy=multi-user.target

3. Run the following command as root user
systemctl daemon-reload
systemctl enable ohas.service
systemctl start ohas.service
4. View running status
[root@rac1 init.d]# systemctl status ohas.service

Run root.sh after the service is up
if the ohad failed to start error is still reported, it may be that ohas.service does not start immediately after init.ohad is created by the root.sh script. Refer to the following for solutions:

When running root.sh, refresh/etc/init. D until the init.ohasd file appears. Start ohas.service manually immediately. The service command is systemctl start ohas.service

[Solved] Installing github.com/uudashr/gopkgs/v2/cmd/gopkgs@latest FAILED和cannot install, GOBIN must be an ab

When configuring the go environment with vscode

Installing github.com/uudashr/gopkgs/v2/cmd/gopkgs@latest FAILED
"stderr": "cannot install, GOBIN must be an absolute path\n" // Prompt to set absolute path

Go components can be installed here, but go.exe installation in Bin cannot be found

We enter go env to view the environment configuration

set GO111MODULE=on
set GOARCH=amd64
set GOBIN=D:\Program Files\Go\bin  // Here is the path used to install the go component
set GOCACHE=C:\Users\44305\AppData\Local\go-build
set GOENV=C:\Users\44305\AppData\Roaming\go\env  // --------------------------------这里是env文件存放的位置
set GOEXE=.exe
set GOEXPERIMENT=
set GOFLAGS=
set GOHOSTARCH=amd64
set GOHOSTOS=windows
set GOINSECURE=
set GOMODCACHE=C:\Users\44305\go\pkg\mod
set GONOPROXY=
set GONOSUMDB=
set GOOS=windows
set GOPATH=C:\Users\44305\go
set GOPRIVATE=
set GOPROXY=https://goproxy.io,direct
set GOROOT=D:\Program Files\Go // ---------------Here is the location of the go installation
set GOSUMDB=sum.golang.org
set GOTMPDIR=
set GOTOOLDIR=D:\Program Files\Go\pkg\tool\windows_amd64
set GOVCS=
set GOVERSION=go1.17.1
set GCCGO=gccgo
set AR=ar
set CC=gcc
set CXX=g++
set CGO_ENABLED=1
set GOMOD=NUL
set CGO_CFLAGS=-g -O2
set CGO_CPPFLAGS=
set CGO_CXXFLAGS=-g -O2
set CGO_FFLAGS=-g -O2
set CGO_LDFLAGS=-g -O2
set PKG_CONFIG=pkg-config
set GOGCCFLAGS=-m64 -mthreads -fno-caret-diagnostics -Qunused-arguments -fmessage-length=0 -fdebug-prefix-map=C:\Users\44305\AppData\Local\Temp\go-build352704544=/tmp/go-build -gno-record-gcc-switches

Use the command line to find that the settings still do not work. Finally, modify the file directly
1) the first step is to find the env file
set goenv = C:\users\44305\appdata\roaming\go\env// ——————————————- here is the location where the env file is stored

2) The second step is to open it with a notebook

3) the third step is to set the path here to the bin file in the following directory
set goroot = D:\program files\go// ——————– here is the location where go is installed

Finally, close vscode and then open it to install successfully

Tools environment: GOPATH=C:\Users\44305\go, GOBIN=D:\Program Files\Go\bin
Installing 8 tools at the configured GOBIN: D:\Program Files\Go\bin in module mode.
  go-outline
  gotests
  gomodifytags
  impl
  goplay
  dlv
  staticcheck
  gopls

Installing github.com/ramya-rao-a/go-outline@latest (D:\Program Files\Go\bin\go-outline.exe) SUCCEEDED
Installing github.com/cweill/gotests/gotests@latest (D:\Program Files\Go\bin\gotests.exe) SUCCEEDED
Installing github.com/fatih/gomodifytags@latest (D:\Program Files\Go\bin\gomodifytags.exe) SUCCEEDED
Installing github.com/josharian/impl@latest (D:\Program Files\Go\bin\impl.exe) SUCCEEDED
Installing github.com/haya14busa/goplay/cmd/goplay@latest (D:\Program Files\Go\bin\goplay.exe) SUCCEEDED
Installing github.com/go-delve/delve/cmd/dlv@latest (D:\Program Files\Go\bin\dlv.exe) SUCCEEDED
Installing honnef.co/go/tools/cmd/staticcheck@latest (D:\Program Files\Go\bin\staticcheck.exe) SUCCEEDED
Installing golang.org/x/tools/gopls@latest (D:\Program Files\Go\bin\gopls.exe) SUCCEEDED

All tools successfully installed. You are ready to Go. :)