Author Archives: Robins

Ubuntu 18.04 desktop installation tasksel aptitude failed (100) problem repair

the ubuntu 18.04 desktop will not boot, possibly because the configuration of the graphical desktop was damaged while installing the remote desktop.

because baidu is not specific error files and related configuration. You can only delete the desktop system.

then the problem came, sudo apt install ubuntu-desk reported dependency problems, not to install.

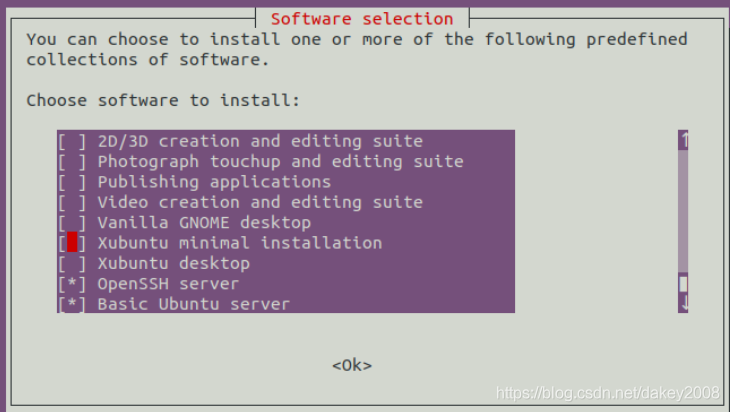
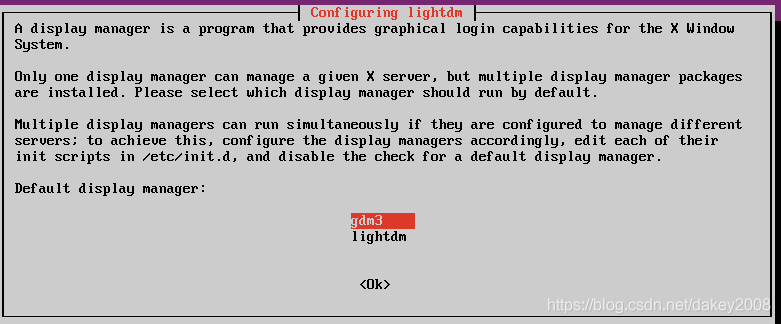
so baidu, can use tasksel, perform really pop up a graphic after installation tools:

this installation should be OK, but TAB to OK, press ENTER, error:

tasksel aptitude failed (100)

is just another round of rummaging, but the good news is that something is wrong with the source of LINUX.

to view their current source, is a new ali cloud, may be posted online at that time there is a leak. Hurry up and get a new Qing Hua.

command-line switch:

CD/etc/apt/

vi sources.list

delete all content

copy and paste:

# 默认注释了源码镜像以提高 apt update 速度,如有需要可自行取消注释
deb https://mirrors.tuna.tsinghua.edu.cn/ubuntu/ bionic main restricted universe multiverse
# deb-src https://mirrors.tuna.tsinghua.edu.cn/ubuntu/ bionic main restricted universe multiverse
deb https://mirrors.tuna.tsinghua.edu.cn/ubuntu/ bionic-updates main restricted universe multiverse
# deb-src https://mirrors.tuna.tsinghua.edu.cn/ubuntu/ bionic-updates main restricted universe multiverse
deb https://mirrors.tuna.tsinghua.edu.cn/ubuntu/ bionic-backports main restricted universe multiverse
# deb-src https://mirrors.tuna.tsinghua.edu.cn/ubuntu/ bionic-backports main restricted universe multiverse
deb https://mirrors.tuna.tsinghua.edu.cn/ubuntu/ bionic-security main restricted universe multiverse
# deb-src https://mirrors.tuna.tsinghua.edu.cn/ubuntu/ bionic-security main restricted universe multiverse

and tasksel will be running again. It’s like seeing the light of day again and tears running down my face.

After installing MySQL again under Linux, the solution of ‘MySQL module failed to start’ appears

had previously installed Mysql database on CentOS 6.4 and wanted to upgrade to a newer version so I updated the database. However, after reinstallation, run: service mysqld start to restart the database will always appear with the following prompt:

MySQL Daemon failed to start.
Starting mysqld: [failed]

Hint for

. If direct input mysql – root – p landing will appear (HY000)/mysql ERROR 2002: Can ‘t connect to local mysql server through socket’/var/lib/mysql/mysql. The sock ‘(2) errors. In general, the MySql server always fails to start. Many of the solutions offered online have not worked. Finally, the solution is as follows:

runs the following command:

 rm -fr /var/lib/mysql/*
rm /var/lock/subsys/mysqld 
 killall mysqld

service mysqld restart

then run service mysqld start to launch mysql as shown in the figure below:

then run: service mysqld start

/etc/rc. D/init. D/mysqld status

view the database state as follows

found that the database is working properly problem solved.

Failed to read artifact descriptor for * maven

in the process of my code writing, this Maven error suddenly and inexplicably appeared,

Failed to read artifact descriptor for org.apache.hadoop:hadoop-common:jar:2.4.0

query the cause of the problem, the original version is not matched, just the problem.

so here’s the solution:

1.
After opening the project, there is a Maven projects on the right side of Intellij, click on it, there is a Lifecycle, click on it again, you can see clean , validate, compile, .... Right-click clean, select Run 'project[clean]', where the project is the actual name of our project.
2.
In the same place (Lifecycle) find the install, select Run 'project[install]', where the project is also the name of our specific project, this process is longer, if you have encountered which jar package can not be downloaded, you can manually put it into the local m2 directory.
3.
Finally, find the Maven projects and click on "Reimport All Maven Projects", this time the error "Failed to .... " Disappears, required dependencies start downloading. 

Explanation of port mapping in dlink

http://hi.baidu.com/wwt06/item/29d5d5246f3a71d50f37f9f6

dlink set port map illustration (to solve the failure problem of electric TCP link test)

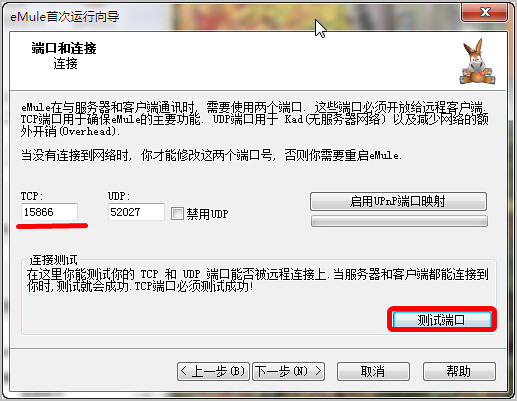
today to find a resource when you want to use the next donkey, so download the online reputation of emule a5.0a Xtreme8.0

test steps appear in the installation process, click test after. The problem arises:


Testing IP: 122.85.120.171 (122.85.120.171)

, Starting TCP connection test…
TCP test failed! UDP test will not be performed.
Connection test finished.


Results in detail:

  • TCP connection test failed.
    It was not possible, to establish a TCP connection to your eMule.
    Other users will only be able to connect to you with the help of a server, resulting in a low ID for you. While eMule still works, this will give you several disadvantages. Therfore it is highly recommended to solve this problem.

How to resolve port problems… Something is interfering with your network communications. There are two main reasons for this:

  • If you are using a firewall, ensure that your firwall don’t block the required ports! You might need to set a rule to allow the ports to be available.
  • If you use a router, make sure that your router forwards the required ports to your local IP!
  • You can find more details and guides here in the online help.

this problem indicates that the TCP connection test fails and the udp test cannot be completed, which will become the low ID group and affect the normal function. We specifically look at the how to resolve Port Problems section, which focuses on how to resolve port problems and gives two main reasons:

1. If you use a firewall. To ensure that the firewall is not blocking this required port, you may need to set a rule to allow port use.

2. If you are using a router, make sure your router port maps to your own local IP!

for these two problems, let’s look at them separately. Easy to view for firewalls. Turn off the firewall at most. After the test does not matter, no firewall can still test not pass. Therefore, it is likely to be the second reason. The second reason should be checked in the router Settings. The specific steps are as follows:

(note that I am using a dlink di-524m router, which may have different Settings depending on the router)

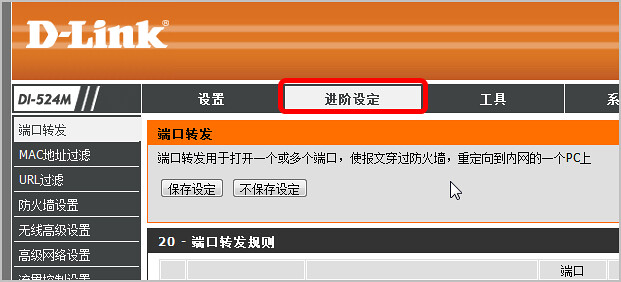
enter in the browser: “192.168.0.1” to open the router interface, log in with admin, and click “advanced Settings” — “port forwarding”

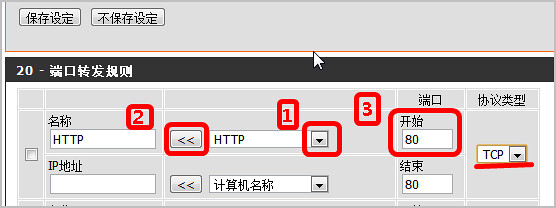
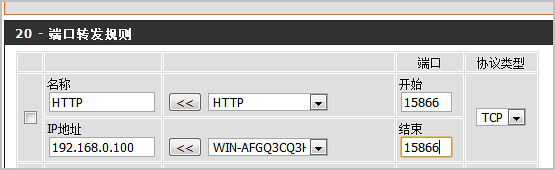
set specific rules as follows:

be careful here because we are dealing with TCP connections. So we chose the HTTP application, but otherwise we chose the computer name. Then click the arrow on the left to automatically add the IP address, and notice what port number you want to test, fill in the port box:

here is 15866, so we fill in 15866 in the port, the final effect is as follows:

check the small box on the left and click save Settings at the top. With respect to ok. (This function opens only one port when the same port number is entered at the beginning and the end.)

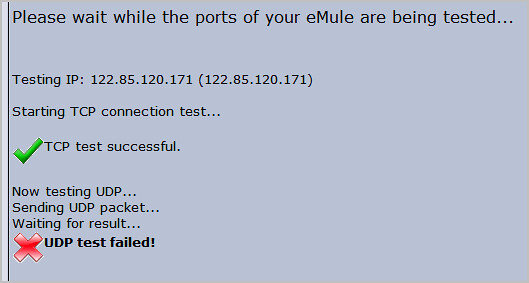
retested the connection and found that the TCP test passed but the udp port test failed:

has a detail:


UDP connection test failed.

A sent UDP packet could not be received by your eMule. UDP communication is used for Kad and to reduce bandwidth usage (Overhead) – which will not work for you. Although the main operativeness of eMule is still available to you by TCP communication.


mean: udp test fails, a packet has not been sent out your emule software receives, udp communication is used by the kad network (no server network) and use less bandwidth overhead (network) – now it will not work for you, even if via TCP communications has made, the main operation effect.

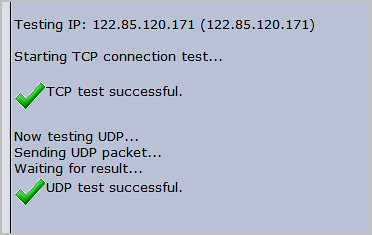
should also be the problem that the port cannot be opened. Before, our port ends and starts with the same number 15866, so only this port is opened. Of course, whether to enable udp port is an optional item. It’s a must. See if you want to use it. Here we simply repeat the previous setup, except that the port is changed to UDP. Here Is 52027. After selecting udp (not TCP), please pay attention to select UDP in the protocol. Retest after saving:

and it’s perfect! Perfect! Now that you know how to set up port mappings, you can solve some of the software problems you encounter.


reprint please indicate from: oh! Ding dong http://wodingdong.com/

comparison of Fixnum with nil failed

  def validate
    errors.add(:score, '您的积分不够') if (!self.cur_ask_score.nil?) && (self.score > self.cur_ask_score)
  end

, that’s the validation in the model.

, I started with

  def validate
    errors.add(:score, '您的积分不够') if self.score > self.cur_ask_score
  end

results in the following error:

comparison of Fixnum with nil failed

just now, I ran into a weird problem — the usual assumption is that saving a successful operation doesn’t work!

this kind of problem, generally is the model validation failure caused by!

Macfee can not be upgraded, the prompt returns an error

Macfee can not be upgraded, the error is returned, uninstall and reinstall, the upgrade prompt becomes “Initialization of the general update program subsystem failed, make sure the McAfee Franework service is running. “. Going into the Service Console to manually start McAfee’s Common Frame service, the service cannot be started.

Official error message:

Corporate KnowledgeBase
ERROR: McAfee Common Framework returns error ffff95b @ 2 (issue: FrameworkManifest.xml corrupt)

Enterprise Knowledge Base ID: KB54520
Published: August 8, 2008

environment
McAfee Common Management Agent 3.60
McAfee VirusScan Enterprise 8.5i
McAfee VirusScan Enterprise 8.0i
The following error occurs after starting AutoUpdate:
McAfee Common Framework returns error ffff95b @ 2.(FrameworkManifest.xml corrupt).
Public Updater Subsystem Initialization Failure

Confirm that McAfee Framework services are running
Problem 2
Subsequent errors when trying to start the McAfee Framework service:
Unable to start McAfee Framework service on local computer

<p The system could not find the specified file.
Question No. 3

The following update method will cause an automatic error:
Right-click the McShield icon in the system tray and select Update Now
Right click on McCafe’s automation console and click on Start.

Create a new scheduled task to edit an existing property Automated tasks

Cause FrameworkManifest.xml has become corrupted.
Solution 1
McAfee Agent 4.0

McAfee Agent 4.0 design changes will prevent corruption of the FrameworkManifest.xml file.
Retrieved from www.mcafee.com网站下载McAfee代理, see KB54808. </ p>

Solution 2

General Management Agent

Solution 1 – Get frameworkmanife.xml from another computer:
Find another Virus Scanning Enterprise (VSE) computer where the update job is error-free. Copy FrameworkManifest.xml from the following path:

For VSE 8.5i (running on Windows Vista)
x:/Program Data/McAfee/Common Framework

x:/Documents and Settings/All Users/Application Data/McAfee/Generic Framework</font bb1 For VSE 8.5i (runs on Windows XP and earlier)
x:/documents and settings/all users/application data/McAfee/generic framework</font

Paste the file into a portable media or network share file that can be accessed by two computers.
Click Start, Run, type Service. , and click OK.
Right-click the McAfee Framework Service and select Stop.
Copy FrameworkManifest.xml to the public framework directory.
Right-click McAfee Framework Service and select Start.
Update the product. </ font> </ p>

Solution 2 – Delete FrameworkManifest.xml and reinstall the Common Management Agent (CMA)
It is necessary to remove FrameworkManifest.xml, as it may not be removed or replaced when uninstalling/reinstalling. </ font> </ p>

Step 1 – Allow to modify VSE files and settings (only VirusScan Enterprise 8.5i and above) </p

Click on Start, Programs, McAfee, VirusScan Console.
Right-click on Access Protection and select Properties.
Select Common Criteria Protection.
Select “Prevent modification of McAfee files and settings” and disable this option.
Click OK.

Step 2 – Delete FrameworkManifest.xml and reinstall CMA:
Remove FrameworkManifest.xml from the following path:

For VSE 8.5i (running on Windows Vista)
x:/Program Data/McAfee/Common Framework

x:/Documents and Settings/All Users/Application Data/McAfee/General Framework font bb1 For VSE 8.5i (runs on Windows XP and earlier)
x:/documents and settings/all users/application data/McAfee/generic frameworkfont

Font Restart your computer.
Reinstall the Common Management Agent (CMA)/ePO agent.
Note: The CMA can be downloaded from the McAfee download site. See KB54808.
Previous Document ID
5432392
Please take a moment to fill out this form to help us serve you better.

The original introductory page for the official font workaround is
https://kc.mcafee.com/corporate/index?page=content& id = KB54520

Translated with www.DeepL.com/Translator (free version)

Glxchoosevisual failed in Ubuntu 16.04 steam

system :Ubuntu16.04

after the update of graphics card driver steam has been prompted that ‘glXChooseVisual failed’, how can I bear

different methods on many blogs, the graphics drivers have changed and changed, the system kernel has also changed, finally still can not completely solve the problem, of course, it may be my machine was I do too much, a variety of miscellaneous problems stacked together

the final solution is

if you are using a nvidia driver, sometimes you will find libgl.so.1 pointing to the fuzzy libGL provided by mesa and nvidia. To test this, run this command on the terminal :

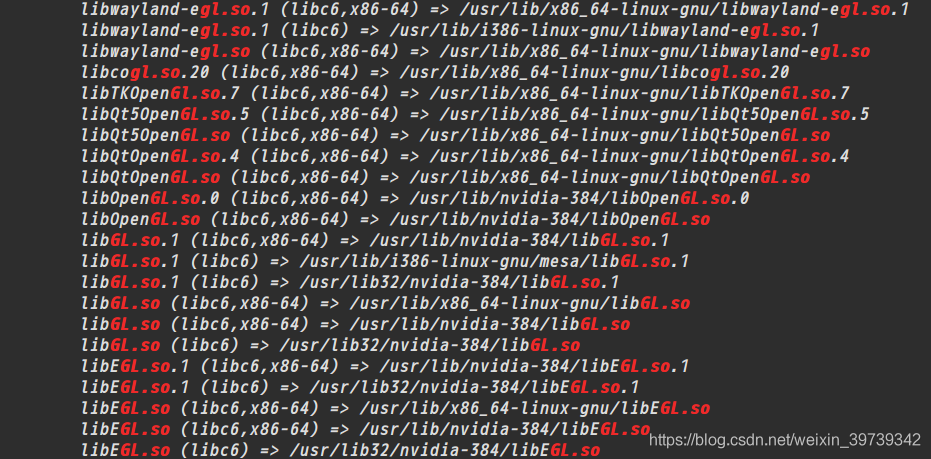
sudo ldconfig -p | grep -i gl.so

you’re going to get

then you only need to delete the library provided on the table, as follows :

sudo rm /usr/lib/i386-linux-gnu/mesa/libGL.so.1

and steam will be perfect

this issue was a night, finally found in this web site (https://askubuntu.com/questions/834254/steam-libgl-error-no-matching-fbconfigs-or-visuals-found-libgl-error-failed-t/903488#903488), a try, the perfect solution!!!!!

Driver failed programming external connectivity on endpoint quirky_ allen

docker port mapping or starting container Error Error response from daemon: driver failed programming external connectivity on endpoint quirky_allen

phenomenon:

[root@localhost ~]# docker run -d -p 9000:80 centos:httpd /bin/sh -c /usr/local/bin/start.sh
d5b2bd5a7bc4895a973fe61efd051847047d26385f65c278aaa09e4fa31c4d76
docker: Error response from daemon: driver failed programming external connectivity on endpoint quirky_allen (6bda693d1143657e46bee0300276aa05820da2b21a3d89441e820d1a274c48b6): (iptables failed: Iptables — wait-T nat-a Docker-P TCP-D 0/0 — Dport 9000-j DNAT — to-Destination 172.17.0.2:80! -i docker0: iptables: No chain/target/match by that name.
(exit status 1)).

[root@localhost ~]# docker start d5b2bd5a7bc4
Error response from daemon: driver failed programming external connectivity on endpoint quirky_allen (4127da7466709fd45695a1fbe98e13c2ac30c2a554e18fb902ef5a03ba308438): (iptables failed: Iptables — wait-T nat-a Docker-P TCP-D 0/0 — Dport 9000-j DNAT — to-Destination 172.17.0.2:80! -i docker0: iptables: No chain/target/match by that name.
(exit status 1))
Error: failed to start containers: d5b2bd5a7bc4

reason :
docker service startup custom chain docker due to centos7 firewall has been removed

The

firewall is based on iptables for data filtering, which may cause conflicts with Docker.

when firewalld is started or restarted, the rules of DOCKER will be removed from the iptables, thus affecting the normal work of DOCKER.

when you are using Systemd, firewalld will start before Docker, but if you start after Docker or restart firewalld, you will need to restart the Docker process.

restart docker service and regenerate the custom docker

chain

Chain PREROUTING (policy ACCEPT)
target     prot opt source               destination        
DOCKER     all  --  0.0.0.0/0            0.0.0.0/0            ADDRTYPE match dst-type LOCAL

Chain INPUT (policy ACCEPT)
target     prot opt source               destination        

Chain OUTPUT (policy ACCEPT)
target     prot opt source               destination        
DOCKER     all  --  0.0.0.0/0           !127.0.0.0/8          ADDRTYPE match dst-type LOCAL

Chain POSTROUTING (policy ACCEPT)
target     prot opt source               destination        
MASQUERADE  all  --  172.17.0.0/16        0.0.0.0/0          
MASQUERADE  tcp  --  172.17.0.2           172.17.0.2           tcp dpt:8080

Chain DOCKER (2 references)
target     prot opt source               destination        
RETURN     all  --  0.0.0.0/0            0.0.0.0/0          
DNAT       tcp  --  0.0.0.0/0            0.0.0.0/0            tcp dpt:8888 to:172.17.0.2:8080
root@router:playbook#iptables -t nat -nL
Chain PREROUTING (policy ACCEPT)
target     prot opt source               destination        
DOCKER     all  --  0.0.0.0/0            0.0.0.0/0            ADDRTYPE match dst-type LOCAL

Chain INPUT (policy ACCEPT)
target     prot opt source               destination        

Chain OUTPUT (policy ACCEPT)
target     prot opt source               destination        
DOCKER     all  --  0.0.0.0/0           !127.0.0.0/8          ADDRTYPE match dst-type LOCAL

Chain POSTROUTING (policy ACCEPT)
target     prot opt source               destination        
MASQUERADE  all  --  172.17.0.0/16        0.0.0.0/0          
MASQUERADE  tcp  --  172.17.0.2           172.17.0.2           tcp dpt:8080

Chain DOCKER (2 references)
target     prot opt source               destination        
RETURN     all  --  0.0.0.0/0            0.0.0.0/0          
DNAT       tcp  --  0.0.0.0/0            0.0.0.0/0            tcp dpt:8888 to:172.17.0.2:8080


restart docker service then start the container
systemctl restart docker
docker start foo

/sbin/mount.vboxsf: mounting failed with the error: No such device

centos7 VM VirtualBox setting Shared directory error.

Step 1: create the VM VirtualBox Shared directory

1. Create VM’s Shared directory under window D:\workspace

2. Create a Shared directory under Linux mkdir/MNT /workspace

3. Set the Shared directory

on the VM operation interface

Step 2: install the control

1. For Linux, install controls

yum groupinstall “GNOME Desktop” “Graphical Administration Tools”

ln -sf /lib/systemd/system/runlevel5.target /etc/systemd/system/default.target

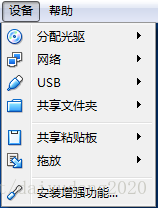
2. Restart the system, enter the interface centos7 system, then install the enhanced functions on the operation interface of VM, and click run to install

Step 3: mount the Shared disk

mount -t vboxsf workspace /mnt/workspace

ln-s/MNT /workspace /home/daiyu (soft connection to user daiyu)

step 3: /sbin/mount.vboxsf: mounting failed with the error: No such device

solution:

yum clean all
yum update
yum install kernel
yum install kernel-devel
yum install kernel-headers
yum install GCC
yum install make
reboot

0


CD /opt/ vboxadd
./vboxadd setup
reboot

perform step 3 again and succeed.

the original source: http://blog.csdn.net/daiyudong2020/article/details/58073520

End;

TypeError:Network request failed

recently run react native project application in which the data is the local json of the request before good suddenly reported TypeError:Network request failed

The inside of the

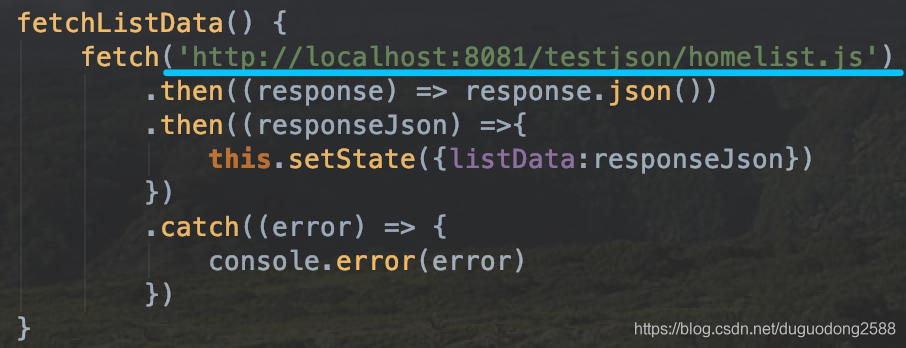
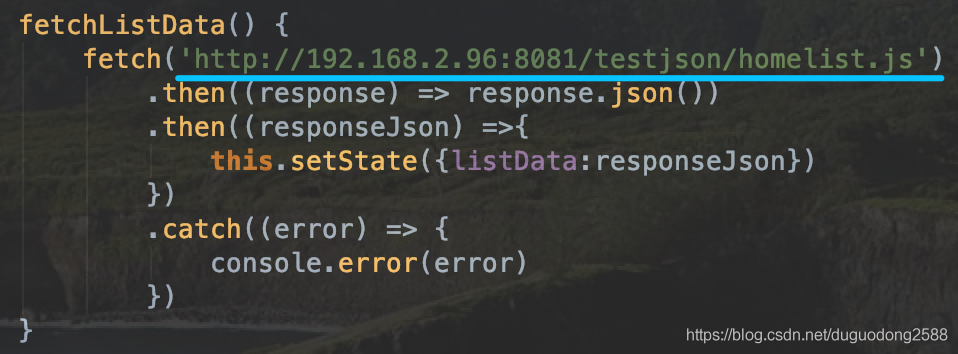
project request address localhost is written into computers at the real IP is ok

before modification :

modified:

view computer IP address method :

Windows: open the command window to execute ipconfig

MAC: open a command window to execute ifconfig

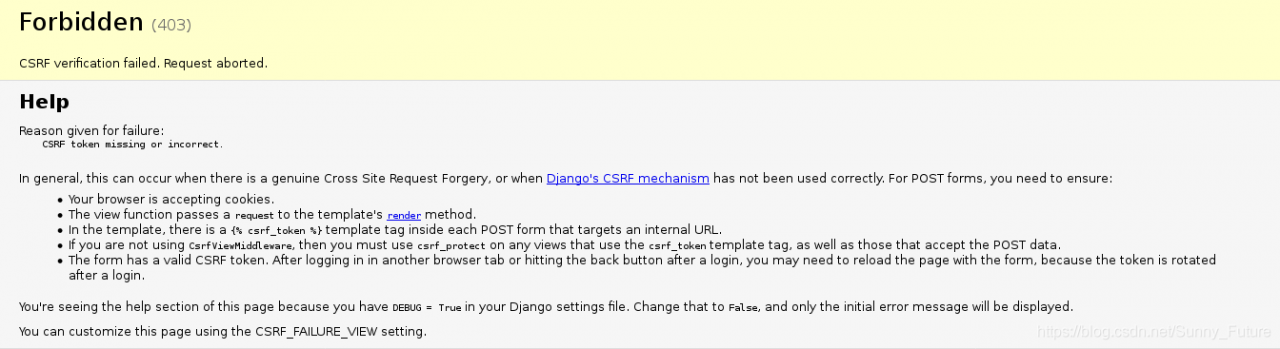
CSRF verification failed. Request aborted.

Forbidden (403)
CSRF验证失败。请求中止。

Help

Reason given for failure:

    CSRF token missing or incorrect.
    

In general, this can occur when there is a genuine Cross Site Request Forgery, or when Django's CSRF mechanism has not been used correctly. For POST forms, you need to ensure:

    Your browser is accepting cookies.
    The view function passes a request to the template's render method.
    In the template, there is a {% csrf_token %} template tag inside each POST form that targets an internal URL.
    If you are not using CsrfViewMiddleware, then you must use csrf_protect on any views that use the csrf_token template tag, as well as those that accept the POST data.
    The form has a valid CSRF token. After logging in in another browser tab or hitting the back button after a login, you may need to reload the page with the form, because the token is rotated after a login.

You're seeing the help section of this page because you have DEBUG = True in your Django settings file. Change that to False, and only the initial error message will be displayed.

You can customize this page using the CSRF_FAILURE_VIEW setting.

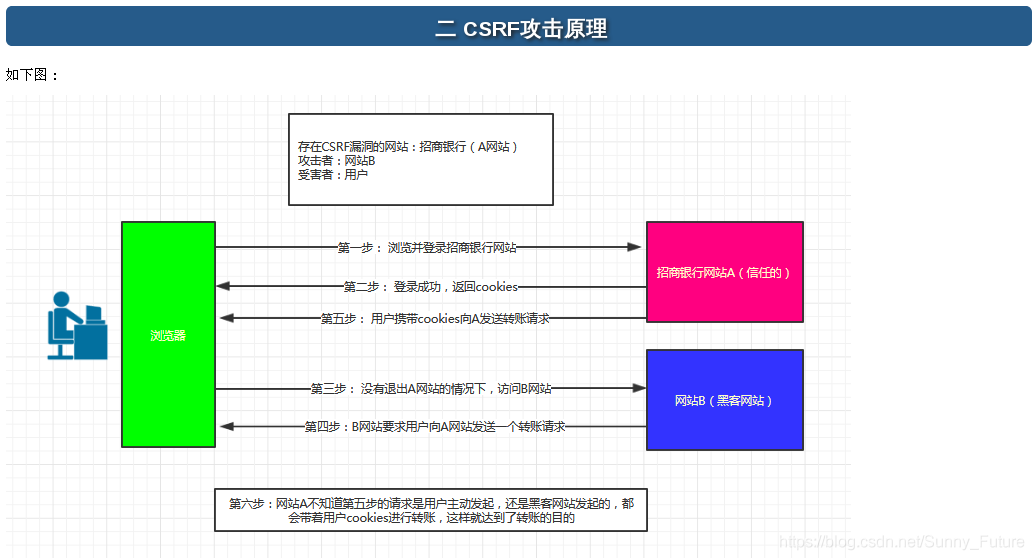
** cross-site Request Forgery (CSRF) vulnerability. ** is a malicious exploit of a website. Although it sounds like cross-site scripting (XSS), it is very different from XSS, which exploits a trusted user within a site, while CSRF exploits a trusted site by impersonating a Request from a trusted user. CSRF attacks tend to be less prevalent (and therefore have relatively few resources to defend against) and harder to defend against than XSS attacks, and are therefore considered more dangerous than XSS attacks

can understand :
the attacker steal your identity, in the name of your sending malicious request, the request for server is perfectly legal, but finished the attacker’s expectation of an operation, such as in the name of your email, send messages, to steal your account, add a system administrator, or even to buy goods, virtual currency transfer, etc.

Django’s protection against CSRF is to place an auto-generated token in each generated form to determine whether a POST request is coming from the same site

solution one:

Use the Django template here. Use the TemplateTag to add CSRF tokens. Add {% crrf_token %}

in the from form

# index.html
...
<form method="post">
  <div >
    <input  name="username" placeholder="username"><br>
    <input  name="password" placeholder="password"><br>
    <div >
    <button type='submit' id='btn'>提交</button>
    </div>
 </div>
  {% csrf_token %}
</form>
...

again, refresh the page and resubmit the form to access

normally

solution two:

simply ignores this check and comments CSRF in the Settings. Py of the project

MIDDLEWARE = [
    'django.middleware.security.SecurityMiddleware',
    'django.contrib.sessions.middleware.SessionMiddleware',
    'django.middleware.common.CommonMiddleware',
    #'django.middleware.csrf.CsrfViewMiddleware',
    'django.contrib.auth.middleware.AuthenticationMiddleware',
    'django.contrib.messages.middleware.MessageMiddleware',
    'django.middleware.clickjacking.XFrameOptionsMiddleware',
]

CSRF (cross-site request forgery)

CSRF specific see:
https://www.cnblogs.com/liuqingzheng/p/9505044.html

Failed to connect to remote VM. Connection reused. Connection reused: Connect

as shown in the figure:
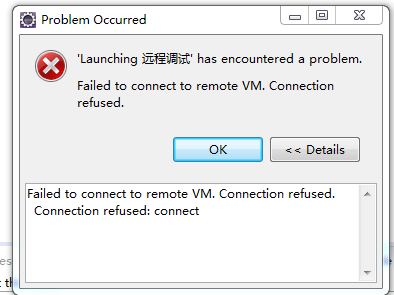
:

solution 1 : the service is started under the root account, turn off the service, kill the process, and then log in with a normal user to restart the service!

solution 2 : find run-debug Configurations -remote Java Application find the corresponding project under connect’s tag set port to 8000 (which means invalid in my case)

If

still doesn’t work, delete all WebViewHistory under Remote Java Application. Instead of creating a new one, Debug it and Eclipse will automatically create a default WebViewHistory for you. Do not debug directly! Close test)

solution 3 : it is possible that there is a firewall problem (close the firewall, this problem still exists!

solution 4 : because it was possible before, so puzzled, Google for a long time, can find the problem is generally because the other side did not open the remote debugging port, so naturally not connected, but I here obviously is not the case. After a long period of confusion, it occurred to me that I might be affected by the Eclipse proxy Settings. It seems unlikely, though, because my understanding is that the agent is only for Eclipse itself, not for applications launched through Eclipse.

solution 5 : this is because Tomcat has not started yet, or it is not started in Debug mode. (of course I don’t have this problem here)

solution 6 : other people in the same group own the connection (only one connection can be used for remote debugging), click the disconnect button. (I still don’t have that problem here)

: it’s important to run the application and connect to it, otherwise Eclipse will throw an exception “Failed to connect to remote vm.connection 40”. In the JVM DEBUG parameter, there is a parameter called “suspend” that takes two values, “y” or “n”, and if you want to DEBUG from the beginning, set it to “suspend=y” so that Eclipse can connect to Java applications remotely.
if you want to run the project first and then connect to Eclipse, you can set the parameter to “suspend=n” so that the Java application will be up and running, after which Eclipse will start the remote connection. Tip 2: use the startup script to enter JVM debugging parameters, and use the variable isDebugEnabled or REMOTE_DEBUG_PORT in the script, which you can export when you want to remotely debug Java applications. The entire operation is very simple, requiring only a one-time installation.
prompt 3: if you get an error message, “Failed to connect to remote vm.connection union” or “Connection union: connect”, there are two possible reasons for this. The first is that your Java project is not running on the remote host. The second is that there are errors in the input port and host name. After successful verification, you can fill in the complete host name. Tip 4: you also want to make sure that local Eclipse and remote Eclipse run the same code base. Code can be compiled using the debug option “-g”, and Eclipse can easily collect debugging information, such as debugging information for local variables. By default, with the debug option “-g”, the class file may have larger debug information.

.

solution 8 : find the tomcat/bin/catalina.bat file, edit, and add the downstream code

before CATALINA_OPTS

set CATALINA_OPTS=-server – xdebug-xnoager-djava.com piler= none-xrunjdwp :transport=dt_socket,server=y,suspend=n,address=50001 [port number used for debugging]

save and restart Tomcat (this one doesn’t solve my problem either)

solution 9 : the most likely reason is that the IP address in Eclipse is misconfigured (for this reason, copying the IP address is wrong, so am I…)

solution 10 :
estimated that the network is unstable, but finally the debugging was successful. this… )

solution 11 : firewall issues. Turn off the web firewall in 360 and you’re good to go. I reload every time. This time the reason has finally been found.

.

conclusion : in the future, you must look at the most basic configuration, and then step by step to determine whether your conclusion is correct. In fact, IP address error, this problem should be the first reason to rule out, but I for some reason, did not check, so that I wasted a day’s time!