DGMGRL> switchover to testogg;
Performing switchover NOW, please wait...
Operation requires a connection to instance "testogg" on database "testogg"
Connecting to instance "testogg"...
Connected.
New primary database "testogg" is opening...
Operation requires startup of instance "testogg_stdby" on database "testogg_stdby"
Starting instance "testogg_stdby"...
Unable to connect to database
ORA-12545: Connect failed because target host or object does not exist

Failed.
Warning: You are no longer connected to ORACLE.

Please complete the following steps to finish switchover:
	start up instance "testogg_stdby" of database "testogg_stdby"

DGMGRL>
View the Alert log log, indicating that log_archive_dest_2 is invalid. Db_unique_name is not correct.
Switchover: Primary highest seen SCN set to 0x0.0x1a410d
ARCH: Noswitch archival of thread 1, sequence 113
ARCH: End-Of-Redo Branch archival of thread 1 sequence 113
ARCH: LGWR is actively archiving destination LOG_ARCHIVE_DEST_3
ARCH: Standby redo logfile selected for thread 1 sequence 113 for destination LOG_ARCHIVE_DEST_3
Archived Log entry 32 added for thread 1 sequence 113 ID 0xe0779467 dest 1:
ARCH: Archiving is disabled due to current logfile archival
Primary will check for some target standby to have received alls redo
Final check for a synchronized target standby. Check will be made once.
Archive destination LOG_ARCHIVE_DEST_2 invalidated
DB_UNIQUE_NAME tesgogg is not in the Data Guard configuration
LOG_ARCHIVE_DEST_3 is a potential Physical Standby switchover target
Active, synchronized target has been identified
Target has also received all redo
Check the setting of log_archive_dest_2, there is a problem with db_unique_name, change, prompt and log_archive_dest_3 because the value is the same.
SYS@testogg_stdby>alter system set log_archive_dest_2= 'SERVICE=tesgogg ASYNC VALID_FOR=(ONLINE_LOGFILES,PRIMARY_ROLE) DB_UNIQUE_NAME=testogg';
alter system set log_archive_dest_2= 'SERVICE=tesgogg ASYNC VALID_FOR=(ONLINE_LOGFILES,PRIMARY_ROLE) DB_UNIQUE_NAME=testogg'
*
ERROR at line 1:
ORA-02097: parameter cannot be modified because specified value is invalid
ORA-16021: session LOG_ARCHIVE_DEST_3 destination cannot be the same as session
LOG_ARCHIVE_DEST_2 destination
If you look at log_ARCHIve_dest_3, you see that log_archive_dest_3 is configured. However, this parameter is not set when you build the Data Guard. This parameter is generated by the Broker itself after the Broker is configured. After clearing, set log_archive_dest_2.
SYS@testogg_stdby>show parameter log_archive_dest_3

NAME				     TYPE	 VALUE
------------------------------------ ----------- ------------------------------
log_archive_dest_3		     string	 service="testogg", LGWR ASYNC
						 NOAFFIRM delay=0 optional comp
						 ression=disable max_failure=0
						 max_connections=1 reopen=300 d
						 b_unique_name="testogg" net_ti
						 meout=30, valid_for=(all_logfi
						 les,primary_role)
log_archive_dest_30		     string
log_archive_dest_31		     string
SYS@testogg_stdby>alter system set log_archive_dest_3='';

System altered.

SYS@testogg_stdby>alter system set log_archive_dest_2= 'SERVICE=tesgogg ASYNC VALID_FOR=(ONLINE_LOGFILES,PRIMARY_ROLE) DB_UNIQUE_NAME=testogg';

System altered.
Once set up, there is still a problem with not being able to switch data Guard. Check the configuration of the Broker. Discover that in the configuration of the database, the host being connected is hostname, not IP address.
DGMGRL> show database verbose testogg_stdby;

Database - testogg_stdby

  Role:            PHYSICAL STANDBY
  Intended State:  APPLY-ON
  Transport Lag:   (unknown)
  Apply Lag:       (unknown)
  Apply Rate:      (unknown)
  Real Time Query: OFF
  Instance(s):
    testogg_stdby

  Properties:
    DGConnectIdentifier             = 'testogg_stdby'
    ObserverConnectIdentifier       = ''
    LogXptMode                      = 'ASYNC'
    DelayMins                       = '0'
    Binding                         = 'OPTIONAL'
    MaxFailure                      = '0'
    MaxConnections                  = '1'
    ReopenSecs                      = '300'
    NetTimeout                      = '30'
    RedoCompression                 = 'DISABLE'
    LogShipping                     = 'ON'
    PreferredApplyInstance          = ''
    ApplyInstanceTimeout            = '0'
    ApplyParallel                   = 'AUTO'
    StandbyFileManagement           = 'AUTO'
    ArchiveLagTarget                = '0'
    LogArchiveMaxProcesses          = '4'
    LogArchiveMinSucceedDest        = '1'
    DbFileNameConvert               = '/u01/app/oracle/oradata/testogg/, /u01/app/oracle/oradata/testogg_stdby/'
    LogFileNameConvert              = '/u01/app/oracle/oradata/testogg/, /u01/app/oracle/oradata/testogg_stdby/'
    FastStartFailoverTarget         = ''
    InconsistentProperties          = '(monitor)'
    InconsistentLogXptProps         = '(monitor)'
    SendQEntries                    = '(monitor)'
    LogXptStatus                    = '(monitor)'
    RecvQEntries                    = '(monitor)'
    ApplyLagThreshold               = '0'
    TransportLagThreshold           = '0'
    TransportDisconnectedThreshold  = '30'
    SidName                         = 'testogg_stdby'
    StaticConnectIdentifier         = '(DESCRIPTION=(ADDRESS=(PROTOCOL=tcp)(HOST=dbtrain)(PORT=1521))(CONNECT_DATA=(SERVICE_NAME=testogg_stdby_DGMGRL)(INSTANCE_NAME=testogg_stdby)(SERVER=DEDICATED)))'
    StandbyArchiveLocation          = '/archive_log/'
    AlternateLocation               = ''
    LogArchiveTrace                 = '0'
    LogArchiveFormat                = '%t_%s_%r.dbf'
    TopWaitEvents                   = '(monitor)'

Database Status:
DGM-17016: failed to retrieve status for database "testogg_stdby"
ORA-12514: TNS:listener does not currently know of service requested in connect descriptor
ORA-16625: cannot reach database "testogg_stdby"

DGMGRL>
Check the hosts file of the host and backup library and find that there is no host address. Add. Perform the switch again under the DGMGRL command line. The switch between main and backup is normal.
DGMGRL> switchover to testogg
Performing switchover NOW, please wait...
Operation requires a connection to instance "testogg" on database "testogg"
Connecting to instance "testogg"...
Connected.
New primary database "testogg" is opening...
Operation requires startup of instance "testogg_stdby" on database "testogg_stdby"
Starting instance "testogg_stdby"...
ORACLE instance started.
Database mounted.
Database opened.
Switchover succeeded, new primary is "testogg"
结束
Failed to load the native TensorFlow runtime.
Failed to load the native TensorFlow runtime.
Running CPU version of object Detection’s sample program, which appears when importing tensorFlow:
Failed to load the native TensorFlow runtime.
The solution is: PIP install –upgrade –ignore — Installed tensorFlow
Update tensorflow good
the original link: https://blog.csdn.net/sy20173081277/article/details/82977893
Mac install pycurl error: python setup.py egg_info" failed with error code 1”
(env3) [MrYang:Desktop]$ python3 -m pip install pycurl
Looking in indexes: http://mirrors.aliyun.com/pypi/simple/
Collecting pycurl
  Downloading http://mirrors.aliyun.com/pypi/packages/e8/e4/0dbb8735407189f00b33d84122b9be52c790c7c3b25286826f4e1bdb7bde/pycurl-7.43.0.2.tar.gz (214kB)
    100% |████████████████████████████████| 215kB 3.1MB/s
    Complete output from command python setup.py egg_info:
    Using curl-config (libcurl 7.43.0)
    Traceback (most recent call last):
      File "<string>", line 1, in <module>
      File "/private/var/folders/dx/m2t9qg010gg9pk5v8xzt4gxc0000gn/T/pip-install-bn546qog/pycurl/setup.py", line 913, in <module>
        ext = get_extension(sys.argv, split_extension_source=split_extension_source)
      File "/private/var/folders/dx/m2t9qg010gg9pk5v8xzt4gxc0000gn/T/pip-install-bn546qog/pycurl/setup.py", line 582, in get_extension
        ext_config = ExtensionConfiguration(argv)
      File "/private/var/folders/dx/m2t9qg010gg9pk5v8xzt4gxc0000gn/T/pip-install-bn546qog/pycurl/setup.py", line 99, in __init__
        self.configure()
      File "/private/var/folders/dx/m2t9qg010gg9pk5v8xzt4gxc0000gn/T/pip-install-bn546qog/pycurl/setup.py", line 316, in configure_unix
        specify the SSL backend manually.''')
    __main__.ConfigurationError: Curl is configured to use SSL, but we have not been able to determine which SSL backend it is using. Please see PycURL documentation for how to specify the SSL backend manually.

    ----------------------------------------
Command "python setup.py egg_info" failed with error code 1 in /private/var/folders/dx/m2t9qg010gg9pk5v8xzt4gxc0000gn/T/pip-install-bn546qog/pycurl/
The solution is as follows
# First upgrade PIP
Sudo Python-m PIP install — Upgrade — Force PIP
You can then specify the version number to install (the version number can be found in the error log)
Sudo PIP install pycurl = = 7.43.0
Solve the Google Chrome Failed to load resource: net::ERR_FAILED problem
Problem description:
when using ajax to access the json file, use the Google browser opens, there will be a problem: the diagram below
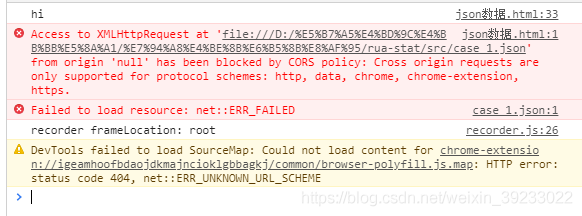
problem solving:
1, because of the problems appeared a cross-domain, to find relevant solutions to cross-domain solutions
2, use vscode editor, install live – server plug-in, as shown in figure method is used to open the HTML file, will be forced to make it under the same server. 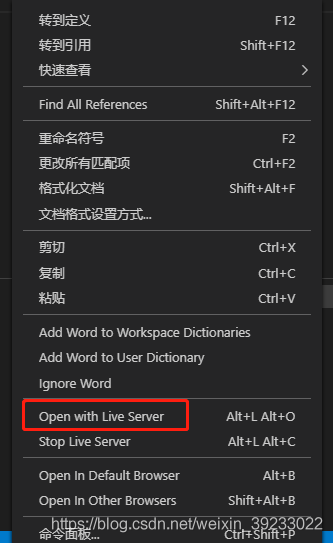
mysql Error: Failed to open file “file_name” error 2/error 22
The reason is the same: mysql imports SQL according to the relative path query. For example, When I open mysql in the WWW folder, I enter source Form /test.sql to query the file in the WWW folder.
Solution: Simple, use CMD to enter the folder where SQL files exist, then open mysql, and then import SQL files
Centos7 offline installation of redis and PHP extension redis
Redis related packages
Phpredis – 2.2.4. Tar. Gz
phpredis-develop.zip
Redis – 4.0.6. Tar. Gz
Link: https://pan.baidu.com/s/1eSOwqhO password: af4c
1. Unzip, compile and install tar-Zxvf Redis-4.0.6.tar.gz
CD redis – 4.0.6/SRC
make
make install
2. You can see some green files when moving ls redis-4.0.6/ SRC
mkdir -p /usr/local/redis/etc ###etc has a storage configuration file
mkdir -p /usr/local/redis/bin ###bin is used to store commands
Copy redis.conf under redis.4.0.6 to /usr/local/redis/etc/
cp ../redis. Conf/usr/local/redis/etc /
copy the green file under redis-4.0.6/ SRC folder to /usr/local/redis/bin
cp green file name /usr/local/redis/bin/
CD/usr/local/redis/bin
ls
3. Start redIS service. Starting the RedIS service requires the command Redis-server./ Redis-server
Warning: no config file specified,
after the termination
/redis server/usr/local/redis/etc/redis. Conf
now redis is running in the foreground
redis runs in the background
vi /usr/local/redis/etc/redis.conf
search: /daemonize
changes the daemonize configuration entry to yes
save exit
./redis-server /usr/local/redis/etc/redis.conf
ps -ef | grep redis
pstree -p | grep redis ## tree display
netstat – NTLP | grep 6379 ### port
[linuxidc@localhost bin]$ /usr/local/redis/bin/redis-cli
127.0.0.1:6379 & gt;// hint
indicates successful client login
4. Join systemctl configure redis vi/usr/lib/systemd/system/redis. Service
[Unit]
Description=Redis
After=network.target
[Service]
#Type=forking
PIDFile=/run/redis_6379.pid
ExecStart =/usr/local/redis/bin/redis server/usr/local/redis/etc/redis. Conf – daemonize no
ExecReload=/bin/kill -s HUP $MAINPID
ExecStop =/usr/local/redis/bin/redis – 127.0.0.1 cli – h – p 6379 shutdown
PrivateTmp=true
[Install]
WantedBy=multi-user.target
save exit
systemctl daemon-reload
systemctl start redis
systemctl enable redis
systemctl is-enabled redis
if an error occurs
systemctl enable redis
Failed to execute operation: Bad message
Please check the/usr/lib/systemd/system/redis. Service file
5. Install the PHPREdis-Develop.zip extension if you have PHP installed
download address: https://github.com/phpredis/phpredis/archive/develop.zip
unzip phpredis – develop. Zip
cd phpredis-develop
/usr/local/php7/bin/phpize
./configure –with-php-config=/usr/local/php7/bin/php-config
make
(see result: Don’t forget to run ‘make test’. That is success.)
make install
(see the results as follows: Installing Shared extensions:/usr/local/php7/lib/PHP/extensions/no – debug – non – ZTS – 20160303 /
)
: Shared extensions, has generated the dynamic link library file redis. So.
can check if there is redis.so
ls/usr/local/php7/lib/PHP/extensions/no – debug – non – ZTS – 20160303 /
file redis.so path
phpredis-develop/modules/redis.so
phpredis-develop/.libs/redis.so
/usr/local/php7/lib/php/extensions/no-debug-non-zts-20160303/redis.so
three files are the same file
Configure php.ini to add after extension
extension=redis.so
restart PHP
Test redis CD
vi test.php
< ?php
$redis = new redis();
$redis-> The connect (‘ 127.0.0.1, 6379);
echo ‘Connection to server successfully’;
echo ‘Server is running:’ . $redis-> ping();
:wq
to perform the test. The PHP
php test.php
in case of Fatal error: Uncaught error: Class ‘redis’ not found
may be because running the PHP command and apache or ngnix may use a different php.ini. Even if you see redis loaded in php.ini, you also need to add redis module in php.ini to the PHP command line.
address:
1. View phpinfo in php.ini location
/usr/local/php7/etc/php.ini
2. Search the php.ini file location
/usr/local/php7/lib/
3. Cp/usr/local/php7/etc/PHP ini/usr/local/php7/lib/PHP ini
4. Restart php-fpm nginx redis
5. Execute test.php
[root@192 /]# php test.php
Connection to server successfullyServer is running:+PONG[root@192 /]#
php -m | grep redis
keytool error: java.lang.Exception: Failed to establish chain from reply
keytool error: java.lang.Exception: Failed to establish chain from reply
Didn’t solve the problem, find a lot of articles, baidu search to an article in English https://www.veritas.com/support/en_US/article.000021204 later
The following is mentioned:
Problem
When importing an SSL certificate to Clearwell’s keystore, an error is encountered.
Error Message
keytool error: java.lang.Exception: Failed to establish chain from reply
Cause
Root and/or Intermediate certificates have not been imported order.
I checked that I commented out the original step and did not execute it
That is, import the self-signed certificate (that is, my root certificate) information into the server secret key library
Modify the following, perform this step first, then perform normal.
Summary: The order in which certificates are imported into the secret key library is important, and if there is a root certificate or a multi-level certificate authority, they must be imported level by level from top to bottom.
Use mini-css-extract-plugin to report ReferenceError: window is not defined
Because of the conflict between style-loader and mini-CSs-extract – Plugin, the style-loader can be removed
Add samba user prompt Failed to add entry for user.

The reason:
Samba user prompt Failed to add entry for user
smbpasswd-a test01(user name)
New SMB password:
Retype New SMB password:
Failed to add entry for user test01.
Solutions:
groupadd test01(user name) -g 6000
useradd test01(user name) -u 6000-g 6000-s /sbin/ nologin-d /dev/null

Android Studio Install Error Failed to install Intel HAXM. For details, please check the installation log
Ineffective mark-compacts near heap limit Allocation failed – JavaScript heap out of memory
1. problem description.
At present, when compressing the front-end code, there are memory leaks in the nodes, errors as follows: invalid marker – collating nearby heap limit allocation failure – JavaScript heap memory
2. The errors are as follows.
Warning: callback based version of packager() has been deprecated and will be removed from future major releases, please convert to committed version or use nodeify module.
Packager application for win32 ia32 platform, using ev4.0.5
—last few times–>
ms: Mark-sweep 1294.7 (1425.0) -> 1294.7 (1425.5) MB, 1723.7/0.0 ms (average mu = 0.094, current mu = 0.000) last resort GC requests for old space
[23328:00000202C8E3E9D0] 11281890 ms: marker scan 1295.7 (1425.5)->1294.7 (1426.5) MB, 1734.9/0.0 ms (average mu = 0.101, current mu = 0.108) assignment failure clearance may not be successful
<- JS stacktrace ->
0: ExitFrame [pc: 000003C6B7315600]
Security context: 0x01457ba9e6e1 <JSObject>
1: access [0000031C1EB050F9] [fs]js: ~ 167] [pc = 000003 c6b7319b09] (= 0 x01dd68b04d69 & lt;object mapping = 00000232 d8c16af9>, = 0 x00b368108379 & lt;path string[737]:E: \pacs-consultation-electron-meeting \ node_modules \ stompjs \ node_modules \ websocket \\ node_modules \ es5-ext \ node_modules \ es6-iterator \ node_modules \ d\ node_modules \ es5-ext \ node_modules \ es6-iterator \ node_modules \ es6-iterator \ node_modules \ es6-iterator node__……
Fatal error: Invalid marker – failed collation nearby heap limit allocation – JavaScript heap memory
1: 00007 ff67be308aa v8: Internal:GCIdleTimeHandler: GCIdleTimeHandler + 4810
2: 00007 ff67be09c46 node:MakeCallback + 4518
3: 00007 ff67be0a630 node_module_register + 2160
4: 00007 ff67c09aa4e v8: Internal:FatalProcessOutOfMemory + 846
5: 00007 ff67c09a97f v8:Internal:FatalProcessOutOfMemory + 639
6: 00007 ff67c5d8984 v8:internal:heap:MaxHeapGrowingFactor + 11476
7:00007 ff67c5cf0e7 v8::internal::ScavengeJob::operator= + 25543
8: 00007 ff67c5cd65c v8:Internal:ScavengeJob::operator= + 18748
9: 00007 ff67c5d65d7 v8:Internal:Heap:MaxHeapGrowingFactor + 2343
10: 00007 ff67c5d6656 v8:Internal:Heap:MaxHeapGrowingFactor + 2470
11: 00007 ff67c1790db v8:Internal::Factory::AllocateRawWithImmortalMap + 59
12: 00007 ff67c17ba9d v8:Internal::Factory::NewRawOneByteString + 77
13: 00007 ff67c38fbc4 v8: Internal:Heavy:SmiPrint + 372
14:00007FF67C08DF5B v8::internal::StringHasher::UpdateIndex+219
15: 00007FF67C0B44CB v8::WriteUtf8+171
16: 00007FF67BD3F1A0 std::basic_ostream<:operator< +40912
17: 00007FF67BDC9B92 uv_loop_fork+13762
18: 000003c6b7315600
npm ERR!Code ELIFECYCLE
npm ERR!er!pac – electronic [email protected] build:win32: ‘ cross-env BUILD_TARGET=win32 node .electron-vue/build. js ‘
npm made a mistake! Exit Status 134
npm ERR!
npm ERR! In pac – electronic [email protected]构建:win32脚本中失败.
npm made an error! This may not be a problem with npm. There may be additional log output above.
npm made an error! The full log of this run can be found in the following file:
npm ERR!C:\Users\boyi08\AppData\Roaming\npm-cache\_logs\ 2020 – 02 – 25 – t04_43_09_617z debug.log
3. Solutions
Programme I.
In the package. inside the json: add this sentence:–max_old_space_size = 8192 // or max_old_space_size = 4096 (it is recommended to set to 4 g to see, if not set to 8 g)
“script”: {
“dev”: “node build/dev-server.” “start”: “node build/dev-server.” node -max_old_space_size=8192 build/build”.
“build”: “node -max_old_space_size=8192 build/build. js ”
},
Programme 2.
Delete the npmrc file (not the npmrc file in the nodejs installation directory under the npm module, but the .npmrc file in C: \\user\{account}\).
About creo 4.0 license request failed for feature solution
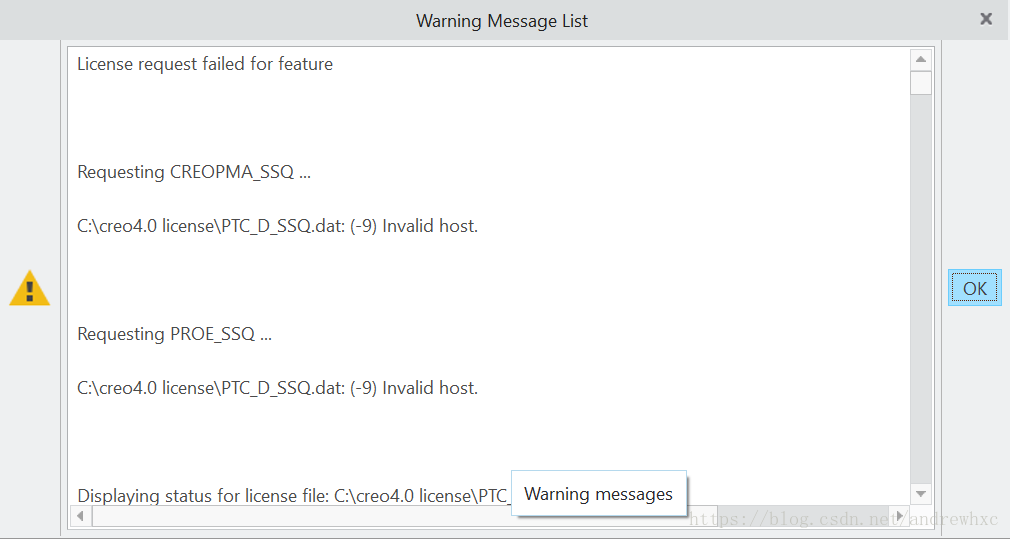
Solution: Reuse the registry to generate a license file and overwrite the original license file
The reason for the problem: The first day I used a mobile phone as a hot spot to connect to the computer, and the second day I used another mobile phone as a hot spot, which led to the change of the host ID, making the license file generated previously unavailable, and the host ID would also change after the network was disconnected.
Ps: There was no such phenomenon with PROE before.