Author Archives: Robins

Unity Android packaging error “UnityEditor.BuildPlayerWindow+BuildMethodException” solution record

I. Error reporting content:
(Sometimes 49 mistakes, then 19 again. Here’s the last one each time.)

UnityEditor. BuildPlayerWindow + BuildMethodException: 19 errors at UnityEditor. BuildPlayerWindow + DefaultBuildMethods. BuildPlayer (UnityEditor. BuildPlayerOptions options) in x00242 [0]
D:\unity\Editor\Mono\BuildPlayerWindowBuildMethods.cs:190
The at UnityEditor. BuildPlayerWindow. CallBuildMethods (System. Boolean askForBuildLocation, UnityEditor.BuildOptions defaultBuildOptions) [0x0007f] in D:\unity\Editor\Mono\BuildPlayerWindowBuildMethods.cs:95
UnityEngine.GUIUtility:ProcessEvent(Int32, IntPtr)

(There is also an error message that differs from other error messages,Gradle is a Unity packaging related tool)

CommandInvokationFailure: Gradle build failed.

 
Two. Solutions
The following four methods are all found by querying the data:
(None of the four approaches successfully solved my problem, but a similar BuildPlayerWindow+BuildMethodException error might occur if you don’t follow these Settings, where the number of errors might be different):

Method 1: File-buildsetting-PlayerSetting-Player-otherSettings-AndroidTVCompatibility disabled (Individual tried not to work)
Method 2: The release path cannot include Chinese, the path cannot be in the project, try to change the path, the release directory is placed in the same level directory as the project (individual tried, but it does not work)
Method 3: File-buildsettings-PlayerSetting-API Compatibility Level Choose Net 2.0(personal try does not work)
Step 4: Remove the plugins folder from the project’s “Assets” folder. I left a plugins/ vscode.cs in my project (I tried it personally but it didn’t work)

Tips for personal success:

Method 5: The name of the file-buildsetting-playersetting-player-productname is the same as the apK name after the file-buildsetting-build (my problem is that I try to change the following to send the package normally)

 
Three. I refer to the UNITY of the android package transmission gate configuration tutorial: https://blog.csdn.net/ChinarCSDN/article/details/79513403
There is also a portal for the error reporting solution of the great God, but I tried that my error reporting was not for this reason, so I failed to solve it.
The software version I used was different, because the time interval was long, so I used JDK-Java SE 8U231 version and SDK-3.5.2 version.


Unreal4 C++ error guidelines


I believe that students are now starting to use C++ development method to complete some functions or try to understand the internal application process of UnrealEngine4, the process is naturally indispensable
Epic
Self packaged C++ dealing.

The
Of course, C++ with UnrealEngine4 must be complied with
UE4 engineering
Rules such as the entire project configuration are basically done using the [NMaker] configuration. You need to compile the [UnrealHeaderTool] tool before compiling the code
UnrealHeaderTool to compile our own projects. Of course, the entire build process was compiled as for UnrealEngine3 using the command line (to address both platform expansion and IDE decoupling). The various \UnrealEngine\Engine\Build\ files \ folders under the BatchFiles start calling each other during the entire compilation of Windows… (Well, usually we don’t care.)

since the UnrealEngine4 has its own rules, the more problems we run into in the process of updating the UnrealEngine4. The following is a collection of problems I encountered to share with you, I hope you can quickly solve the problem, less detours.

1. compile when the following 2 errors occur, please do not question whether the UnrealEngine4 engine compilation tool has a problem or the automatically generated project configuration has a problem, there is only one problem is their own code has a problem. As follows:

 
The
EXEC: error: Failed to generate code for XXXX (XXXX is the name of our project)
The
The and

 
The
EXEC: error: UnrealHeaderTool failed for target ‘PandaEditor’ (platform: Win64, module info: C: \ Users \ User \ Documents \ UnrealProjects/Panda/Intermediate/Build \ Win64 \ PandaEditor \ Development
\UnrealHeaderTool.manifest).

 
The
this error resolution: check the.h file for cross-references to header files. If you do need to refer to each other, try [+class] before your class name and then refer to header files in.cpP.

 
The
The

 
The
of course this error is
[UnrealHeaderTool],
[UnrealHeaderTool] error detection is not strong enough to accurately prompt for compilation errors, and many problems can cause this. If you find [EXEC: error: Failed to generate code for XX], please check the code carefully

System and host port mapping under virtualbox

Environment:
Virtualbox is installed under Ubuntu and XP is installed under VirtualBox,
 
Requirements:
Accessing xp Web services under Ubuntu,
 
Methods:
To do port mapping in Ubuntu, execute the following command (turn the virtual off before executing) :
VBoxManage setextradata “xp” “VBoxInternal/Devices/pcnet/0/LUN# 0/Config/web/Protocol” TCP
VBoxManage setextradata “xp” “VBoxInternal/Devices/pcnet/0/LUN# 0/Config/web/GuestPort” 80
VBoxManage setextradata “xp” “VBoxInternal/Devices/pcnet/0/LUN# 0/Config/web/HostPort” 8888
 
The operating system name of the “XP” virtual machine; Pcnet is a network type; The Web can be anything;
 
Completed: start the xp virtual machine, and then under the ubuntu browser to access the address is: http://www.test.com:8888/, 80 service will show the xp system.
 
Just to remind you, there’s one question that’s been bothering me for a long time:
Description:

NAT#0: configuration query for “HostPort” int failed (VERR_CFGM_VALUE_NOT_FOUND).
Unknown error creating VM (VERR_CFGM_VALUE_NOT_FOUND).
 
When using VBoxManage setextradata “xp” “VBoxInternal/Devices/pcnet/0/LUN# 0/Config/web/HostPort”, 8080, the above problems;
Later: 8080 into 8888 port IS OK.

TSV_TNEW_PAGE_ALLOC_FAILED

Premise:
foreground runs the program and processes 10 million pieces of data.

status:
will extract 10 million pieces of data from the database to the inner table, if a one-time extraction will occur memory TSV_TNEW_PAGE_ALLOC_FAILED dump.
that is: select XXXX
into table XXX
where…

if the package size is adopted, 1 million pieces of data are extracted once and processed.
select XXXX
into table XXX
package size 1000000
where…

perform XXXX “processed the 1 million pieces of data.

Endselect.

service really needs under the premise, the solution can only ask basis to change the kernel parameters, either to increase the buffer, or to extend the front running time.

Nginx: recv() failed (104: connection reset by peer) troubleshooting

Recv () Failed (104: Connection reset by Peer) problem troubleshooting
In the recent project, through the Nginx reverse proxy nodejs (using nestjs framework) service, the probability of 502 Bad Gateway appears in the pressure testing process, with a low probability of around 0.005%. The specific error message in the log is recv() failed (104: Connection reset by peer) while reading the response header from upstream, through searching the data, we learned that the direct reason for the error was:

nodejs服务已经断开了连接,但是未通知到Nginx,Nginx还在该连接上收发数据,最终导致了该报错。

Considering that in Nginx we have configured to open a long connection with nodeJS Server, namely:

proxy_http_version 1.1;
proxy_set_header Connection "";

Let’s start with the Settings related to long connections. Several common parameters that Nginx USES to affect long connections are: keepalive_timeout, keepalive_requests, and keepalive
1) keepalive_timeout: set the client’s long connection timeout. If the client does not make a request beyond this time, Nginx server will actively close the long connection. Nginx defaults to keepalive_timeout 75s; . Some browsers only hold 60 seconds at most, so we usually set it to 60s. If set to 0, close the long connection. 2) keepalive_requests: set the maximum number of requests a long connection can handle with the client. If this value is exceeded, Nginx will actively close the long connection. The default value is 100. Under normal circumstances, keepalive_requests 100 can basically meet the requirements. However, in the case of high QPS, the number of continuous long connection requests reaches the maximum number of requests and is shut down. This means that Nginx needs to keep creating new long connection to handle the requests. Set the maximum number of connection to the upstream server free keepalive, the number of connections when idle keepalive exceeds this value, the least recently used connection will be closed, if this value is set too small, a certain time period the number of requests, and request processing time is not stable, may be kept closed and create a long number of connections. We usually set 1024. In special scenarios, the average response time and QPS of the interface can be estimated. 4) Open a long connection with the upstream server The default nginx access backend is a short (HTTP1.0) connection that is opened each time a request is made, closed after processing, and reopened on the next request. The HTTP protocol has supported long connections since version 1.1. Therefore, we will set the following parameters in location to open a long connection:

  http {
      server {
          location/ {
              proxy_http_version 1.1;
              proxy_set_header Connection "";
          }
      }
  }

1) and 2) are set to be long connections between client and Nginx, and 3) and 4) are set to be long connections between Nginx and server.
After checking the above parameter configuration, we started to look for the configuration related to keepalive in node. By looking up nodejs documents, we found that the default server.keepAliveTimeout is 5000ms. If you continue to send and receive data on the long connection, the above error may occur.
So we add more to the node keepAliveTimeout value (see https://shuheikagawa.com/blog/2019/04/25/keep-alive-timeout/) :


// Set up the app...
const server = app.listen(8080);

server.keepAliveTimeout = 61 * 1000;
server.headersTimeout = 65 * 1000; // Node.js >= 10.15.2 需要设置该值大于keepAliveTimeout

The purpose of lengthening the node keepAliveTimeout value is to prevent Nginx from disconnecting before node service, and the caller needs to timeout longer than the caller.
After the above modification, no error 502 Bad Gateway occurred in Nginx during the pressure test.

Failure [INSTALL_PARSE_FAILED_NO_CERTIFICATES: … has no certificates at entry AndroidManifest.xml]


For a long time, We used packer-ng-plugin and didn’t notice the difference between using Android Studio for packaging. Today, I wrote a demo and found that only one installation was successful after I typed in my signature, and the following were all installation errors: Failure [INSTALL_PARSE_FAILED_NO_CERTIFICATES: Package /data/app/vmdl924957567.tmp/base.apk has no certificates at entry AndroidManifest.xml]
Analyze and find the cause of the problem:
Possible cause: A mobile version problem?Google later found that there are actually two versions of Signature. APK Signature Scheme v2 is introduced in Android7.0, and v1 is jar Signature from JDK. I was using Android Studio3.1, and it was only through a query that I knew there was a difference between the two versions. The old version probably didn’t and didn’t notice the change very much. After all, you don’t need signature packaging every day, and you don’t need to move it once it’s configured, so you don’t notice it.
V1: It should be verified by a ZIP entry so that APK can be signed for many changes – you can move or even recompress the file.
V2: Validates all bytes of the compressed file, not a single ZIP entry, so it cannot be changed after signing (including Zipalign). Because of this, we now merge compression, tuning, and signing in one step during compilation. The benefits are obvious, more secure, and the new signature speeds up the application installation by reducing the time it takes to validate on the device (without the time-consuming process of decompressing and validating).

v1 and v2 signatures are used
It doesn’t matter if you just check the V1 signature, but won’t you use more secure authentication on 7.0
If only check V2 signature 7.0, the installation will be finished and the installation will not be displayed. If 7.0 is above, V2 verification will be used
If I check V1 and V2, all the models are ok
But I did check both of them, and I tried different combinations of them, none of them (it will tell you to pick at least one), pick one, pick two, it’s the same error, it says base APK has no signature.
I found the Stack Overflow and someone had the same problem, but it was just a simple thing to check two and solve it. After a long time, a day, uncomfortable, congestion panic, do other things to…
And changed a cell phone or the same error. Changed a demo project, changed a keystore and still got the same error!!
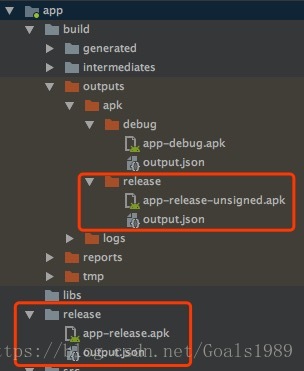
When I went back to the computer at night, I inadvertently found the difference in the screenshots in the new demo project. I used to find the signed package in the build-out-APk-Release folder, but this installation was not successful. And from the name you can see that it’s app-release-unsigned. Apk, but there is an additional release folder on the bottom, where the file is installed normally.
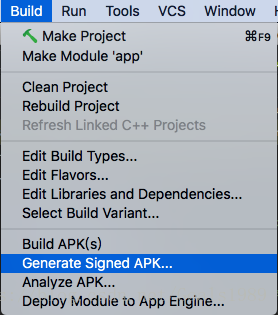
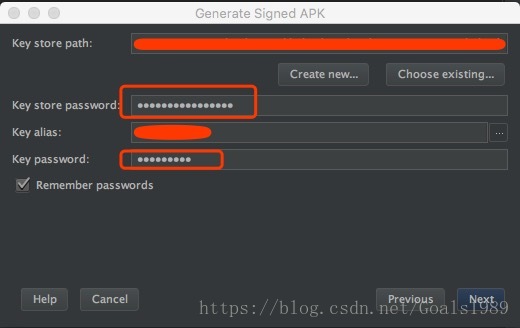
So I delete this file, and then just use 1, the command line package; Or 2, wrap it formally with Android Studio, and this folder does not appear. How strange!! I have entered various password aliases for secret keys before!! Why can’t you get a normal bag?Once before I packed a formal installation is normal ah!!
Inadvertently click on the steps to enter the signature information,!! Need you to enter the secret key information again!! After typing, use the Android Studio button again to package, or the command to package, the folder will come out. There’s a folder release in the main project, and the signature file that’s next to it is the normal app-release.apk. The installation is in order. Apk is app-release-unsigned. Apk. Unsigned, of course, will get an error.

So to summarize, the solution is this: if you type in the signature key again, put it in the official package, it will generate a folder under the main project called Release, and the app-Release.apk in the side here will be signed normally. The build-out-apk-unsigned. Apk generated at the same time will not be installed successfully. The package is not fully signed. Why this should be is not clear. I hope it can help you solve the same problem you have.
 

PHP under linux uses pdo-dblib to connect to mssql to report an error solution. Error message: SQLSTATE[01002] Adaptive Server connection failed (severity 9)

I found a lot of answers on the Internet, but they are not the root cause of the problem.
Finally, it can be seen on the official website that the connection of PDO_dblib to MSSQL database is through FreeTDS.
PDO_DBLIB is a driver that implements the PHP Data Objects (PDO) interface to enable access from PHP to Microsoft SQL Server and Sybase databases through the FreeTDS libary.
Therefore, the problem was found. Freetds is a re-implementation of TDS protocol (Baidu’s). Different database versions use different VERSIONS of TDS protocol, so it is ok to modify the corresponding TDS version.
I am an Ubuntu system and the installation directory of Freetds is /usr/local/freetds
Modify the file to/usr/local/freetds/etc/freetds. Conf file.
Connect SQL Server2000, I change to TDS version=4.2 is ok, although Baidu is 8.0, I do not know this, but I know the key of the problem is ok, and so on in the future to understand the update.

Oracle Net Configuration Assistant failed abnormal solution

System use oracle12c centos7 oracle data version of
about the installation of oracle database reference: https://www.linuxidc.com/Linux/2017-08/146528.htm

process is detailed
about in the process of installation disk space is insufficient, swap the size is not enough, really depend on the package please make your own problems such as baidu.
I installed the database step by step according to this tutorial and solved all kinds of problems encountered in the process one by one. Finally, I got stuck in the
Oracle Net Configuration Assistant failed
which could not be solved by all kinds of baidu methods.
In fact, this error can be caused by many reasons, so it is difficult to find the correct solution.
My final solution was to set the NLS_LANG environment variable
This variable represents the encoding of the database
Set the location to ~/.bash_profile
The value should be the third last step in the database installation process, the page with the install button
Sliding down will show the database code
After the source ~/.bash_profile takes effect, click install.
(My database is already installed, so I don’t want to install it again, so I don’t have any screenshots. It’s so hard to speak.)
Reference for database unloading:
https://blog.csdn.net/kimsoft/article/details/8129292
The main thing is to delete the files

Nginx reports 502 error, log connect() failed (111: Connection refused) while connecting to upstream. A personal effective solution

Personal information is for reference only. If it is not applicable to your project, please do not speak ill of it.
The project adopts the mode of separation between front and rear ends, in which the routing relationship is Nginx A, which exposes the host address to the outside world, and all requests for App go directly to NginxB through the server.
The routing relationship is as follows: mobile App→ request (for example: www.test.cn: 8072/xp-web /index.html) →Nginx A→Nginx B
The server configuration of Nginx A routing to Nginx B is as follows:

  server {
        listen       8090;
   #     listen       192.25.106.214:8090;
        server_name  192.25.106.214;
	location /xy-app-web {
            proxy_pass http://192.25.106.214:8090/xy-app-web;
            proxy_set_header Host $host:8090;
            proxy_set_header X-Real-IP $remote_addr;
            proxy_set_header X-Forwarded-For $proxy_add_x_forwarded_for;
            proxy_set_header Via "nginx";
        }
        location/{
            root   html;
            index  index.html index.htm;
        }
    }

Suddenly I found that there was A problem with the project, and the access interface reported an error. After checking the logs of Nginx A, I found the following errors:

[Error] 20969#0: *1 Connect () failed (111: Connection union) while connecting to upstream, Client: 192.25.103.53, Server: 192.25.106.214, Request: “GET /xy-app-web/portfolio/piazza?rettype=appjson& E72 opstation = Y_IHADPLAZA_12222222222_e9dfdb288326f0371d091ea8bd64b2f55b7906ff77b68db98ae99bafe0cf9896_07AE3442-1-4346 – A58B – 6 ee511202f01_30901_3. 9.0.11 & amp; logintoken=b6459d2e-1e85-489a-94e9-57d2059cba69& userId=5d395883d13573b189da524ce1401834& timestamp=1548750589604& client=3& device=appweb& version=appweb& clientId=appweb& Sign = 8 e6cfc226dbcf7dbd01a68a987363427 HTTP/1.0 “, upstream: “http://192.25.106.214:8090/xy-app-web/portfolio/piazza?rettype=appjson& E72 opstation = Y_IHADPLAZA_12222222222_e9dfdb288326f0371d091ea8bd64b2f55b7906ff77b68db98ae99bafe0cf9896_07AE3442-1-4346 – A58B – 6 ee511202f01_30901_3. 9.0.11 & amp; logintoken=b6459d2e-1e85-489a-94e9-57d2059cba69& userId=5d395883d13573b189da524ce1401834& timestamp=1548750589604& client=3& device=appweb& version=appweb& clientId=appweb& sign=8E6CFC226DBCF7DBD01A68A987363427”, host: “www.xyzqts.cn:8072”, referrer: “http://www.test.cn:8072/app-web/index.html”

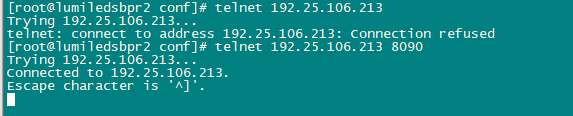
Internet search for half a day is what shit like plagiarized article, what PHP problems. Our project did not have PHP, and the reason why connect() failed (111:Connection refused) while connecting to upstream was that the establishment of network Connection failed, so we started to check the call link from the place where the error was reported. Here we found that port 8090 did not provide service from the network call link of Telent Nginx B, A server of Nginx A. The simple way to do this is telent.
The correct picture for Telnet should look like this:

The problem is obvious. Take a look at which service is providing port 8090, indicate that the service is abnormal, and see if the process is still there.

ps -ef|grep java

I found that at some point, xy-app-Web on port 8090 was gone.
We’re using SpringBoot here, so start it.

nohup  java -jar -Dlogging.path=./logs xy-app-web-0.0.2.jar --spring.profiles.active=test & 

Check the process again: ps-ef |grep Java finds xy-app-web for port 8090 already available. Call the phone App again and find the problem solved.