Author Archives: Robins

[SSL: CERTIFICATE_VERIFY_FAILED] Certificate Verify Failed (_ssl.C:579)

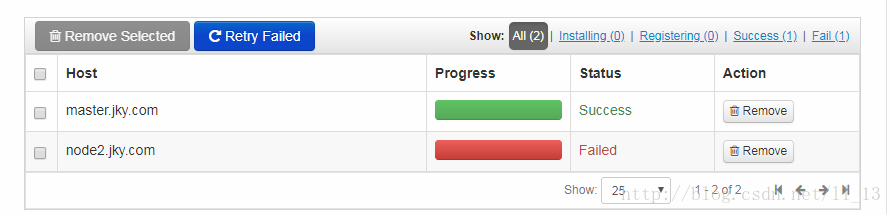
Problems have been encountered during HDP installation. Both Failed at first. Internet search, said that the OpenSSL version is too old to update, update after the problem is resolved, but their CentOS7 tried to update, but it is already the latest version. The final version of the problem was python2.7.5. See the error code for online answers.

==========================
Creating target directory...
==========================

Command start time 2018-02-27 09:30:03

Connection to node2.jky.com closed.
SSH command execution finished
host=node2.jky.com, exitcode=0
Command end time 2018-02-27 09:30:03

==========================
Copying ambari sudo script...
==========================

Command start time 2018-02-27 09:30:03

scp /var/lib/ambari-server/ambari-sudo.sh
host=node2.jky.com, exitcode=0
Command end time 2018-02-27 09:30:03

==========================
Copying common functions script...
==========================

Command start time 2018-02-27 09:30:03

scp /usr/lib/python2.6/site-packages/ambari_commons
host=node2.jky.com, exitcode=0
Command end time 2018-02-27 09:30:04

==========================
Copying OS type check script...
==========================

Command start time 2018-02-27 09:30:04

scp /usr/lib/python2.6/site-packages/ambari_server/os_check_type.py
host=node2.jky.com, exitcode=0
Command end time 2018-02-27 09:30:04

==========================
Running OS type check...
==========================

Command start time 2018-02-27 09:30:04
Cluster primary/cluster OS family is redhat7 and local/current OS family is redhat7

Connection to node2.jky.com closed.
SSH command execution finished
host=node2.jky.com, exitcode=0
Command end time 2018-02-27 09:30:04

==========================
Checking 'sudo' package on remote host...
==========================

Command start time 2018-02-27 09:30:04

Connection to node2.jky.com closed.
SSH command execution finished
host=node2.jky.com, exitcode=0
Command end time 2018-02-27 09:30:05

==========================
Copying repo file to 'tmp' folder...
==========================

Command start time 2018-02-27 09:30:05

scp /etc/yum.repos.d/ambari.repo
host=node2.jky.com, exitcode=0
Command end time 2018-02-27 09:30:05

==========================
Moving file to repo dir...
==========================

Command start time 2018-02-27 09:30:05

Connection to node2.jky.com closed.
SSH command execution finished
host=node2.jky.com, exitcode=0
Command end time 2018-02-27 09:30:05

==========================
Changing permissions for ambari.repo...
==========================

Command start time 2018-02-27 09:30:05

Connection to node2.jky.com closed.
SSH command execution finished
host=node2.jky.com, exitcode=0
Command end time 2018-02-27 09:30:06

==========================
Copying setup script file...
==========================

Command start time 2018-02-27 09:30:06

scp /usr/lib/python2.6/site-packages/ambari_server/setupAgent.py
host=node2.jky.com, exitcode=0
Command end time 2018-02-27 09:30:06

==========================
Running setup agent script...
==========================

Command start time 2018-02-27 09:30:06
('WARNING 2018-02-27 09:30:14,621 NetUtil.py:116 - Server at https://master.jky.com:8440 is not reachable, sleeping for 10 seconds...
INFO 2018-02-27 09:30:14,621 HeartbeatHandlers.py:115 - Stop event received
INFO 2018-02-27 09:30:14,621 NetUtil.py:122 - Stop event received
INFO 2018-02-27 09:30:14,621 ExitHelper.py:53 - Performing cleanup before exiting...
INFO 2018-02-27 09:30:14,621 ExitHelper.py:67 - Cleanup finished, exiting with code:0
INFO 2018-02-27 09:30:16,903 main.py:223 - Agent died gracefully, exiting.
INFO 2018-02-27 09:30:16,904 ExitHelper.py:53 - Performing cleanup before exiting...
INFO 2018-02-27 09:30:17,196 main.py:90 - loglevel=logging.INFO
INFO 2018-02-27 09:30:17,197 main.py:90 - loglevel=logging.INFO
INFO 2018-02-27 09:30:17,198 DataCleaner.py:39 - Data cleanup thread started
INFO 2018-02-27 09:30:17,199 DataCleaner.py:120 - Data cleanup started
INFO 2018-02-27 09:30:17,199 DataCleaner.py:122 - Data cleanup finished
INFO 2018-02-27 09:30:17,252 PingPortListener.py:50 - Ping port listener started on port: 8670
INFO 2018-02-27 09:30:17,254 main.py:349 - Connecting to Ambari server at https://master.jky.com:8440 (192.168.201.13)
INFO 2018-02-27 09:30:17,254 NetUtil.py:62 - Connecting to https://master.jky.com:8440/ca
ERROR 2018-02-27 09:30:17,314 NetUtil.py:88 - [SSL: CERTIFICATE_VERIFY_FAILED] certificate verify failed (_ssl.c:579)
ERROR 2018-02-27 09:30:17,314 NetUtil.py:89 - SSLError: Failed to connect. Please check openssl library versions. 
Refer to: https://bugzilla.redhat.com/show_bug.cgi?id=1022468 for more details.
WARNING 2018-02-27 09:30:17,315 NetUtil.py:116 - Server at https://master.jky.com:8440 is not reachable, sleeping for 10 seconds...
', None)
('WARNING 2018-02-27 09:30:14,621 NetUtil.py:116 - Server at https://master.jky.com:8440 is not reachable, sleeping for 10 seconds...
INFO 2018-02-27 09:30:14,621 HeartbeatHandlers.py:115 - Stop event received
INFO 2018-02-27 09:30:14,621 NetUtil.py:122 - Stop event received
INFO 2018-02-27 09:30:14,621 ExitHelper.py:53 - Performing cleanup before exiting...
INFO 2018-02-27 09:30:14,621 ExitHelper.py:67 - Cleanup finished, exiting with code:0
INFO 2018-02-27 09:30:16,903 main.py:223 - Agent died gracefully, exiting.
INFO 2018-02-27 09:30:16,904 ExitHelper.py:53 - Performing cleanup before exiting...
INFO 2018-02-27 09:30:17,196 main.py:90 - loglevel=logging.INFO
INFO 2018-02-27 09:30:17,197 main.py:90 - loglevel=logging.INFO
INFO 2018-02-27 09:30:17,198 DataCleaner.py:39 - Data cleanup thread started
INFO 2018-02-27 09:30:17,199 DataCleaner.py:120 - Data cleanup started
INFO 2018-02-27 09:30:17,199 DataCleaner.py:122 - Data cleanup finished
INFO 2018-02-27 09:30:17,252 PingPortListener.py:50 - Ping port listener started on port: 8670
INFO 2018-02-27 09:30:17,254 main.py:349 - Connecting to Ambari server at https://master.jky.com:8440 (192.168.201.13)
INFO 2018-02-27 09:30:17,254 NetUtil.py:62 - Connecting to https://master.jky.com:8440/ca
ERROR 2018-02-27 09:30:17,314 NetUtil.py:88 - [SSL: CERTIFICATE_VERIFY_FAILED] certificate verify failed (_ssl.c:579)
ERROR 2018-02-27 09:30:17,314 NetUtil.py:89 - SSLError: Failed to connect. Please check openssl library versions. 
Refer to: https://bugzilla.redhat.com/show_bug.cgi?id=1022468 for more details.
WARNING 2018-02-27 09:30:17,315 NetUtil.py:116 - Server at https://master.jky.com:8440 is not reachable, sleeping for 10 seconds...
', None)

Connection to node2.jky.com closed.
SSH command execution finished
host=node2.jky.com, exitcode=0
Command end time 2018-02-27 09:30:19

Registering with the server...
Registration with the server failed.

原因:
这是由于较新的Python 2.7.5版本中的一个缺陷造成的,该缺陷会导致无论证书状态如何,证书验证都失败。
(这是由于Python 2.7.5的新版本中存在缺陷,导致无论证书状态如何,证书验证都失败)。

解决步骤:
注意:作为一种解决方案,我们强烈建议Python不要更新到比Python -2.7.5-48.el*更新的版本。x86_64(或者降级到那个版本,如果更新的话)。

你可以通过python -V或python -c ‘import sys来验证你的版本;print(sys.version)’或yum列表安装了|grep python。您需要确认主要版本是2.7.5,构建版本是2017年2月或更早,完整版本是2.7.5-48或更早。
或者,如果您希望保持在较新的版本上,您可以禁用Python中的证书验证:

sed -i 's/verify=platform_default/verify=disable/' /etc/python/cert-verification.cfg

** I solved the problem with this command. You only need to enter this command on both nodes. The screenshot of this article is only executed on the first node, so the second node fails again
(Note: As a solution, we strongly recommend it
Don’t
Update Python to a newer version (or downgrade to it, if updated) than Python-2.7.5-48. el *.x86_64.
You can import sys via Python-v or Python-C ‘; Print (sys.version) ‘or install yum list | grep python. You need to confirm that the primary version is 2.7.5, the version is February 2017 or earlier, and the full version is 2.7.5-48 or earlier.
Or, if you want to keep it in the new version, you can disable certificate validation in Python 🙂
* Through Python-V, I can only check that my Python version is 2.7.5, but I don’t know whether it is 2.7.5-48 or not. Therefore, I can’t reduce the version to 2.7.5-48 according to others’ solution and disable certificate verification intelligently. Hopefully, there is a way to fix the problem by changing the Python version

Problem solving resources:
1.https://interset.zendesk.com/hc/en-us/articles/115011874548–SSL-CERTIFICATE-VERIFY-FAILED-certificate-verify-failed-ssl-c-579-
2.https://community.hortonworks.com/questions/120861/ambari-agent-ssl-certificate-verify-failed-certifi.html
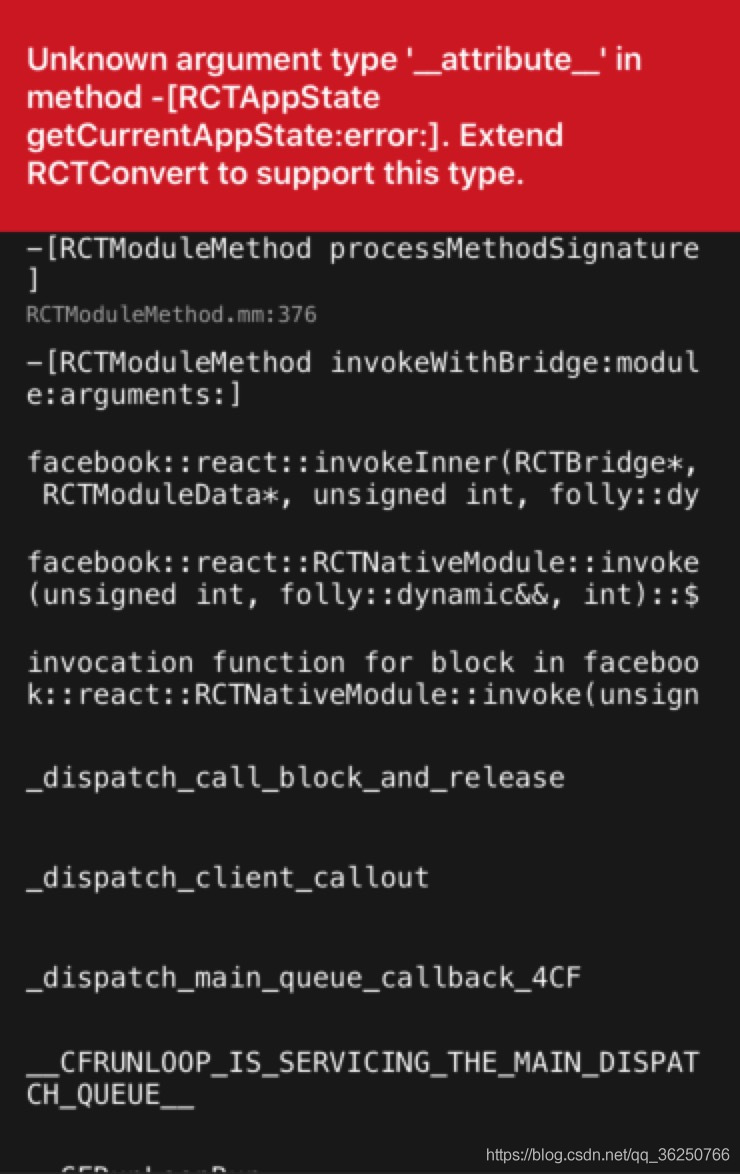
Start react-native after updating Xcode11 and report an error: Unknown argument type ‘_attribute_’ in method -[RCTAppState getCurren

The article directories
Preface Question 1: If a non-Xcode is used to start RN project error description is solved

Problem 2: After starting the RN project, enter the RN page to report an error description and solve it

preface
When you update Xcode11, you’ll find that when you start the previous React – Native project, you’ll report an error. But the previous code is already online, so there should be no logic problems. After investigation, there are two main problems.
Question 1: If you start an RN project with a non-Xcode, an error is reported
describe
Normally, like when I started react- Native in Webstorm, it was a two-step process.

> npm start

> react-native run-ios
info Found Xcode project XXX.xcodeproj
CoreData: annotation:  Failed to load optimized model at path '/Applications/Xcode.app/Contents/Applications/Instruments.app/Contents/Frameworks/InstrumentsPackaging.framework/Versions/A/Resources/XRPackageModel.momd/XRPackageModel 9.0.omo'
error Could not find iPhone X simulator. Run CLI with --verbose flag for more details.

Before all start good, how to report a mistake now?
To solve
After Xcode11 is updated, only iPhone 8/iPhone 8 Plus/iPhone 11/iPhone 11 Pro/iPhone 11 Pro Max are installed in the emulator by default.
And react – native, the address of the configuration file
/node_modules/@ the react - native - community/cli - platform - ios/build/commands/runIOS/runIOS js 359 rows, you can see the configuration is as follows:

options: [{
    command: '--simulator [string]',
    description: 'Explicitly set simulator to use. Optionally include iOS version between' + 'parenthesis at the end to match an exact version: "iPhone 6 (10.0)"',
    default: 'iPhone X'
  }

The default launch entry for iPhone X no longer exists. So we need to manually specify the type of emulator that exists in Xcode11 at startup.

react-native run-ios --simulator="iPhone 8" # 非全面屏
react-native run-ios --simulator="iPhone 11 Pro" # 全面屏

Problem 2: An error was reported when I entered the RN page after starting the RN project
describe
In the RN project created in Xcode10, the whole program was good. But after update to Xcode11 runtime, the simulator can rise, but when enter the page of RN, but tip error: Unknown argument type '_attribute_ method in - [RCTAppState getCurrentAppState: error:]. The Extend RCTConvert to support this type .

This problem is caused by the Xcode11 update.
To solve
Open the /node_modules/react - native/react/Base/RCTModuleMethod. Mm file.
Then revise the rctparseprint section and add a new evaluation condition RCTReadString(input, "___ __te__ (((unused__) __)) ||

// 修改后的结果如下
static BOOL RCTParseUnused(const char **input)
{
  return RCTReadString(input, "__unused") ||
         RCTReadString(input, "__attribute__((__unused__))") ||
         RCTReadString(input, "__attribute__((unused))");
}

Then restart the project and see if we can get back to the React - Native project page as usual.

Insufficient space in the root directory causes the state of the managed server to become FAILED_NOT_RESTARTABLE

The tester did a stress test on the SOA Suite system last night and came in this morning and found

The system cannot be accessed. The Console can also log in, but Managed Server cannot open. The state finally becomes FAILED_NOT_RESTARTABLE.

Just a few warnings and notifications, when you restart AdminServer, it turns out that AdminServer process is starting, but the console can’t log in, and the log screen doesn’t work

When it came time to check the OS system problem, dF-H checked the Linux system and found that/space utilization was 100%, suddenly realized that it should be its problem, went in and found that a directory/TMP space occupied 93%, du-sh/TMP was 21G, a total of only 26G. Resolutely deleted about 18G of TMP (specific TMP file or the following directory can’t understand what). Open AdminServer again, and the log on the screen goes smoothly, so it’s comfortable…

from ITPUB blog tolywang’s blog, source link: lack of space in the root directory caused the Managed Server state to become FAILED_NOT_RESTARTABLE, please contact the original blogger if you want to reprint.

MYSQL login error: mysqladmin: connect to server at’localhost’ failed

1. Mysql login error

mysqladmin: connect to server at ‘localhost’ failed
error: ‘Access denied for user ‘root’@’localhost’ (using password:

use service mysqld stop
mysqld_safe — skip-gran-tables &
enter mysql-uroot-p enter
> use mysql;
> update user set password=PASSWORD(“newpass”)where user=”root”;
change password to newpassord
> flush privileges; Update permission
> Quit out
service mysqld restart
mysql – uroot – p a new password to enter

= = = = = = = = = = = = = = = = = = = = = = = = = = = = = = = = = = = = = = = = = = = = = = = = = = = = = = = = = = =
2, forget the local root login password
solving process:
1, edit /etc/my.cnf
to [mysqld] configuration part to add a line
skate-grant-tables

; 2. Restart mysql
[root@localhost etc]# service mysqld restart
Shutting down mysql. [OK
Starting MySQL. [OK]

Welcome to
[root@localhost ~]# mysql-uroot-p MySQL
Enter password:
Enter

Welcome to

Commands end with the MySQL Monitor. or \g.
Your MySQL connection id is 1
Server version: 5.1.47-log Source distribution
Copyright (c) 2000, 2010, Oracle and/or its affiliates. All rights reserved.
This software comes with ABSOLUTELY NO WARRANTY. This is free software,
and you are welcome to modify and redistribute it under the GPL v2 license

Type ‘help; ‘ or ‘\h’ for help. Type ‘\c’ to clear the current input statement.

mysql> show databases;
+ — — — — — — — — — — — — — — — — — — — — +
| Database |
+ — — — — — — — — — — — — — — — — — — — — +
| information_schema |
| mysql |
| test |
+ — — — — — — — — — — — — — — — — — — — — +
3 rows in the set

execute the following statement
mysql> update user set password=password(“mysql”) where user=’root’;
Query OK, 4 rows affected (0.00 SEC)
rows matched: 4 Changed: 4 Warnings: 0

mysql> flush privileges;
Query OK, 0 rows affected (0.00 SEC)

4, delete the added “skip-gran-tables” row from /etc/my.cnf file, and restart mysql;
can log in normally with the new password;

= = = = = = = = = = = = = = = = = = = = = = = = = = = = = = = = = = = = = = = = = = = = = = = = =
Skip-grant-tables, a very useful mysql startup parameter, is described. As the name implies, you don’t start The grant-tables authorization table when mysql starts. What’s the use?Of course, it is useful to forget the administrator password. Operation method:

1, kill the original mysql:

rcmysqld stop

or:

service mysqld stop

or:

kill TERM mysqld
2. Start mysql with command line parameters:

/usr/bin/mysqld_safe – skip – grant – tables & amp;
3. Modify the administrator password:

use mysql;

update user set password=password(‘yournewpasswordhere’) where user=’root’;

flush privileges;

the exit;
4. Kill mysql, restart mysql

【ipfs-api】npm ERR! JSON.parse package.json must be actual JSON, not just JavaScript.

Reasons for this problem:
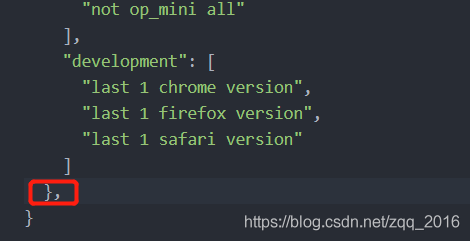
I used NPM install –save-dev IPFS-API to download IPFS-API first. When using this command to download, IPFS-API is listed in devDependencies separately. Later, when using NPM install –save IPFS-API to reinstall, one comma is missing in removing devDependencies.

npm ERR! code EJSONPARSE
npm ERR! file D:\contract\ipfs\go-ipfs\ipfs-http-demo\package.json
npm ERR! JSON.parse Failed to parse json
npm ERR! JSON.parse Unexpected token } in JSON at position 749 while parsing near '...version"
npm ERR! JSON.parse     ]
npm ERR! JSON.parse   },
npm ERR! JSON.parse }
npm ERR! JSON.parse '
npm ERR! JSON.parse Failed to parse package.json data.
npm ERR! JSON.parse package.json must be actual JSON, not just JavaScript.

npm ERR! A complete log of this run can be found in:
npm ERR!     C:\Users\lenovo\AppData\Roaming\npm-cache\_logs\2020-08-17T11_01_41_124Z-debug.log

The package. Json figure is as follows:

Just delete the bottom comma.

Eclipse reports Failed to load the JNI shared library jvm.dll error solution

This error Failed to load the JNI Shared library jvm.dll for two possible reasons:
reason 1: the jvm.dll file does not exist
solution: copy a jvm.dll file from elsewhere.
reason 2: the Eclipse version number is inconsistent with the JDK version number
solution: either use 64 bits for both Eclipse and JDK versions, or use 32 bits for both. Remember not a 32 bit, a 64 bit. Note: the occurrence probability of general cause 1 is very low, and in most cases it is cause 2.

Samba shared server cannot be accessed and the path cannot be found

The Path cannot be found because the Samba Shared server is inaccessible
First blog post: P
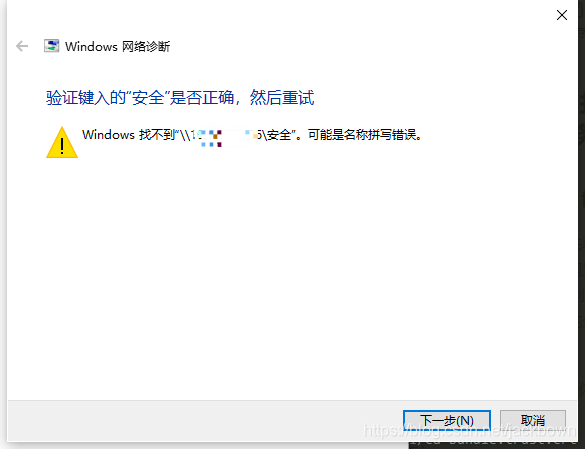
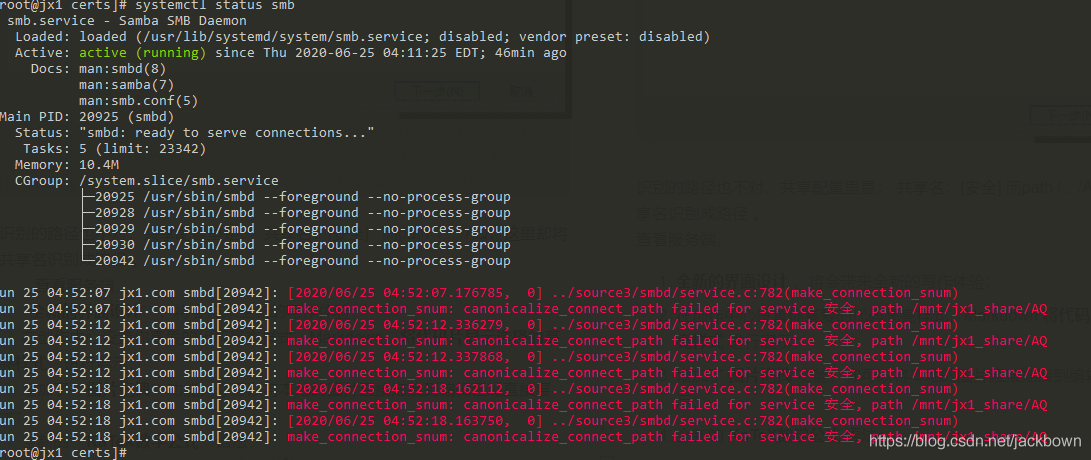
Windows access can only go to the root directory, opening the Shared subdirectory indicates that the path could not be found, spelling error may occur, and the server appears “make_connection_SNum: canonicalize_connect_Path Fail…”
As an amateur, recently tried to built a Shared server, using the virtual machine to do the test before, run successfully, permissions can be implemented, the day before yesterday with a spare industrial control server, reinstall the Samba server, configuration files, and access configuration is copied, is unable to access, the same Windows, access to the original virtual machine SMB, completely normal, and access to the physical machine SMB, input \ IP address, a successful connection, input user name and password, is normal to list the Shared directory, but want to get into Shared subdirectory, have been tip don’t have access to:

recognized the wrong path, the Shared configuration is: share name: [security] and path /… /AQ, which identifies the Shared name as a path.
looks at the server and prompts “make_connection_snum: canonicalize_connect_path fails for service security, path/MNT /jx1_share/AQ”, the same is true for logging.

java.net.SocketException: Broken pipe (Write failed)

Springboot accessing Redis reports this error:

org.springframework.dao.InvalidDataAccessApiUsageException: DENIED Redis is running in protected mode because protected mode is enabled, no bind address was specified, no authentication password is requested to clients. In this mode connections are only accepted from the loopback interface. If you want to connect from external computers to Redis you may adopt one of the following solutions: 1) Just disable protected mode sending the command 'CONFIG SET protected-mode no' from the loopback interface by connecting to Redis from the same host the server is running, however MAKE SURE Redis is not publicly accessible from internet if you do so. Use CONFIG REWRITE to make this change permanent. 2) Alternatively you can just disable the protected mode by editing the Redis configuration file, and setting the protected mode option to 'no', and then restarting the server. 3) If you started the server manually just for testing, restart it with the '--protected-mode no' option. 4) Setup a bind address or an authentication password. NOTE: You only need to do one of the above things in order for the server to start accepting connections from the outside.; nested exception is redis.clients.jedis.exceptions.JedisDataException: DENIED Redis is running in protected mode because protected mode is enabled, no bind address was specified, no authentication password is requested to clients. In this mode connections are only accepted from the loopback interface. If you want to connect from external computers to Redis you may adopt one of the following solutions: 1) Just disable protected mode sending the command 'CONFIG SET protected-mode no' from the loopback interface by connecting to Redis from the same host the server is running, however MAKE SURE Redis is not publicly accessible from internet if you do so. Use CONFIG REWRITE to make this change permanent. 2) Alternatively you can just disable the protected mode by editing the Redis configuration file, and setting the protected mode option to 'no', and then restarting the server. 3) If you started the server manually just for testing, restart it with the '--protected-mode no' option. 4) Setup a bind address or an authentication password. NOTE: You only need to do one of the above things in order for the server to start accepting connections from the outside.
   at org.springframework.data.redis.connection.jedis.JedisExceptionConverter.convert(JedisExceptionConverter.java:64)
   at org.springframework.data.redis.connection.jedis.JedisExceptionConverter.convert(JedisExceptionConverter.java:41)
   at org.springframework.data.redis.PassThroughExceptionTranslationStrategy.translate(PassThroughExceptionTranslationStrategy.java:44)
   at org.springframework.data.redis.FallbackExceptionTranslationStrategy.translate(FallbackExceptionTranslationStrategy.java:42)
   at org.springframework.data.redis.connection.jedis.JedisConnection.convertJedisAccessException(JedisConnection.java:181)
   at org.springframework.data.redis.connection.jedis.JedisKeyCommands.keys(JedisKeyCommands.java:143)
   at org.springframework.data.redis.connection.DefaultedRedisConnection.keys(DefaultedRedisConnection.java:75)
   at org.springframework.data.redis.core.RedisTemplate.lambda$keys$10(RedisTemplate.java:840)
   at org.springframework.data.redis.core.RedisTemplate.execute(RedisTemplate.java:224)
   at org.springframework.data.redis.core.RedisTemplate.execute(RedisTemplate.java:184)
   at org.springframework.data.redis.core.RedisTemplate.keys(RedisTemplate.java:840)
   at com.boss.sysuser.bs.impl.UserRedisServiceImpl.getKeys(UserRedisServiceImpl.java:68)
   at com.boss.sysuser.bs.impl.UserRedisServiceImpl.removeByKey(UserRedisServiceImpl.java:84)
   at com.boss.sysuser.bs.impl.UserCacheService.cacheUser(UserCacheService.java:32)
   at com.boss.sysuser.listener.ApplicationContextListener.onApplicationEvent(ApplicationContextListener.java:26)
   at com.boss.sysuser.listener.ApplicationContextListener.onApplicationEvent(ApplicationContextListener.java:1)
   at org.springframework.context.event.SimpleApplicationEventMulticaster.doInvokeListener(SimpleApplicationEventMulticaster.java:172)
   at org.springframework.context.event.SimpleApplicationEventMulticaster.invokeListener(SimpleApplicationEventMulticaster.java:165)
   at org.springframework.context.event.SimpleApplicationEventMulticaster.multicastEvent(SimpleApplicationEventMulticaster.java:139)
   at org.springframework.context.support.AbstractApplicationContext.publishEvent(AbstractApplicationContext.java:400)
   at org.springframework.context.support.AbstractApplicationContext.publishEvent(AbstractApplicationContext.java:354)
   at org.springframework.boot.context.event.EventPublishingRunListener.running(EventPublishingRunListener.java:103)
   at org.springframework.boot.SpringApplicationRunListeners.running(SpringApplicationRunListeners.java:78)
   at org.springframework.boot.SpringApplication.run(SpringApplication.java:323)
   at org.springframework.boot.SpringApplication.run(SpringApplication.java:1242)
   at org.springframework.boot.SpringApplication.run(SpringApplication.java:1230)
   at com.boss.UserserviceApplication.main(UserserviceApplication.java:17)
   at sun.reflect.NativeMethodAccessorImpl.invoke0(Native Method)
   at sun.reflect.NativeMethodAccessorImpl.invoke(NativeMethodAccessorImpl.java:62)
   at sun.reflect.DelegatingMethodAccessorImpl.invoke(DelegatingMethodAccessorImpl.java:43)
   at java.lang.reflect.Method.invoke(Method.java:498)
   at org.springframework.boot.loader.MainMethodRunner.run(MainMethodRunner.java:48)
   at org.springframework.boot.loader.Launcher.launch(Launcher.java:87)
   at org.springframework.boot.loader.Launcher.launch(Launcher.java:50)
   at org.springframework.boot.loader.JarLauncher.main(JarLauncher.java:51)
Caused by: redis.clients.jedis.exceptions.JedisDataException: DENIED Redis is running in protected mode because protected mode is enabled, no bind address was specified, no authentication password is requested to clients. In this mode connections are only accepted from the loopback interface. If you want to connect from external computers to Redis you may adopt one of the following solutions: 1) Just disable protected mode sending the command 'CONFIG SET protected-mode no' from the loopback interface by connecting to Redis from the same host the server is running, however MAKE SURE Redis is not publicly accessible from internet if you do so. Use CONFIG REWRITE to make this change permanent. 2) Alternatively you can just disable the protected mode by editing the Redis configuration file, and setting the protected mode option to 'no', and then restarting the server. 3) If you started the server manually just for testing, restart it with the '--protected-mode no' option. 4) Setup a bind address or an authentication password. NOTE: You only need to do one of the above things in order for the server to start accepting connections from the outside.
   at redis.clients.jedis.Protocol.processError(Protocol.java:127)
   at redis.clients.jedis.Protocol.process(Protocol.java:161)
   at redis.clients.jedis.Protocol.read(Protocol.java:215)
   at redis.clients.jedis.Connection.readProtocolWithCheckingBroken(Connection.java:340)
   at redis.clients.jedis.Connection.getBinaryMultiBulkReply(Connection.java:276)
   at redis.clients.jedis.BinaryJedis.keys(BinaryJedis.java:357)
   at org.springframework.data.redis.connection.jedis.JedisKeyCommands.keys(JedisKeyCommands.java:141)
   ... 29 more                                                                                                            畃rex妯$虫ヨredis涓
2020-03-11 14:09:18.953  INFO [userservice,,,] 17736 --- [           main] com.boss.sysuser.bs.IUserRedisService    : 鏍规                        key,?
ュprex : userorg#
org.springframework.data.redis.RedisConnectionFailureException: java.net.SocketException: Broken pipe (Write failed); nested exception is redis.clients.jedis.exceptions.JedisConnectionException: java.net.SocketException: Broken pipe (Write failed)
   at org.springframework.data.redis.connection.jedis.JedisExceptionConverter.convert(JedisExceptionConverter.java:67)
   at org.springframework.data.redis.connection.jedis.JedisExceptionConverter.convert(JedisExceptionConverter.java:41)
   at org.springframework.data.redis.PassThroughExceptionTranslationStrategy.translate(PassThroughExceptionTranslationStrategy.java:44)
   at org.springframework.data.redis.FallbackExceptionTranslationStrategy.translate(FallbackExceptionTranslationStrategy.java:42)
   at org.springframework.data.redis.connection.jedis.JedisConnection.convertJedisAccessException(JedisConnection.java:181)
   at org.springframework.data.redis.connection.jedis.JedisKeyCommands.keys(JedisKeyCommands.java:143)
   at org.springframework.data.redis.connection.DefaultedRedisConnection.keys(DefaultedRedisConnection.java:75)
   at org.springframework.data.redis.core.RedisTemplate.lambda$keys$10(RedisTemplate.java:840)
   at org.springframework.data.redis.core.RedisTemplate.execute(RedisTemplate.java:224)
   at org.springframework.data.redis.core.RedisTemplate.execute(RedisTemplate.java:184)
   at org.springframework.data.redis.core.RedisTemplate.keys(RedisTemplate.java:840)
   at com.boss.sysuser.bs.impl.UserRedisServiceImpl.getKeys(UserRedisServiceImpl.java:68)
   at com.boss.sysuser.bs.impl.UserRedisServiceImpl.removeByKey(UserRedisServiceImpl.java:84)
   at com.boss.sysuser.bs.impl.UserMgrBusinessImpl.initOrgCache(UserMgrBusinessImpl.java:85)
   at com.boss.sysuser.bs.impl.UserMgrBusinessImpl$$FastClassBySpringCGLIB$$7621e1f2.invoke(<generated>)
   at org.springframework.cglib.proxy.MethodProxy.invoke(MethodProxy.java:204)
   at org.springframework.aop.framework.CglibAopProxy$DynamicAdvisedInterceptor.intercept(CglibAopProxy.java:684)
   at com.boss.sysuser.bs.impl.UserMgrBusinessImpl$$EnhancerBySpringCGLIB$$d05c5f2c.initOrgCache(<generated>)
   at com.boss.sysuser.listener.ApplicationContextListener.onApplicationEvent(ApplicationContextListener.java:27)
   at com.boss.sysuser.listener.ApplicationContextListener.onApplicationEvent(ApplicationContextListener.java:1)
   at org.springframework.context.event.SimpleApplicationEventMulticaster.doInvokeListener(SimpleApplicationEventMulticaster.java:172)
   at org.springframework.context.event.SimpleApplicationEventMulticaster.invokeListener(SimpleApplicationEventMulticaster.java:165)
   at org.springframework.context.event.SimpleApplicationEventMulticaster.multicastEvent(SimpleApplicationEventMulticaster.java:139)
   at org.springframework.context.support.AbstractApplicationContext.publishEvent(AbstractApplicationContext.java:400)
   at org.springframework.context.support.AbstractApplicationContext.publishEvent(AbstractApplicationContext.java:354)
   at org.springframework.boot.context.event.EventPublishingRunListener.running(EventPublishingRunListener.java:103)
   at org.springframework.boot.SpringApplicationRunListeners.running(SpringApplicationRunListeners.java:78)
   at org.springframework.boot.SpringApplication.run(SpringApplication.java:323)
   at org.springframework.boot.SpringApplication.run(SpringApplication.java:1242)
   at org.springframework.boot.SpringApplication.run(SpringApplication.java:1230)
   at com.boss.UserserviceApplication.main(UserserviceApplication.java:17)
   at sun.reflect.NativeMethodAccessorImpl.invoke0(Native Method)
   at sun.reflect.NativeMethodAccessorImpl.invoke(NativeMethodAccessorImpl.java:62)
   at sun.reflect.DelegatingMethodAccessorImpl.invoke(DelegatingMethodAccessorImpl.java:43)
   at java.lang.reflect.Method.invoke(Method.java:498)
   at org.springframework.boot.loader.MainMethodRunner.run(MainMethodRunner.java:48)
   at org.springframework.boot.loader.Launcher.launch(Launcher.java:87)
   at org.springframework.boot.loader.Launcher.launch(Launcher.java:50)
   at org.springframework.boot.loader.JarLauncher.main(JarLauncher.java:51)
Caused by: redis.clients.jedis.exceptions.JedisConnectionException: java.net.SocketException: Broken pipe (Write failed)
   at redis.clients.jedis.Connection.flush(Connection.java:334)
   at redis.clients.jedis.Connection.getBinaryMultiBulkReply(Connection.java:274)
   at redis.clients.jedis.BinaryJedis.keys(BinaryJedis.java:357)
   at org.springframework.data.redis.connection.jedis.JedisKeyCommands.keys(JedisKeyCommands.java:141)
   ... 33 more
Caused by: java.net.SocketException: Broken pipe (Write failed)
   at java.net.SocketOutputStream.socketWrite0(Native Method)
   at java.net.SocketOutputStream.socketWrite(SocketOutputStream.java:111)
   at java.net.SocketOutputStream.write(SocketOutputStream.java:155)
   at redis.clients.util.RedisOutputStream.flushBuffer(RedisOutputStream.java:52)
   at redis.clients.util.RedisOutputStream.flush(RedisOutputStream.java:216)
   at redis.clients.jedis.Connection.flush(Connection.java:331)
   ... 36 more

The timeout parameter of the configuration file is set to 0. Meanwhile, testOnReturn, testWhileIdle and testOnBorrow are configured to be true. However, when I tried, I failed to solve the problem.

1) Just disable protected mode sending the command 'CONFIG SET protected-mode no' from the loopback interface by connecting to Redis from the same host the server is running, however MAKE SURE Redis is not publicly accessible from internet if you do so. Use CONFIG REWRITE to make this change permanent. 2) Alternatively you can just disable the protected mode by editing the Redis configuration file, and setting the protected mode option to 'no', and then restarting the server. 3) If you started the server manually just for testing, restart it with the '--protected-mode no' option. 4) Setup a bind address or an authentication password. NOTE: You only need to do one of the above things in order for the server to start accepting connections from the outside.

Redis has given three solutions: SET protected-mode no
New protected-mode configuration after Redis3.2, default is yes, that is, on. The effect of protected-mode setting to different values is as follows:
At this point, the external network can directly access
. To enable the protected protection-mode, configure the bind IP or set the access password.
The developer has been using Redis 3.0 and this time redIS 5.0.7 is used on the server
Set the protected-mode in the configuration file to no problem resolution. It seems that you should read the error log carefully when you encounter problems

License Error: “Failed to Open the TCP Port Number in the License” Ultimate Solution

Why is it called the ultimate solution?Not to boast, this list is more complete than the current Synopsys, Cadence, support documentation, and FLEXnet’s help documentation.

these moves most of the eda vendor’s engineers are not plenary, the true conclusion is not nonsense. This thing toss about for a long time, spent a lot of energy, let me blow brag, ha ha.

in addition, if the following problems are excluded and the license is reported incorrectly, do not suspect that the list is incomplete, 99% of the time it may be that one of the steps is not done completely. Get a new check.

is limited to the legal license, crack is a weird problem, not to be discussed

start of text:

1, ensure that the LMGRD process has been completely killed;

# killall LMGRD

2, make sure the tool processes in the license, like synopsys SNPSLMD, cadence CDSLMD, are also completely killed

# killall XXXX

above two steps than lmdown-c license.lic insurance, also can be used cross-over

3, check whether the license port is used, if this is the case, you can temporarily change the port to try to start it once, if it is successful to explain the problem, follow the steps below to change back to the actual use of port

# netstat -pan | grep port_number

gets the process that is using the port, kill it, if not, wait for the port to be released, which may take a few minutes.

4, make sure the TCP protocol is started

can ping the host name view, can ping no problem

5, make sure the firewall does not block this port or turn off iptables

#service iptables stop

6, view seLinux or close

#setenforce 0

7, check /etc/hosts to make sure you have this line

127.0.0.1 localhost

8, check to see if Telnet hostname can pass, if it can’t login, then change by the following way

1 & gt; Install Telnet, Telnet-Server, xinetd
2 & gt; Modify /etc/xinetd.d/ Telnet disable to no
3 & gt; /etc/init.d/xinetd restart

9, if you use nis, make sure that the first parameter of all items in /etc/nsswitch is files

For example, networks: nisplus [NOTFOUND=return] files should be changed to
networks: files [NOTFOUND=return] nisplus

more than one problem usually do not encounter all at once, from front to back to find which solution to the problem can be.

is limited to the legal license, crack is a weird problem, not to be discussed

Python module learning-Paramiko-Use python to throw an exception: Authentication failed.

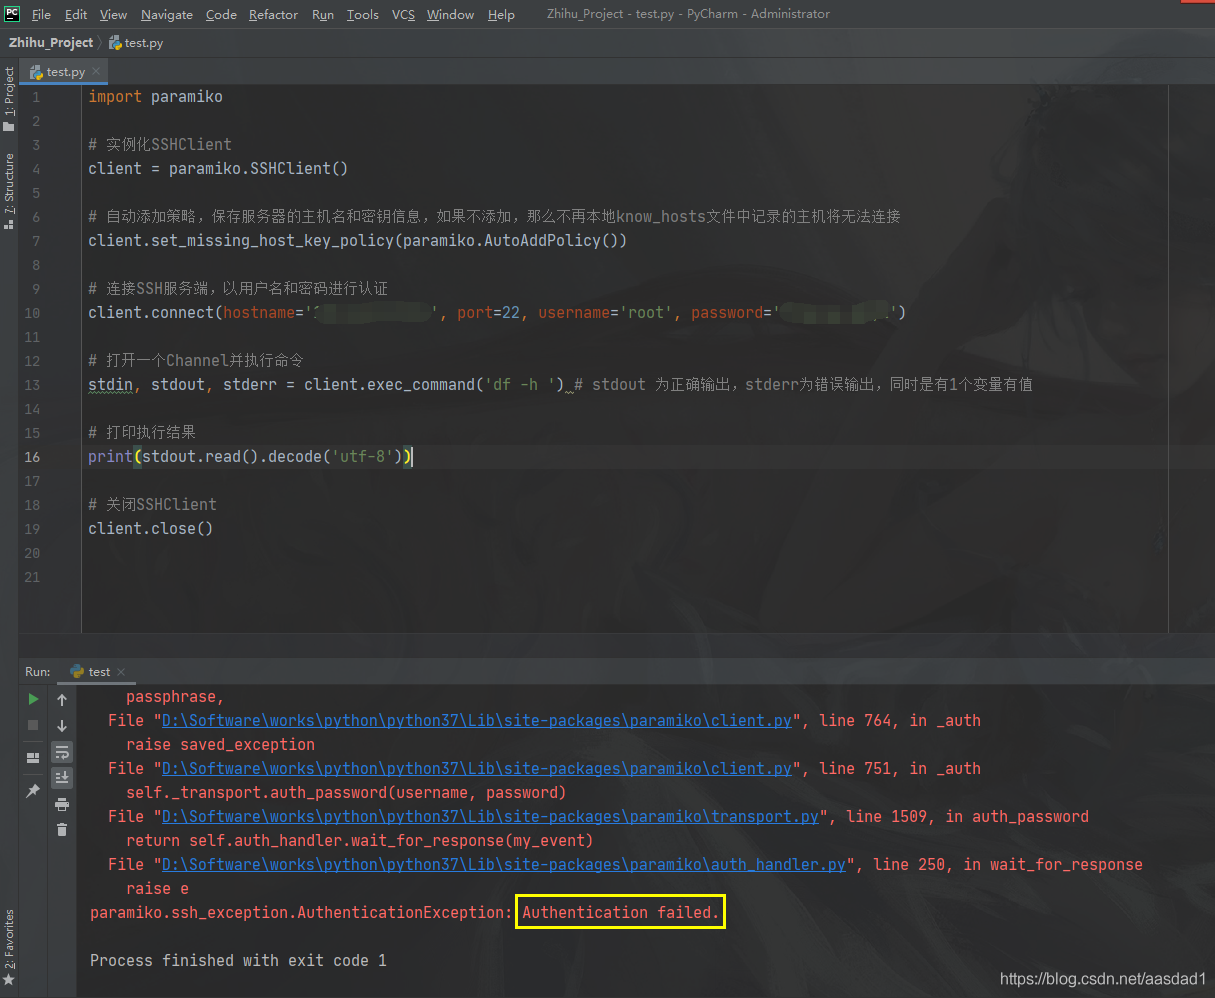
When an exception is thrown, paramiko. Ssh_exception. AuthenticationException: Authentication failed.
Please check:
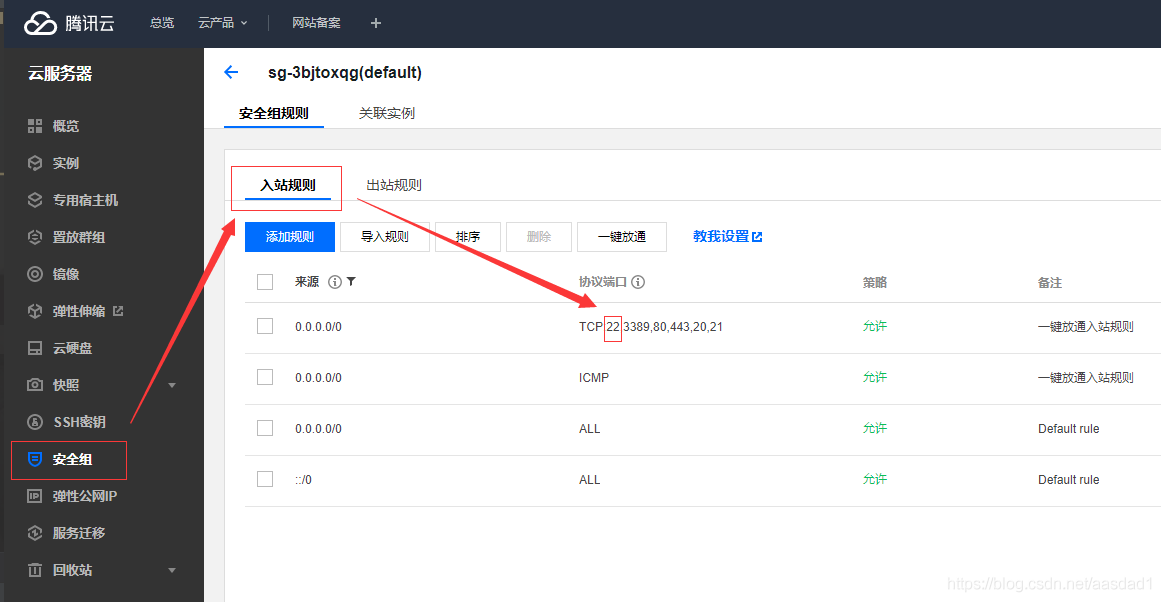
1. Is port 22 enabled on the cloud server?
2. Is the password wrong when passing the parameter?

Error reporting example:

 
Operation method:
 
Take my Tencent Cloud as an example:
1. Click the security group rule to check whether the server opens port 22:

 
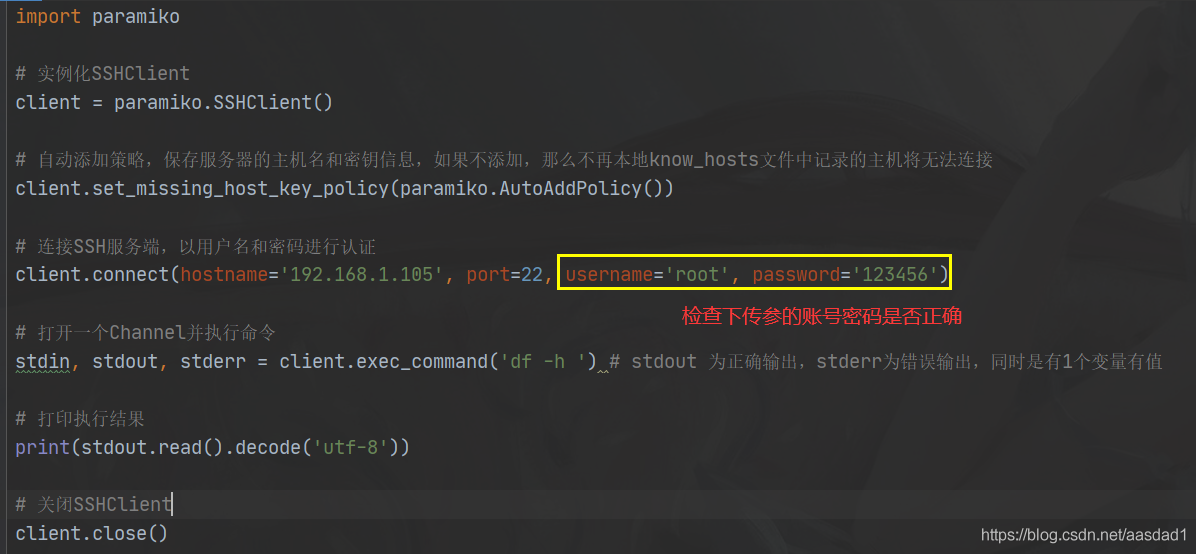
2. Check whether the code transmission parameter: account password is correct:

import paramiko

# 实例化SSHClient
client = paramiko.SSHClient()

# 自动添加策略,保存服务器的主机名和密钥信息,如果不添加,那么不再本地know_hosts文件中记录的主机将无法连接
client.set_missing_host_key_policy(paramiko.AutoAddPolicy())

# 连接SSH服务端,以用户名和密码进行认证
client.connect(hostname='192.168.1.105', port=22, username='root', password='123456')

# 打开一个Channel并执行命令
stdin, stdout, stderr = client.exec_command('df -h ') # stdout 为正确输出,stderr为错误输出,同时是有1个变量有值

# 打印执行结果
print(stdout.read().decode('utf-8'))

# 关闭SSHClient
client.close()

 
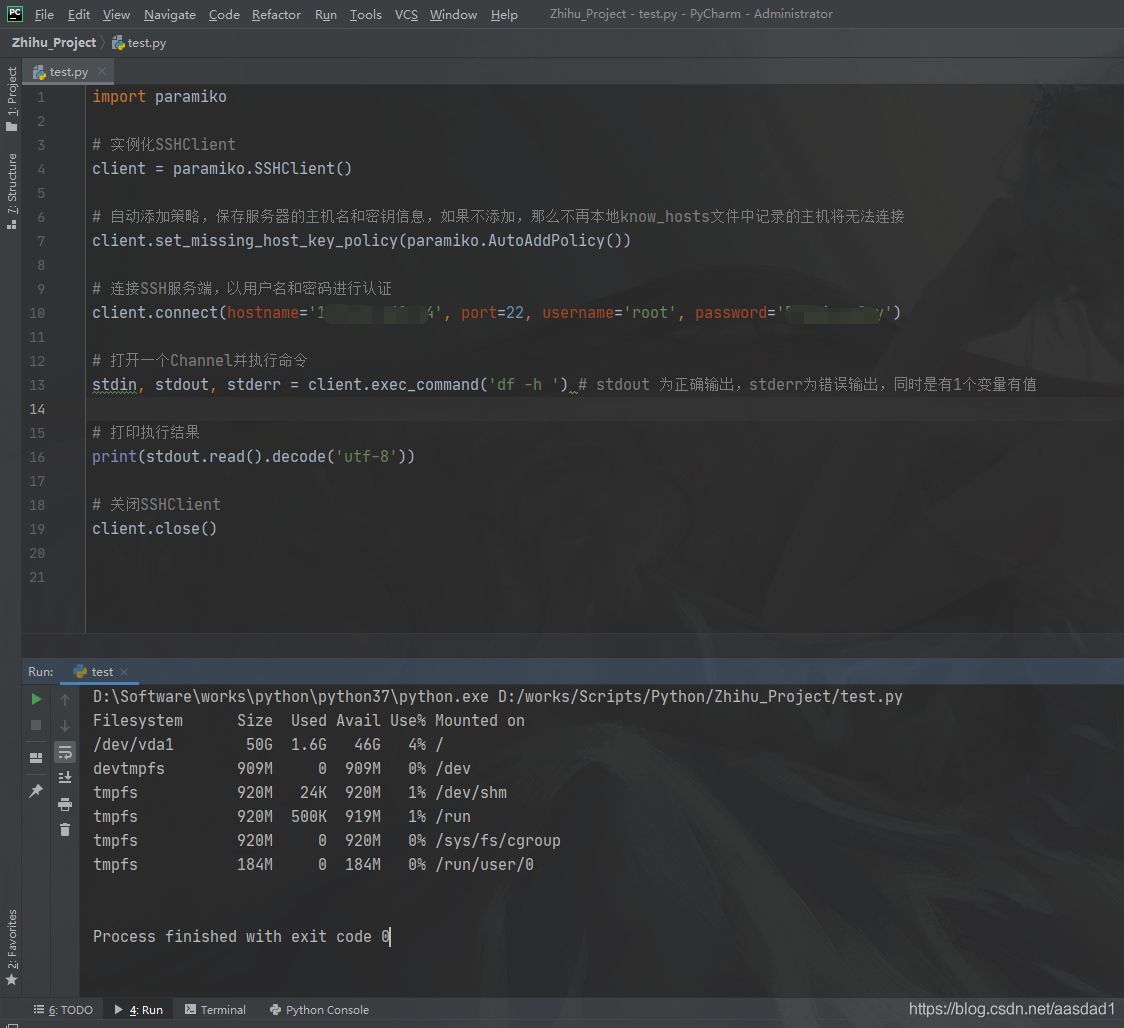
3. After checking, run the Linux command with Python:

Conversion to dalvik format failed with error 1 solution

Note: transfer to http://dev.wo.com.cn/docportal/doc_queryMdocDetail.action?Mdoc docindex = 6540
 
Resource description:

1. If you do not modify the Android SDK version, use the Project Clean command to work on a project.
(this process is only compatible with the lower version of the project in the higher version, not a real upgrade)

2. If the android SDK version is modified, the following steps are required:

1) modify the SDK

select project, buildpath –> configure build path —> Library delete the lower version of referenced SDK,
then add ExternalJARs, select the higher version SDK,OK, save

2) modify the classpath file

the file may have this item :< Classpathentry kind=”lib” path =” higher version address you specify “
change her to < classpathentrykind=”con”path=”com.android.ide.eclipse.adt.ANDROID_FRAMEWORK” />

3) modify androidmanifest.xml

add &lt after the application tag in the androidmanifest.xml file; uses-sdkandroid:minSdkVersion=”3″> < /uses-sdk>

4) modify default.properties (very important)

the last line of the file (not used in the previous #) target=android-3 target=android-8, save.
look again at your project and the new android2.2 project structure. 3. Many problems occurred in the development of Android Project in eclipse can be used to Project– > Clean is easy to solve.
but if it appears that the Android library cannot be found, or accidentally removed the Android library, how can you add the Android library again?

in eclipse Java Build Path can not add such as Android 2.1 defined system libraries. However, I tried to manually add android.jar in the SDK folder
, which showed a Conversion to Dalvik format failed with error 1. After playing around with
for a while, many users said that using Projectclean would solve the problem, but in my case, it was useless.

solution:

modify the project classpath file, which makes me understand, directly from other normal projects into the
< ! Note that this.classpath file is located in the Eclipse workspace hard disk location under the project directory –>
< Classpathentry kind=”lib”path =” Address of custom JAR “/>

modified to www.2cto.com
< classpathentry kind=”con”path=”com.android.ide.eclipse.adt.ANDROID_FRAMEWORK”/> .

like this refresh project, Android system library Android 2.1 is back, that error is resolved.
— — — — — — — — — — — — — — — — — — — — — — — — — — — — — — — — — — — — — — — — — — — — — — — — — — — — — — — — — — — — — — — — — — — — — — — — — — — — — — — — — — — — — — — — — — — — — — — — — — — — — — — — — — — — — — — — — — — — — — — — — —
this several days again encountered such a problem, however. The classpath file already contains the above con inside Path, then found a new method on BBS:

project -> properties -> androidlabel, check a target from the project build target list

< ! — Sometimes the error cannot be removed. At this time, please pay attention when entering project-> properties -> After android, there is a
is library item below, tick it, and then click “OK”. This is how my error was solved. At first, I could not solve it according to
above and the following methods.
(is library)
(is library)
(is library)
(is library)
; There is another case: the package conflict, please go to the project directory to remove the same package, re-import one, this is similar to the first case, but this is for other packages, not android package

solution: Java Build Path-> Libraries-> JARs and class folders on thebuild path
see if there are identical JARs some jar versions are not necessarily android JARs other library JARs can also cause such errors
last time signpost-core-1[1].2.1.1.jar and signpost-core-1.2.1.1.jar conflicts this occurs so you have to see if there are identical JARs

Compared with before is the fourth kind of situation, I’m from others that take an examination of a andengine game engine code, me to his libs folder is set as the source folder, and then put inside the jar package add to the buildpath, then came the problem of subject, checked a lot of solution, no solution, then carefully observed my question and the fourth is like, put the jar all removed, and then reload time, under this solved, ha ha, here the method summary posted, convenient viewing.


TNS-03505: Failed to resolve name – accidental error!

The original address: http://blog.csdn.net/zhpsam109/article/details/727289
Modify TNsnames. ora with VI to add a local service name configuration with the following types:
 
(DESCRIPTION = = XXX

(ADDRESS_LIST =
(ADDRESS = (TCP) PROTOCOL = (HOST = 192.168.100.131) (1521) PORT =))

(CONNECT_DATA =

(= DEDICATED SERVER) (SERVICE_NAME = XXX)
)
)
 
After the configuration, use the command WQ, save and exit, and then test with TNSPing XXX, error occurs:
 
TNS-03505: Failed to resolve name
 
After a good check, the content added in tnsnames.ora above is correct and hard to understand! had to search the Internet to find a solution, just know is TNS|NAME before a space, re-open tnsnames.ora with VI, and then delete XXX in front of the space, with tnsping XXX, the problem is solved!
A small problem, toss me for a long time, ha ha!