rpmdb: Thread/process 6539/140448388269824 failed: Thread died in Berkeley DB library
error: db3 error(-30974) from dbenv->failchk: DB_RUNRECOVERY: Fatal error, run database recovery
error: cannot open Packages index using db3 -  (-30974)
error: cannot open Packages database in /var/lib/rpm
CRITICAL:yum.main:
The reason is that the RPM database is corrupted
Restore the database to normal after rebuilding:
cd /var/lib/rpm/
for i in `ls | grep 'db.'`;do mv $i $i.bak;done
rpm --rebuilddb
yum clean all
Common mistakes in WCF distributed development (15): Communication with the underlying transaction manager has failed.
The error occurs today when debugging WCF transactions locally: Communication with the stable Transaction Manager has failed.
I did a lot of research to find out why. It’s because of MSDTC. This protocol USES a distributed transaction coordinator. Or the transaction protocol.
Solutions:
Modify the transaction communication protocol.
1. & lt; bindings>
& lt; netTcpBinding >
& lt; The binding name = “netTcpBindingTcp transactionFlow” = “true” & gt;
& lt; ! –transactionProtocol=”WSAtomicTransactionOctober2004″–> // Local debugging does not apply to this transaction protocol
& lt; ! –< reliableSession enabled=”true” ordered=”true”/>
& lt; security mode=”None”> < /security> –>
& lt; /binding>
& lt; /netTcpBinding>
& lt; /bindings>
2. Check MS DTC Settings. [Control Panel -& GT; Performance and Maintenance -& GT; Management Tools -& GT; Component Services -& GT; Computer -& GT; My Computer -& GT; Properties -& GT; MS-DTC TAB -& GT; Security Configuration.
See article links:
1. http://social.msdn.microsoft.com/forums/en-us/windowstransactionsprogramming/thread/71f7a219-c85d-4a04-973b-c73464f59606;
2.http://msforums.ph/forums/t/38399.aspx
3.http://www.cnblogs.com/ThinkCode/archive/2008/10/14/1311021.html
This article from frankxulei 51 cto blog, the original link: http://blog.51cto.com/frankxulei/320435, if you want to reprint, please contact our author
Connection for controluser as defined in your configuration failed.
Using the event scheduler (schedule tasks) in mysql,
The statement is written and runs fine, but it doesn’t have the desired result. The reasons for the failure of many planned tasks are summarized online. None of them fit me.
When you open the event table in phpmyAdmin, you see the following red prompt: Connection for Controluser as defined in your Configuration Failed.
“Due to the failure of the control user connection defined in the configuration.”
Without further ado, find phpyAdmin’s configuration file config.sample.inc. PHP, and see a paragraph like this:
/* PMA User advanced features */
$CFG [‘Servers’][$I][‘controluser’] = ‘PMA ‘;
$CFG [‘ the Servers’] [$I] [‘ controlpass] = $password;
It turns out that this user is the advanced user, when I installed the integration environment before, I didn’t let the user enter, I just needed to enter password,
As a result, I usually use a root account, but this account is not a power user, so I changed the pMA to root.
Back on the event table page, the red prompt disappears. My plan has started to work.
.
There are also people on the Internet who have summarized the reasons for the very common failure of event scheduling. Some important things to note are:
After the server is shut down and restarted, the planned task fails, which is not approved in the actual production.
Able to change mysql’s configuration file to resolve, add an event_scheduler=ON to my. Ini
Reproduced in: https://www.cnblogs.com/lcchuguo/p/5180282.html
Linux dynamically loads kernel modules
Linux is a single kernel. In order to make up for the poor scalability and maintenance of a single kernel, Linux introduces dynamic loadable kernel modules, which can be loaded into or unloaded from the kernel during the running of the system. A module is a stand-alone program that can be compiled but not run independently. It is linked to the kernel at runtime and runs in kernel space as part of the kernel. A module usually consists of a set of functions and data structures used to implement a file system, a driver, or other functions on top of the kernel.
Here’s a simple example: the
(1) module hello.c file
#include <linux/init.h>
//specify the initialization and cleanup functions
#include <linux/module.h>
// Contains definitions for a large number of functions and symbols needed to load the module.
#include <linux/kernel.h>

MODULE_LICENSE("GPL");
MODULE_AUTHOR("WFJ");
// Declare the module's license, for any version of the GNU General Public License
static int hello_init (void)
{
    printk(KERN_ALERT "Hello module init/n");
    return 0;
}
//The initialization function should be declared as static.
static void hello_exit (void)
{
    printk(KERN_ALERT "Hello module exit/n");
}
//Purge function, which logs out the interface and returns all resources to the system before the module is removed.
module_init(hello_init);
//This macro definition adds a special segment to the module object code, indicating where to find the module's initialization function.
//Without this definition, the initialization function will not be called.
module_exit(hello_exit);
A Linux kernel module must contain module initialization and module uninstall functions, which run at insmod and rmMOD, which must be defined before the macros module_init and module_exit are used, otherwise there will be a compilation error.
(2) Makefile file
CONFIG_MODULE_SIG=n

obj-m := hello.o

KERNELBUILD :=/usr/src/linux-source-3.13.0

default:

    make -C $(KERNELBUILD) M=$(shell pwd) modules

clean:

    rm -rf *.o  *.ko *.mod.c .*.cmd .tmp_versions *.order *.symvers
(3) the compilation Module
is compiled with make command. After the compilation, several new files will be produced: hello.ko, hello.mod. C, hello.mod. O, hello.o, modules. Order, module.symvers. Where Hello.ko is required.
(4) insert module
sudo insmod hello.ko(5) View module
lsmodLsmod is short for list Modules. It lists all the modules.
does not print out the output of hello.c file on the port, but you can use the dmesg command to view it.
dmesg > hello.txtSave the output of dMESg in the hello.txt file. If the CONFIG_MODULE_SIG=n statement is not included in the Makefile, then the hello.txt file will show: Hello: module verification failed: signature and/or required key missing-tainting kernel
: module verification failed. If this statement is present, the hello.txt file will show:
[ 9753.846136] Hello module init/n
[12601.703040] Hello module exit/n
That is: output the output content of the hello.c file.
(7) unload the module
sudo rmmod hello.koEXSI6.0 virtual machine swap error causes it to fail to start
scenario
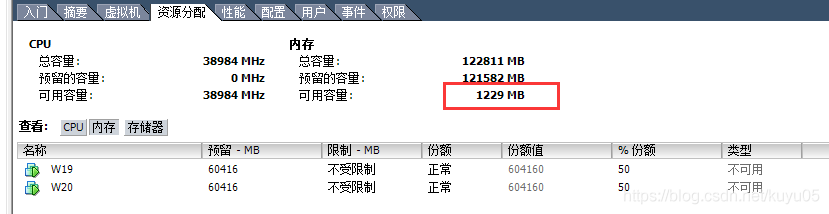
Install EXSI6.0 on the server. Once the installation is complete, set up the two virtual machines via Vshpere. Start one normal. The error was “Failed to extend swap File from 0 KB to XXX KB”. The key point of this question is swap. There is a saying on the Internet is file, need to change the storage path of swap file, I tried it seems to have no effect.
The solution
- virtual machine attributes -> Options – & gt; File swap location, stored in the host’s swap file data store. (not sure if it works) Virtual machine attributes -& GT; Memory, set the memory size. In the resource option, set the reserved size of memory to the previous set size. Make sure there is a certain amount of memory available in the resource allocation column of the virtual machine.
git clone Error “Clone failed: Authentication failed for xxxxx”
Possible scenarios include:
1. There is no project operation permission in the warehouse, so I need to contact master or master programmer to pull you into the project and authorize
2. Open “Git bash”; Add user.name and user.email; The identity authentication
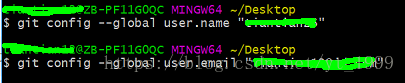
And you can view it through Git Config — List
3. If clone or push had been normal all the time; Suddenly failed; Think about whether you’ve ever changed your Git password. If it has been modified, this error is sure to occur
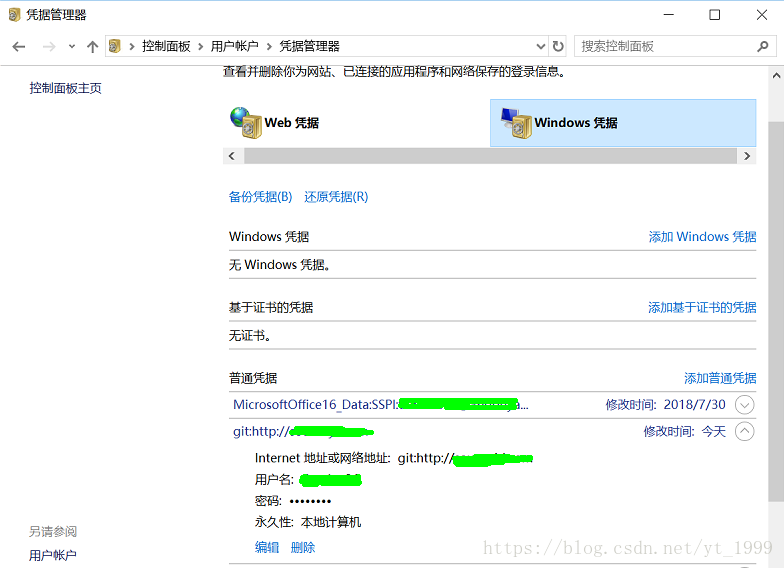
The solution is to open Windows’ credential manager; It will automatically record your Git address, username, password, etc. Change the password inside
SSH connection to MAC server shows No route to host solution
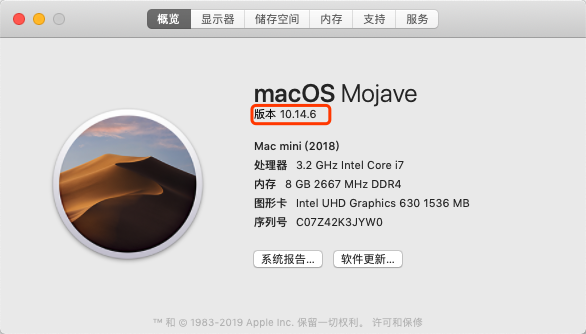
First, the MAC operating system is 10
When other computers SSH into a MAC server, sometimes they can log in, and the display shows no route to host
Jenkins installed on the MAC was also accessed through the browser, but the response was slow. After the following modifications, it could be used normally.
1. System preference setting & GT; > Sharing & gt; > Check file sharing, log in, remote management
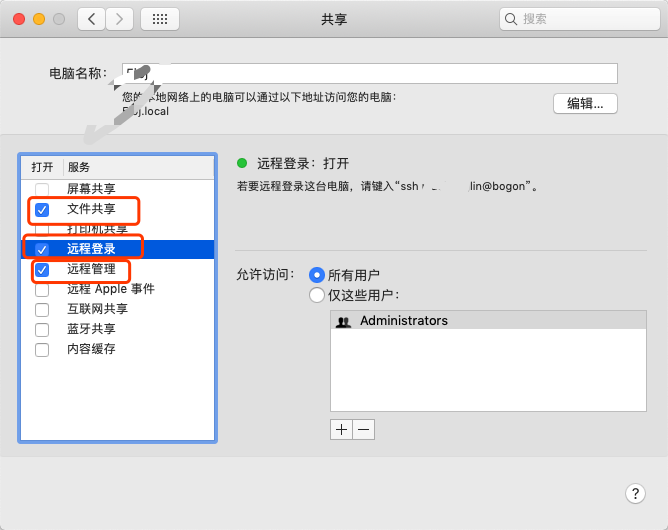
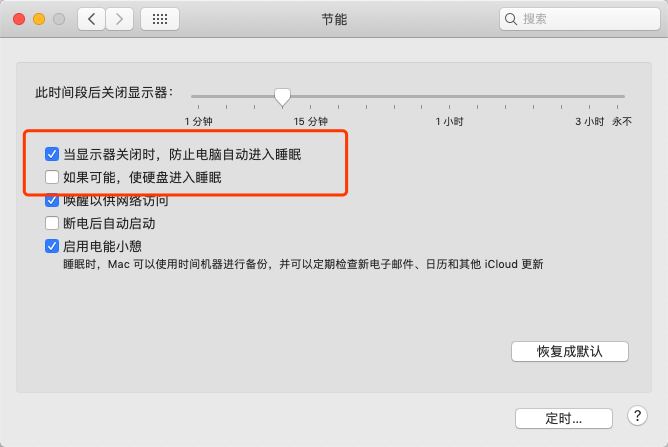
It is also possible that the computer is in sleep state, so cut off the network, the following configuration, so that the computer does not go to sleep even if the monitor is turned off.
2. System preference setting & GT; > Energy-saving & gt; > When the monitor is turned off, prevent the computer from falling asleep automatically
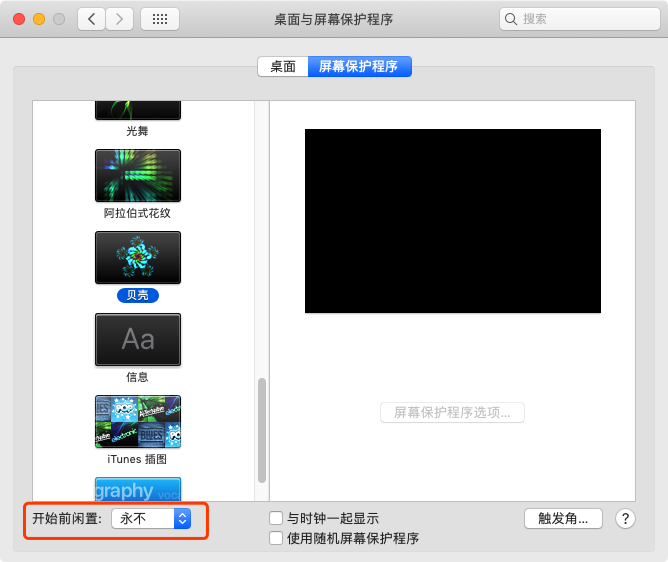
3. Desktop and Protector & GT; > Screen saver & GT; > Idle options before starting [never]
With reference to
https://jingyan.baidu.com/article/ae97a64606acfabbfd461d9d.html
Reproduced in: https://www.cnblogs.com/kaerxifa/p/11382652.html
Failed to load resource: net::ERR_CONNECTION_RESET
Failed to load resource: net::ERR_CONNECTION_RESET
init.js:568 Uncaught TypeError: Unable read property ‘_getInfo’ of undefined
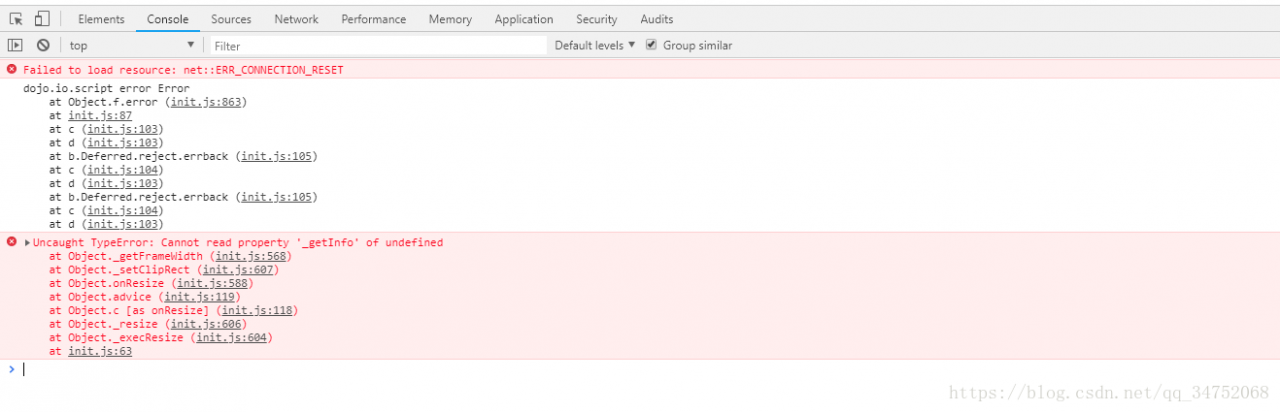
reported two consecutive errors. After baidu, I found that the problem was caused by the failure of a resource loading in the page, but I refreshed the page before opening the chrome developer tool. This error occurs when the developer tool loads the cache and the resource is not found. If you open the developer tool and then refresh it, the error will not be reported.
The answer here: https://zhidao.baidu.com/question/1385177154063329420.html
Failed to load the resource: net: : ERR_CACHE_MISS developer tools into the cache, said can’t find the resources.
the problem is that you open the page before you open chrome’s developer tools. The page itself is set to no-store without cache, so developer tools opened by the latter cannot reach the cache.
if you have already opened developer tools, refresh again will not have this error
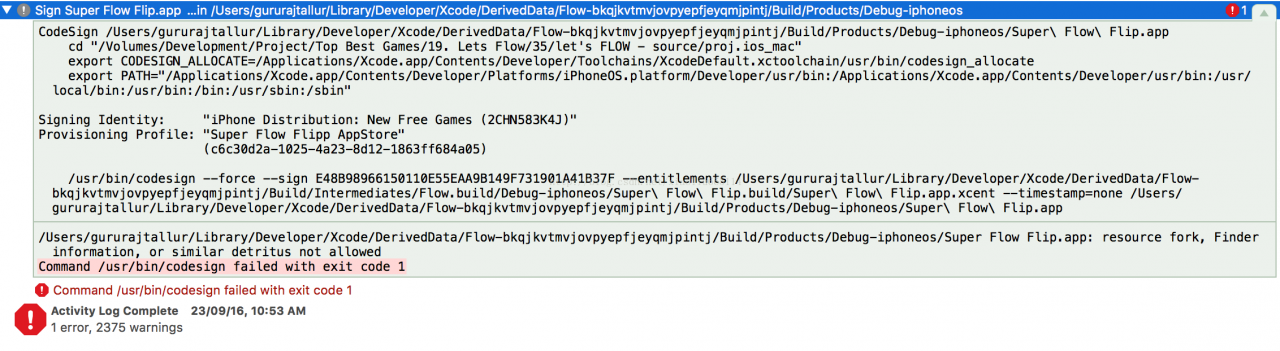
Command /usr/bin/codesign failed with exit code 1
mysql configuration supports SSL connection
MariaDB [(none)]> Show variables like ‘% % SSL;
If I show,
+---------------+----------+
| Variable_name | Value    |
+---------------+----------+
| have_openssl  | DISABLED |
| have_ssl      | DISABLED |
| ssl_ca        |          |
| ssl_capath    |          |
| ssl_cert      |          |
| ssl_cipher    |          |
| ssl_key       |          |
+---------------+----------+
7 rows in set (0.01 sec)
indicates that Mysql Server does not support SSL.
Complete the configuration by modifying my.CNF
vim /etc/my.cnf
After adding SSL under [mySQld], save.
service mariadb stop
service mariadb start
Restart the mysql service
At this point, open the database again to query SSL status:
MariaDB [(none)]> show variables like '%ssl%';
+---------------+-------+
| Variable_name | Value |
+---------------+-------+
| have_openssl  | YES   |
| have_ssl      | YES   |
| ssl_ca        |       |
| ssl_capath    |       |
| ssl_cert      |       |
| ssl_cipher    |       |
| ssl_key       |       |
+---------------+-------+
7 rows in set (0.00 sec)
found that mysql already supports SSL
# Use OpenSSL to create certificates and private keys
First confirm the OpensSL installation
[root@mcu web]# openssl version
OpenSSL 1.0.1e-fips 11 Feb 2013
[root@mcu web]#
Create a./ CERT directory for the generated certificates and private keys
[root@mcu mcu]# mkdir ./cert
[root@mcu mcu]# cd ./cert/
# create CA private key and CA certificate
Then, let’s first generate a CA private key:
openssl genrsa 2048 > ca-key.pem
Once we have a CA private key, we can then use this private key to generate a new digital certificate:
openssl req -sha1 -new -x509 -nodes -days 3650 -key ca-key.pem > ca-cert.pem
When executing this command, you will need to fill in some questions, just fill in whatever you want.
After executing the above command, we have a CA private key and a CA certificate.
# create server-side RSA private key and digital certificate
Next, we need to create the private key on the server side and a certificate request file with the following command:
openssl req -sha1 -newkey rsa:2048 -days 3650 -nodes -keyout server-key.pem > server-req.pem
This command will generate a new private key (server-key.pem), and will be used to generate a certificate request file (server-req.pem).
this command also needs to answer a few questions, just fill in. Note, however, that the term A challenge password needs to be empty.
Next, we need to convert the generated private key into RSA private key file format:
openssl rsa -in server-key.pem -out server-key.pem
As a final step, we need to use the original generated CA certificate to generate a server-side digital certificate:
openssl x509 -sha1 -req -in server-req.pem -days 3650 -CA ca-cert.pem -CAkey ca-key.pem -set_serial 01 > server-cert.pem
The command above creates a digital certificate file on the server side.
# Create the client’s RSA private key and digital certificate
Similar to the command executed on the server side, we also need to generate a private key and certificate request file for the client. The command is as follows. Challenge Password is left blank:
openssl req -sha1 -newkey rsa:2048 -days 3650 -nodes -keyout client-key.pem > client-req.pem
Similarly, we need to convert the generated private key to the RSA private key file format:
openssl rsa -in client-key.pem -out client-key.pem
Finally, we also need to create a digital certificate for the client:
openssl x509 -sha1 -req -in client-req.pem -days 3650 -CA ca-cert.pem -CAkey ca-key.pem -set_serial 01 > client-cert.pem
# SSL configuration
In the previous step, we have generated 8 files, which are respectively:
Ca cert. Pem: ca certificate for generating digital certificates on the server/client side.
ca-key. Pem: ca private key for generating digital certificates on the server side.
server-key.
client-key.pem: client RSA private key
client-req.pem: client certificate request file, used to generate client digital certificate.
client cert. Pem: client digital certificate.
Next we need to configure the server side and the client side respectively.
# server side configuration
The server side needs to use three files, namely: CA certificate, RSA private key on the server side, and digital certificate on the server side. We need to add the following contents in the [mySQld] configuration field:
?
ssl-ca=/etc/mysql/ca-cert.pem
ssl-cert=/etc/mysql/server-cert.pem
ssl-key=/etc/mysql/server-key.pem
Then we can change the Bind-Address so that the MySQL service can receive clients from all IP addresses, that is:
bind-address = *
When configured, we need to restart the MySQL service to enable configuration.
As a final step, we add an account that requires SSL to log in to verify that our SSL configuration is working:
copy code
The code is as follows:
GRANT ALL PRIVILEGES ON *.* TO ‘ssl_test’@’%’ IDENTIFIED BY ‘sSL_test’ REQUIRE SSL;
FLUSH PRIVILEGES;
When configured, use root to log into MySQL and execute the show Variables like ‘% SSL %’ statement with the following output:
MariaDB [(none)]> show variables like '%ssl%'
    -> ;
+---------------+----------------------------+
| Variable_name | Value                      |
+---------------+----------------------------+
| have_openssl  | YES                        |
| have_ssl      | YES                        |
| ssl_ca        | /etc/mysql/ca-cert.pem     |
| ssl_capath    |                            |
| ssl_cert      | /etc/mysql/server-cert.pem |
| ssl_cipher    |                            |
| ssl_key       | /etc/mysql/server-key.pem  |
+---------------+----------------------------+
7 rows in set (0.00 sec)
# client configuration
Client configuration is relatively simple. First we need to copy ca-CERt.pem, Client-cert.pem, and client-key.pem to the client host. Then we can execute the following command to use SSL to connect to MySQL service:
mysql --ssl-ca=/path/to/ca-cert.pem --ssl-key=/path/to/client-key.pem --ssl-key=/path/to/ client-key.pem-h host_name-u ssl_test-p in addition to the above command line configuration for SSL, we can also use the configuration file. Add the following contents to the etc/my.cnf file:
[client]
default-character-set=utf8
ssl-ca=/path/to/ca-cert.pem
ssl-cert=/path/to/client-cert.pem
ssl-key=/path/to/client-key.pem
if the following error occurs
ERROR 2026 (HY000): SSL connection error: SSL_CTX_set_default_verify_paths failedindicates that the SSL authentication file cannot be accessed. Place the CA file in an accessible directory.
If the following error occurs
ERROR 2026 (HY000): SSL connection error: error:14090086:SSL routines:SSL3_GET_SERVER_CERTIFICATE:certificate verify failedmaybe the Common Name field in the cert file the certificate of the server and the certificate of the client are identical. This field cannot be consistent
If the following error occurs
ERROR 1045 (28000): Access denied for user 'ssl_test'@'10.35.8.182' (using password: YES)requires the following options to be added when connecting
--ssl-cipher=AES128-SHAWhen the connection is successful, we execute the following instructions
MariaDB [(none)]> \s
--------------
mysql  Ver 15.1 Distrib 5.5.41-MariaDB, for Linux (x86_64) using readline 5.1

Connection id:          13
Current database:
Current user:           [email protected]
SSL:                    Cipher in use is AES128-SHA
Current pager:          stdout
Using outfile:          ''
Using delimiter:        ;
Server:                 MariaDB
Server version:         5.5.44-MariaDB MariaDB Server
Protocol version:       10
Connection:             10.35.11.196 via TCP/IP
Server characterset:    utf8
Db     characterset:    utf8
Client characterset:    utf8
Conn.  characterset:    utf8
TCP port:               3306
Uptime:                 1 hour 6 min 31 sec

Threads: 6  Questions: 3135  Slow queries: 0  Opens: 13  Flush tables: 2  Open tables: 39  Queries per second avg: 0.785
--------------

MariaDB [(none)]>
?If the output contains information such as SSL: Cipher in use is HE-RSA-AES256-SHA, then SSL has been used to connect.
Win 10 System Restore Fail 0x80070091
Question:
The following about says it all. I have tried SysRes from both sides and failed.
System Restore did not complete successfully. Your computer’s system files and
The settings have not changed.
Details:
System restore fails when restoring a directory from a restore point.
Source:AppxStaging
Target: %ProgramFiles%\WindowsApps
An unspecified error occurred during system recovery. (0 x80070091)
The two attempts come from:Select different recovery points to show more backups of the recovery point type. I really need this function to work. Is there a solution?
Answer:
Renaming the folder WindowsApps, restarting the system and trying system recovery should fix the problem.
1. Download an iso image file of Win10 (the official original).
2. use ultraiso to write the image to U disk (method baidu)
3. Use the boot sequence provided by the BIOS to switch, boot from the USB flash drive, and wait patiently.
4. After selecting the language next, on the second screen in the lower left corner, tap "Repair Computer (R)", tap "Troubleshooting", tap "Command Line Prompt".
  Typing in the order.
  c:
  cd "Program Files"
  md "WindowsApps-"
  xcopy "WindowsApps" "WindowsApps-" /s /e /y /h
  rd "WindowsApps"
  Close the command line window, click "Troubleshooting", click "System Restore", and then execute OK.
I described a solution Windows 10 1607 version:System recovery error 0x80070091 [fixed] here.
Add:This issue seems to have been fixed in the Windows 10 creator update. There is a batch file to fix this issue. For more information, see:
Message about System Recovery Error 0x80070091.
From:https://answers.microsoft.com/en – us/windows/forum/windows_10 update/win – 10 – system-restore-failure- 0 – x80070091/7f690ec3 a3da – 4 – c14 – 90 – fd – 3 – eb0ba83f4ac
Error loading Python DLL ‘python36.dll’. LoadLibrary: The specified module could not be found.
For today’s release of Python programs, you need to go to the python installation file and find python36.DLL and copy it to the same directory as the publisher’s executable