Tag Archives: ubuntu

Ubuntu 18.04 installing postman

Download the tar packages
Official download zip package
The installation
1, enter the download directory to decompress

sudo  tar -xzf postman.tar.gz	-C /usr/local/tools

2. Try running PostMan

/Postman/Postman

Create global variables

sudo ln -s /usr/local/tools/Postman/Postman /usr/bin/postman

4. Add launcher application icon

sudo vim /usr/share/applications/postman.desktop

Add content

[Desktop Entry]

Encoding=UTF-8

Name=Postman

Exec=postman

Icon=/usr/local/tools/Postman/app/resources/app/assets/icon.png

Terminal=false

Type=Application

Categories=Development;

QT learning 3: configuration and testing of QT creator 2.4.1 development environment

1. System environment
Host operating system: Ubuntu 10.04
Host compiler: gcc4.4.3,
Cross compiler: arm-linux-gcc-4.3.2
Prerequisites: build three compiled versions of Qt4.6.3: PC,X86, ARM
 
2. Install
Qt_SDK_Lin32_offline_v1_2_en.run
Download address: http://www.developer.nokia.com/dp?uri=http%3A%2F%2Fsw.nokia.com%2Fid%2F8ea74da4-fec1-4277-8b26-c58cc82e204b%2FQt_SDK_Lin32_offline
 
Run it directly and follow the default steps to install it. It’s included
Qt creator — against 2.4.1
 
3. Configuration of Qt-Creator development environment
1. Start Qt-Creator.
2. In the QT-Creator menu bar Tools–>; Options opens the Options window.
3. On the left side of the Options screen, click Build & Run—> The right side of QtVersions displays the QTVersions setting interface.

 
4. Click Add on the right side to Add the path of qmake:

At this point, Qt- Creator is configured.


5 sample
Here is divided into two parts, first compiled under x86, and run under QVFB, and then compiled under ARM, moved to the development board to run.
From/usr/local/Trolltech QtEmbedded 4.6.3/demos copy books routines to root under/TMP folder.
 
5.1×86 compilation and debugging
5.1.1 Start Qt-Creator, File–>; Open File or Project,
Open the root/TMP/books/books. Pro.
 
5.1.2 Select Compiler

Click Finish and the screen appears

The lower on the left allows you to modify compiler-specific configurations at any time
 
5.1.3 Modify the configuration
Click and add the -qws parameter, because you want to run under QVFB

 
5.1.3 compile

5.1.3 run
Start the QVFB
#qvfb -width800 -height 480 &
Run

So this is the result
 
5.2 Compiling and debugging under ARN
Leave it on hold


Reference:
1. Qt embedded environment construction and transplantation
http://blog.chinaunix.net/uid-26119896-id-3141782.html
= = = = = = = = = = = = = = = = = = = = = = = = = = = = = = = = = = = = = = = = = = = = = = = = = = = = = = = = = = =
Make :arm-linux-g++:Command Not Found Make :arm-linux-g++:Command Not Found Make :arm-linux-g++:Command Not Found: Make :arm-linux-g++:Command Not Found: Make :arm-linux-g++:Command Not Found

Download and install texlive

Found a download Texlive huazhong university of science and technology of mirror sites, http://mirrors.hust.edu.cn/CTAN/, and then in the systems (directory) find Texlive, click enter, then click enter Images, you can select an image file to download.

The installation process can be found in a blog post

Linux system tools installation, the installation of Ubuntu 16.04 TexLive 2016: https://blog.csdn.net/qq_33429968/article/details/62928742

Solutions to the problem of unable to locate package

When installing Ubuntu12.04, the VMware Player will be installed.
Unable to locate package error: Unable to locate package error: Unable to locate package

sudo apt-get update

The reason should be that the software source has not been updated, so it can not find the package. I suspect this problem is also likely to occur after the software source is changed.


Configure glut in Ubuntu and implement basic OpenGL experiment on CodeBlocks platform

1. First, install GLUT. I selected “Download FreeGLUT” to install the command procedure:
http://freeglut.sourceforge.net/docs/install.php
$sudo apt-get install libxi-dev: error: X11/extensions/ xinput. h: No such file or directory
//after the installation, my computer inside the/usr/local/include/lib folder and set up some reference libraries and header files, etc

2. Configure Codeblocks:
Open Codeblocks, select the GLUT project, select New, enter the project name, and you will be prompted to specify the installation path for GLUT. You can specify it directly to /usr/ (I specified /usr/local/). If both of the above files are present, you should be able to set up the project without any problems.
in the end, one more thing, is to compile time there will be a mistake about Xxf86vm. Right-click on the project to open the project properties window and see the “Project Settings” TAB. Click on the “project ‘s build
Options “, then click on the “Linker Settings” TAB and delete the reference to xxf86VM to compile correctly.
3. Another easy way (just use Vim directly)
1). Install build-essential sudo apt-get Install build-essential // Install autotool
2). Install OpenGL sudo apt-get Install FreeGLUT 3-dev //
3). Use the command: : GCC simple.c-lGlut-o Simple at compile time
Where simple.c can use:

/*
 * GLUT Shapes Demo
 *
 * Written by Nigel Stewart November 2003
 *
 * This program is test harness for the sphere, cone
 * and torus shapes in GLUT.
 *
 * Spinning wireframe and smooth shaded shapes are
 * displayed until the ESC or q key is pressed.  The
 * number of geometry stacks and slices can be adjusted
 * using the + and - keys.
 */

#ifdef __APPLE__
#include <GLUT/glut.h>
#else
#include <GL/glut.h>
#endif

#include <stdlib.h>

static int slices = 16;
static int stacks = 16;

/* GLUT callback Handlers */

static void resize(int width, int height)
{
    const float ar = (float) width/(float) height;

    glViewport(0, 0, width, height);
    glMatrixMode(GL_PROJECTION);
    glLoadIdentity();
    glFrustum(-ar, ar, -1.0, 1.0, 2.0, 100.0);

    glMatrixMode(GL_MODELVIEW);
    glLoadIdentity() ;
}

static void display(void)
{
    const double t = glutGet(GLUT_ELAPSED_TIME)/1000.0;
    const double a = t*90.0;

    glClear(GL_COLOR_BUFFER_BIT | GL_DEPTH_BUFFER_BIT);
    glColor3d(1,0,0);

    glPushMatrix();
        glTranslated(-2.4,1.2,-6);
        glRotated(60,1,0,0);
        glRotated(a,0,0,1);
        glutSolidSphere(1,slices,stacks);
    glPopMatrix();

    glPushMatrix();
        glTranslated(0,1.2,-6);
        glRotated(60,1,0,0);
        glRotated(a,0,0,1);
        glutSolidCone(1,1,slices,stacks);
    glPopMatrix();

    glPushMatrix();
        glTranslated(2.4,1.2,-6);
        glRotated(60,1,0,0);
        glRotated(a,0,0,1);
        glutSolidTorus(0.2,0.8,slices,stacks);
    glPopMatrix();

    glPushMatrix();
        glTranslated(-2.4,-1.2,-6);
        glRotated(60,1,0,0);
        glRotated(a,0,0,1);
        glutWireSphere(1,slices,stacks);
    glPopMatrix();

    glPushMatrix();
        glTranslated(0,-1.2,-6);
        glRotated(60,1,0,0);
        glRotated(a,0,0,1);
        glutWireCone(1,1,slices,stacks);
    glPopMatrix();

    glPushMatrix();
        glTranslated(2.4,-1.2,-6);
        glRotated(60,1,0,0);
        glRotated(a,0,0,1);
        glutWireTorus(0.2,0.8,slices,stacks);
    glPopMatrix();

    glutSwapBuffers();
}


static void key(unsigned char key, int x, int y)
{
    switch (key)
    {
        case 27 :
        case 'q':
            exit(0);
            break;

        case '+':
            slices++;
            stacks++;
            break;

        case '-':
            if (slices>3 && stacks>3)
            {
                slices--;
                stacks--;
            }
            break;
    }

    glutPostRedisplay();
}

static void idle(void)
{
    glutPostRedisplay();
}

const GLfloat light_ambient[]  = { 0.0f, 0.0f, 0.0f, 1.0f };
const GLfloat light_diffuse[]  = { 1.0f, 1.0f, 1.0f, 1.0f };
const GLfloat light_specular[] = { 1.0f, 1.0f, 1.0f, 1.0f };
const GLfloat light_position[] = { 2.0f, 5.0f, 5.0f, 0.0f };

const GLfloat mat_ambient[]    = { 0.7f, 0.7f, 0.7f, 1.0f };
const GLfloat mat_diffuse[]    = { 0.8f, 0.8f, 0.8f, 1.0f };
const GLfloat mat_specular[]   = { 1.0f, 1.0f, 1.0f, 1.0f };
const GLfloat high_shininess[] = { 100.0f };

/* Program entry point */

int main(int argc, char *argv[])
{
    glutInit(&argc, argv);
    glutInitWindowSize(640,480);
    glutInitWindowPosition(10,10);
    glutInitDisplayMode(GLUT_RGB | GLUT_DOUBLE | GLUT_DEPTH);

    glutCreateWindow("GLUT Shapes");

    glutReshapeFunc(resize);
    glutDisplayFunc(display);
    glutKeyboardFunc(key);
    glutIdleFunc(idle);

    glClearColor(1,1,1,1);
    glEnable(GL_CULL_FACE);
    glCullFace(GL_BACK);

    glEnable(GL_DEPTH_TEST);
    glDepthFunc(GL_LESS);

    glEnable(GL_LIGHT0);
    glEnable(GL_NORMALIZE);
    glEnable(GL_COLOR_MATERIAL);
    glEnable(GL_LIGHTING);

    glLightfv(GL_LIGHT0, GL_AMBIENT,  light_ambient);
    glLightfv(GL_LIGHT0, GL_DIFFUSE,  light_diffuse);
    glLightfv(GL_LIGHT0, GL_SPECULAR, light_specular);
    glLightfv(GL_LIGHT0, GL_POSITION, light_position);

    glMaterialfv(GL_FRONT, GL_AMBIENT,   mat_ambient);
    glMaterialfv(GL_FRONT, GL_DIFFUSE,   mat_diffuse);
    glMaterialfv(GL_FRONT, GL_SPECULAR,  mat_specular);
    glMaterialfv(GL_FRONT, GL_SHININESS, high_shininess);

    glutMainLoop();

    return EXIT_SUCCESS;
}

To complete.

Report ippicv error during opencv3 compilation

Background:
Ubuntu14.04 is in the process of installing OpenCV3.1
Question:
Unable to compile and install, error is as follows:
— Configuring incomplete, errors occurred!
See also “/ opt/opencv – 3.2.0/3 rdparty/ippicv/CMakeFiles/CMakeOutput log”.
See also “/ opt/opencv – 3.2.0/3 rdparty/ippicv/CMakeFiles/CMakeError log”.
Solution:
Opencv3 to download a ippicv third-party packages, need to download the finished in 3 rdparty/ippicv b791a6eac9ed78d32a7666804320e/downloads/Linux – 808, Download link https://raw.githubusercontent.com/Itseez/opencv_3rdparty/81a676001ca8075ada498583e4166079e5744668/ippicv/ippicv_linux_20151201.tgz

Installation of Ubuntu + VTK

Sudo apt-get install libvtk5.2 libvtk5-qt4-dev sudo apt-get install libvtk5.2 libvtk5-qt4-dev
Different Ubuntu versions support different versions of VTK, here is Ubuntu 10.04, followed by QT4 support.
 
two
1. Download source code
Address: http://www.vtk.org/VTK/resources/software.html
The version is the latest
2. Unzip
The tar ZXVF… .
A VTK folder is created in the current directory
3. Install OpenGL
apt-get install mesa-common-dev libgl1-mesa-dev
4. Install ccmake
sudo apt-get install cmake-curses-gui
5.cd VTK
6.mkdir VTK-build
7.cd VTK-build
8.ccmake .. /
9. Press C to start the configuration and set VTK_USE_QT to ON. BUILD_SHARED_LIBS is set to ON
10. Press T to enter detailed setup, then locate QT_QMake_Executable, press ENTER to modify, and change QMAKE
The path of the input, for example:/home/zhang/QtSDK/Desktop/Qt/4.8.0/GCC/bin/qmake. Confirm and press Enter to exit the modification.
11. Press C to check the Settings.
12. Confirm by C.
13. Press G to generate makefile and exit CCMAKE automatically
14.make
15.sudo make install.
 
Add (.pro file) to the project
INCLUDEPATH =/usr/local/include/VTK to 5.10
LIBS + = L/usr/local/lib/VTK – 5.10 \
 
5.2
INCLUDEPATH =/usr/include/VTK to 5.2
LIBS += -L/usr/lib \
Select as needed at the end
-lvtkCommon -lvtksys -lQVTK -lvtkViews -lvtkWidgets -lvtkInfovis -lvtkRendering -lvtkGraphics -lvtkImaging -lvtkIO -lvtkFiltering -lvtklibxml2 -lvtkDICOMParser -lvtkpng -lvtkpng -lvtktiff -lvtkzlib -lvtkjpeg -lvtkalglib -lvtkexpat -lvtkverdict -lvtkmetaio -lvtkNetCDF -lvtksqlite -lvtkexoIIc -lvtkftgl -lvtkfreetype -lvtkHybrid
 
Command line compilation
G + + – o Cylinder – O3 – I/usr/include/VTK – 5.2 – L/usr/local/lib – Wno – deprecated – lvtkCommon lvtkDICOMParser – lvtkexoIIc – lvtkFiltering – LVTKFTGL – lvtkGenericFiltering lvtkGraphics — lvtkHybrid -lvtkImaging -lvtkIO -lvtkNetCDF -lvtkRendering -lvtksys -lvtkVolumeRendering -lvtkWidgets Cylinder.cxx


SCP error: not a regular file

Linux local files are uploaded to the server
SCP/home/liujia/file. TXT [email protected]:1/user/liujia
Download the file from the server
[email protected]:/user/liujia/file1. TXT/home/liujia

The command
SCP [email protected]:/user/liujia// home/liujia
Cp not a regular file
The reason is that this is the equivalent of downloading folders, not files.
The solution is to add the parameter -r
SCP – r [email protected]:/user/liujia// home/liujia
That’s it

Failed to initialize nvml driver / library version mismatch due to automatic update of NVIDIA driver

failed to initialize NVML driver/library version mismatchfailed to initiate NVML driver/library version mismatch. failed to initiate NVML driver/library version mismatch
This situation is generally Nvidia’s driver is automatically updated, enter the command to view the log, it is automatically updated

$ cat /var/log/apt/history.log
Start-Date: 2021-01-12  06:14:29
Commandline: /usr/bin/unattended-upgrade
Upgrade: libnvidia-compute-450:amd64 (450.80.02-0ubuntu0.18.04.2, 450.102.04-0ubuntu0.18.04.1), libnvidia-encode-450:amd64 (450.80.02-0ubuntu0.18.04.2, 450.102.04-0ubuntu0.18.04.1), nvidia-kernel-common-450:amd64 (450.80.02-0ubuntu0.18.04.2, 450.102.04-0ubuntu0.18.04.1), xserver-xorg-video-nvidia-450:amd64 (450.80.02-0ubuntu0.18.04.2, 450.102.04-0ubuntu0.18.04.1), libnvidia-gl-450:amd64 (450.80.02-0ubuntu0.18.04.2, 450.102.04-0ubuntu0.18.04.1), libnvidia-fbc1-450:amd64 (450.80.02-0ubuntu0.18.04.2, 450.102.04-0ubuntu0.18.04.1), libnvidia-decode-450:amd64 (450.80.02-0ubuntu0.18.04.2, 450.102.04-0ubuntu0.18.04.1), libnvidia-cfg1-450:amd64 (450.80.02-0ubuntu0.18.04.2, 450.102.04-0ubuntu0.18.04.1), nvidia-utils-450:amd64 (450.80.02-0ubuntu0.18.04.2, 450.102.04-0ubuntu0.18.04.1), nvidia-dkms-450:amd64 (450.80.02-0ubuntu0.18.04.2, 450.102.04-0ubuntu0.18.04.1), nvidia-compute-utils-450:amd64 (450.80.02-0ubuntu0.18.04.2, 450.102.04-0ubuntu0.18.04.1), libnvidia-ifr1-450:amd64 (450.80.02-0ubuntu0.18.04.2, 450.102.04-0ubuntu0.18.04.1), nvidia-driver-450:amd64 (450.80.02-0ubuntu0.18.04.2, 450.102.04-0ubuntu0.18.04.1), libnvidia-extra-450:amd64 (450.80.02-0ubuntu0.18.04.2, 450.102.04-0ubuntu0.18.04.1), nvidia-kernel-source-450:amd64 (450.80.02-0ubuntu0.18.04.2, 450.102.04-0ubuntu0.18.04.1)
End-Date: 2021-01-12  06:16:37

Referring to StackFlow, it was decided to restart the server, which was resolved after the restart.
I have to say that this driver update is really annoying. Anyone who reads this blog and knows how to disable this driver update on Ubuntu, please leave a comment in the comments section (for the time being, only on Windows)

-bash: cannot create temp file for here-document: No space left on device

Phenomenon of 1.
[Bug MC-108686] – CD to a directory with TAB key

-bash: cannot create temp file for here-document: No space left on device

Reason 2.
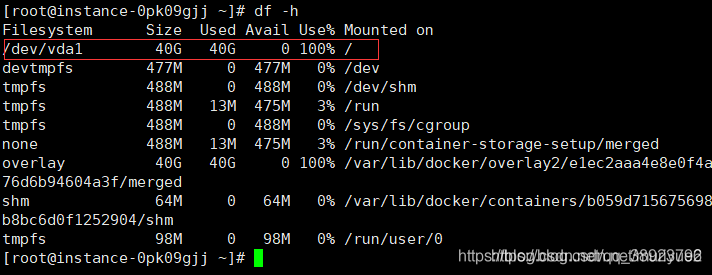
Cannot create temporary file document, there is no space left on device (tells us disk space is full)
3. Clean up your files
df-h

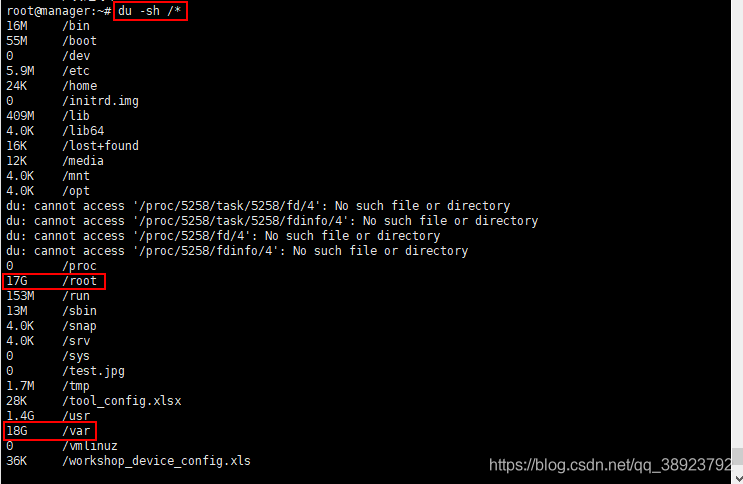
du -sh /*

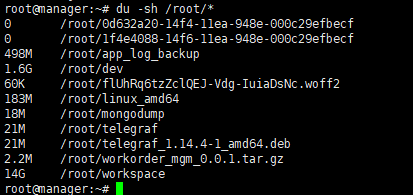
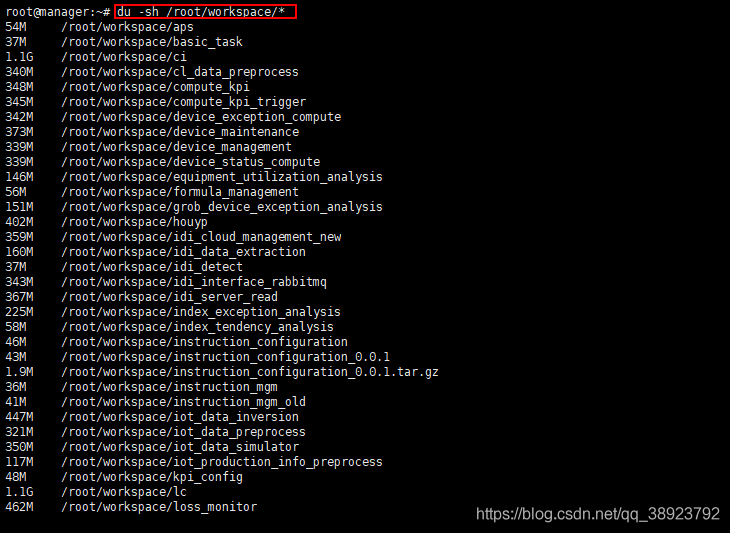
du -sh /root/*


3.4 Find the maximum file
(1) If the largest file is a log file or a backup file, this file can be cleared; (2) If you want to keep this maximum file, you have to expand the disk space.

Solve the problem of “wireless network activation failure” in Ubuntu 18, and repeatedly pop up the password input interface

When my ubuntu18 system connected to mobile hotspot, it always appeared that “wireless network activation failed” and the password entry interface popped up repeatedly
A relatively simple solution is:
open the terminal and execute:

$ sudo pppoeconf

If you have an option, choose Yes
Then change the wife password to 10 or more digits, preferably all in combination
Then see if the connection works, and if that doesn’t solve the problem, find another solution
Done!