Tag Archives: other

Please specify which branch you want to merge with

$git pull


$ git pull
warning: no common commits
remote: Counting objects: 5, done.
remote: Compressing objects: 100% (4/4), done.
remote: Total 5 (delta 0), reused 0 (delta 0), pack-reused 0
Unpacking objects: 100% (5/5), done.
From github.com:nonfuxinyang/android-study
 * [new branch]      master     -> origin/master
There is no tracking information for the current branch.
Please specify which branch you want to merge with.
See git-pull(1) for details.

    git pull <remote> <branch>

If you wish to set tracking information for this branch you can do so with:

    git branch --set-upstream-to=origin/<branch> master

Seeing the second tip, we now know a solution. That is to specify the link relationship between the current working directory, working branch, and remote warehouse and branch. ≪ BR & gt;

for example, we set the master branch corresponding to the remote warehouse

git branch — set upstream master origin / Master

so every time we want to push or pull, we just need to enter Git push or git pull.

Before that, we have to specify the remote branch that we want to push or pull.

git push origin master

git pull origin master.


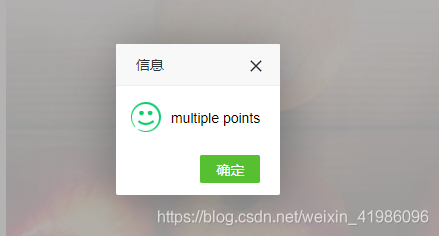
Error: java.lang.NumberFormatException : multiple points

Encountered error for java.lang.NumberFormatException : multiple points

The background error is:

java.lang.NumberFormatException: multiple points
	at sun.misc.FloatingDecimal.readJavaFormatString(FloatingDecimal.java:1890)
	at sun.misc.FloatingDecimal.parseDouble(FloatingDecimal.java:110)
	at java.lang.Double.parseDouble(Double.java:538)
	at bus.mdrms.algorithm.indexmodel.exterInterface.StationIndexForecast.initPubertyIndex(StationIndexForecast.java:278)
	at bus.mdrms.algorithm.indexmodel.exterInterface.StationIndexForecast.init(StationIndexForecast.java:51)
	at bus.mdrms.algorithm.indexmodel.exterInterface.StationIndexForecast.calPubertySuitability(StationIndexForecast.java:55)
	at bus.mdrms.algorithm.indexmodel.IndexCalculator.processRequest(IndexCalculator.java:177)
	at com.supermap.mdrms.framework.util.MDRMSUtil.queryMDRMSInfo(MDRMSUtil.java:747)
	at com.supermap.mdrms.modules.mdrms.controller.MdrmsController.queryMDRMSInfo(MdrmsController.java:177)
	at sun.reflect.NativeMethodAccessorImpl.invoke0(Native Method)
	at sun.reflect.NativeMethodAccessorImpl.invoke(NativeMethodAccessorImpl.java:62)
	at sun.reflect.DelegatingMethodAccessorImpl.invoke(DelegatingMethodAccessorImpl.java:43)
	at java.lang.reflect.Method.invoke(Method.java:498)
	at org.springframework.web.method.support.InvocableHandlerMethod.doInvoke(InvocableHandlerMethod.java:221)
	at org.springframework.web.method.support.InvocableHandlerMethod.invokeForRequest(InvocableHandlerMethod.java:137)
	at org.springframework.web.servlet.mvc.method.annotation.ServletInvocableHandlerMethod.invokeAndHandle(ServletInvocableHandlerMethod.java:111)
	at org.springframework.web.servlet.mvc.method.annotation.RequestMappingHandlerAdapter.invokeHandlerMethod(RequestMappingHandlerAdapter.java:806)
	at org.springframework.web.servlet.mvc.method.annotation.RequestMappingHandlerAdapter.handleInternal(RequestMappingHandlerAdapter.java:729)
	at org.springframework.web.servlet.mvc.method.AbstractHandlerMethodAdapter.handle(AbstractHandlerMethodAdapter.java:85)
	at org.springframework.web.servlet.DispatcherServlet.doDispatch(DispatcherServlet.java:959)
	at org.springframework.web.servlet.DispatcherServlet.doService(DispatcherServlet.java:893)
	at org.springframework.web.servlet.FrameworkServlet.processRequest(FrameworkServlet.java:970)
	at org.springframework.web.servlet.FrameworkServlet.doPost(FrameworkServlet.java:872)
	at javax.servlet.http.HttpServlet.service(HttpServlet.java:650)
	at org.springframework.web.servlet.FrameworkServlet.service(FrameworkServlet.java:846)
	at javax.servlet.http.HttpServlet.service(HttpServlet.java:731)
	at org.apache.catalina.core.ApplicationFilterChain.internalDoFilter(ApplicationFilterChain.java:303)
	at org.apache.catalina.core.ApplicationFilterChain.doFilter(ApplicationFilterChain.java:208)
	at org.apache.tomcat.websocket.server.WsFilter.doFilter(WsFilter.java:52)
	at org.apache.catalina.core.ApplicationFilterChain.internalDoFilter(ApplicationFilterChain.java:241)
	at org.apache.catalina.core.ApplicationFilterChain.doFilter(ApplicationFilterChain.java:208)
	at com.alibaba.druid.support.http.WebStatFilter.doFilter(WebStatFilter.java:123)
	at org.apache.catalina.core.ApplicationFilterChain.internalDoFilter(ApplicationFilterChain.java:241)
	at org.apache.catalina.core.ApplicationFilterChain.doFilter(ApplicationFilterChain.java:208)
	at org.springframework.web.filter.CharacterEncodingFilter.doFilterInternal(CharacterEncodingFilter.java:85)
	at org.springframework.web.filter.OncePerRequestFilter.doFilter(OncePerRequestFilter.java:107)
	at org.apache.catalina.core.ApplicationFilterChain.internalDoFilter(ApplicationFilterChain.java:241)
	at org.apache.catalina.core.ApplicationFilterChain.doFilter(ApplicationFilterChain.java:208)
	at org.apache.catalina.core.StandardWrapperValve.invoke(StandardWrapperValve.java:218)
	at org.apache.catalina.core.StandardContextValve.invoke(StandardContextValve.java:110)
	at org.apache.catalina.core.StandardHostValve.invoke(StandardHostValve.java:169)
	at org.apache.catalina.valves.ErrorReportValve.invoke(ErrorReportValve.java:103)
	at org.apache.catalina.valves.AccessLogValve.invoke(AccessLogValve.java:962)
	at org.apache.catalina.core.StandardEngineValve.invoke(StandardEngineValve.java:116)
	at org.apache.catalina.connector.CoyoteAdapter.service(CoyoteAdapter.java:445)
	at org.apache.coyote.http11.AbstractHttp11Processor.process(AbstractHttp11Processor.java:1115)
	at org.apache.coyote.AbstractProtocol$AbstractConnectionHandler.process(AbstractProtocol.java:637)
	at org.apache.tomcat.util.net.JIoEndpoint$SocketProcessor.run(JIoEndpoint.java:316)
	at java.util.concurrent.ThreadPoolExecutor.runWorker(ThreadPoolExecutor.java:1149)
	at java.util.concurrent.ThreadPoolExecutor$Worker.run(ThreadPoolExecutor.java:624)
	at org.apache.tomcat.util.threads.TaskThread$WrappingRunnable.run(TaskThread.java:61)
	at java.lang.Thread.run(Thread.java:748)

The error is multiple points

Same code:
double D_ version = Double.parseDouble ( “1.1.2 “);

Exception in thread "main" java.lang.NumberFormatException: multiple points

It would be the same mistake

double d_ version = Double.parseDouble ( “1..2 “);

It’s also a mistake


Mac boot boot the most detailed explanation, so that the automatic start of the program can not escape

##Login items
the program started by the current user of Mac OSX after successful login. The configuration file of the startup items of this category is stored in ~ / library / preferences/ com.apple.loginitems . plist, so only for the current user, you can set it in the following ways:

1. Set under “users and groups” in system preferences, which can be deleted, added, opened and closed;

2. You can modify ~ / library / preferences directly/ com.apple.loginitems . plist configuration file, in which each startup item corresponds to a dictionary, with three values of alias, icon and name, in which name is nsstring type and others are data type. We don’t know how to generate it serially, so we can delete it at present;

3. Add and delete through lssharedfilelistinsertitemurl and lssharedfilelistitemremove method, and related introduction (the registration program starts up)

##Launchdemon
this type of startup items are all started by launchd. Launchd is the key process used to initialize the system environment in Mac OS. It is the first process started in OS environment after the kernel is loaded successfully. In this way, it is very easy to configure the self booting item. Only one plist file is needed. The directory where the plist file exists is

~/Library/LaunchAgents

/Library/LaunchAgents

/System/Library/LaunchAgents

The above three directories are the recommended paths for the system. They are the processes started after login

~/Library/LaunchDaemons

/Library/LaunchDaemons

/System/Library/LaunchDaemons

If it is placed in the above three directories, it will be started as the daemons and the processes started immediately after the system starts

Different directory processes have different permissions and priorities. You can set them in the following ways:

1. Through launchctl load xxx.plist Or launchctl unload xxx.plist Command to add and delete the specified startup items;

2. Directly create, modify and delete plist files under related directories.

The main fields in plist and their meanings

Label is used as a unique identifier in launchd, similar to that every program has an identifier.

User name specifies the user to run the startup item. This item is applicable only when launchd is running as root.

Groupname specifies the group to run the startup item. This item applies only when launchd is running as root.

The key value of keepalive is used to control whether the executable file runs continuously or starts after meeting specific conditions. The default value is false, that is to say, it will not start until the specific conditions are met. When the setting value is true, the executable file will be opened unconditionally and kept in the whole system running cycle.

Runatload identifies that launchd starts the executable file specified by the path immediately after loading the service. The default value is false.

The value program is used to specify the path of the executable file of the process.

Programarguments if program is not specified, it must be specified, including executable files and running parameters.

##3. Startupitems
startupitems, as the name suggests, are programs that run during the system startup. They can be programs that terminate immediately after running (for example, start to empty the wastebasket), or they can be background processes that continue in the system running cycle.

Startupitems are generally stored in the following two paths:

1)/System/Library/StartupItems

2)/Library/StartupItems

Most of the system related startupitems are placed in the path of / system / library / startupitems, and they will be executed prior to the path of / library / startupitems, because the startupitems in the path of the former provide system level basic services, such as crash reporting, core graphics services, system The latter path does not exist by default and needs to be created manually.

Here we take iceberg control tower in / library / startupitems directory as an example.

In short, on Mac OS X, a startupitems includes the following two aspects:

1) Executable program;

2) Plist file containing dependent process relationships( StartupParameters.plist )。

StartupParameters.plist Is a property list that contains the necessary conditions for running an executable program, the main fields in plist, and its meaning

The plist needs to obtain root permission, which includes several aspects:

1)Description;

A simple description of the service is only a description, not the actual process name.

2)Provides;

Specify the services provided by startupitems. As shown in the plist file provides, the background process started by startupitems is named iceberg control tower.

Provides can specify multiple services, which are reflected in the figure as item0, Item1 And so on. There is only item0.

3)Uses;

Specifies the services that need to be opened before startupitems is loaded. The Mac OS X system first attempts to load the service specified in uses, and then loads startupitems. In other words, even if the service specified in uses is not loaded successfully, the system will still load startupitems.

4)OrderPreference;

Specifies the chronological order in which startupitems are executed. The importance of this order comes after uses, which is the order after the specified uses are executed. Possible values include: first, early, none (default), late, last.

5)Messages。

The Executable File

Note: 1) the name of the executable file is the same as that of the folder where it is located, which is the default rule of the system.

2) Root permission is required to operate the executable.

3) The executable is a shell script.

Open the executable file with the same name in the icebergcontroltower file directory to see the specific content of the script

The general executable file includes the following aspects:

1)./etc/ rc.common

A script library provided by apple, which contains the interface of importing parameters for executable files. Here, the library mainly calls runservice.

2)StartService(), StopService(), RestartService()

When the parameters received by the executable file are start, stop or restart, the corresponding functions are executed.

Parameter meaning:

Start: start the service during startup;

Stop: stop the service during shutdown;

Restart: restart the service under specific conditions.

3)RunService “$1”

Executes the service specified by the first parameter passed to the script.

“$1” represents the first parameter passed to the script. For example, if the passed in parameter is start, startservice() is executed.

(some of the contents are quoted in http://blog.csdn.net/abby_ sheen/article/details/7817198
ansoft:Com Engine non-responsive since

Ansoft :Com Engine Non-responsive since 17:23:04, October 18, 2015.If Persisting for Long, Functional Testing kills the Com Engine Process and Restart Analysis.
When this situation occurs in Ansoft simulation, the progress bar is 0 and unchanged. Many methods have been tried on the Internet, but the software crashed and was closed and then opened, which can be simulated normally.

RemoveError: ‘setuptools’ is a dependency of conda and cannot be removed from conda’s operatin

RemoveError: ‘setuptools’ is a dependency of conda and cannot be removed from
conda’s operating environment.

PIP uninstall install setuptools
c> update conda
conda u>e –force conda

PIP un>all install setuptools
conda install -c anaconda setuptools

The solution to the flash of. Bat file

Recently, when I was doing a project, I found that the.bat file flashed by after I clicked it. I believe that many friends have also encountered the same problem
The following methods:
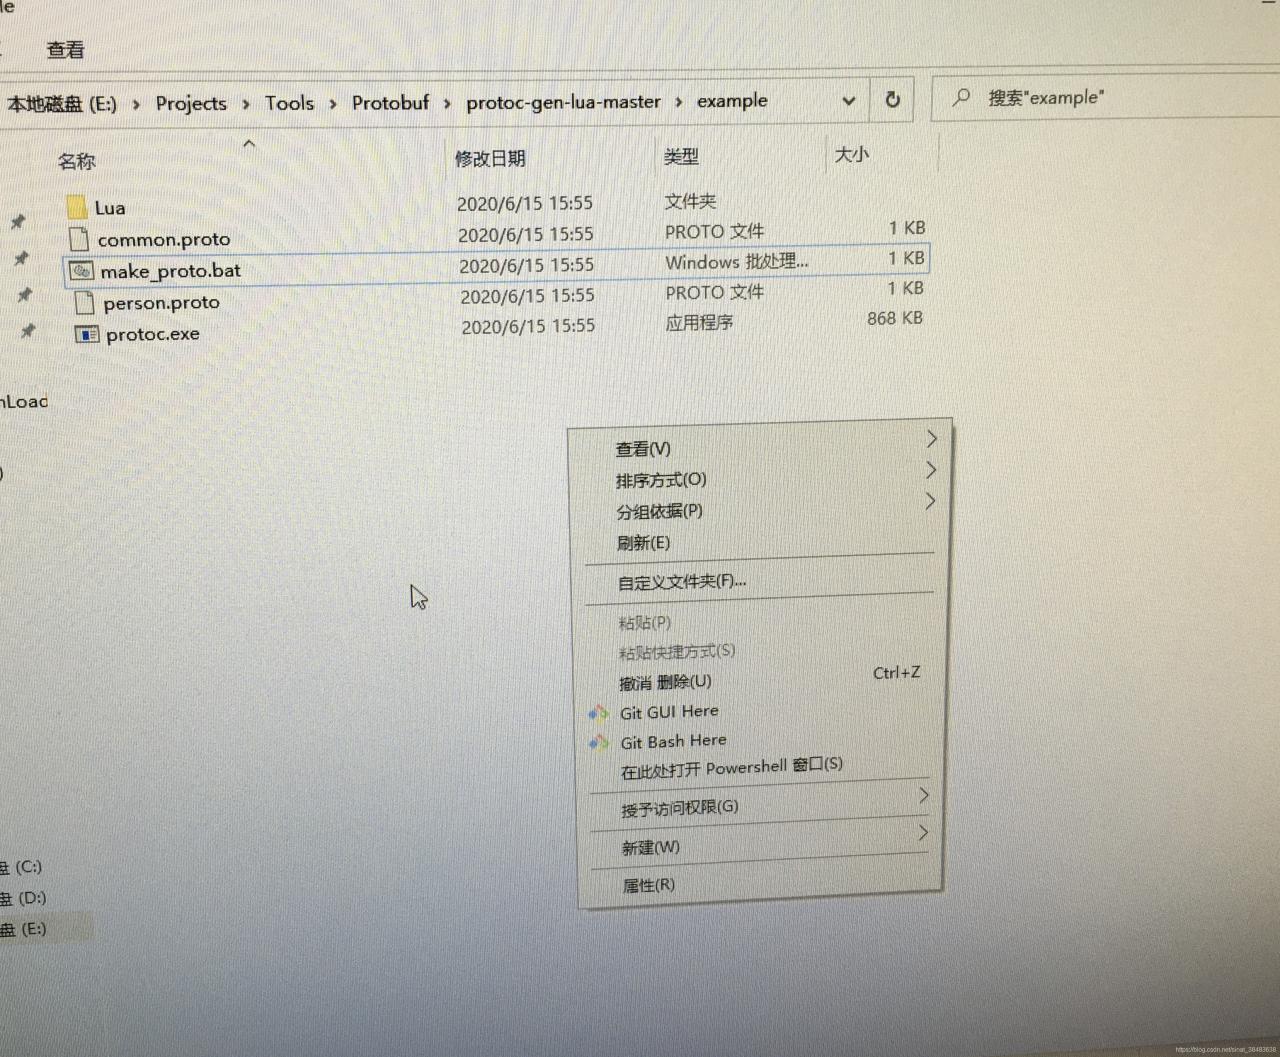
First, hold down the Shift key in the folder where your.bat file is located and click the right mouse button. Select “Open PowerShell Window here” as shown in the picture

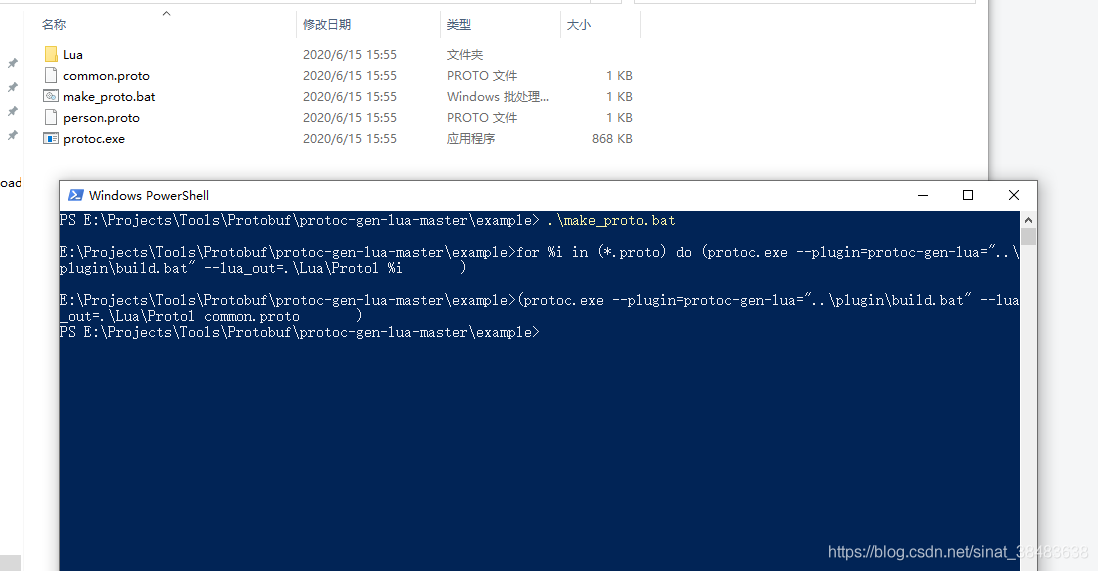
You’ll get a blue command line window and you’ll type.\ the name of your file at the end of the command line and make sure you add a suffix, like mine
.\make_proto.bat

The above methods are effective, of course, there are other methods, friends can choose.


Solution to the flashback of visual studio output window

 
1. The project – & gt; Property – & gt; Configure properties ->; The linker – & gt; System – & gt; Subsystem – & gt; SUBSYSTEM:CONSOLE adds “/SUBSYSTEM:CONSOLE”
2. Press Ctrl + F5 directly to run the program
3.return 0; Before adding a system(“pause”);
4. In return 0; I’m going to do a getchar ();

Ubuntu 16.04 Chinese installation tutorial (Graphic), Ubuntu 16.04

Ubuntu 16.04 Chinese version installation tutorial (text and text), Ubuntu 16.04
Ubuntu16.041 installation, enter the live CD
1) desktop setup disk download address: http://releases.ubuntu.com/16.04/, you can use hard disk boot, can also be carved into cd-rom start
enter after looking for blue links click download, such as ubuntu 16.04 – the desktop – amd64. Iso, i386 version can be downloaded 32 bit CPU, including; Desktop is the desktop version, Server is the server version, Torrent is the torrent download;

USTC source http://mirrors.ustc.edu.cn/ubuntu-releases/16.04/ ali cloud open source image station http://mirrors.aliyun.com/ubuntu-releases/16.04/
open source image of lanzhou university station http://mirror.lzu.edu.cn/ubuntu-releases/16.04/
Beijing institute of technology http://mirror.bit.edu.cn/ubuntu-releases/16.04/ http://mirrors.zju.edu.cn/ubuntu-releases/16.04/

zhejiang university
2) using CD/U disk/hard disk boot after a moment, the system automatically run, wait patiently for a system boot to the desktop;

)

3)

3)

3)

3)

3)

3)


4) For hard disk installation, click the circle button in the upper left corner, and then input the letter TER in the text box next to it. Then click the terminal icon below.
If Chinese comes out, click the “middle” on the input bar to change to “ying”, and drag it to one side.

5) Enter the command sudo umount-l /isodevice and press the enter key. If there is no prompt, it is successful. Close the terminal.

6) Click the network icon in the upper right corner, and click to remove the check box in front of “Enable network” to disconnect the network;

1) Double click the “Install Ubuntu16.04 LTS” icon on the desktop and a “Welcome” panel appears. Check that “Chinese (Simplified)” is selected in the left column. If not, select it on the left and then click the “Continue” button in the lower right corner.

2) The second step is to check the preparation, require sufficient disk space, do not connect to the network, generally do not check the update and third-party software, directly click the “continue” button;

3) The next step is to ask which partition to install on, select “Other Options” at the bottom, and click “Continue” button;

If you want to create and convert partitions, you can refer to Lesson 7, 13, 15, 16, and 19 above. Here is an Ext4 partition installed on previous 12.10.

5) Click to select the partition that you plan to install. It can be determined according to the partition type and size, and then click “Change…” below. Button;

6) In the dialog box, set the format for partition Ext4, check “Format”, click on the right of “mount point”, select “/”, and click “OK”
Note that formatting will delete all files on this partition, please backup important data in advance;  

7) Click “OK” to prompt continue, go back to the partition panel, check that the partition is edited, if there is /home partition, according to the original Settings, generally do not check “Forformat”, just clean up the configuration file in advance

Below are the options for installing the GRUB bootloader, no changes are required for the UEFI installation, see: UEFI Win7/8/Ubuntu Hard Drive Install Ubuntu, for traditional MBR installation, you can choose to install on/on the partition, and then boot Ubuntu with Windows, see: Easybcd Install Ubuntu on Win7/8 Hard Drive

8) After checking, click “Install Now”. If the prompt does not have swap space, click “Continue”. This partition is used for sleeping.
9) Then go out to ask about the region and click “Continue”. The time difference may arise when modifying the region, so the installation has already begun.

10) Next is the keyboard layout, generally “Chinese”, directly click “Forward” to continue;

11) Next is to set their own user name (lowercase letters) and password, from the top to the bottom of the input, then click “continue”;

12) Then continue the installation process, you can have a look at the system introduction;

) Wait patiently for completion, then a dialog box will appear, click “Restart Now” to complete the installation, press the power button to call out the shutdown dialog box;

14) If it is a CD installation, wait for the prompt to remove the CD, and then press Enter to restart the computer, the installation is complete;

) After reboot, stop at a login interface, click on your user name, enter the password and press Enter to enter the system;

2) After entering the desktop, an “Incomplete Language Support” prompt dialog box will appear. If it is not closed, drag it to the side for later use. (If it is closed, then click the gear “System Settings – Language Support” on the left.)

3) First connect to the Internet, find a network icon next to the keyboard in the upper right corner of the screen, aim to click the left button, and select “Edit Connection”;

4) For ADSL dial-up broadband connection, click “Add” on the right side of the dialog box, then click “Ethernet” in the middle of the dialog box, select DSL, and then click New;


5) In the dialog box, enter the ADSL broadband user name in the user name, the password below, enter the broadband password,
and then click the first “general” label, check the top “automatic connection when available”, click the “keep” button in the lower right corner;

After closing the dialog box, wait for a moment to indicate successful networking.

You can also reboot your computer, or use sudo pppoeconf from the command line.

br>

6) If you want to>ect to the LAN, in the dialog box that comes out, select “Wired Connection1” inside, and click the “Edit” button on the right;

7) in the dialog box, select the IPV4 Settings TAB, in the way below choose “manual”, “add” button at the bottom of the order,
in the text box, in turn, enter the IP address, subnet mask, gateway, and then press enter to determine, DNS server address in the DNS below input,
check and point “save” button in the lower-right corner of the window, in the certification, input your password;

Go back to the original dialog box click “close”, wait a while you can surf the Internet, you can also restart the computer;

br> 8>fter connecting to the network, click “System Settings” button in the left quick start bar, and click “Software and Update” icon in the window that comes out;

9) Under the software source panel, click the drop-down list of “Servers in China” and select “Other Sites”;

10) In the list of servers, choose 163 or CN99, and then click the “Select Server” button in the lower right corner to return;

11) After closing the window, come out to authenticate, enter your login password and click “Authorization”. If it comes out to update the prompt, click “Reload” and wait for completion.

More set the source of the related introduction, please refer to: http://teliute.org/linux/Ubsetup/lesson9/lesson9.html

4, update system 1) back to the beginning of “incomplete language support” dialog box, point “to perform this action now”, if can’t find the point of the upper right corner of the gear icon in the system Settings – language support;

2) Click the “Update” button if it shows “No language information available” panel;

3) Then comes out a dialog box for cache update, wait patiently for completion, click “details” to check the progress;

4) Then, in the dialog box “Language support is not fully installed”, click “Install” to install the language package;

5) After the language pack installation is completed, click the Close button to close the dialog box. The default input method for 16.04 installation is FCITX. Click the upper right corner of the gear and select “Log out” or restart the system to use it.

Original: https://blog.csdn.net/weixin_40539892/article/details/79494922

Problems encountered in configuring OpenGL development environment in vs2015

Configuration process address: https://blog.csdn.net/qq_19003345/article/details/76098781
I don’t need to go into details of the process, you can see the original blog address below, I used the last way in the blog
Problems encountered during configuration:
Error in “file glad.h cannot be found” and “file khrplatform.h cannot be found” :
#include <; #include <; glad/glad.h> Instead of # include "Includes/glad/glad. H" #include < KHR/khrplatform.h> Instead of # include ".. /KHR/khrplatform.h"  

Fix vs2017 unable to install

Fixed VS2017 not being able to install
(Jin Qing’s column, November, 2018)
Downloaded from the website vs_community__1600125377. 1541561546. Exe, but when running the installation can’t appear the interface for product selection.
Looking at the logs in the Temp directory, no errors were found.
A search reveals a large number of similar errors:
VS : How to fix stuck Visual Studio Community installation problem
https://www.howtosolutions.net/2015/08/solving-installation-is-stuck-problem-in-visual-studio-community-edition/Resolving Installation Issues with Visual Studio 2017
http://rion.io/2017/02/17/resolving-installation-issues-with-visual-studio-2017/Unable to start vs_installer.exe to install VS2017 Community
https://social.msdn.microsoft.com/Forums/vstudio/en-US/fc8f5a04-8687-48dd-987e-1cfac67566a1/unable-to-start-vsinstallerexe-to-install-vs2017-community?Forum = vssetupVS 2017 Installer quits before starting the
https://developercommunity.visualstudio.com/content/problem/8993/vs-2017-installer-quits-before-starting.htmlVS2017 is not installed into the solution – the whole interface problems, Perseverance – CSDN blog
https://blog.csdn.net/qq951127336/article/details/71036868VS2017 automatically quit when installation _yanggy_ sina blog
http://blog.sina.com.cn/s/blog_702b606a0102y6n3.html
But it didn’t work.
C: Program Files (x86)\Microsoft Visual Studio\Installer: Program Files (x86)\Microsoft Visual Studio\Installer
but download again after cleaning, is still the same.
Vs_installer. exe. The pop-up screen says there is a compatibility error and you can choose to fix it.
fixed, vs_installer.exe will appear in the product selection screen.
Then run vs_community__1600125377. 1541561546. Exe, can appear the interface for product selection.
The problem may be that the Installer is not installed correctly, you may have selected the wrong version, and it will still be the same if you delete it and download it again. Fortunately, you can fix it manually.
VS2017 is now being installed.

Wireshark can’t find a solution to capture interface

After installing Wireshark, in the “Capture “-> “Options” does not have a single capture interface.
Question why
Win10 compatibility issues caused. is required to uninstall Winpcap and reinstall Win10pcap
The solution
(a) to download and install win10Pcap, download links: http://www.win10pcap.org/download/
note: prior to install Wireshark off, otherwise an error during the installation.


n>