Tag Archives: macOS

[Solved] MySQL Startup Error: The server quit without updating PID file

Specific reports are as follows:
Starting MySQL
. Error! The server quit without updating PID file (/opt/homebrew/was/mysql/QdeMacBook-Pro.local.pid).

Resolution programme:

linux:
sudo chmod -R 777 /usr/local/var/mysql/

Start:
systemctl restart mysqld

Mac: homebrew installed.

chmod -R 777 /opt/homebrew/was/mysql

Start:
sudo mysql.server restart

Error! MySQL server PID file could not be found!
Starting MySQL
SUCCESS!

[Solved] Mac Maven Command Error: zsh: command not found

The MVN command cannot be found under Zsh
If Maven is configured, you must execute source ~ /.Bash every time the terminal executes the MVN command_ Profile to take effect. This is because when Zsh is installed on the Mac,. The configuration of the Bash_profile file cannot take effect. The solution is:

vi ~/.zshrc

Add the following command at the end of the file:

source ~/.bash_profile
then
esc  :wq

Update document:

source ~/.zshrc

In this way, when Zsh starts, it will read. Bash_ The contents of the profile file and make it effective
configure Maven environment variables under Zsh
there are three places on the MAC where you can set environment variables:

/Etc/Profile: system global variable, which loads the configuration of the file upon system startup (not recommended)
/etc/bashrc: all types of bash shells will read the configuration of the file
~ /.Bash_Profile: configure user level environment variables and create them in the system user folder. When a user logs in, the file will be executed only once

export PATH=/usr/local/bin:/usr/bin:/bin:/usr/sbin:/sbin
export PATH=${PATH}:/usr/local/mysql/bin

export JAVA_HOME=/Library/Java/JavaVirtualMachines/jdk1.8.0_131.jdk/Contents/Home/
export PATH=$PATH:$JAVA_HOME/bin
export CLASSPATH=.:$JAVA_HOME/lib/dt.jar:$JAVA_HOME/lib/tools.jar

export PATH=$PATH:/usr/local/maven/apache-maven-3.5.0/bin

export CATALINA_HOME=/usr/local/tomcat/apache-tomcat-7.0.77
export PATH=$PATH:/CATALINA_HOME/bin

alias ll='ls -alF'
alias la='ls -A' 
alias l='ls -CF'

Then experiment

mvn -v 
Apache Maven 3.8.4 (9b656c72d54e5bacbed989b64718c159fe39b537)
Maven home: /Users/yaoyonghao/Documents/software/apache-maven-3.8.4
Java version: 1.8.0_212, vendor: Oracle Corporation, runtime: /Library/Internet Plug-Ins/JavaAppletPlugin.plugin/Contents/Home
Default locale: zh_CN, platform encoding: UTF-8
OS name: "mac os x", version: "10.16", arch: "x86_64", family: "mac"

[Solved] Mac Install homebrew Error: error: Not a valid ref: refs/remotes/origin/master

The MAC reports the following error after installing homeberw:

Press RETURN to continue or any other key to abort
==> /usr/bin/sudo /usr/sbin/chown -R aa:admin /opt/homebrew
==> Downloading and installing Homebrew...
HEAD is now at 8de10a05b Merge pull request #10472 from MikeMcQuaid/new-issue-templates
error: Not a valid ref: refs/remotes/origin/master
fatal: ambiguous argument 'refs/remotes/origin/master': unknown revision or path not in the working tree.
Use '--' to separate paths from revisions, like this:
'git [...] -- [...]'
fatal: the remote end hung up unexpectedly
fatal: early EOF
fatal: index-pack failed
Error: Fetching /opt/homebrew/Library/Taps/homebrew/homebrew-core failed!
fatal: invalid upstream 'origin/master'
Failed during: /opt/homebrew/bin/brew update --force --quiet

The solution is as follows:

Uninstall homebrew

/bin/bash -c "$(curl -fsSL https://raw.githubusercontent.com/Homebrew/install/HEAD/uninstall.sh)"

Set git compression:

git config --global core.compression 0

Set git buffer size:

git config --global http.postBuffer 1048576000

Reinstall brew

/bin/bash -c "$(curl -fsSL https://raw.githubusercontent.com/Homebrew/install/master/install.sh)"

[Solved] ZK Connect Error: A JNI error has occurred, please check your installation and try again

Connect ZK

public static void main(String[] args) {
        CuratorFramework curator = CuratorFrameworkFactory.builder().connectString("127.0.0.1")
                .retryPolicy(new RetryOneTime( 4))
                .connectionTimeoutMs(10000)
                .sessionTimeoutMs(6000)
                .build();
        curator.start();
    }

Error Messages:
Error: A JNI error has occurred, please check your installation and try again
Exception in thread “main” java.lang.NoClassDefFoundError: org/apache/curator/RetryPolicy
at java.lang.Class.getDeclaredMethods0(Native Method)
at java.lang.Class.privateGetDeclaredMethods(Class.java:2701)
at java.lang.Class.privateGetMethodRecursive(Class.java:3048)
at java.lang.Class.getMethod0(Class.java:3018)
at java.lang.Class.getMethod(Class.java:1784)
at sun.launcher.LauncherHelper.validateMainClass(LauncherHelper.java:544)
at sun.launcher.LauncherHelper.checkAndLoadMain(LauncherHelper.java:526)
Caused by: java.lang.ClassNotFoundException: org.apache.curator.RetryPolicy
at java.net.URLClassLoader.findClass(URLClassLoader.java:382)
at java.lang.ClassLoader.loadClass(ClassLoader.java:424)
at sun.misc.Launcher$AppClassLoader.loadClass(Launcher.java:349)
at java.lang.ClassLoader.loadClass(ClassLoader.java:357)
… 7 more

To solve it, it is not suitable for the execution of the main method, just use the following method

@Test
    public void testzk() {
        CuratorFramework curatorFramework = Demo.getCuratorFramework();
        System.out.println(curatorFramework);

    }


public static CuratorFramework getCuratorFramework() {

        CuratorFramework client = CuratorFrameworkFactory.builder().connectString("127.0.0.1:2181")
                .connectionTimeoutMs(60 * 1000)
                .sessionTimeoutMs(60 * 1000).retryPolicy(new RetryUntilElapsed(1000, 4)).build();

        client.start();

        return client;
    }

[Solved] Mac ffmpeg Install Error: filenotfounderror: [errno 2] no such file or directory: ‘ffmpeg’: ‘ffmpeg’

Audio processing error: filenotfounderror: [errno 2] no such file or directory: ‘ffmpeg’: ‘ffmpeg’

An error occurs when the following code is executed

import audiosegment

print("Reading in the wave file...")
seg = audiosegment.from_file("voice_data/out_11.wav")

print("Information:")
print("Channels:", seg.channels)
print("Bits per sample:", seg.sample_width * 8)
print("Sampling frequency:", seg.frame_rate)
print("Length:", seg.duration_seconds, "seconds")

print("Detecting voice...")
seg = seg.resample(sample_rate_Hz=32000, sample_width=2, channels=1)
results = seg.detect_voice()
voiced = [tup[1] for tup in results if tup[0] == 'v']
unvoiced = [tup[1] for tup in results if tup[0] == 'u']

print("Reducing voiced segments to a single wav file 'voiced.wav'")
voiced_segment = voiced[0].reduce(voiced[1:])
voiced_segment.export("voiced.wav", format="WAV")

print("Reducing unvoiced segments to a single wav file 'unvoiced.wav'")
unvoiced_segment = unvoiced[0].reduce(unvoiced[1:])
unvoiced_segment.export("unvoiced.wav", format="WAV")

Error content

Solution:
use the command: brew install ffmpeg installation. If the following problems occur, let’s continue brew install ffmpeg installation without turning off the error message.

==> Downloading from https://pkg-containers.githubusercontent.com/ghcr1/blobs/sha256:c16266957db69346464e39967d41d5198f3550423d6
############################                                              40.0%
curl: (92) HTTP/2 stream 0 was not closed cleanly: PROTOCOL_ERROR (err 1)
Error: ffmpeg: Failed to download resource "rav1e"
Download failed: https://ghcr.io/v2/homebrew/core/rav1e/blobs/sha256:c16266957db69346464e39967d41d5198f3550423d6aabfb62919975cf52ea19

After that, new error messages are found as follows:

Error: The `brew link` step did not complete successfully
The formula built, but is not symlinked into /usr/local
Could not symlink bin/2to3
Target /usr/local/bin/2to3
already exists. You may want to remove it:
  rm '/usr/local/bin/2to3'

To force the link and overwrite all conflicting files:
  brew link --overwrite [email protected]

To list all files that would be deleted:
  brew link --overwrite --dry-run [email protected]

Follow the prompts and execute the following statements:

 rm '/usr/local/bin/2to3'
 brew link --overwrite [email protected]
 brew link --overwrite --dry-run [email protected]

[Solved] Curl: (22) the requested URL returned error: 404 when installing XXX on MAC brew

There are two solutions:

Solution 1:
(solved through method 1)
Update brew directly
brew update method 2:
(the experiment in method 2 failed)
modify the environment variable:

brew config # Find
## Find: 
HOMEBREW_BOTTLE_DOMAIN:https://mirrors.ustc.edu.cn/homebrew-bottles

echo 'export HOMEBREW_BOTTLE_DOMAIN=https://mirrors.ustc.edu.cn/homebrew-bottles/bottles' >> ~/.zshrc

source ~/.zshrc

echo 'export HOMEBREW_BOTTLE_DOMAIN=https://mirrors.ustc.edu.cn/homebrew-bottles/bottles' >> ~/.zprofile
source ~/.zprofile

Error: Your CLT does not support macOS 11.6 [How to Solve]

After upgrading MacOS to MacOS Big Sur, we will encounter an error: your CLT does not support MacOS 11.6. When installing or updating software with brew , we just need to reinstall Xcode select
solution:
enter the following command

sudo rm -rf /Library/Developer/CommandLineTools
sudo xcode-select --install 

At this time, you will be prompted to install Xcode select. In the pop-up box, we click Install, then the agreement will pop up, and then we click agree. Then wait for the installation to complete.

[Solved] validateNewTexture:89: failed assertion `BytesPerRow of a buffer-backed texture with pixelFormat

IPA runtime tips compiled after Xcode upgrade (version 13.1)

validateNewTexture:89: failed assertion `BytesPerRow of a buffer-backed texture with pixelFormat(MTLPixelFormatBGRA8Unorm) must be aligned to 64 bytes, found bytesPerRow(5344)'

Solution:
Product->Scheme->Edit Scheme->Diagnostics->Cancel API Validation

Reference: https://stackoverflow.com/questions/58043738/validatenewtexture89-failed-assertion-bytesperrow-of-a-buffer-backed-texture/58051893

The MAC system installs MySQL client, and the error is solved_ config not found

The MAC system installs MySQL client, and the error is solved_ config not found

Using PIP3 install MySQL_ Client error

The error message is as follows: prompt: oserror: MySQL_ config not found
python setup.py egg_ info Check the logs for full command output
mysql_ Config not found

Solve the problem according to the error report

Prompt that the file does not exist. Use find to find the file and verify whether the file exists
find/- name MySQL_ Config
you can see that the file exists. It is preliminarily judged that the environment variable is not configured

resolvent

Add the queried address to the environment variable
export path = $path:/usr/local/mysql-5.6.38-macos10.12-x86_ 64/bin

Verify again

Download again, the prompt is successful, and the problem is solved

Problem regression

Because MySQL has been downloaded before, the environment variable configuration may be deleted when operating other contents. This method is not applicable to all cases

[Solved] Failed to install PIP for MacOS, prompt: syntax error: invalid syntax

Use the command easy_ Install install pip

Use the command sudo easy_Install PIP installing PIP failed. The information of executing the command is as follows:

➜  ~ sudo easy_install pip
Password:
Searching for pip
Reading https://pypi.org/simple/pip/
Downloading https://files.pythonhosted.org/packages/da/f6/c83229dcc3635cdeb51874184241a9508ada15d8baa337a41093fab58011/pip-21.3.1.tar.gz#sha256=fd11ba3d0fdb4c07fbc5ecbba0b1b719809420f25038f8ee3cd913d3faa3033a
Best match: pip 21.3.1
Processing pip-21.3.1.tar.gz
Writing /tmp/easy_install-8XXfb1/pip-21.3.1/setup.cfg
Running pip-21.3.1/setup.py -q bdist_egg --dist-dir /tmp/easy_install-8XXfb1/pip-21.3.1/egg-dist-tmp-5cqtMF
Traceback (most recent call last):
# ...  
  File "/System/Library/Frameworks/Python.framework/Versions/2.7/Extras/lib/python/setuptools/sandbox.py", line 44, in _execfile
    code = compile(script, filename, 'exec')
  File "/tmp/easy_install-8XXfb1/pip-21.3.1/setup.py", line 7
    def read(rel_path: str) -> str:
                     ^
SyntaxError: invalid syntax

Solution

Download the script file get-pip.py:

curl 'https://bootstrap.pypa.io/get-pip.py' > get-pip.py

Then execute the script file get-pip.py with the command python3:

sudo python3 get-pip.py

This completes the installation.

The process information of executing the command is as follows:

➜  ~ curl 'https://bootstrap.pypa.io/get-pip.py' > get-pip.py
  % Total    % Received % Xferd  Average Speed   Time    Time     Time  Current
                                 Dload  Upload   Total   Spent    Left  Speed
100 2108k  100 2108k    0     0  2571k      0 --:--:-- --:--:-- --:--:-- 2568k
➜  ~ sudo python3 get-pip.py
Password:
WARNING: The directory '/Users/liaowenxiong/Library/Caches/pip' or its parent directory is not owned or is not writable by the current user. The cache has been disabled. Check the permissions and owner of that directory. If executing pip with sudo, you should use sudo's -H flag.
DEPRECATION: Configuring installation scheme with distutils config files is deprecated and will no longer work in the near future. If you are using a Homebrew or Linuxbrew Python, please see discussion at https://github.com/Homebrew/homebrew-core/issues/76621
Collecting pip
  Downloading pip-21.3.1-py3-none-any.whl (1.7 MB)
     |████████████████████████████████| 1.7 MB 1.0 MB/s
Installing collected packages: pip
  Attempting uninstall: pip
    Found existing installation: pip 21.2.4
    Uninstalling pip-21.2.4:
      Successfully uninstalled pip-21.2.4
DEPRECATION: Configuring installation scheme with distutils config files is deprecated and will no longer work in the near future. If you are using a Homebrew or Linuxbrew Python, please see discussion at https://github.com/Homebrew/homebrew-core/issues/76621
Successfully installed pip-21.3.1
WARNING: Running pip as the 'root' user can result in broken permissions and conflicting behaviour with the system package manager. It is recommended to use a virtual environment instead: https://pip.pypa.io/warnings/venv
➜  ~ pip --version
pip 21.3.1 from /usr/local/lib/python3.9/site-packages/pip (python 3.9)

A simpler command to execute is as follows:

curl https://bootstrap.pypa.io/get-pip.py | python3

Uninstall pip

sudo pip uninstall pip  

M1 Computer: How to Solve pod update

Error Messages:

Solution:

Method 1: A simple and straightforward solution
Add arch -x86_64 in front of the pod command
e.g. arch -x86_64 pod update

Method 2: reinstall cocoaPods

Answering my own question. I fixed the ffi issue by uninstalling my faulty Ruby version and CocoaPods, then I used the -x86_64 arch to reinstall ffi and CocoaPods.
These are the steps I did to get back to a working state (and to apply the M1 workarounds for ffi):

Uninstall Ruby with: brew uninstall ruby –force
Uninstall CocoaPods. At first, try to list all CocoaPods versions / components with gem list –local | grep cocoapods. Then uninstall them one by one, in my case:
sudo gem uninstall cocoapods
sudo gem uninstall cocoapods-core
sudo gem uninstall cocoapods-downloader
etc.
As a next step I was able to reinstall ffi and then CocoaPods with:
sudo arch -x86_64 gem install ffi
sudo arch -x86_64 gem install cocoapods
Once done, I could run pod install as expected. Note that I had the Terminal open all the time in standard mode – no Rosetta required

“Practical tips” to solve the error after installing inode in MAC system: libcoreutils.dylib

0x01: Introduction

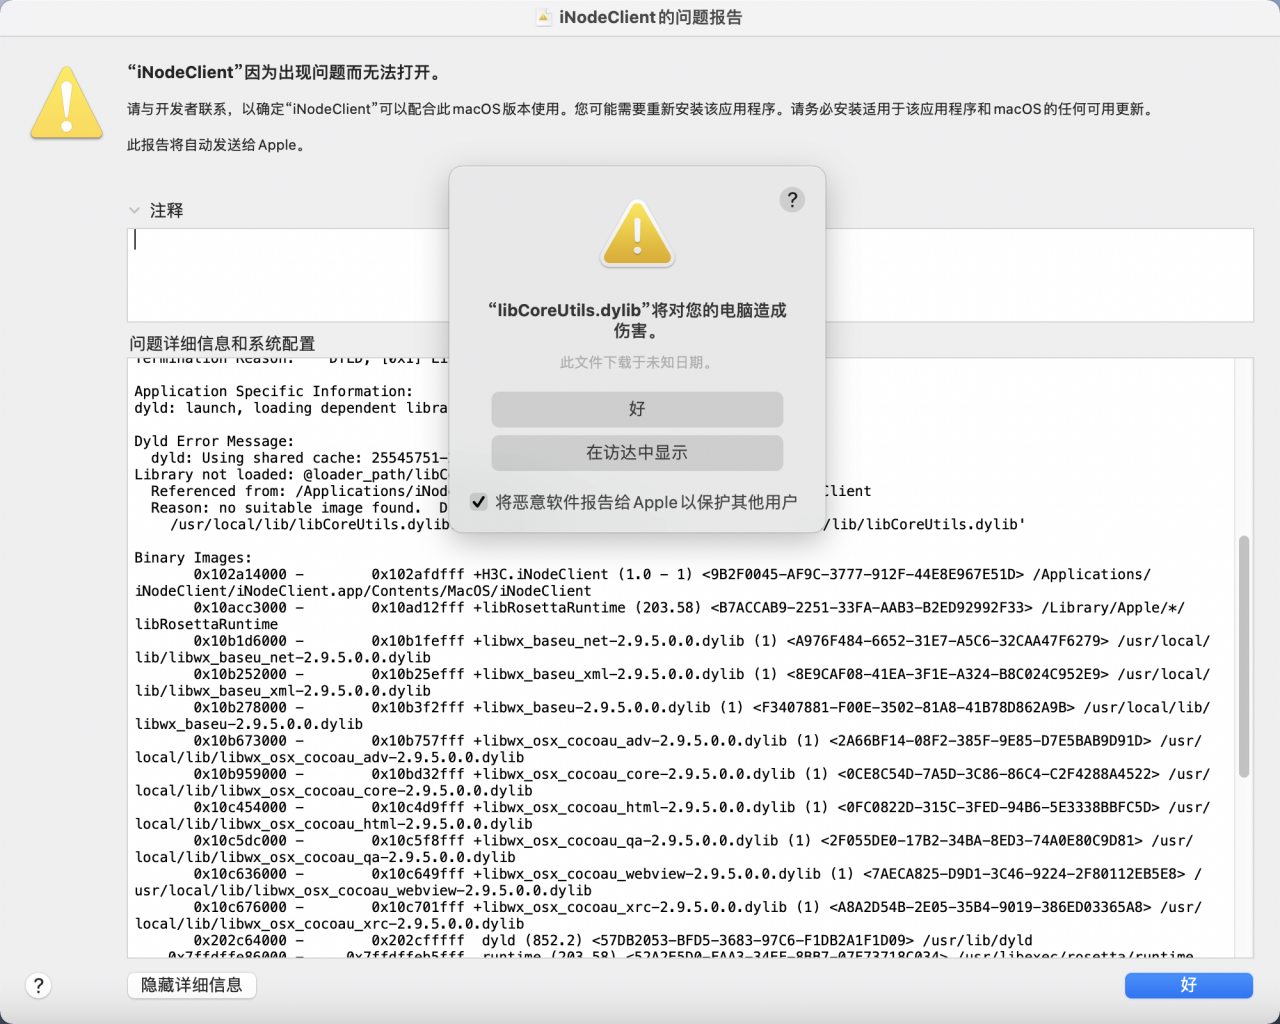
Recently encountered “prompt” on macbookair utility inode   “Libcoreutils. Dylib” will cause damage to your computer, resulting in the problem that inode cannot be used normally. As shown in the figure:

0x02: solution

Refer to the Internet and find the solution: inode for Mac MAC MAC system reports an error after installing inode – know the community

The steps are as follows:

It’s a sip problem. SIP is turned on after a system update and needs to be turned off

During our development, sometimes we need to copy files to the folders restricted by the system when we install some tools and software, and sometimes we even need to change the files restricted by the system. At this time, the Mac will prompt that the system files cannot be modified. At this time, if we want to continue the operation, we must turn off the “system integrity protection” mechanism (SIP) of the Mac

1. Check SIP status

Enter csrutil status in the terminal to see whether it is enabled or disabled.

2. Turn off sip

1 restart the Mac, press and hold CMD + R until the apple logo and progress bar appear on the screen, and enter the recovery mode; 2. Find the utility (the third from the left) in the toolbar at the top of the screen, open the terminal, and enter: csrutil disable; 3. Turn off the terminal and restart the MAC; 4 after restart, you can view the status confirmation in the terminal.

3. Turn on SIP

Similar to the closing step, just enter csrutil enable in S2.

4. M1 chip solution

When the M1 chip computer is turned off, long press the start button until the setting button appears ⚙ After release, it will enter the recovery mode. Open the terminal, enter csrutil disable, and then enter, and then enter y, and then enter here. After entering the password and executing sip, it can be closed and restarted directly