Tag Archives: macOS

Homebrew reports an error after upgrading MacOS to Big Sur

Question

Homebrew reports an error after upgrading MacOS to Big Sur, as follows:

$ brew
Traceback (most recent call last):
	23: from /usr/local/Library/Homebrew/brew.rb:6:in `<main>'
	22: from /System/Library/Frameworks/Ruby.framework/Versions/2.6/usr/lib/ruby/2.6.0/rubygems/core_ext/kernel_require.rb:54:in `require'
	21: from /System/Library/Frameworks/Ruby.framework/Versions/2.6/usr/lib/ruby/2.6.0/rubygems/core_ext/kernel_require.rb:54:in `require'
	20: from /usr/local/Library/Homebrew/global.rb:3:in `<top (required)>'
	19: from /System/Library/Frameworks/Ruby.framework/Versions/2.6/usr/lib/ruby/2.6.0/rubygems/core_ext/kernel_require.rb:54:in `require'
	18: from /System/Library/Frameworks/Ruby.framework/Versions/2.6/usr/lib/ruby/2.6.0/rubygems/core_ext/kernel_require.rb:54:in `require'
	17: from /usr/local/Library/Homebrew/extend/pathname.rb:4:in `<top (required)>'
	16: from /System/Library/Frameworks/Ruby.framework/Versions/2.6/usr/lib/ruby/2.6.0/rubygems/core_ext/kernel_require.rb:54:in `require'
	15: from /System/Library/Frameworks/Ruby.framework/Versions/2.6/usr/lib/ruby/2.6.0/rubygems/core_ext/kernel_require.rb:54:in `require'
	14: from /usr/local/Library/Homebrew/utils.rb:2:in `<top (required)>'
	13: from /System/Library/Frameworks/Ruby.framework/Versions/2.6/usr/lib/ruby/2.6.0/rubygems/core_ext/kernel_require.rb:54:in `require'
	12: from /System/Library/Frameworks/Ruby.framework/Versions/2.6/usr/lib/ruby/2.6.0/rubygems/core_ext/kernel_require.rb:54:in `require'
	11: from /usr/local/Library/Homebrew/emoji.rb:24:in `<top (required)>'
	10: from /System/Library/Frameworks/Ruby.framework/Versions/2.6/usr/lib/ruby/2.6.0/rubygems/core_ext/kernel_require.rb:54:in `require'
	 9: from /System/Library/Frameworks/Ruby.framework/Versions/2.6/usr/lib/ruby/2.6.0/rubygems/core_ext/kernel_require.rb:54:in `require'
	 8: from /usr/local/Library/Homebrew/extend/os/emoji.rb:1:in `<top (required)>'
	 7: from /System/Library/Frameworks/Ruby.framework/Versions/2.6/usr/lib/ruby/2.6.0/rubygems/core_ext/kernel_require.rb:54:in `require'
	 6: from /System/Library/Frameworks/Ruby.framework/Versions/2.6/usr/lib/ruby/2.6.0/rubygems/core_ext/kernel_require.rb:54:in `require'
	 5: from /usr/local/Library/Homebrew/os.rb:1:in `<top (required)>'
	 4: from /usr/local/Library/Homebrew/os.rb:18:in `<module:OS>'
	 3: from /usr/local/Library/Homebrew/os/mac.rb:21:in `version'
	 2: from /usr/local/Library/Homebrew/os/mac.rb:21:in `new'
	 1: from /usr/local/Library/Homebrew/os/mac/version.rb:26:in `initialize'
/usr/local/Library/Homebrew/version.rb:198:in `initialize': Version value must be a string; got a NilClass () (TypeError)

terms of settlement

Modify the/usr/local/library/homebrew/version.rb file and change @ version in the initialize function to a specific value, such as:

  def initialize(val)
    if val.respond_to?(:to_str)
      @version = val.to_str
    else
      raise TypeError, "Version value must be a string; got a #{val.class} (#{val})"
    end
  end

Change to

  def initialize(val)
    if val.respond_to?(:to_str)
      @version = '10.15.7'
    else
      raise TypeError, "Version value must be a string; got a #{val.class} (#{val})"
    end
  end

Cmake compile cocos2d-x error [How to Solve]

Enter at the terminal:

cocos run --proj-dir .. -p mac

The error information is as follows:

-- The C compiler identification is unknown
-- The CXX compiler identification is unknown
CMake Error at CMakeLists.txt:30 (project):
  No CMAKE_C_COMPILER could be found.


CMake Error at CMakeLists.txt:30 (project):
  No CMAKE_CXX_COMPILER could be found.


-- Configuring incomplete, errors occurred!
See also "/Users/roy/Desktop/workspace/CocosProject/MyGame/mac-build/CMakeFiles/CMakeOutput.log".
See also "/Users/roy/Desktop/workspace/CocosProject/MyGame/mac-build/CMakeFiles/CMakeError.log".

Solution:

sudo xcode-select --reset

Mac office Run-time error ‘53 [How to Solve]

~/Library/Group Containers/UBF8T346G9.Office/User Content.localized/Startup.localized/Word

Just delete the file below this one. You can refer to the following solution.

I had the same problem, and found that it was due to incompatible Adobe Add-in “linkCreation.dotm”.

It is located at:
~/Library/Group Containers/UBF8T346G9.Office/User Content.localized/Startup.localized/Word
Once you remove the file and re-start Word, no more errors.

An error occurred when MySQL backup with mysqldump instruction in MacOS system

Error 1064 (42000) from mysqldump command

Mysqldump – uroot – P library name & gt/ Backup path/backup file name. SQL;

Always report error:

ERROR 1064 (42000): You have an error in your SQL syntax; check the manual that corresponds to your MySQL server version for the right syntax to use near ‘mysqldump -uroot -p bank>/ Users/F/bank_ back.sql’ at line 1

resolvent:

Input mysqldump command directly in the terminal, do not input mysqldump command after logging into the database.

Special thanks to the original author guanggulala.

[MacOS] brew install 404:Bottle missing, falling back to the default domain…

Contents of articles

Problem description solution

Problem description

MacOS version: 10.15.7 prompts that there is no WGet, so install it through brew. After installing brew, configure the domestic source brew install WGet and report an error

Solution

The homebrew address described in [homebrew boxes source help] is:
0 https://mirrors.ustc.edu.cn/homebrew-bottles/ Run brew config to see

HOMEBREW_BOTTLE_DOMAIN: https://mirrors.ustc.edu.cn/homebrew-bottles

The solution is to change the environment variables and change homebrew_ BOTTLE_ Correct domain

echo 'export HOMEBREW_BOTTLE_DOMAIN=https://mirrors.ustc.edu.cn/homebrew-bottles/bottles' >> ~/.zshrc

source ~/.zshrc

Ruby Install Error running ‘requirements_osx_brew_update_system ruby-2.3.1

Operating system: macOS 10.12.1

Install Ruby 2.3.1 error

The specific error message is as follows.

chaorenbuhuifeideMacBook-Air:~ chaorenbuhuifei$ rvm install 2.3.1

Searching for binary rubies, this might take some time.

Found remote file https://rubies.travis-ci.org/osx/10.12/x86_64/ruby-2.3.1.tar.bz2

Checking requirements for osx.

Installing requirements for osx.

Updating system…….

Error running ‘requirements_osx_brew_update_system ruby-2.3.1′,

showing last 15 lines of /Users/chaorenbuhuifei/.rvm/log/1481424365_ruby-2.3.1/update_system.log

https://github.com/Homebrew/homebrew/wiki/Common-Issues

and make sure `brew update` works before continuing.’

++ rvm_pretty_print stderr

++ case “${rvm_pretty_print_flag:=auto}” in

++ case “${TERM:-dumb}” in

++ case “$1” in

++ [[ -t 2 ]]

++ return 1

++ printf %b ‘Failed to update Homebrew, follow instructions here:

https://github.com/Homebrew/homebrew/wiki/Common-Issues

and make sure `brew update` works before continuing.\n’

Failed to update Homebrew, follow instructions here:

https://github.com/Homebrew/homebrew/wiki/Common-Issues

and make sure `brew update` works before continuing.

++ return 1

Requirements installation failed with status: 1.

Error running ‘requirements_osx_brew_update_system ruby-2.3.1’


How to Solve:

Step 1:

$ brew install autoconf automake libtool pkg-config apple-gcc42 libyaml readline libxml2 libxslt libksba openssl sqlite

This method will report error

Error: No available formula with the name “apple-gcc42”

==> Searching for similarly named formulae…

Error: No similarly named formulae found.

==> Searching taps…

This formula was found in a tap:

homebrew/dupes/apple-gcc42

To install it, run:

brew install homebrew/dupes/apple-gcc42


Step 2:

$brew install homebrew/dupes/apple-gcc42


then re-install

$rvm install 2.3.1


Clion compiles and runs a single C / cpp file

C/CPP is all right, but you need to create a new project first. You can only have one main at a time, so you need to be able to let it compile and execute a single file
Installing a plug-in

in the Settings to find the plug-in installation, after the completion of the open folder, you first create a new Cmakelist files, and right click on the need to perform the c file

choose the bottom of the add, you will see the main function on the left side of a small arrow, direct execution

Bad pen notes: solution to leaving blank folder on launchpad after Adobe product is uninstalled by MacOS

This article source: http://blog.csdn.net/chaijunkun/article/details/104272409, reproduced please indicate. As I am not regular will sort out the relevant blog, the corresponding content will be improved. It is therefore highly recommended to view this article in its original source.
First of all, it is stated that this solution has been translated from an answer on the official website of Adobe community, but no reliable answer has been found in Baidu. For those students who have encountered the same problem, please refer to the translation here. The original address: https://community.adobe.com/t5/get-started/adobe-application-manager-in-launchpad/td-p/8857148?page=1
When upgrading Adobe products in macOS, I used to delete all the historical versions of relevant apps and then install them completely to avoid all kinds of inexplicable problems. However, after uninstalling, there will always be one left behind in Launchpad called Adobe Application Manager (Other) in some cases. If you’re using a Chinese system, it might be: Adobe Application Manager (other). I have deleted all the apps, but I can’t delete this folder. The original answer was:

This answer 100% worked for me!
Take a random app
Make it wobble (as if if deleting it)
Drag and drop into folder you’re trying to delete
Then click into folder you just drop the app into
Remove the app from the folder
Folder will automatically delete

In fact, don’t bother, randomly select an application installed in the system, long press, make the app icon become shaking, move it to the folder in question, release. Then try to remove the app, and the empty folder will automatically be deleted.
Attachment: Adobe products in the macOS complete deletion method:
https://helpx.adobe.com/x-productkb/global/delete-previously-installed-application-files.html
In a nutshell, focus on the following sections:
/Applications: all Adobe software under the directory
and all adobe-related files (including plist files) and folders under the directory below:
/Users/[User]/Library/Preferences
/Users/[User]/Library/Application Support
/Library/Application Support
/Library/Preferences

/Applications/Utilities
may also have Adobe related files, which are recommended to be cleaned together when completely deleted.

Error in installing RVM on MacOS raw.githubusercontent.com:443 Connection failure resolution

I thought a ladder could solve the problem, but I was naive and wrote down the solution
1. Look up the connection failure domain current IP [https://site.ip138.com/raw.Githubusercontent.com/]

2. Terminal input sudo vi/etc/hosts and a corresponding IP connection failure domain configuration is added to the file, I add the Chinese Hong Kong
151.101.76.133 raw.githubusercontent.com
save after exit
3. Reexecute the install RVM command and it will be successful

VirtualBox for macOS NS_ ERROR_ Failure (0x80004005) problem solving record

System environment
macOS catalina(10.15)virtualbox version: 6.0.14 r133895
Problem description
After upgrading the old version of VirtualBox 5 to VirtualBox 6.0, the following error is found in docker-machine start

➜  ~ docker-machine start
Starting "default"...
(default) Check network to re-create if needed...
Unable to start the VM: /usr/local/bin/VBoxManage startvm default --type headless failed:
VBoxManage: error: The virtual machine 'default' has terminated unexpectedly during startup with exit code 1 (0x1)
VBoxManage: error: Details: code NS_ERROR_FAILURE (0x80004005), component MachineWrap, interface IMachine

Details: 00:29:32.593106 Console: Machine state changed to 'PoweredOff'


found that all Vbox virtual machines could not start, the reason should be the same
. Then I remembered that I once had the permission to change some system directory (or users), whether I changed the installation path of VirtualBox
solution

    because I’m not sure the original /Application/VirtualBox. App what permissions, so the uninstall tools perform VirtualBox installation image will be installed version completely uninstall, and then reassembled, found after heavy users and user groups is root: admin , but start still have the same error for help online, watch some, not installed corresponding enhanced version of the tools expansion pack, So I went to the official website to download the enhancement package and install it. When installing the package, an error was reported: 
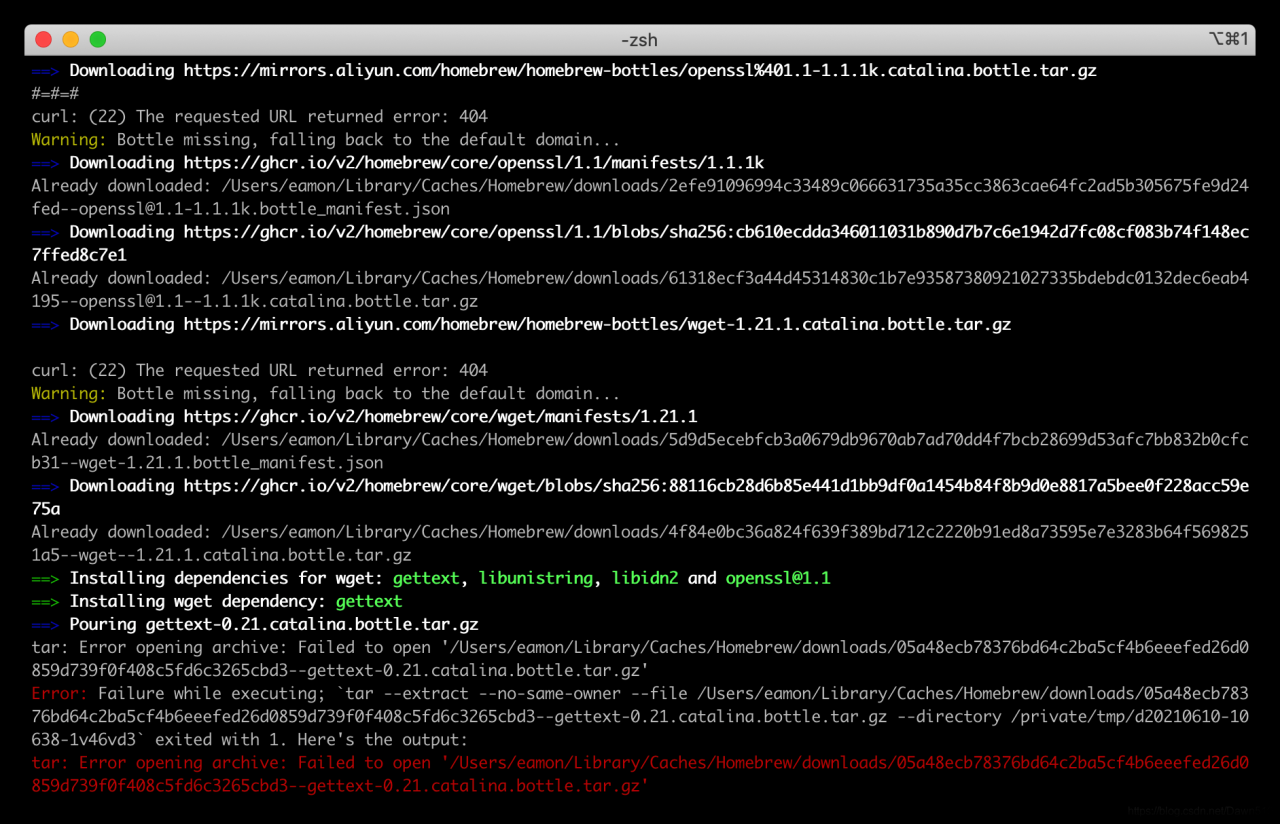
then found that although The error type was The same, this time it was reported for a different reason: VBoxExtPackHelperApp: error: The owner is not root: /Applications. Now I remember that I once changed The /Application directory to a normal user in order to test a certain program and forgot to change it back... Really dug a pit pit themselves so /Applications by users and groups in the root: wheel , to perform the installation of the expansion pack, installation is not an error, guess is probably because when the user is not the root cause in the installation directory belong to unable to perform a specific system commands (such as virtual machine driver installation ) expansion pack, after the success of the installation, open the virtual machine again, found that already can start, The problem has been fixed here.

summary

    do not eat too full to have nothing to modify the system directory permissions (including the users) encounter problems can be Internet help, and then for each possible useful scheme to try one by one

Ubuntu 20.04 builds nginx 1.18.0 and MAC file transfer / download to server

Install Nginx, configure firewall and file structure; SFTP transfer download, SCP upload download.
// it is not clear here that it is very similar to the last one.

Nginx
Install Nginx
Apt get update
apt install nginx;
after installation, the service will be automatically executed,
verification: systemctl status nginx;
Configure the firewall
ufw allow 'Nginx;
verification :ufw status;
Successful execution interface

File structure

all Nginx configuration files are located in /etc/nginx directory.
the main configuration file for Nginx is /etc/nginx/nginx.conf. To make the Nginx configuration easier to maintain, it is recommended to create a separate configuration file for each domain. You can have as many server block files as you want.
Nginx server prevents files from being stored in the /etc/nginx/ locations-available directory. Nginx will not use the configuration files found in this directory unless they are linked to the /etc/nginx/ location-enabled directory.
to activate the server block, you need to create a symbolic link (pointer) from the configuration file site in the sites-available directory to the directory sites-enabled.
is recommended to follow standard naming conventions. For example, if your domain name is mydomain.com, then your configuration file should be named /etc/nginx/sites-available/mydomain.com.conf
the/etc/nginx/snippets directory contains can included in the configuration file from the server. If you use repeatable configuration segments, you can refactor these segments into fragments and include the fragment file in the server block.
Nginx log files (access.log and error.log) are located in the /var/log/ Nginx directory. It is suggested that there are different Access, and the error is the log file of each server module.
The MAC sends files to the server
SFTP transfer download
Create a new remote connection in the shell and send it using SFTP (prompted for server password) :

Use put to send command: put local file path remote path ; The
put command cannot upload a folder directly. Can be packaged for delivery.
use the get download command get remote path ;
use bye to exit SFTP :bye.
SCP upload and download
1, from the server to download file SCP username @ servername:/path/filename/Users/MAC/Desktop (local directory)
For example: SCP [email protected]:/root/zouzouzou. TXT/Users/MAC/Desktop is the server/root/zouzouzou. TXT/Users/MAC/downloaded to a local Desktop directory.
[email protected]: SCP - r/raid5 ZXX/my_download/zouzouzou.zip/users/zhuxiaoxia/Desktop
2. Upload local files to the server SCP /path/filename username@servername:/path;
For example, SCP/Users/MAC/Desktop/zouzouzou. TXT [email protected]:/root/
3. Download the whole directory scp-r username@servername:/root/ (remote directory) /Users/ MAC /Desktop (local directory)
For example : scp-r [email protected]:/root/ /Users/ MAC /Desktop/
4. Upload directory to server scp-r local_dir username@servername:remote_dir
For example: scp-r test [email protected]:/root/ upload the test directory under current directory to the server's /root/ directory
Reminder: The target server wants to enable write permission.