Tag Archives: linux

Make the root user login through SSH and report the error of “permission denied, please try again”

When using SSH to log in to the ECS instance of the Linux system, if the root user enters the correct password, the following error message will appear.

Note: the non root user can log in normally, and the root user can log in normally through the management terminal.

Permission denied, please try again.

Please check the security log. If it contains the following error message, the problem is usually caused by the SELinux service enabled. Please refer to the solution to the problem caused by SELinux service. In other cases, please refer to the solution to the problem caused by forbidding the root user to log in.

error: Could not get shadow infromation for root.

 
Solutions to problems caused by forbidding root user to log in

Tips:

The related Linux configuration and instructions in this paper have been tested in CentOS 6.5 64 bit operating system. The operating system configuration of other types and versions may be different. Please refer to the official documents of the corresponding release for details. Related policies can improve the security of the server. Users are requested to decide whether to modify the relevant configuration based on the trade-off between security and ease of use.

Please refer to the following steps to check the configuration and modify it.

    log in to the ECS instance of Linux system through the management terminal

      View /etc/SSH/sshd through cat and other commands_ Whether the config configuration file contains a configuration similar to the following.

      PermitRootLogin no

      Note: the description of this parameter is as follows.

      If the parameter is not configured (by default), or the parameter value is configured to “yes”, the root user is allowed to log in. Only when the parameter value is set to “no”, will the root user be forbidden to log in.

      This parameter only affects the root user’s SSH login, and does not affect the root user’s login to the system through the management terminal and other ways.

      use VI and other editors to set the parameter value to “yes”, or delete the parameter, or comment (add “#” at the beginning) the whole line configuration. For example: ?Permitrootlogin yes .

      Note: it is recommended to back up the configuration file before modification.

      execute the following command to restart the SSH service.

      service sshd restart

      Try logging in to the server again using root. If the problem still exists, you can refer to the troubleshooting guide for remote login failure of ECS Linux SSH for further troubleshooting and analysis

       
      Solutions to problems caused by SELinux service

      You can choose to temporarily or permanently shut down SELinux service to solve the problem of SSH connection exception according to the needs of the on-site environment.

       
      Check SELinux service status

        log in to the Linux instance through the management terminal and execute the following command to view the current SELinux service status.

        /usr/sbin/sestatus -v 

        The system display is similar to the following.

        SELinux status:       enabled

        Tip: if

        The SELinux status parameter is

        enabled means that it is in the on state

        disabled is off.

       
      Temporarily shut down SELinux service

      Log in to the Linux instance and execute the following command to temporarily close SELinux.

      Tip: temporary modification of SELinux service status is real-time and effective, and there is no need to restart the system or instance.

      setenforce 0

       
      Permanently shut down SELinux service

      Log in to the Linux instance and execute the following command to shut down the SELinux service permanently.

      Tip: to permanently modify SELinux service status, you need to restart the system or instance before it can take effect.

      sed -i 's/SELINUX=enforcing/SELINUX=disabled/' /etc/selinux/config

      Tip: this command is only applicable when the SELinux service is in enforcing state.

Copying a param with shape torch. Size ([262, 2048]), parameter size does not match

A parameter with shape torch. Size ([262]) is copied from the checkpoint, and the shape in the current model is torch. Size ([290]).

The parameter size of fc.weight does not match, just modify the parameter.

VIM open the corresponding file and modify the parameters

Solve the problem successfully

Reference link


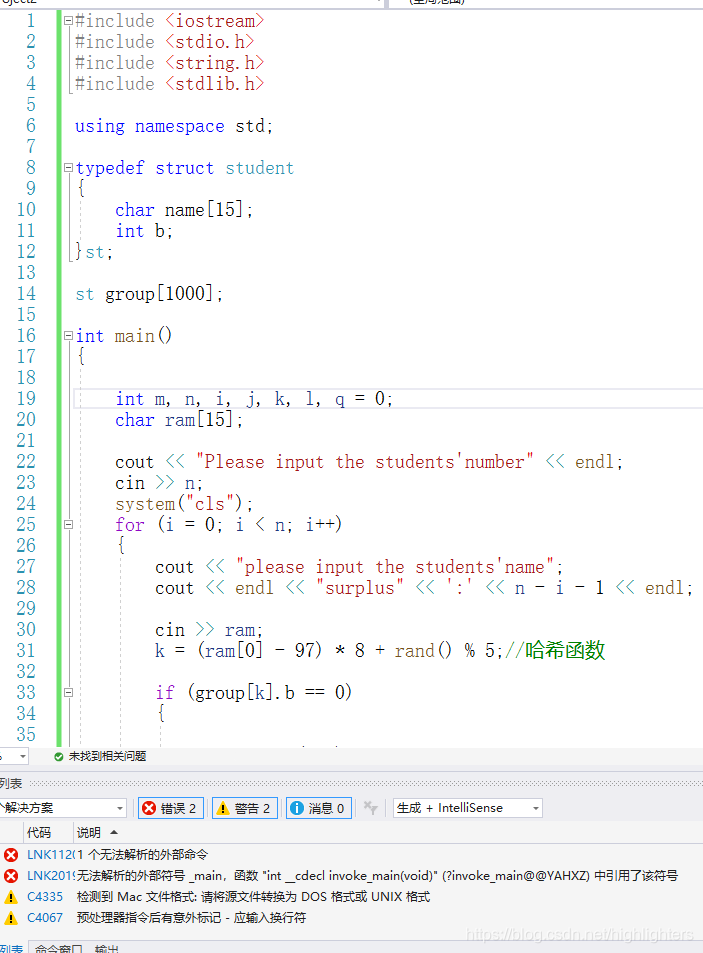
Vs error unresolved external symbol_ Main, the symbol in the function “int”__ cdecl invoke_ main

Cause analysis

There are many reasons for this problem. The first and most common one is that there are multiple CPP files in your project, which contain multiple main functions
the second is that your code is copied from QQ or other ways (such as Notepad). In this case, the newline character may change. According to the explanation of the online boss, the newline character has many codes. If the format is wrong, there will be problems. At this time, you will be prompted to convert the source file to DOS or UNIX format, If there is a warning, it means that you are in this situation. You need to find the advanced save option in the file menu of vs (the advanced version needs to be called out in the settings, but not Baidu search), and then select window (CR LF), which means that the new line character supported by the window system indicates that the problem is solved ~
the third is that your project is created incorrectly, If your compiler’s preprocessor is not right, you can copy the code directly to the new correct project, or open the project settings and modify your preprocessor. You can search for it.

Ubuntu sub process/usr/bin/dpkg returned an error code (1) solution

When installing dependencies using the apt-get install directive, an error is reported as follows

dpkg: error processing tex-common (--configure):
 subprocess installed post-installation script returned error exit status 1
Errors were encountered while processing:
 tex-common
E: Sub-process /usr/bin/dpkg returned an error code (1)

The solution is a three-step process:
The first step

sudo mv /var/lib/dpkg/info /var/lib/dpkg/info.bak //First rename the info folder
sudo mkdir /var/lib/dpkg/info // Create a new info folder again
sudo apt-get update

The second step

apt-get -f install xxx  //Here xxx is replaced by the software to be installed
sudo mv /var/lib/dpkg/info/* /var/lib/dpkg/info.bak

The third step

sudo rm -rf /var/lib/dpkg/info //Delete the new info folder you created
sudo mv /var/lib/dpkg/info.bak /var/lib/dpkg/info // change the name of the previous info folder back

So far the installation problem has been solved!

Connection error:Cannot connect to redis-server. Details are available in connection log.

The redis process has not started, and the following situation occurs

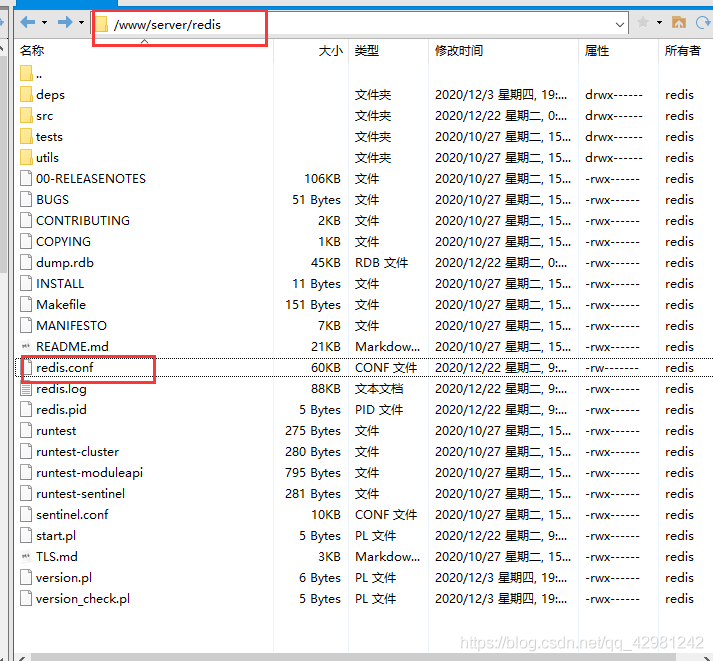
reloads the configuration, and the directory does not use the absolute path to restart. My redis is installed in the pagoda
redis.conf in the/www/server/redis directory

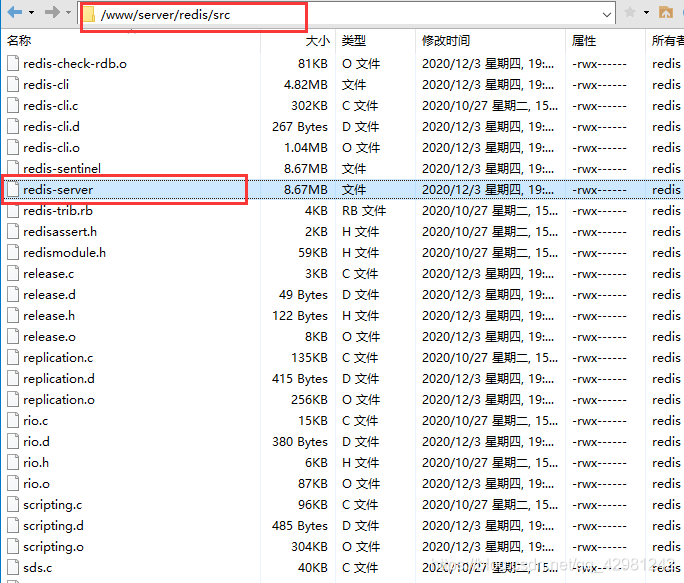
redis server in the/www/server/redis/SRC directory

Restart profile

/www/server/redis/src/redis-server /www/server/redis/redis.conf

Profile validation

[Solved] Failed to execute/bin/bash: resource temporarily unavailable

[[email protected] config]# su – mform
Last login: Mon Apr 16 14:08:05 CST 2018 on pts/4
su: failed to execute /bin/bash: Resource temporarily unavailable
[[email protected] config]#
[[email protected] config]#
[[email protected] config]# egrep -v “$|#” /etc/security/limits.d/20-nproc.conf

     soft    nproc     4096

root soft nproc unlimited
[[email protected] config]# su – mform
Last login: Mon Apr 16 14:16:25 CST 2018 on pts/4
su: failed to execute /bin/bash: Resource temporarily unavailable
[[email protected] config]#
[[email protected] config]#
[[email protected] config]#
#change the default numble 4096 to 8192
[[email protected] config]# vim /etc/security/limits.d/20-nproc. conf
[[email protected] config]# egrep -v “$|#” /etc/security/limits.d/20-nproc.conf

     soft    nproc     8192

root soft nproc unlimited
[[email protected] config]# su – mform
Last login: Mon Apr 16 14:16:49 CST 2018 on pt s/4
[[email protected] ~]$ id
uid=1002(mform) gid=1003(mform) groups=1003(mform)

Problem solving / etc/ rc.local The boot entry of the file configuration is invalid

Fixed issue: The boot entry for /etc/rc.local file configuration does not work
Start by looking at the contents of the /etc/rc.local file to find the cause of the problem.

[root@localhost ~]# cat /etc/rc.local
#!/bin/bash
# THIS FILE IS ADDED FOR COMPATIBILITY PURPOSES
#**这This file was added for compatibility**
# It is highly advisable to create own systemd services or udev rules
# to run scripts during boot instead of using this file.
#** It is highly advisable to create your own systemd services or udev rules to run scripts during boot instead of using this file. ***
# In contrast to previous versions due to parallel execution during boot
# This script will NOT be run after all other services.
#** In contrast to previous versions due to parallel execution during boot # this script will NOT be run after all other services. **Please note that you must run 'parallel execution during boot'.
# Please note that you must run 'chmod +x /etc/rc.d/rc.local' to ensure
# that this script will be executed during boot.
#** Please note that you must run 'chmod +x /etc/rc.d/rc.local' to ensure # that this script will be executed during boot.
touch /var/lock/subsys/local
#**Create the file /var/lock/subsys/local**

According to the prompt, it may not execute because the file permissions are insufficient. So, first look at the permissions for the /etc/rc.local file.

[root@localhost ~]# ll /etc/rc.local
-rw-r--r--. 1 root root 13 Apr 21 23:06 /etc/rc.local -> rc.d/rc.local

/etc/rc.d/rc.local = /etc/rc.local = /etc/rc.local = /etc/rc.local = /etc/rc.local = /etc/rc.local = /etc/rc.local = /etc/rc.local = /etc/rc.local

[root@localhost ~]# chmod +x /etc/rc.d/rc.local
[root@localhost ~]# ll /etc/rc.d/rc.local 
-rwxr-xr-x. 1 root root 13 Apr  21 23:06 /etc/rc.d/rc.local

After restarting the server, I found that the boot items set in the /etc/rc.local file are working properly.

[Solved] removeerror: ‘requests’ is a dependency of CONDA and cannot be removed from

[Solved]RemoveError: ‘requests’ is a dependency of conda and cannot be removed from conda’s operating environment.

Collecting package metadata: done
Solving environment: done

Downloading and Extracting Packages
certifi-2018.1.18    | 144 KB    | ############################################################################ | 100%
mkl-2018.0.1         | 155.2 MB  | ############################################################################ | 100%
freetype-2.9.1       | 475 KB    | ############################################################################ | 100%
scipy-1.0.0          | 13.0 MB   | ############################################################################ | 100%
......
......
pyparsing-2.3.1      | 54 KB     | ############################################################################ | 100%
kiwisolver-1.0.1     | 60 KB     | ############################################################################ | 100%
qt-5.6.2             | 55.6 MB   | ############################################################################ | 100%
setuptools-38.4.0    | 540 KB    | ############################################################################ | 100%
matplotlib-2.2.2     | 6.5 MB    | ############################################################################ | 100%
six-1.12.0           | 21 KB     | ############################################################################ | 100%
openssl-1.0.2n       | 5.4 MB    | ############################################################################ | 100%
pyqt-5.6.0           | 4.5 MB    | ############################################################################ | 100%
zlib-1.2.11          | 236 KB    | ############################################################################ | 100%
tornado-5.1.1        | 665 KB    | ############################################################################ | 100%
sqlite-3.22.0        | 907 KB    | ############################################################################ | 100%
cycler-0.10.0        | 8 KB      | ############################################################################ | 100%
Preparing transaction: done
Verifying transaction: failed

RemoveError: 'requests' is a dependency of conda and cannot be removed from
conda's operating environment.

conda update --force condaconda update –force conda

The solution to the crash loop back off error of coredns in k8s deployment

The solution to the crash loop back off error of coredns in k8s deployment

Problem description

Before doing the project, we need to use k8s to build a cluster. I’m a novice Xiaobai, and I’m going to do it step by step according to the online building steps (refer to the link website for the deployment process)
when I check the status of each pod in the cluster, I find that coredns has not been started successfully, and has been in the crashloopback off state, falling into the dead cycle of non-stop error restart

[root@k8s-master a1zMC2]# kubectl get pods -n kube-system
NAME                                 READY   STATUS             RESTARTS   AGE
coredns-bccdc95cf-9wd9n              0/1     CrashLoopBackOff   19         19h
coredns-bccdc95cf-qsf9f              0/1     CrashLoopBackOff   19         19h
etcd-k8s-master                      1/1     Running            3          19h
kube-apiserver-k8s-master            1/1     Running            3          19h
kube-controller-manager-k8s-master   1/1     Running            11         19h
kube-flannel-ds-amd64-sgqsm          1/1     Running            1          16h
kube-flannel-ds-amd64-swqhf          1/1     Running            1          16h
kube-flannel-ds-amd64-tnbmc          1/1     Running            1          16h
kube-proxy-259l8                     1/1     Running            0          16h
kube-proxy-qcnpt                     1/1     Running            0          16h
kube-proxy-rp7qx                     1/1     Running            3          19h
kube-scheduler-k8s-master            1/1     Running            11         19h

Solutions

Check the log file of coredns. The content is as follows

[root@k8s-master a1zMC2]# kubectl logs -f coredns-bccdc95cf-9wd9n -n kube-system
E0512 01:59:03.825489       1 reflector.go:134] github.com/coredns/coredns/plugin/kubernetes/controller.go:317: Failed to list *v1.Endpoints: Get https://10.96.0.1:443/api/v1/endpoints?limit=500&resourceVersion=0: dial tcp 10.96.0.1:443: connect: no route to host
log: exiting because of error: log: cannot create log: open /tmp/coredns.coredns-bccdc95cf-9wd9n.unknownuser.log.ERROR.20210512-015903.1: no such file or directory

再通过kubectl describe pod coredns-bccdc95cf-9wd9n -n kube-system命令查看详情

Events:
  Type     Reason            Age                  From                 Message
  ----     ------            ----                 ----                 -------
  Warning  FailedScheduling  16h (x697 over 17h)  default-scheduler    0/1 nodes are available: 1 node(s) had taints that the pod didn't tolerate.
  Warning  Unhealthy         15h (x5 over 15h)    kubelet, k8s-master  Readiness probe failed: Get http://10.244.0.2:8080/health: net/http: request canceled while waiting for connection (Client.Timeout exceeded while awaiting headers)
  Warning  Unhealthy         15h (x5 over 15h)    kubelet, k8s-master  Liveness probe failed: Get http://10.244.0.2:8080/health: net/http: request canceled while waiting for connection (Client.Timeout exceeded while awaiting headers)

I feel that there should be a problem connecting with the host, so I enter cat/etc/resolv. Conf to view the configuration file. It is found that the nameserver column is not the address of the host master.

With a try attitude, modify it to the IP address of the master node, and then restart docker and kubenet

[root@k8s-master a1zMC2]# systemctl stop kubelet
[root@k8s-master a1zMC2]# systemctl stop docker
[root@k8s-master a1zMC2]# iptables --flush
[root@k8s-master a1zMC2]# iptables -tnat --flush
[root@k8s-master a1zMC2]# systemctl start kubelet
[root@k8s-master a1zMC2]# systemctl start docker

Check the status and find that all pods can work normally!

[root@k8s-master a1zMC2]# kubectl get pods -n kube-system
NAME                                 READY   STATUS    RESTARTS   AGE
coredns-bccdc95cf-9wd9n              1/1     Running   21         20h
coredns-bccdc95cf-qsf9f              1/1     Running   21         20h
etcd-k8s-master                      1/1     Running   4          19h
kube-apiserver-k8s-master            1/1     Running   4          19h
kube-controller-manager-k8s-master   1/1     Running   12         19h
kube-flannel-ds-amd64-sgqsm          1/1     Running   1          17h
kube-flannel-ds-amd64-swqhf          1/1     Running   1          17h
kube-flannel-ds-amd64-tnbmc          1/1     Running   2          17h
kube-proxy-259l8                     1/1     Running   0          17h
kube-proxy-qcnpt                     1/1     Running   0          17h
kube-proxy-rp7qx                     1/1     Running   4          20h
kube-scheduler-k8s-master            1/1     Running   12         19h

Because I haven’t learned the content of cloud computing, there are some mistakes in the blog. Please correct them in the comments area.

Fatal error in CentOS: Python. H: no that file or directory

Today, when I installed the software on my virtual machine, this error occurred. After searching the Internet, I found that I wanted to install Python devel, but I found that I couldn’t solve the problem after installing according to the online command, and then I found that there was another Python 3 devel, that is, I need to install the corresponding devel according to your current version of Python in Linux, I use python3, so the corresponding installation command is:
sudo Yum install python3 devel
if it is python2, the corresponding installation command is
sudo Yum install python3 devel

RuntimeError: received 0 items of ancdata

Party 1:

pool = torch.multiprocessing.Pool(torch.multiprocessing.cpu_count(), maxtasksperchild=1)

Party 2:

   Modify the tensor mode of multithreading to file_ System (the default mode is file)_ Descriptor, limited by the number of open files:

 torch.multiprocessing.set_sharing_strategy('file_system')

Party 3:

Increase the number of open files:

Instead of using sudo ulimit – N command, execute:

sudo sh -c "ulimit -n 65535 && exec su $LOGNAME"