Tag Archives: Linux learning

[Solved] mosquitto log Error: SSL routines:SSL3_READ_BYTES:tlsv1 alert decrypt error

Problem description

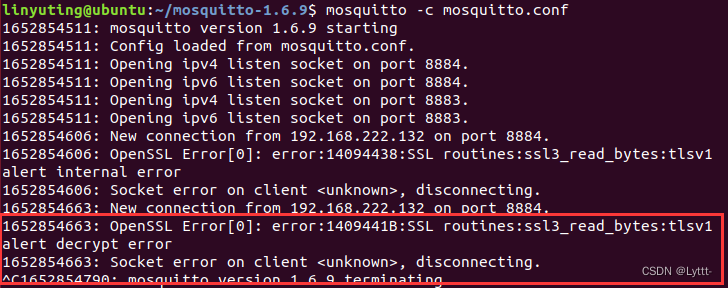
The following errors occurred in the TLS/SSL of mosquitto during the test today, indicating that the error occurred in the TLS version:

I know that the default tls version of mosquitto_pub and mosquitto_sub is tlsv1.2, however, the version of openssl in my virtual machine is 1.1.1, and the tls_version tlsv1.1 is configured in mosquitto.conf (one-way authentication is configured here, two-way authentication is also (here the configuration is one-way authentication, two-way authentication is also applicable), so there will be tls version error.


Solution:

For C programs of mosquitto library
Use the API mosquitto_tls_set() before attaching mosquitto_tls_opts_set(), this API can set the corresponding tls version of the client, note that the tls version defaults to tlsv1.2.

The code is as follows:

int    rc = -1;

rc = mosquitto_tls_opts_set(mosq, 1, "tlsv1.1", NULL);
if( rc != MOSQ_ERR_SUCCESS )
{
    printf("mosquitto_tls_opts_set failure.\n");
    exit(1);
}

rc = mosquitto_tls_set(mosq, CAFILE, CAPATH, CERTFILE, KEYFILE, NULL);
if( rc != MOSQ_ERR_SUCCESS )
{
    printf("mosquitto_tls_set failure.\n");
    exit(1);
}

On the mosquitto command line

The following is the test of one-way authentication (in case of two-way authentication, add the certificate and key by yourself)

mosquitto_ pub -h 192.168.222.130 -p 8884 -t “hello” -m “hi sub” –tls-version tlsv1. 1 –cafile ./ ca/ca.crt

mosquitto_ sub -h 192.168.222.130 -p 8884 -t “hello” –tls-version tlsv1. 1 –cafile ./ ca/ca.crt

If the problem is solved successfully, it can be connected normally:

[Solved] Raspberry Pi Error: VNC error “No configured security type is supported by 3.3 VNC Viewer“

Raspberry Pi Error: VNC error “No configured security type is supported by 3.3 VNC Viewer”

# Command Line Configuration Startup
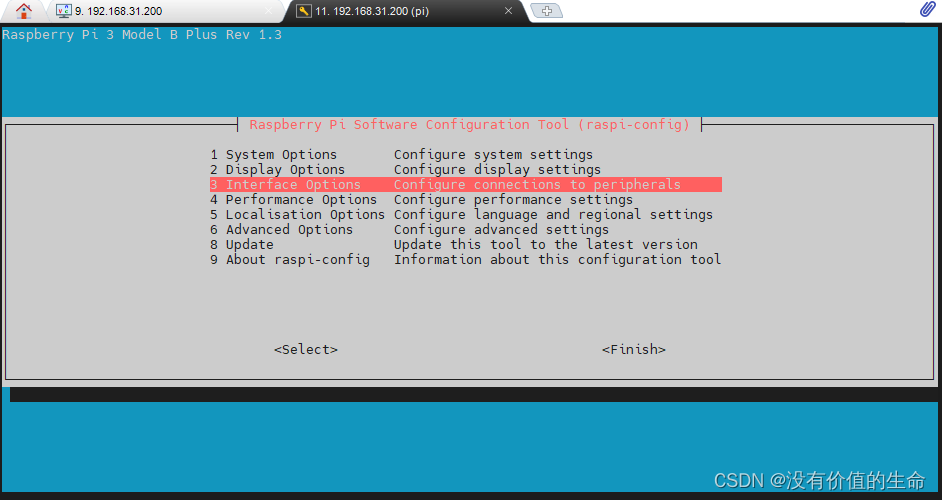
sudo raspi-config 

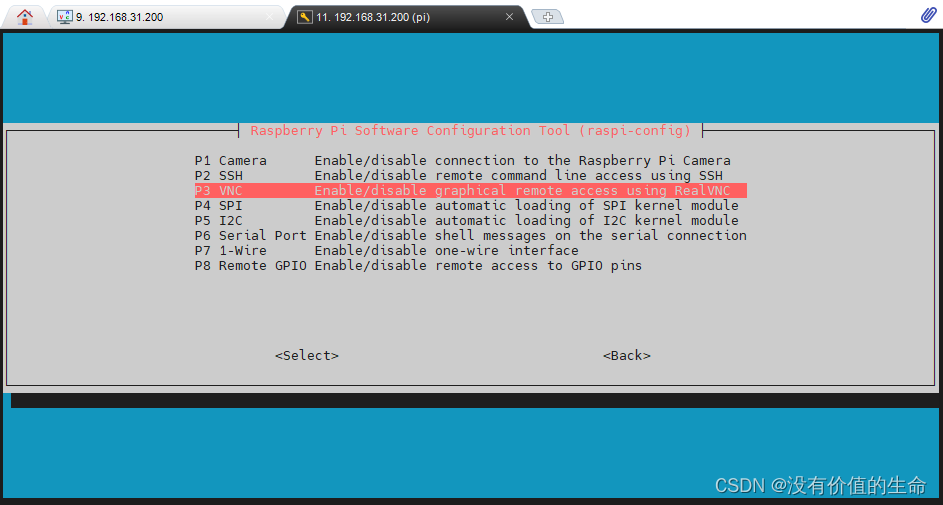
Enter interface options

there are VNC options inside. Enter enable

Step 2: modify VNC configuration (Note: the following command lines are executed)

# Note: Here the first step of the change password command line is also executed, change the password to the same password as your original start on the line
# Do not ask why, just change it
$ sudo passwd
passwd: password updated successfully
$ su root
$ sudo echo 'Authentication=VncAuth' >> /root/.vnc/config.d/vncserver-x11
$ sudo vncpasswd -service
# Execute here to enter the password (occasionally you have to wait a few seconds), here is to set the password to log in to VNC
Successfully set "Password" VNC parameter in /root/.vnc/config.d/vncserver-x11
$ sudo cat /root/.vnc/config.d/vncserver-x11
_AnlLastConnTime=int64:0000000000000000
_LastUpdateCheckSuccessTime=int64:01d7d31e1f95ea36
_LastUpdateCheckTime=int64:01d7d31e1f95ea36
Authentication=VncAuth
Password=c3abbea3b003a0b231737c0541892d72

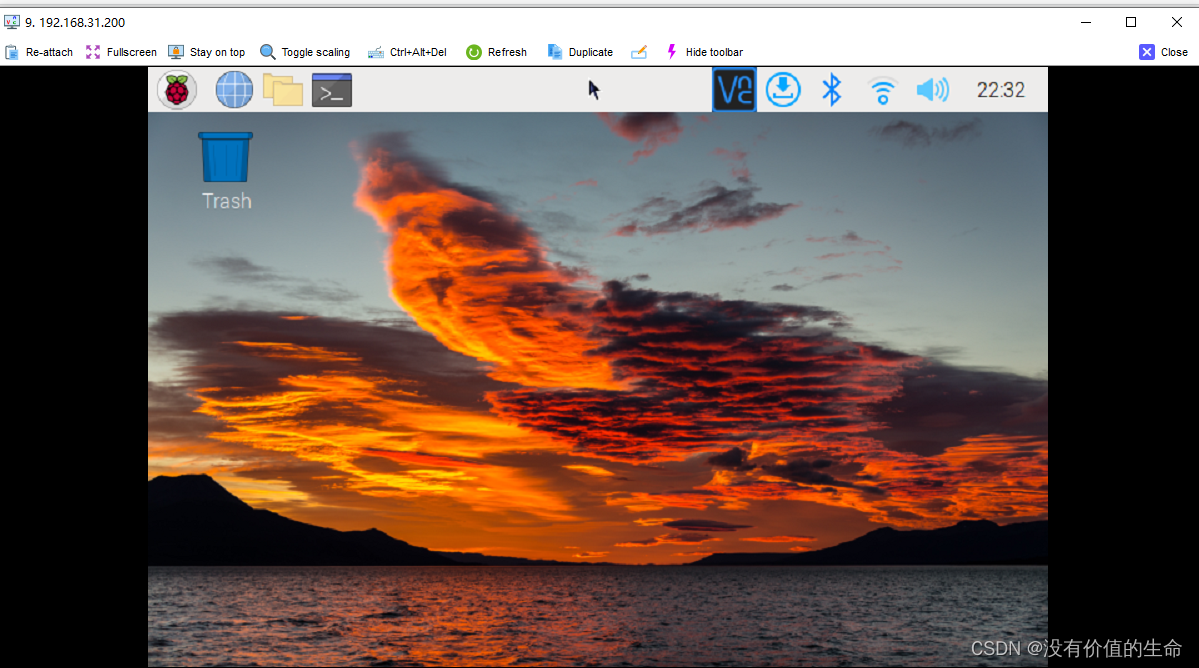
Start VNC/mobaxterm again to connect normally

Error when creating partitions in Linux: no free sectors available solution

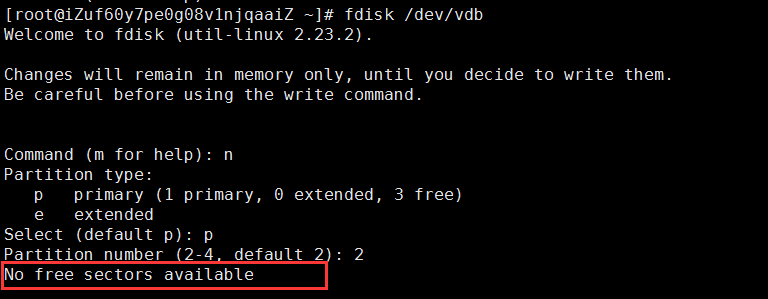
When creating a partition with Linux, an error is reported:

no free sectors available

Chinese translation

No free partitions available

reason:

No free sectors available: your disk space is insufficient and there is no extra space for you to allocate; Sometimes, using various translation tools is not necessarily accurate; Everyone can understand vernacular;

The Linux partition also needs space. If you don’t even have excess disk space, of course, you can’t divide the partition;

Combined with the above figure:

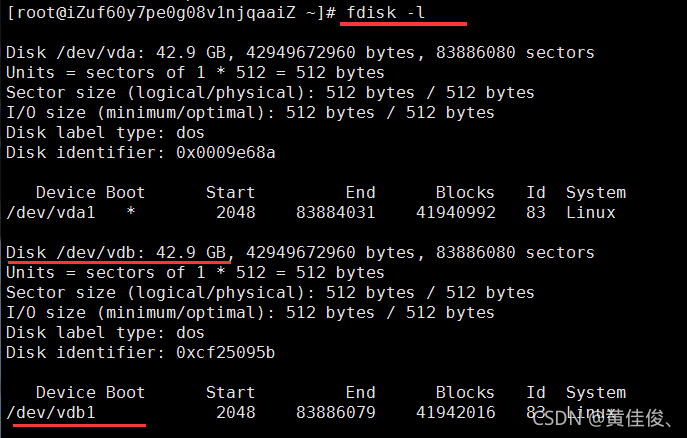
Let’s take a look at all the information on the disk; With command:

fdisk -l

As a result, it is found that VDB already has a partition, which is/dev/vdb1; It happens to be the size of the whole disk, because we can’t partition again; As shown below:

  Therefore, we need to delete the partition first and then re partition it! The entire command is as follows:

fdisk /dev/vdb

d

(select the partition number. Bloggers only have one partition on this disk, and do not need to select. For multiple partitions, you need to select the partition number; if you do not understand the partition number of the disk)

Kvm internal error: process exited :cannot set up guest memory ‘pc.ram‘:Cannot allocate memory

An error message indicates that the memory is insufficient and cannot be allocated. Check that the physical machine memory is used normally. After modifying the virtual machine memory, an error message is still reported when starting

report errors:

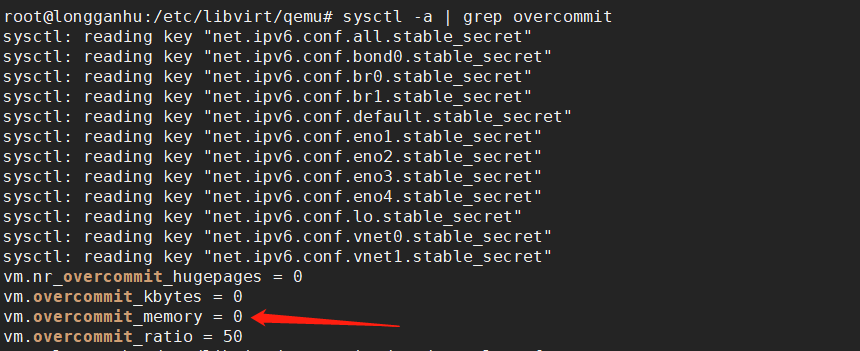
At this time, you need to see how much memory the host can allocate

sysctl -a | grep overcommit

Kernel parameter overcommit_ memory  

It is   Memory allocation strategy

Optional values: 0, 1, 2
0 indicates that the kernel will check whether there is enough available memory for processes to use; If there is enough available memory, the memory application is allowed; Otherwise, the memory request fails and the error is returned to the application process
1 indicates that the kernel is allowed to allocate all physical memory regardless of the current memory state
2 indicates that the kernel allows to allocate more memory than the sum of all physical memory and swap space

What are overcommit and oom

     Linux replies “yes” to most requests for memory so that it can run more and larger programs. Because after applying for memory, memory will not be used immediately. This technology is called overcommit. When Linux finds that there is insufficient memory, an oom killer (OOM = out of memory) occurs. It will choose to kill some processes (user state processes, not kernel threads) to free memory.

     When oom killer happens, which processes will Linux choose to kill?The function to select a process is oom_ Badness function (in mm/oom_kill. C), which calculates the number of points (0 ~ 1000) for each process. The higher the number of points, the more likely the process is to be killed. The number of points per process is the same as oom_ score_ Adj related, and OOM_ score_ Adj can be set (- 1000 min, 1000 max).

resolvent:

      Simply follow the prompts (set vm.overcommit_memory to 1):

      There are three ways to modify kernel parameters, but with root permission:

    (1) Edit/etc/sysctl.conf to vm.overcommit_ Memory = 1, then sysctl – P makes the configuration file effective

  (2)sysctl vm.overcommit_ memory=1

  (3)echo 1 >/proc/sys/vm/overcommit_ memory

The command Du – h — max depth = 1 in Linux

Du [- abcdhhklmssx] [- L & lt; symbolic link & gt;] [- X & lt; file & gt;] [– block size] [– exclude = & lt; directory or file & gt;] [– max depth = & lt; directory level & gt;] [– help] [– version] [directory or file]

Common parameters:

-A or – all displays disk usage for each specified file, or for each file in the directory.

-B or – bytes displays the size of the directory or file in bytes.

-C or – total displays not only the size of the directory or file, but also the sum of all the directories or files.

-D or – dereference args displays the source file size of the specified symbolic connection.

-H or – human readable in units of K, m and G to improve the readability of information.

-H or – Si is the same as – H, but K, m and G are converted to 1000 instead of 1024.

-K or – kilobytes in 1024 bytes.

-L or – count links repeatedly calculate the file of hardware connection.

-L & lt; symbolic connection & gt; or – dereference & lt; symbolic connection & gt; displays the source file size of the symbolic connection specified in the options.

-M or – megabytes in 1MB.

-S or – summarize displays only the total, the size of the current directory.

-S or – separate dirs displays the size of each directory, excluding the size of its subdirectories.

-X or – one file Xsystem is based on the file system at the beginning of processing. If there are other different file system directories, they will be omitted.

-X & lt; file & gt; or – exclude from = & lt; file & gt; specify a directory or file in & lt; file & gt.

– exclude = & lt; directory or file & gt; skips the specified directory or file.

– max depth = & lt; the number of directory layers & gt; is ignored when the number of directory layers exceeds the specified number.

– help displays help.

– version displays the version information.

1 & gt; to display the disk usage of a directory tree and each subtree

du /home/linux

This shows the number of disk blocks in the / home / Linux directory and each subdirectory.

2 & gt; to display the disk usage of a directory tree and each subtree in 1024 bytes

du -k /home/linux

This shows the number of 1024 byte disk blocks in the / home / Linux directory and each subdirectory.

3 & gt; displays the disk usage of a directory tree and each subtree in MB

du -m /home/linux

This shows the number of MB disk blocks in the / home / Linux directory and each subdirectory.

4 & gt; displays the disk usage of a directory tree and each subtree in GB

du -g /home/linux

This shows the number of GB disk blocks in the / home / Linux directory and each subdirectory.

5 & gt; view the size of all directories and subdirectories under the current directory:

du -h .

“.” represents the current directory. It can also be changed to a clear path

-H means to display in the humanized form of K, m and G

6 & gt; view the size of the user directory in the current directory, and do not want to see other directories and their subdirectories:

du -sh user

-S means to summarize, that is, only one summarized value is listed

du -h –max-depth=0 user

–Max depth = n means only to drill down to the n-th level directory. If it is set to 0, it means not to drill down to the subdirectory.

7 & gt; list the sizes of all directories and files in the user directory and its subdirectories:

du -ah user

-A means including directory and file

a

8 & gt; lists the size of the directory in the current directory whose name does not include the XYZ string:

du -h –exclude=’*xyz*’

9 & gt; want to list more information about the size of the user directory and subdirectories in one screen:

du -0h user

-0 (zero bar) indicates that the information of each directory listed is directly output to the next directory instead of newline.

10 & gt; displays all disk usage for only one directory tree

du -s /home/linux

11 & gt; view the size of each folder: Du – h — max depth = 1

To view the specified directory:

The code is as follows: where / path represents the path

du -h --max-depth=1 /path

The details are as follows:

root@ubuntu4146:~# du -h --max-depth=1 /data/
1.1G	/data/gitlabDataa
8.0K	/data/test
241G	/data/gitlabData
809G	/data/home
15G	/data/OpenGrok
16K	/data/lost+found
1.1T	/data/

We find that the / data / home / directory takes up the most, so we can continue to see which directory takes up the most, as follows:

root@ubuntu4146:/data/home# du -h --max-depth=1 /data/home/
141G	/data/home/wzm
62G	/data/home/lwc
421G	/data/home/hcy
16K	/data/home/zzp
16K	/data/home/zl
54G	/data/home/drj
122G	/data/home/sjq
4.1G	/data/home/ljs
6.7G	/data/home/ywm
809G	/data/home/
root@ubuntu4146:/data/home# 

Author: Ouyang Peng welcome to reprint, share with others is the source of progress!

Please keep the original address: http://blog.csdn.net/ouyang_ peng/article/details/10414499

Solve the problem of the C compiler identification is unknown or the cxx compiler identification is unknown in the process of using cmake

The compiler is not installed. You can run the following commands from the command line depending on your system choice.
RedHat-based

yum install gcc gcc-c++

Debian/Ubuntu-based

apt-get install cmake gcc g++

If you don’t have enough permissions, preface the command with sudo, execute
and recompile your project

Can’t open display: can’t open display: localhost:10.0

Windows connects to the Linux remote desktop with Xmanager4.0’s Xstart

The installation package:
xorg-x11-xauth
xterm.x86_64 0:253-1.el6
Execute the command path:/usr/bin/xterm
 
The benefit of Xstart connecting to the Linux remote desktop is that you don’t need to do anything on the server side, just turn on SSH.
The server has to have a desktop environment, and X Window
 
XDMCP connection, the server side to do some configuration, trouble.
 
The menu
Xmanager Enterprise 4 — Xbrowser
Create a new Xstart session

The protocol is SSH,
Click the following button to select GNOME
 
Open the session and you can connect to the remote desktop. It’s easy.
 
There are three menus in the taskbar,
One is to display the Linux header menu
One is the taskbar that displays Linux
One is the desktop that displays Linux
 
How to quit
Right-click in the taskbar (right) and close XManager
 
You can also set up an Xstart session in the following way
The menu
Xmanager Enterprise 4 — Xstart
 

If an error is reported: the X11 transfer application has been rejected,
(check first that X11Forwarding yes
is set in etc/ssh/sshd_config, but on some hosts, no matter how you set it up in the client side, there’s no way you can forwarding the X11 forwarding feature correctly; after logging in, DISPLAY will always be empty. The sshd_config file also doesn’t disable The X11 Forwarding feature.
solution:
originally X11 forwarding relies on the “xorg-x11-xauth” package, so you must first install the “xorg-x11-xauth” package.
yum install xorg-x11-xauth)
X Window should be installed on the server. See the link below.
 
If the server does not have a desktop environment, the following error is reported
[17:18:41] Start timer (TIMER_SHUTDOWN, 180).
bash: /usr/bin/gnome-session: No such file or directory
 
———————————————————————————————————————————————-

Start the specific Settings for the GNOME desktop with XStart

    start xstart, name a session, enter host name, hang SSH, enter user name and password, and Execution Command box: if GNOME is started, fill in DISPLAY=$DISPLAY /usr/bin/gnome-session; if KDE is started, fill in DISPLAY=$DISPLAY /usr/bin/startkde to modify configuration

1) Click start – All programs – XManager 3 – Xconfig, and then double-click the configuration you are currently using (there is a small checkmark, usually Default Profile).

2) Window Mode select Multiple Windows Mode, then click Settings, select Multiple Windows Mode TAB, Window corresponding to the drop-down box select Remote Only or Automatic Switch, and click OK

Select Terminate at Reset

4) Click OK.

Failure to start XStart several errors and resolution

Error 1: Can’t open display: localhost:10.0 when connecting

_X11TransSocketINETConnect () can ‘t get the address for localhost: 6010: Name or service not known

/usr/bin/xterm Xt error: Can’t open display: localhost:10.0

Solutions:
Add in /etc/hosts
127.0.0.1 localhost
Ipaddress hostname
Then you can go to the graphical interface, and notice the actual IP and machine name
Error 2: The Xterm directory for SLC5 and SLC4 is not the same and should be noted.
/usr/X11/bin/xterm: Command not found.
Change Excution Command to
The/usr/bin/xterm – ls – $display display
Can be
————————————————————————————————————————
 
[16:21:58] Host authentication initiated…
[16:21:58] Hostkey fingerprint:
[16:21:58] SSH – dsa 1024 o c: c3: f8:71:0 f: d2: b2: e1:4 c: 21: f8: abarim: 9 a: 9 a
[16:22:00] Accepted. Verifying the host key…
[16:22:00] Verified.
[16:22:00] User authentication initiated…
[16:22:00] Sent user name ‘oracle’.
[16:22:00] Sent password.
[16:22:00] follow the command line.
[16:22:00] /usr/X11R6/bin/ xterm-ls-display $display
[16:22:00] Start timer (TIMER_SHUTDOWN, Xauthority
/usr/X11R6/bin/xauth: creating new authority file /home/oracle/.Xauthority
bash: /usr/X11R6/bin/xterm: No such file or directory
[16:22:01] Connection closed


Solution:
 
[root@localhost ~]# rpm-qf /usr/bin/xterm
xterm-215-4.el5
 
The RPM package was found missing and installed
 
Mount the cd-rom
 
[root@localhost ~]# mount -t iso9660 /dev/cdrom /mnt/cdrom
[root@localhost ~]#cd /mnt/cdrom
 
[root@localhost cdrom]# cd Server
[root@localhost Server]# ls xterm*
xterm-215-5.el5.i386.rpm

[root@localhost Server]# rpm -ivh xterm-215-5.el5.i386.rpm
warning: xterm-215-5.el5.i386.rpm: Header V3 DSA signature: NOKEY, key ID 37017186
Preparing… # # # # # # # # # # # # # # # # # # # # # # # # # # # # # # # # # # # # # # # # # # # [100%]
the file/usr/bin/resize the from the install of xterm – 215-5. El5 conflicts with the file from package xterm – 215-4. El5
the file /usr/bin/xterm from install of xterm-215-5.el5 conflicts with file from package xterm-215-4.el5
 
An error occurred installing the xter-215-5.el5.i386.rpm package, meaning that the Xterm package named Xter-215-4.el5 has been installed under /usr/bin/xterm
 
Determine what to do now that the package already exists…
modify the configuration of Xstart and click the arrow to add it in the Execution Command: as shown in the figure below:


After clicking the arrow, click Add/Remove… Add the execution command line. The following figure


After adding, in the XStart window, re-specify, as shown in the figure below


That’s it

sorry,ubuntu 14.04 has experienced an internal error

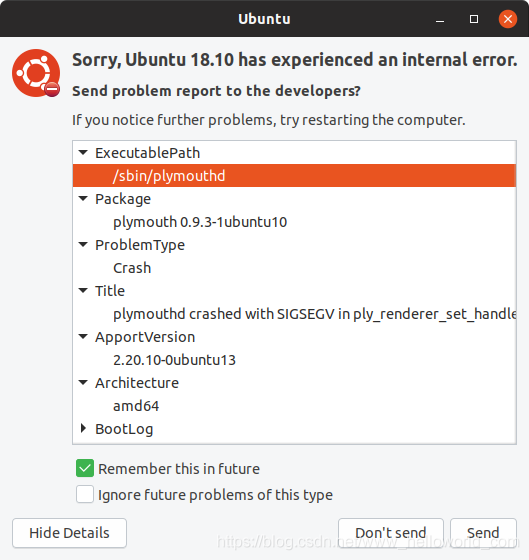
The newly installed Ubuntu18 will report an error every time it boots, as shown in the figure below:

A search revealed this:
https://wiki.ubuntu.com/Apport
This information can be used by developers to catch bugs in certain aspects of the system and make improvements.
This is the function of Apport. If you have any questions, please report them to the developer for reference. It should be a good thing, but for the novice, there is no psychological preparation in advance, and the frequency of occurrence is too frequent, which often affects the operation of the program.
I’m so bored, so I’m going to turn it off for the time being
so /etc/defaul/apport
which is enabled=1
instead of enabled=0
it’s going to shut up
but if there’s a problem no one is going to tell you so please make your own choice

supplement
new version installation problems are more
as improvements and updates become less and less problems