How to Solve Error: There are no resources that can be added or removed from the server.
Solution.
Select the project right click-->properties-->Project Facets-->
Check Dynamic Web Project and java, etc. will be fine.
How to Solve Error: There are no resources that can be added or removed from the server.
Solution. Select the project right click-->properties-->Project Facets--> Check Dynamic Web Project and java, etc. will be fine.
1: The solution to the garbled code in reading Chinese:
add the encoding mode “UTF-8” when constructing the inputstreamreader
BufferedReader br = new BufferedReader(new InputStreamReader(
                new FileInputStream(new File("F:/download/test.txt")),"utf-8"))
2: When using filewriter to write a file, you must add
fw.flush();To write successfully.
Problem description
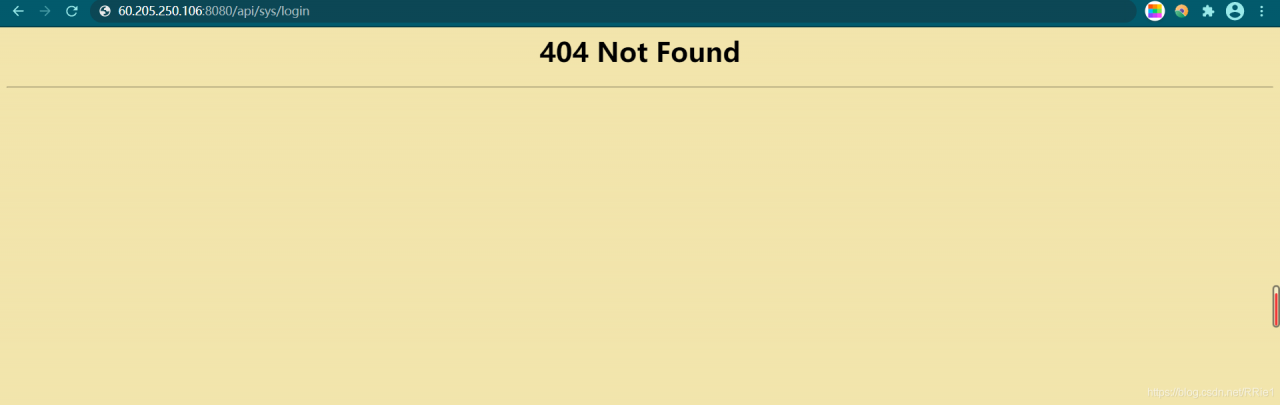
We design a set of recruitment back transfer system, and use ant design Vue and jfinal framework at the front and back end respectively. You want to deploy the project to the server, but external access always reports 404 not found
Solutions
The error is: the dynamic interface can not be found, but I don’t know whether there is a problem in the project or after nginx agent.
Therefore, it is necessary to test the interface of the project itself and the interface after nginx proxy.
First, test the interface in the project
Enter the command: curl on the Ubuntu side http://localhost :port/xxx/xxx
Here my interface is. curl http://localhost:20294/sys/login
Results of operation:

It shows that there is no problem with the interface in my project.
Test the interface after nginx proxy again
Then input the command in Ubuntu
curl http://localhost:8080/api/user/login
Running result:

the prompt here is that the interface cannot be found, which indicates that the problem lies in the proxy server nginx, so we need to modify the configuration file of nginx.
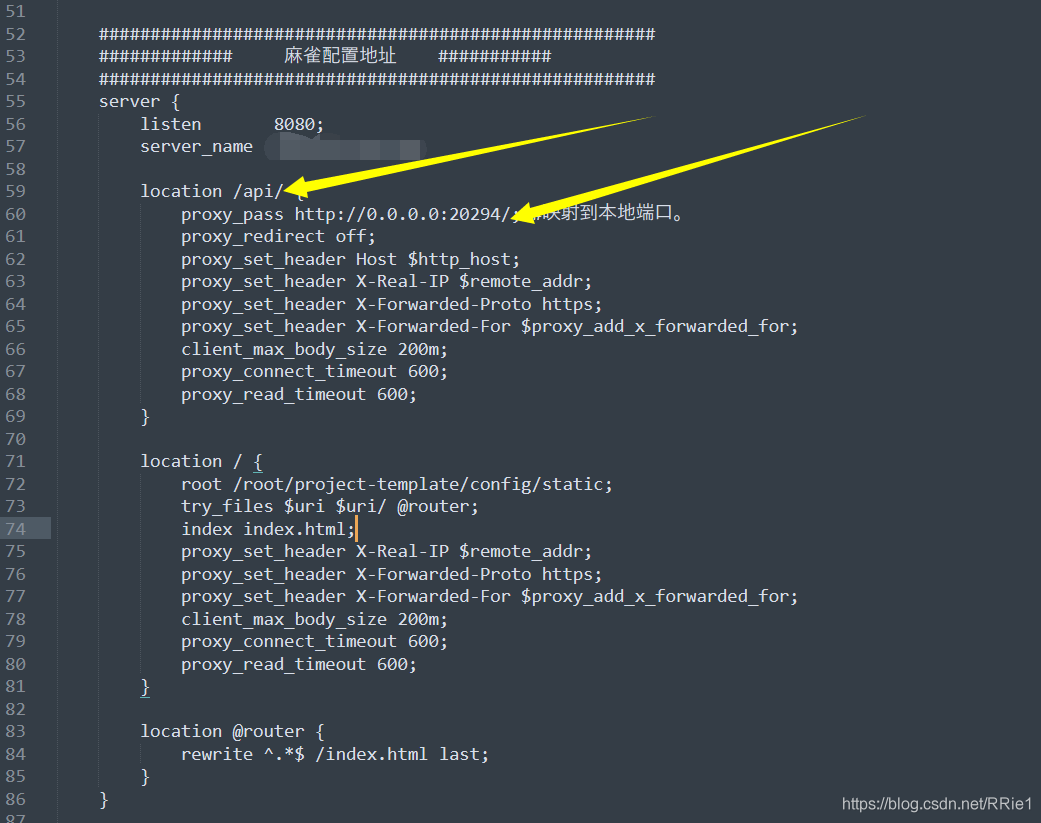
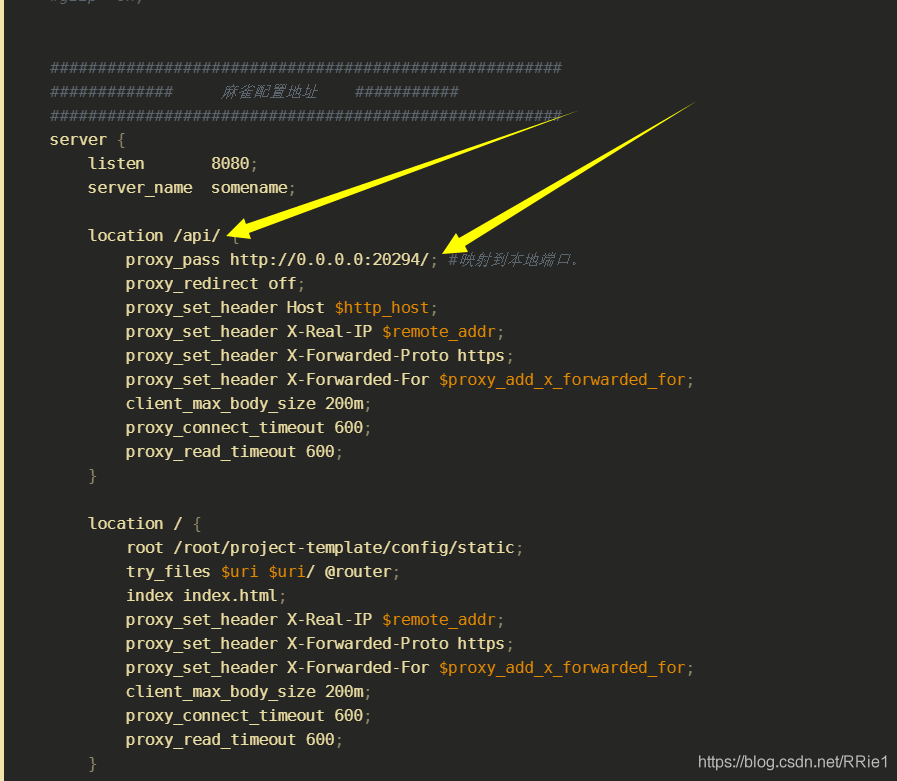
According to the suggestions of other blogs, I added a slash to this place in nginx configuration
after restarting the server, it still can’t work.
Complete solution
When I didn’t know what to do, I suddenly found that there were two nginx in my server ····
I was wondering if it was because there were two nginx, and the modified configuration file was not the nginx I started. So I replaced all nginx configuration files with my original configuration files, and then restarted. Still not
Worried about the two nginxs, I deleted all nginxs in the server. Delete steps (run the following steps in turn:
ps aux|grep nginx  #View nginx processes
kill -9 process number #Kill the nginx queried in the previous step (process number is in the second column)
find/-name nginx #Find the nginx file address
rm -rf xxx #Delete all nginx files
Finally, use weget to install the new nginx, and then install it according to the original installation steps. After modifying the configuration file, run curl to access the dynamic interface. All of a sudden, it’s OK!
The following is my nginx configuration file:
user root;
#user  nobody;
worker_processes  4;

#error_log  logs/error.log;
#error_log  logs/error.log  notice;
#error_log  logs/error.log  info;

#pid        logs/nginx.pid;


events {
    worker_connections  1024;
}


http {
    include       mime.types;
    default_type  application/octet-stream;
    log_format main '$remote_addr - $remote_user [$time_local] "$request" '
                      '$status $body_bytes_sent "$http_referer" '
                      '"$http_user_agent" "$http_x_forwarded_for"';

    server_names_hash_bucket_size 128;
    client_header_buffer_size 32k;
    underscores_in_headers on;
    large_client_header_buffers 4 32k;
    client_max_body_size 50m;
    #log_format  main  '$remote_addr - $remote_user [$time_local] "$request" '
    #                  '$status $body_bytes_sent "$http_referer" '
    #                  '"$http_user_agent" "$http_x_forwarded_for"';

    #access_log  logs/access.log  main;

    sendfile        on;

    #keepalive_timeout  0;
    keepalive_timeout  65;
    tcp_nopush          on;
    fastcgi_connect_timeout 300;
    fastcgi_send_timeout    300;
    fastcgi_read_timeout    300;
    fastcgi_buffer_size     64k;
    fastcgi_buffers     4   64k;
    fastcgi_busy_buffers_size 128k;
    fastcgi_temp_file_write_size 256k;
    tcp_nodelay         on;

    #gzip  on;


    ######################################################
    #############     Sparrow configuration address    ###########
    ######################################################
    server {
        listen       8080;
        server_name  somename;

        location /api/ {
            proxy_pass http://0.0.0.0:20294/; #Mapping to the local port.
            proxy_redirect off;
            proxy_set_header Host $http_host;
            proxy_set_header X-Real-IP $remote_addr;
            proxy_set_header X-Forwarded-Proto https;
            proxy_set_header X-Forwarded-For $proxy_add_x_forwarded_for;
            client_max_body_size 200m;
            proxy_connect_timeout 600;
            proxy_read_timeout 600;
        }

        location/{
            root /root/project-template/config/static;
            try_files $uri $uri/ @router;
            index index.html;
            proxy_set_header X-Real-IP $remote_addr;
            proxy_set_header X-Forwarded-Proto https;
            proxy_set_header X-Forwarded-For $proxy_add_x_forwarded_for;
            client_max_body_size 200m;
            proxy_connect_timeout 600;
            proxy_read_timeout 600;
        }

        location @router {
            rewrite ^.*$ /index.html last;
        }
    }
}
note: when configuring the dynamic access API, remember to add a slash at the end
So far, the problem has been solved perfectly.
Background
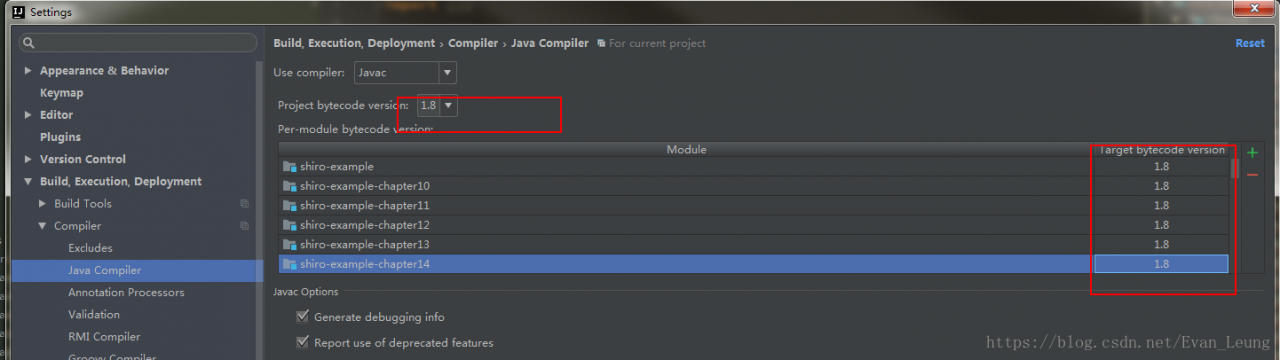
Error:java: Compilation failed: internal java compiler errorAccording to previous experience, the compiling environment of the read project is reset, and the JDK version is all specified as 1.8
1. Setting – & gt; Java complier
2.Project Structure->Modules
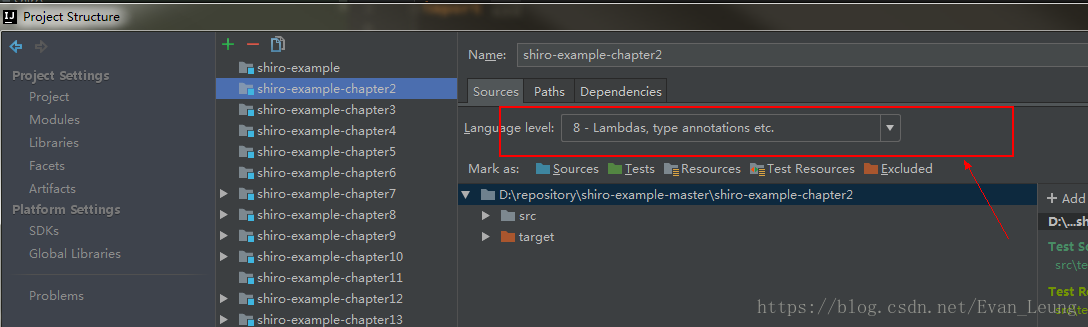
After the above steps are set, the same error will be reported in the recompile run
Solution
After investigation, the project Pom.xml The file does not specify a compiled version, in the Pom.xml Add the following plug-ins:
<build>

    <plugins>
        <plugin>
        <artifactId>maven-compiler-plugin</artifactId>
            <version>3.7.0</version>
            <configuration>
                <source>1.8</source>
                <target>1.8</target>
                <encoding>utf-8</encoding>
            </configuration>
        </plugin>
    </plugins>

</build>1. CentOS version
docker requires that the kernel version of CentOS system is higher than 3.10, and view the version through uname – R
2. Upgrade package kernel (optional)
Yum update
3. Install docker
Yum install docker
4. Start docker
sudo service docker start
5. Set the docker service to boot
systemctl enable docker
6. Remove the docker from the boot entry
systemctl stop docker
7. Search docker image (docker search keyword)
docker search redis
8. Pull the image file
docker pull image name: tag (tag is optional, the default is latest)
9. View the downloaded image
docker images
10. Delete the image
docker RMI image ID (container ID)
11. Run the docker container (- D: running in the background)
docker – run – name custom container name – D specifies the image template( imageName:tag , if tag is latest, it can be omitted.)
12. View running containers (add – A to view all containers)
docker PS
13. Stop the running container
docker stop image ID
14. Delete container (different from deleting image, here is RM)
docker RM image ID
15. When starting the container, map the port of the JVM and the port of the Tomcat container
docker – run name custom container name – D – P 8888:8080 specify the image template
note: to start mysql, you need to specify the password, and you need to specify the password through the – e command
16. View the firewall status
service firewalld status
17. View the container log
docker log image ID
The solution of importing idea: cannot resolve symbol ‘log’ when running someone else’s project (halo blog system)
When importing other people’s projects, the log will report an error and prompt cannot resolve symbol ‘log’. After online query, you can install the Lombok plug-in. Here’s what the Lombok plug-in does.
The official introduction is as follows:
Project Lombok makes java a spicier language by adding 'handlers' that know how to build and compile simple, boilerplate-free, not-quite-java code.Lombok can make Java concise and fast by adding some “handlers”.
About Lombok:
Lombok can simplify java code in the form of simple annotations and improve the development efficiency of developers. For example, JavaBeans often need to be written in development. They need to spend time to add corresponding getter/setter, and maybe also need to write constructor, equals and other methods. Moreover, they need to be maintained. When there are many attributes, there will be a large number of getter/setter methods, which are very lengthy and not too technical. Once the attributes are modified, it is easy to forget to modify the corresponding methods.
Lombok can automatically generate constructor, getter/setter, equals, hashcode and toString methods for attributes at compile time through annotation. The magic is that there are no getter and setter methods in the source code, but there are getter and setter methods in the bytecode file generated by compilation. This saves the trouble of manually rebuilding the code and makes it look simpler.
terms of settlement:
1.1ctrl + Alt + s open Settings
Search or directly select plugins and search Lombok installation in the marketplace
After installation, as shown in the figure
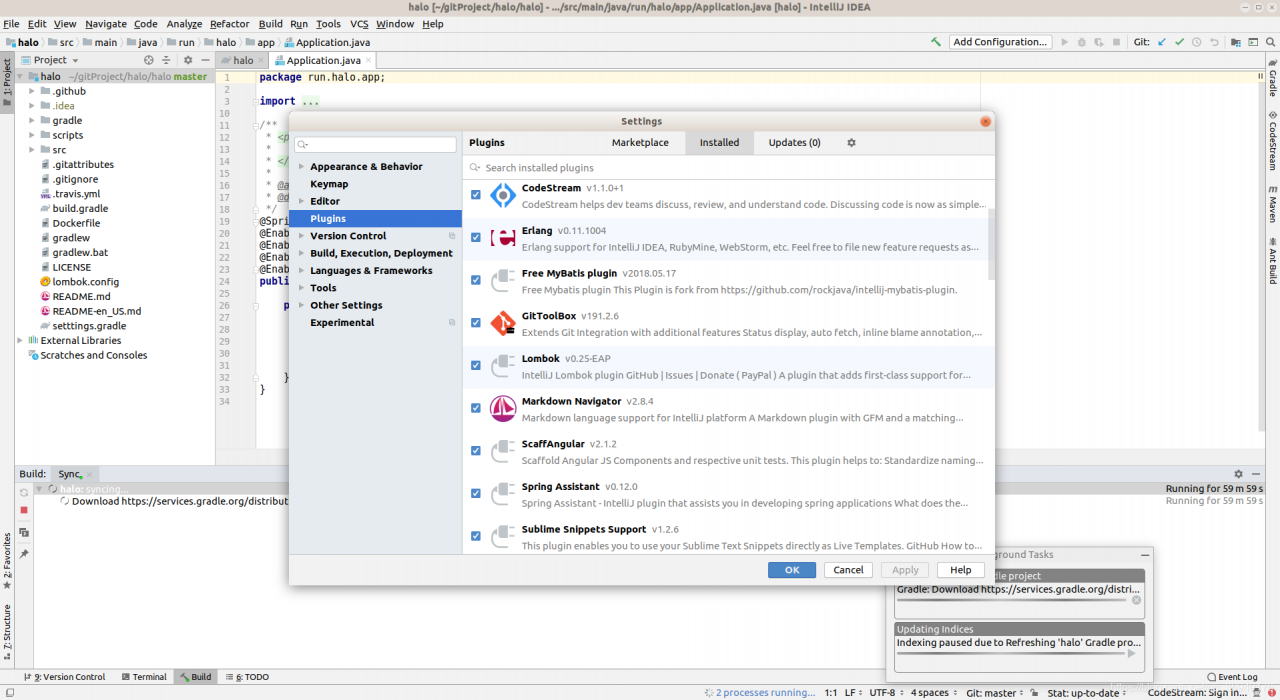
After recompiling, you can run the project, and the log error disappears
The precision of decimal calculation with double and float in Java is not accurate
In most cases, using double and float to calculate the result is accurate, but in some systems with high accuracy requirements or known decimal calculation results will not be accurate, this problem is very serious.
《Effective Java “refers to a principle, that is, float and double can only be used for scientific calculation or engineering calculation, but we should use them in commercial calculation java.math.BigDecimal By using the BigDecimal class, we can solve the above problems. The designer of Java provides a very useful class BigDecimal for programmers, which can improve the problem that the float and double classes can’t calculate accurately I’m sorry.
The example code is as follows:
package ex;

import java.math.*;

public class BigDecimalDemo {
    public static void main(String[] args){
        System.out.println(ArithUtil.add(0.01, 0.05));
        System.out.println(ArithUtil.sub(1.0, 0.42));
        System.out.println(ArithUtil.mul(4.015, 100));
        System.out.println(ArithUtil.div(123.3, 100));
    }
}

class ArithUtil{
    private static final int DEF_DIV_SCALE=10;

    private ArithUtil(){}
    //+
    public static double add(double d1,double d2){
        BigDecimal b1=new BigDecimal(Double.toString(d1));
        BigDecimal b2=new BigDecimal(Double.toString(d2));
        return b1.add(b2).doubleValue();

    }
    //-
    public static double sub(double d1,double d2){
        BigDecimal b1=new BigDecimal(Double.toString(d1));
        BigDecimal b2=new BigDecimal(Double.toString(d2));
        return b1.subtract(b2).doubleValue();

    }
    //*
    public static double mul(double d1,double d2){
        BigDecimal b1=new BigDecimal(Double.toString(d1));
        BigDecimal b2=new BigDecimal(Double.toString(d2));
        return b1.multiply(b2).doubleValue();

    }
    // /
    public static double div(double d1,double d2){

        return div(d1,d2,DEF_DIV_SCALE);

    }

    public static double div(double d1,double d2,int scale){
        if(scale<0){
            throw new IllegalArgumentException("The scale must be a positive integer or zero");
        }
        BigDecimal b1=new BigDecimal(Double.toString(d1));
        BigDecimal b2=new BigDecimal(Double.toString(d2));
        return b1.divide(b2,scale,BigDecimal.ROUND_HALF_UP).doubleValue();

    }

}
Now let’s analyze in detail why floating-point operations cause precision loss?
1. Binary representation of decimals
 First we need to clarify the following two issues.

     (1) How to convert decimal integers to binary numbers

           The algorithm is simple. As an example, 11 is expressed as a binary number.

                     11/2=5 remainder 1

                       5/2=2 remainder 1

                       2/2=1 remainder 0

                       1/2=0 remainder 1

                          End of 0 11 is represented in binary as (from bottom to top):1011

          In other words, will the algorithm for converting all integers into binary numbers go on indefinitely? Absolutely not, integers can always be represented exactly in binary, but not decimals.

      (2) How decimal decimals are converted into binary numbers

           The algorithm is to multiply by 2 until there are no more decimals. As an example, 0.9 is expressed as a binary number

                     0.9*2=1.8 Take the integer part 1

                     0.8(fractional part of 1.8)*2=1.6 Take the integer part 1

                     0.6*2=1.2 Take the integer part 1

                     0.2*2=0.4 Take the integer part 0

                     0.4*2=0.8 Take integer part 0

                     0.8*2=1.6 Take integer part 1

                     0.6*2=1.2 Take integer part 0

                              .........      0.9 Binary representation (from top to bottom): 1100100100100 ......

           Note: The above calculation process is circular, which means that *2 can never eliminate the fractional part, so that the algorithm will go on indefinitely. Obviously, the binary representation of decimals is sometimes impossible to be exact. The reason is simple: can 1/3 be represented accurately in the decimal system? This explains the loss of precision in floating-point subtraction, where "subtraction is incomplete".
.
2. Storage of float type in memory
It is well known that Java's float type takes up 4 bytes in memory. float's 32 binary bits are structured as follows


float memory storage structure

             4bytes 31 30 29 ----23 22 ----0

                        Indicates real sign bit Exponential sign bit Exponential bit Valid number of bits

        Where the sign bit 1 means positive and 0 means negative. The valid bits are 24 bits, one of which is the real sign bit.

         The steps to convert a float type to memory storage format are

        (1) First convert the absolute value of this real number into binary format, noting that the binary methods for the integer and decimal parts of the real number have been discussed above.
     (2) Shift the decimal point of this binary format real number left or right by n bits until the decimal point moves to the right of the first significant digit.
     (3) Count out twenty-three digits from the first digit to the right of the decimal point into the 22nd to the 0th digit.
     (4) If the real number is positive, put a "0" in the 31st place, otherwise put a "1".
     (5) If n is shifted to the left, the exponent is positive and "1" is placed in the 30th place. If n is shifted to the right or n=0, then "0" is placed in the 30th position.
     (6) If n is obtained by left shift, n is converted to binary by subtracting 1 and adding "0" to the left to make up the seven bits and put it into the 29th to 23rd place. If n is shifted to the right or n=0, then n is converted to binary and "0" is added to the left to make up the seven bits, and then each bit is inverted and placed in bits 29 to 23.

          Example: Memory storage format of 11.9

       (1) The memory storage format of 11.9 is approximately "1011. 11100110011001100110011001100..." after converting 11.9 to binary. .".

       (2) Shift the decimal point three places left to the right of the first significant digit: "1. 011 11100110011001100110". Ensure that the number of significant digits is 24, with the extra intercept on the right (where the error is created ).

       (3) This already has twenty-four valid digits, remove the leftmost "1" to get "011 11100110011001100110" with 23 bits. (4) Since 11.9 is a valid number, it is a valid number.

       (4) Since 11.9 is a positive number, put "0" in the 31st real sign bit.

       (5) Since we are shifting the decimal point to the left, we put "1" in the 30th exponent sign position.

       (6) Since we are shifting the decimal point 3 places to the left, we subtract 1 from 3 to get 2, convert it to binary, and add 7 bits to get 0000010, and put it in the 29th to 23rd place.

           The final representation of 11.9 is: 0 1 0000010 011 11100110011001100110

           Another example: the memory storage format of 0.2356
      (1) After converting 0.2356 to binary, it is approximately 0.00111100010100000100100000.
      (2) Move the decimal point three places to the right to get 1.11100010100000100100000.
      (3) Count out twenty-three valid digits from the right of the decimal point, i.e. 1110001010100000100100000.
into the 22nd to the 0th digit.
      (4) Since 0.2356 is positive, put a "0" in the 31st place.
      (5) Since we have shifted the decimal point to the right, we put a "0" in the 30th place.
      (6) Because the decimal point is shifted to the right by 3 bits, so the 3 is converted to binary, and the "0" is added to the left to make up the full seven
(6) Because the decimal point is shifted to the right by 3 bits, the 3 is converted to binary, and the "0" is added to the left to make up the seven bits to get 0000011.


           The final value of 0.2356 is: 0 0 1111100 11100010100000100100000

          Steps to convert a memory-stored float binary format to decimal.
     (1) Write out the binary number from the 22nd to the 0th digit, and add a "1" to the leftmost digit to get twenty-four valid digits. Put the decimal point to the right of the leftmost "1".
     (2) Take out the value n from the 29th to the 23rd digit, and invert the n digit when the 30th digit is "0". When the 30th digit is "1", increment n by 1.
     (3) Shift the decimal point left by n (when the 30th digit is "0") or right by n (when the 30th digit is "1") to obtain a real number in binary.
     (4) Convert this binary real number to decimal and add a plus or minus sign depending on whether the 31st bit is a "0" or a "1".
3. Subtraction of floating point
The process of adding and subtracting floating point is more complex than the process of fixed point. The process of completing a floating point addition or subtraction operation is roughly divided into four steps.

(1) Checking of the 0 operand.
        If one of the two floating-point numbers to be added or subtracted is 0, the result of the operation is known without the need to perform some sequential operations.

(2) Comparing the magnitude of the ordinal (exponent bits) and completing the pair order.
    To add or subtract two floating-point numbers, we must first see whether the exponent bits of the two numbers are the same, i.e., whether the decimal point positions are aligned. If the two numbers have the same exponent, it means the decimal points are aligned, and the addition and subtraction of the last number can be performed. On the contrary, if the two numbers have different ordinates, it means that the decimal points are not aligned, so we must make the ordinates of the two numbers the same, and this process is called pairing.

    How to pair order (assuming two floating point numbers with exponent bits Ex and Ey ).
    By shifting the mantissa to change Ex or Ey so that they are equal. Since floating point numbers are mostly speciated, shifting the trailing left number will cause the loss of the highest significant bit, resulting in a large error; while shifting the trailing right number will cause the loss of the lowest significant bit, but the error caused is smaller, therefore, the pairwise order operation requires that the trailing right number be shifted, and after the trailing right number is shifted, the order code is increased accordingly, while its value remains unchanged. Obviously, if one of the increased ordinals is equal to the other, the increased ordinal must be a small one. Therefore, in the order pairing, always make the small order to the large order, that is, the end of the small order shift to the right (equivalent to the decimal point left shift), each right shift one, its order code plus 1, until the two numbers of the order code equal, the number of right shift is equal to the order difference △ E.

(3) The mantissa (valid digits) is added or subtracted.

(4) The result is normalized and rounded.Is it necessary for bitmap to call recycle method in Android system
Before Android 3.0, bitmap image data was processed in the underlying C, so before Android 3.0, recycle() should be called. Although finalize() will call recycle(), students who are experienced in Java should know that there are many problems in releasing resources only by finalize()
After Android 3.0, the image data is put in a member variable mbuffer [] of the bitmap object. Therefore, it is not necessary to call recycle (). After the bitmap is set to null, the image data will be recycled by GC.
Now that Android is in the age of 5.0, it is recommended not to consider supporting versions before 3.0.
actually Bitmap.recycle This is an advanced call, and normally need not be called, since the normal GC process will free up this memory when there are no more references to this bitmap. When no reference points to a bitmap, GC will automatically free memory.)
Managing bitmap memory Google’s official explanation of bitmap
In addition to the steps described in Caching Bitmaps, there are specific things you can do to facilitate garbage collection and bitmap reuse. The recommended strategy depends on which version(s) of Android you are targeting. The BitmapFun sample app included with this class shows you how to design your app to work efficiently across different versions of Android.
To set the stage for this lesson, here is how Android’s management of bitmap memory has evolved:
On Android Android 2.2 (API level 8) and lower, when garbage collection occurs, your app’s threads get stopped. This causes a lag that can degrade performance. Android 2.3 adds concurrent garbage collection, which means that the memory is reclaimed soon after a bitmap is no longer referenced.
On Android 2.3.3 (API level 10) and lower, the backing pixel data for a bitmap is stored in native memory. It is separate from the bitmap itself, which is stored in the Dalvik heap. The pixel data in native memory is not released in a predictable manner, potentially causing an application to briefly exceed its memory limits and crash. As of Android 3.0 (API level 11), the pixel data is stored on the Dalvik heap along with the associated bitmap.
The following sections describe how to optimize bitmap memory management for different Android versions.
Memory optimization
Memory optimization from: http://my.oschina.net/u/1753339/blog/223379
It’s easy to load a picture on the UI of your application, but when you need to load a lot of pictures on the UI, the situation becomes more complicated. In many cases (such as using listview, GridView or viewpager), the images displayed on the screen can be increased continuously by sliding the screen and other events, which eventually leads to oom.
In order to ensure that the use of memory is always maintained in a reasonable range, the removed screen images are usually recycled. At this time, the garbage collector will also think that you no longer hold the reference of these images, so it will GC these images. It’s very good to use this idea to solve the problem, but in order to make the program run quickly and load pictures on the interface quickly, you have to consider the situation that the user slides some pictures back into the screen after they are recycled. At this time, reloading the image just loaded is undoubtedly the bottleneck of performance. You need to find a way to avoid this situation.
At this time, the use of memory caching technology can solve this problem, it can let components quickly reload and process images. Now let’s take a look at how to use memory caching technology to cache images, so that your application can improve the response speed and fluency when loading many images.
Memory caching technology provides a fast way to access images that occupy a lot of valuable memory of applications. The core class is lrucache (this class is provided in the package of android-support-v4). This class is very suitable for caching images. Its main algorithm principle is to store the most recently used objects in LinkedHashMap with strong references, and remove the least recently used objects from memory before the cache value reaches the preset value.
In the past, we often used a very popular implementation of memory caching technology, namely soft reference or weak reference. However, this method is no longer recommended, because since Android 2.3 (API level 9), the garbage collector tends to recycle objects with soft references or weak references, which makes soft references and weak references unreliable. In addition, in Android 3.0 (API level 11), the image data will be stored in the local memory, so it can not be released in a predictable way, which has the potential risk of causing the memory overflow and crash of the application.
In order to select an appropriate cache size for lrucache, the following factors should be considered, for example:
How much memory can your device allocate for each application?
How many pictures can be displayed on the device screen at a time?How many images need to be preloaded because they may be displayed on the screen soon?
What is the screen size and resolution of your device?A super-high resolution device (such as Galaxy nexus) needs more cache space than a lower resolution device (such as nexus s) when holding the same number of images.
The size and size of the image, and how much memory space each image will occupy.
How often are images visited?Will some pictures be visited more frequently than others?If so, you may want to keep some images resident in memory, or use multiple lrucache objects to distinguish different groups of images.
Can you keep the balance between quantity and quality?Sometimes, it’s more effective to store multiple low pixel images, but it’s more effective to load high pixel images in the background.
There is no specified cache size for all applications, which is up to you. You should analyze the memory usage of the program, and then work out an appropriate solution. A too small cache space may cause images to be released and reloaded frequently, which is not good. However, if the cache space is too large, it may still cause problems java.lang.OutOfMemory It’s abnormal.
Here is an example of using lrucache to cache images:
private LruCache<String, Bitmap> mMemoryCache;
@Override
protected void onCreate(Bundle savedInstanceState) {
    // Get the maximum value of available memory, using memory beyond this value will raise an OutOfMemory exception.
    // LruCache passes in the cache value in KB through the constructor.
    int maxMemory = (int) (Runtime.getRuntime().maxMemory() /1024);
    // Use 1/8 of the maximum available memory value as the size of the cache.
    int cacheSize = maxMemory/8;
    mMemoryCache = new LruCache<String, Bitmap>(cacheSize) {
        @Override
        protected int sizeOf(String key, Bitmap bitmap) {
            // Override this method to measure the size of each image and return the number of images by default.
            return bitmap.getByteCount()/1024;
        }
    };
}

public void addBitmapToMemoryCache(String key, Bitmap bitmap) {
    if (getBitmapFromMemCache(key) == null) {
        mMemoryCache.put(key, bitmap);
    }
}

public Bitmap getBitmapFromMemCache(String key) {
    return mMemoryCache.get(key);
}
In this example, one eighth of the memory allocated by the system to the application is used as the cache size. In medium and high configuration mobile phones, there will be about 4 megabytes (32g8) of cache space. If a full screen GridView is filled with four 800×480 resolution images, it will occupy about 1.5 megabytes of space (800 * 480 * 4). Therefore, this cache size can store 2.5 pages of images.
When a picture is loaded into ImageView, it will be checked in the cache of lrucache first. If the corresponding key value is found, the ImageView will be updated immediately. Otherwise, a background thread will be started to load the image.
public void loadBitmap(int resId, ImageView imageView) {
    final String imageKey = String.valueOf(resId);
    final Bitmap bitmap = getBitmapFromMemCache(imageKey);
    if (bitmap != null) {
        imageView.setImageBitmap(bitmap);
    } else {
        imageView.setImageResource(R.drawable.image_placeholder);
        BitmapWorkerTask task = new BitmapWorkerTask(imageView);
        task.execute(resId);
    }
}
Bitmapworkertask also puts the key value pair of the newly loaded image into the cache.
class BitmapWorkerTask extends AsyncTask<Integer, Void, Bitmap> {
    // loading the pictures
    @Override
    protected Bitmap doInBackground(Integer... params) {
        final Bitmap bitmap = decodeSampledBitmapFromResource(
                getResources(), params[0], 100, 100);
        addBitmapToMemoryCache(String.valueOf(params[0]), bitmap);
        return bitmap;
    }
}
(how to define the key of image key value pair?Path to image (URI)
What are the common memory leaks in Android
Query database without closing cursor
In Android, Cursor is a very common object, but in writing code, people often forget to call close, or because of the code logic problem situation, close is not called.
Usually, in an activity, we can call startmanagingcursor or directly use managedquery to let the activity automatically manage the cursor object.
However, it should be noted that when activity is introduced, cursor will no longer be available!
If the code of operating cursor is not synchronized with UI (such as background thread), there is no need to judge whether the activity has ended or wait for the background thread to end before calling ondestroy.
In addition, the following is also a common case that the cursor will not be closed:
although it seems that, Cursor.close () has been called, but if there is an exception, close () will be skipped, resulting in a memory leak.
Therefore, our code should be written in the following way:
Cursor c = queryCursor();
try {
int a = c.getInt(1);
......
} catch (Exception e) {
} finally {
c.close(); //Call close() in finally, ensuring that it will be called
}
try {
Cursor c = queryCursor();
int a = c.getInt(1);
......
c.close();
} catch (Exception e) {
}
Unregisterreceiver() was not called after calling registerreceiver
After calling registerreceiver, if unregisterreceiver is not called, it will occupy a large amount of memory.
We can often see the following code:
this is a very serious error, because it will cause the broadcastreceiver not to be unregistered, resulting in memory leakage.
registerReceiver(new BroadcastReceiver() {
...
}, filter); ...
*InputStream/OutputStream not closed*
When using files or accessing network resources, using InputStream/OutputStream will also lead to memory leakage
Recycle () is not called after bitmap is used
according to the description of SDK, it is not necessary to call recycle. However, when we call recycle (), we no longer use memory as much as possible.
Context leak
this is a very obscure memory leak.
Let’s take a look at the following code:
in this code, we use a static drawable object.
This usually happens when we need to call a drawable frequently, and its loading is time-consuming. We don’t want to create the drawable every time we load an activity.
At this point, using static is undoubtedly the fastest way to write code, but it is also very bad.
When a drawable is attached to a view, the view will be set to the callback of the drawable Drawable.setCallback () Implementation).
This means that the drawable has a reference to textview, which in turn has a reference to activity.
As a result, the memory will not be released after the activity is destroyed.
The file is placed in the Resources folder and will appear in the boot after it is typed as a jar package_ INF/classes/ xx.xx The second one is the second one;
The file path uses “absolute path”/ xx.xx “, load URL and create InputStream with classloader:
URL fileURL=this.getClass().getResource("/xx.xx");
InputStream is=this.getClass().getResourceAsStream("/resource/res.txt");
This problem is caused by a Java class file compiled by a higher version of JDK trying to run on a lower version of JVM.
1. The solution is to ensure that the versions of JVM (Java command) and JDK (javac command) are consistent. If it is the Linux version, enter the Java – version and javac – version commands in the command line to see if the versions are consistent. I use 1.7.0_ 80。
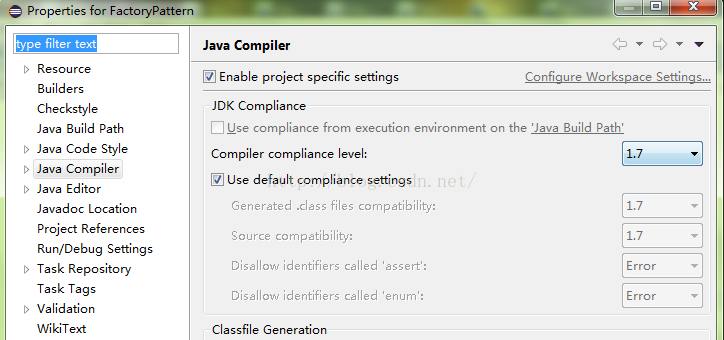
2. The same version still can’t solve the problem. I don’t compile with javac directly from the command line, but with eclipse compiler. Because many compilers come with javac, rather than using the compiler in the operating system. If your compiler is eclipse, you need to set the JDK version in the properties of the project. The method is to right-click the project — & gt; properties — & gt; Java compiler — & gt; enable project specific settings — & gt; and set the compiler compliance level to 1.7, which is the version consistent with the JVM (the version shown by Java – version in the command line). Because of the need to be compatible with other software before, I reduced the Java version from 1.8 to 1.7, but eclipse did not move, so after opening it, I found that the default was 1.8, so I manually reduced it to 1.7, recompiled it, and finally passed!
To sum up, if you are compiling with a compiler, make sure that the JDK version of the compiler is consistent with the Java version of the operating system.
The screenshot is as follows:
1. Principle and mechanism
Use one-way pool to ensure orderly submission and execution.
explain:
1) Alternate execution between threads is not supported.
2) Multithreading is not synchronous, only to ensure the order of execution, multithreading is concurrent execution.
2. Code examples
package com.thread;
import java.util.concurrent.ExecutorService;
import java.util.concurrent.Executors;
import java.util.concurrent.locks.Condition;
import java.util.concurrent.locks.Lock;
import java.util.concurrent.locks.ReentrantLock;
public class TasksWithoutLockTest extends Thread {
private static int num = 0;
private int id;
public TasksWithoutLockTest(int id) {
this.id = id;
}
@Override
public void run() {
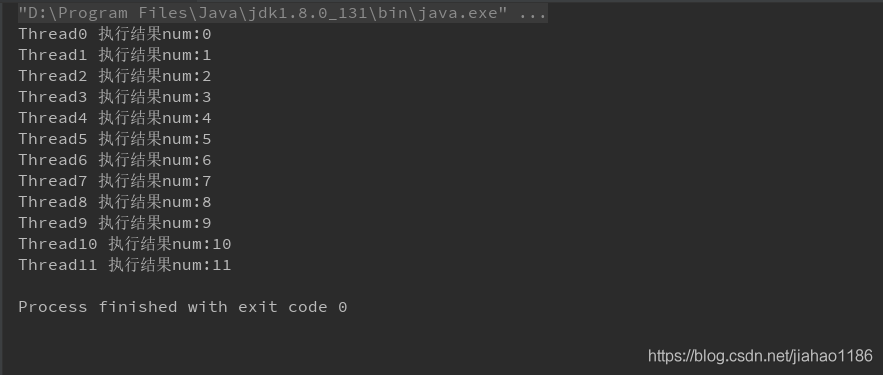
System.out.println("Thread" + id + "output num:" + num++);
try {
Thread.sleep(3);
} catch (InterruptedException e) {
e.printStackTrace();
}
}
public static void main(String[] args) {
//ExecutorService exec = Executors.newFixedThreadPool(1);
ExecutorService exec = Executors.newSingleThreadScheduledExecutor();
for (int i = 0; i < 12; i++) {
exec.submit(new TasksWithoutLockTest(i));
}
exec.shutdown();
}
}3. Output results
1.DeferredResult
Spring supports HTTP asynchronous return
2. Asynchronous processing
Start a new thread, process the data and return the value.
3. Code examples
1)controller
package com.liuxd.controller;

import com.liuxd.entity.Responses;
import com.liuxd.service.TaskService2;
import lombok.extern.slf4j.Slf4j;
import org.springframework.beans.factory.annotation.Autowired;
import org.springframework.web.bind.annotation.GetMapping;
import org.springframework.web.bind.annotation.RestController;
import org.springframework.web.context.request.async.DeferredResult;

@Slf4j
@RestController
public class AsyncCtr2 {

    @Autowired
    private TaskService2 taskService2;

    @GetMapping(value = "/getResult")
    public DeferredResult<Responses<String>> getResult() {
        log.info("HTTP request received...");
        long startTime = System.currentTimeMillis();

        DeferredResult<Responses<String>> deferredResult = new DeferredResult<Responses<String>>();

        new Thread(new Runnable() {
            @Override
            public void run() {
                taskService2.getData(deferredResult);
            }
        }).start();

        log.info("The task of the receiving HTTP request thread has been completed, exit!");
        long endTime = System.currentTimeMillis();
        log.info("http Total request time. " + (endTime - startTime) + "ms");

        return deferredResult;

    }
}
2)service
package com.liuxd.service;

import com.liuxd.entity.Responses;
import lombok.extern.slf4j.Slf4j;
import org.springframework.stereotype.Service;
import org.springframework.web.context.request.async.DeferredResult;

@Slf4j
@Service
public class TaskService2 {

    public void getData(DeferredResult<Responses<String>> deferredResult) {

        log.info("Call service asynchronous with return method, start execution...");
        long startTime = System.currentTimeMillis();

        try {
            Thread.sleep(2500L);
        } catch (InterruptedException e) {
            e.printStackTrace();
        }

        log.info("Call service asynchronous has return method, the end of execution!!!") ;

        long endTime = System.currentTimeMillis();
        log.info("Total time taken to call service asynchronous return method. " + (endTime - startTime) + "ms");

        deferredResult.setResult(new Responses<>(0, "Done", "SUCCESS"));

    }


}
3)Responses
package com.liuxd.entity;

import lombok.AllArgsConstructor;
import lombok.Builder;
import lombok.Data;
import lombok.NoArgsConstructor;

@Data
@Builder
@NoArgsConstructor
@AllArgsConstructor
public class Responses<T> {

    private Integer code;

    private String msg;

    private T data;

}
4) Print results

5) Result analysis
1) The HTTP main thread accepts the request and ends after processing the request
2) After the asynchronous thread ends, returns the