Tag Archives: Deep learning

[Solved] 1.fatal error: NvInfer.h: No such file or directory

yolov5 compile to generate engine error: /tensorrtx/yolov5/yololayer.h:6:10: fatal error: NvInfer.h: No such file or directory 6 | #include <NvInfer.h>
|          ^~~~~~~~~~~
compilation terminated.

1. The header file and library corresponding to tensorRT were not found.

In CMakeLists.txt
#tensorrt Add tensorrt corresponding header files and link libraries
# tensorrt
#include_directories(/usr/include/x86_64-linux-gnu/)
#link_directories(/usr/lib/x86_64-linux-gnu/)

include_directories(/home/******/TensorRT-7.2.3.4/include)
link_directories(/home/******/TensorRT-7.2.3.4/lib/)

How to Solve Error: RuntimeError: all tensors must be on devices[0]

Problem description

The code running Zheng Zhedong’s aicity2020 reported an error. After searching, it was found that the problem is that the code running is more than GPU, but the specified code is a single GPU

Solution:

In test2020.py, the code comments in lines 126 and 129 are replaced by the following code

# set gpu ids
# if len(gpu_ids)>0:
# torch.cuda.set_device(gpu_ids[0])
# cudnn.benchmark = True
os.environ['CUDA_VISIBLE_DEVICES'] = str(gpu_ids[0])

[Solved] Pointsift Error: – ltensorflow not found_framework

My environment: Ubuntu 18.04 tensorflow 2.1
when reproducing pointsift, follow the readme prompt, modify the locations of tensorflow and Lib in the. Sh file, compile the. Sh file, and report an error:
/usr/bin/LD: cannot find – ltensorflow_framework
collect2: error: ld returned 1 exit status

The reason is that the shell file is connected to the dynamic library In libtensorflow_framework.so, the dynamic library name of tensorflow 2.1 is libtensorflow_Frame.So.2, so the link is not available

Solution: create a connection symbol to make libtensorflow_Framework. So. 2 and libtensorflow_Framework.so points to the same

cd /usr/local/lib/python3.6/dist-packages/tensorflow_core //My files are in this directory, some are in the tensorflow directory, as long as they are in the same directory as .so.2
ln -s libtensorflow_framework.so.1 libtensorflow_framework.so

[CUDA Environment] Python Pytorch Error: CudaSetupArgument

@TOC
the probability of this problem is that the CUDA version used for compilation is inconsistent with the CUDA version running
first check the CUDA version of the system (that is, the CUDA version used for compilation)

nvcc -V

In my pytorch + CONDA environment, you can use CONDA list to view the cudatoolkit version in the virtual environment. At first, the CUDA version of my system is 9.0 and the cudatoolkit version is 10.2. Therefore, the version is inconsistent, so the error message shown in the title appears. Later, I switched the CUDA version of the system and the problem was solved
brief description of the specific version switching method:
echo $path view CUDA path information, add the path of cuda10.2 and link it to/usr/local/CUDA. The specific instructions are

ln -s /usr/local/cuda10.2 /usr/local/cuda

Then modify the system path as follows:

vim ~/.bashrc

Add code at the end

export PATH=/usr/local/cuda:$PATH
export LD_LIBRARY_PATH=/usr/local/cuda/lib64:$LD_LIBRARY_PATH

Press ESC, enter: WQ, press enter to exit, and then enter on the command line

source ~/.bashrc

Update path information
now enter from the command line

nvcc -V

You can view the CUDA version after switching

[Solved] RuntimeError: Error(s) in loading state_dict for Net:

size mismatch for classifier.4.weight: copying a param with shape torch.Size([7, 256]) from checkpoint, the shape in current model is torch.Size([751, 256]).
size mismatch for classifier.4.bias: copying a param with shape torch.Size([7]) from checkpoint, the shape in current model is torch.Size([751]).

Training the tracking weight of deepsort. The default data set is market1501. Replace it with your own data set. Test the weight and report an error. As above, change the num_Class in model.py is changed to the number of its own classes. (for example, my num_class is 7, and market1501 defaults to 751.)

class Net(nn.Module):
    def __init__(self, num_classes=751, reid=False):#Change the number of training classes

[Solved] Pytorch Download CIFAR1 Datas Error: urllib.error.URLError: <urlopen error [SSL: CERTIFICATE_VERIFY_FAILED] certi

urllib.error.URLError: < urlopen error [SSL: CERTIFICATE_VERIFY_FAILED] certi

Solution:

Add the following two lines of code before the code starts:

import ssl
ssl._create_default_https_context = ssl._create_unverified_context

Complete example:

import torch
import torchvision
import torchvision.transforms as transforms
import ssl
ssl._create_default_https_context = ssl._create_unverified_context
#Download the data set and adjust the image, because the output of the torchvision data set is in PILImage format, and the data field is in [0,1]
#We convert it into the tensor format of the standard data field [-1,1]
#transform Data Converter
transform=transforms.Compose([transforms.ToTensor(),transforms.Normalize((0.5,0.5,0.5),(0.5,0.5,0.5))])
trainset=torchvision.datasets.CIFAR10(root='./data',train=True,download=True,transform=transform)
# The downloaded data is placed in the trainset
trainloader=torch.utils.data.DataLoader(trainset,batch_size=4,shuffle=True,num_workers=2)
# DataLoader Data Iterator Encapsulate data into DataLoader
# num_workers: Two threads read data
# batch_size=4 batch processing

testset=torchvision.datasets.CIFAR10(root='./data',train=False,download=True,transform=transform)
testloader=torch.utils.data.DataLoader(testset,batch_size=4,shuffle=False,num_workers=2)
classes=('airplane', 'automobile', 'bird', 'cat', 'deer', 'dog', 'frog', 'horse', 'ship', 'truck')

Download result

Error:output with shape [1, 224, 224] doesn‘t match the broadcast shape [3, 224, 224]

Error: output with shape [1, 224, 224] don’t match the broadcast shape [3, 224, 224]
the image input by the original model is RGB three channel, and the input is single channel gray image.

# Error:output with shape [1, 224, 224] doesn't match the broadcast shape [3, 224, 224]
# The input image of the original model is RGB three-channel, and the one I input is a single-channel grayscale image.
# #------------------------------------------------ --------------------------------------
# from torch.utils.data import DataLoader
# dataloader = DataLoader(dataset, shuffle=True, batch_size=16)
# from torchvision.utils import make_grid, save_image
# dataiter = iter(dataloader)
# img = make_grid(next(dataiter)[0], 4) # Assemble a 4*4 grid image and convert it into 3 channels
# to_img(img)
# #-------------------------------------------------------------------------------------
# It seems that make_grid cannot be converted to 3 channels

The solution is as follows:

from torch import nn
from torchvision import datasets
from torchvision import transforms as T
from torch.utils.data import DataLoader
from torchvision.utils import make_grid, save_image
import numpy as np
import matplotlib.pyplot as plt

transform  = T.Compose([
         T.ToTensor(), #This will convert a numpy array between 0 and 255 into a floating point tensor between 0 and 1
          T.Normalize((0.5, ), (0.5, )), #In the normalize() method, we specify the mean of all channels of the normalized tensor image, and also specify the central deviation.
])
dataset = datasets.MNIST('data/', download=True, train=False, transform=transform)
dataloader = DataLoader(dataset, shuffle=True, batch_size=100)

print(type(dataset[0][0]),dataset[0][0].size())
# print(dataset[0][0])
# To draw a tensor image, we must change it back to a numpy array.
# We will do this in the function def im_convert(), which contains a parameter that will become a tensor image.
def im_convert(tensor):
    image=tensor.clone().detach().numpy()
    # The new tensor obtained using torch.clone() and the original data no longer share memory, but still remain in the calculation graph,
    # The clone operation supports gradient transfer and superposition without sharing data memory, so it is commonly used in scenarios where a unit in a neural network needs to be reused.
    # Usually if the requirements_grad of the original tensor=True, then:
    # tensor requires_grad=True after clone() operation
    # The tensor requires_grad=False after the detach() operation.
    image=image.transpose(1, 2, 0)
    # The tensor to be converted to a numpy array has the shape of the first, second and third dimensions. The first dimension represents the color channel, and the second and third dimensions represent the width and height of the image and pixels.
    # We know that each image in the MNIST dataset is a grayscale corresponding to a single color channel, and its width and height are 28 * 28 pixels. Therefore, the shape will be (1, 28, 28).
    # In order to draw an image, the shape of the image is required to be (28, 28, 1). Therefore, by swapping axis zero, one and two
    print(image.shape)
    image=image*(np.array((0.5, 0.5, 0.5))+np.array((0.5, 0.5, 0.5)))
    print(image.shape)
    # We normalize the image, and before we have to normalize it. Normalization is done by subtracting the average value and dividing by the standard deviation.
    # We will multiply by the standard deviation, and then add the average
    image=image.clip(0, 1)
    print(image.shape,type(image))
    return image
    # To ensure the range between 0 and 1, we use clip()
    # Function and passed zero and one as parameters. We apply the clip function to the minimum value 0 and maximum value 1 and return the image.

# It will create an object that allows us to pass through a variable training loader at a time.
# We access one element at a time by calling next on the dataiter.
# next() function will get our first batch of training data, and the training data will be divided into the following images and labels
dataiter=iter(dataloader)
images, labels=dataiter.next()

fig=plt.figure(figsize=(25, 6))
#fig=plt.figure(figsize=(25, 4)) #Picture output width is smaller than above
for idx in np.arange(20):
    ax=fig.add_subplot(2, 10, idx+1)
    plt.imshow(im_convert(images[idx]))
    ax.set_title([labels[idx].item()])
plt.show()

The final results are as follows:

[Solved] AttributeError: ‘NoneType‘ object has no attribute ‘append‘

Problem: in Python, when adding an element to a list, an error is reported attributeerror: ‘nonetype’ object has no attribute ‘append’
my code at that time was:

loss=[]
loss=loss.append(0.1)

Solution: change the code to the below

oss=[]
loss.append(0.1)

The append in the list can directly update the list of added elements without assignment

RuntimeError: Non RGB images are not supported [How to Fix]

Another version problem… I ran into it all. The version of
torchvision is too low, io.read_ Image does not support grayscale images. You can only read three channel color images…

segmentation = mask_to_rle(torchvision.io.read_image(os.path.join(self.root, m['mask']))[0] == 255)

current version

torchvision==0.8.2

Upgraded version

torchvision==0.9.0

Problem solved, yep! Of course, it is possible to solve the problem without upgrading torchvision. You can first convert the gray image into a three channel image, and you can try
(it’s also a reminder. Pay attention to the matching of torch versions)

Internalerror: GPU sync failed error (How to Solve)

1. Error reporting: (from Python deep learning p178-179)

When vscode runs the following code in Jupiter notebook, an error is reported: internalerror: GPU sync failed

from tensorflow.keras.models import Sequential
from tensorflow.keras import layers
from tensorflow.keras.optimizers import RMSprop

model = Sequential()
model.add(layers.Flatten(input_shape=(lookback // step, float_data.shape[-1])))
model.add(layers.Dense(32, activation='relu'))
model.add(layers.Dense(1))

model.compile(optimizer=RMSprop(), loss='mae')
history = model.fit_generator(train_gen,
                              steps_per_epoch=500,
                              epochs=20,
                              validation_data=val_gen,
                              validation_steps=val_steps)

2. Solution:

(1) Don’t open too many ipynb file windows. There is only one running window left. Restart and there should be no problem.

(2) Some friends said that they might have something to do with the wallpaper engine. Just turn it off. I haven’t verified this yet.

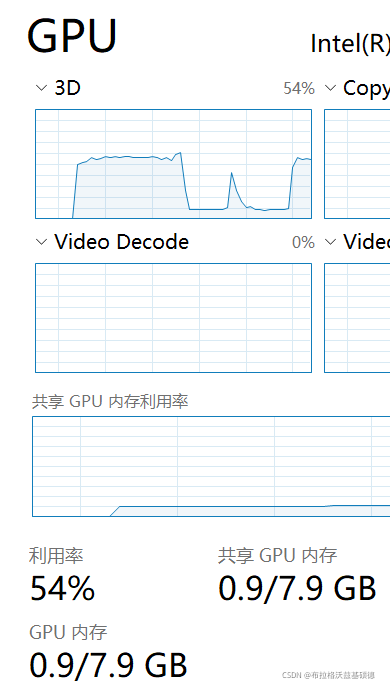
However, I found that when the wallpaper engine dynamic desktop is displayed, the GPU utilization will increase sharply: