Tag Archives: cents

Message log output sbridge: Handling MCE memory error error

/The var/log/message system log is always output, causing the/partition disk to be full

sbridge: HANDLING MCE MEMORY ERROR
kernel: CPU 8: Machine Check Exception: o Bank 5: cc00020000010090
kernel: TSC O ADDR 2068ce8080 MISC 40109086 PROCESSOR O: 206d6 TIME 1634693540 SOCKET 1 APIC 20

resolvent:

 rmmod -v sb_edac

[Solved] Error in installing docker requires: fuse overlayfs >= 0.7

Cause: there is an error docker during installation, and the docker of CentOS 7.9 installation reports an error. Requirements: fuse overlays> = 0.7

el7.x86_64
---> Package docker-scan-plugin.x86_64 0:0.8.0-3.el7 will be installed
---> Package libcgroup.x86_64 0:0.41-21.el7 will be installed
---> Package libseccomp.x86_64 0:2.3.1-4.el7 will be installed
--> Finished Dependency Resolution
Error: Package: 3:docker-ce-20.10.8-3.el7.x86_64 (docker-ce-stable)
           Requires: container-selinux >= 2:2.74
Error: Package: docker-ce-rootless-extras-20.10.8-3.el7.x86_64 (docker-ce-stable)
           Requires: fuse-overlayfs >= 0.7
Error: Package: docker-ce-rootless-extras-20.10.8-3.el7.x86_64 (docker-ce-stable)
           Requires: slirp4netns >= 0.4
Error: Package: containerd.io-1.4.9-3.1.el7.x86_64 (docker-ce-stable)


Solution:

#Go to the yum source configuration folder
cd /etc/yum.repos.d
mv CentOS-Base.repo CentOS-Base.repo_bak

Add an entry to /etc/yum.repos.d/docker-ce.repo at the top of the file, as follows
[centos-extras]
name=Centos extras - $basearch
baseurl=http://mirror.centos.org/centos/7/extras/x86_64
enabled=1
gpgcheck=0

# save and quit


#Then install the command:
yum -y install slirp4netns fuse-overlayfs container-selinux


[How to Modify] etcd-server-8-12: ERROR (spawn error)

My problem is here

 vi etcd-server-startup.sh

#This is wrong

[program:etcd-server-7-12]
command=/opt/etcd/etcd-server-startup.sh              ; the program (relative uses PATH, can take args)
numprocs=1                                            ; number of processes copies to start (def 1)
directory=/opt/etcd                                   ; directory to cwd to before exec (def no cwd)
autostart=true                                        ; start at supervisord start (default: true)
autorestart=true                                      ; retstart at unexpected quit (default: true)
startsecs=30                                          ; number of secs prog must stay running (def. 1)
startretries=3                                        ; max # of serial start failures (default 3)
exitcodes=0,2                                         ; 'expected' exit codes for process (default 0,2)
stopsignal=QUIT                                       ; signal used to kill process (default TERM)
stopwaitsecs=10                                       ; max num secs to wait b4 SIGKILL (default 10)
user=etcd                                             ; setuid to this UNIX account to run the program
redirect_stderr=true                                  ; redirect proc stderr to stdout (default false)
stdout_logfile=/data/logs/etcd-server/etcd.stdout.log ; stdout log path, NONE for none; default AUTO
stdout_logfile_maxbytes=64MB                          ; max # logfile bytes b4 rotation (default 50MB)
stdout_logfile_backups=5                              ; # of stdout logfile backups (default 10)
stdout_capture_maxbytes=1MB                           ; number of bytes in 'capturemode' (default 0)
stdout_events_enabled=false                           ; emit events on stdout writes (default false)


#Right
```bash
#!/bin/sh
./etcd --name etcd-server-8-12 \
    --data-dir /data/etcd/etcd-server \
    --listen-peer-urls https://192.168.118.12:2380 \
    --listen-client-urls https://192.168.118.12:2379,http://127.0.0.1:2379 \
    --quota-backend-bytes 8000000000 \
    --initial-advertise-peer-urls https://192.168.118.12:2380 \
    --advertise-client-urls https://192.168.118.12:2379,http://127.0.0.1:2379 \
    --initial-cluster  etcd-server-8-12=https://192.168.118.12:2380,etcd-server-8-21=https://192.168.118.21:2380,etcd-server-8-22=https://192.168.22:2380 \
    --ca-file ./certs/ca.pem \
    --cert-file ./certs/etcd-peer.pem \
    --key-file ./certs/etcd-peer-key.pem \
    --client-cert-auth  \
    --trusted-ca-file ./certs/ca.pem \
    --peer-ca-file ./certs/ca.pem \
    --peer-cert-file ./certs/etcd-peer.pem \
    --peer-key-file ./certs/etcd-peer-key.pem \
    --peer-client-cert-auth \
    --peer-trusted-ca-file ./certs/ca.pem \
    --log-output stdout
~                                                                                                                             
~                                                     

Etcd start stop command

 ~]# supervisorctl start etcd-server-7-12
 ~]# supervisorctl stop etcd-server-7-12
 ~]# supervisorctl restart etcd-server-7-12
 ~]# supervisorctl status etcd-server-7-12

[Solved] PHP getimagesize(): SSL operation failed with code 1. OpenSSL Error messages: error:14090086:SSL

Today, I encountered a problem with the client application server (CentOS). When using getimagesize(), an error is always reported:

PHP getimagesize(): SSL operation failed with code 1. OpenSSL Error messages: error:14090086:SSL routines:ssl3_ get_ server_ certificate:certificate verify failed

It is preliminarily judged that openssl.cafile in php.ini is not set. After opening the PHP configuration file, it is found that it is set. The current setting value is:

openssl.cafile=/etc/pki/tls/certs/ca-bundle.crt

After that, it was suspected that the certificate might expire. First, compare the contents of the file on your own server. If you find that the size is inconsistent, copy and paste the contents from your own server. After saving, the problem of reloading PHP configuration still exists;

Remember that similar problems have occurred on Windows systems before. At that time, curl.cainfo was configured, so from this website
: http://curl.haxx.se/ca/cacert.pem Download the certificate and put it in the /usr/local/OpenSSL/ directory to modify the configuration

[curl]
curl.cainfo = /usr/local/openssl/cacert.pem

[openssl]
openssl.cafile=/usr/local/openssl/cacert.pem

When this problem occurs on the Internet, the solutions found are also operated in this way. However, the overload configuration problem remains after saving. Change the configuration back again.

Finally, see this article on: https://stackoverflow.com/questions/17084886/ssl-error-routinesssl3-get-server-certificatecertificate-verify-failed

It is found that the Linux system has the command to update the local certificate. The commands are different for different systems. The CentOS operation is as follows:

#Install ca certificate tool
yum install ca-certificates -y

# Update Certificate
update-ca-trust

Problem-solving.

Error when creating partitions in Linux: no free sectors available solution

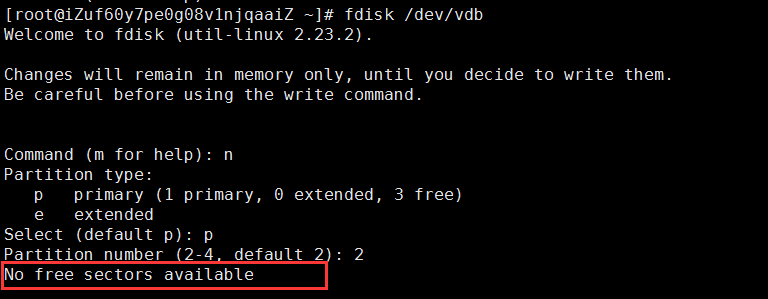
When creating a partition with Linux, an error is reported:

no free sectors available

Chinese translation

No free partitions available

reason:

No free sectors available: your disk space is insufficient and there is no extra space for you to allocate; Sometimes, using various translation tools is not necessarily accurate; Everyone can understand vernacular;

The Linux partition also needs space. If you don’t even have excess disk space, of course, you can’t divide the partition;

Combined with the above figure:

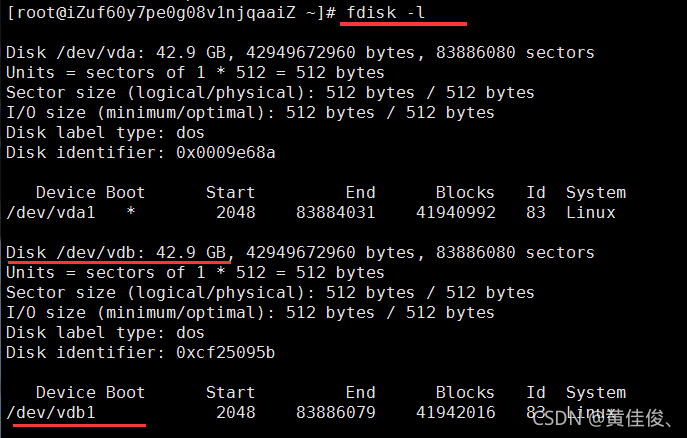
Let’s take a look at all the information on the disk; With command:

fdisk -l

As a result, it is found that VDB already has a partition, which is/dev/vdb1; It happens to be the size of the whole disk, because we can’t partition again; As shown below:

  Therefore, we need to delete the partition first and then re partition it! The entire command is as follows:

fdisk /dev/vdb

d

(select the partition number. Bloggers only have one partition on this disk, and do not need to select. For multiple partitions, you need to select the partition number; if you do not understand the partition number of the disk)

[Solved] CentOS 6 yum update Error: Cannot find a valid baseurl for repo: base

Error Message:
Loaded plugins: fastestmirror, ovl
Setting up Update Process
Loading mirror speeds from cached hostfile
YumRepo Error: All mirror URLs are not using ftp, http[s] or file.
Eg. Invalid release/repo/arch combination/
removing mirrorlist with no valid mirrors: /var/cache/yum/x86_64/6/base/mirrorlist.txt
Error: Cannot find a valid baseurl for repo: base

Solution:

mv /etc/yum.repos.d/CentOS-Base.repo /etc/yum.repos.d/CentOS-Base.repo.old  #Backup
vi /etc/yum.repos.d/CentOS-Base.repo   #New

/etc/yum.repos.d/centos-base.repo

[base]
name=CentOS-$releasever - Base
baseurl=https://vault.centos.org/6.10/os/$basearch/
gpgcheck=1
gpgkey=file:///etc/pki/rpm-gpg/RPM-GPG-KEY-CentOS-6

[updates]
name=CentOS-$releasever - Updates
baseurl=https://vault.centos.org/6.10/updates/$basearch/
gpgcheck=1
gpgkey=file:///etc/pki/rpm-gpg/RPM-GPG-KEY-CentOS-6

[extras]
name=CentOS-$releasever - Extras
baseurl=https://vault.centos.org/6.10/extras/$basearch/
gpgcheck=1
gpgkey=file:///etc/pki/rpm-gpg/RPM-GPG-KEY-CentOS-6

[Solved] mysqldump: Error: ‘Access denied; you need (at least one of) the PROCESS privilege(s) for this opera

Problem: back up the database on centos7 of the virtual machine, and an error occurs when executing mysqldump: error: ‘access denied; You need (at least one of) the process privilege (s) for this operation ‘when trying to dump tablespaces

[root@localhost backup]# sh ./mysql_backup.sh
Start exporting the database...
mysqldump: Error: 'Access denied; you need (at least one of) the PROCESS privilege(s) for this operation' when trying to dump tablespaces
The export was successful and the file name is : /data/backup/mysql/2021-10-06_003536.sql.gz

Solution: log in to MySQL with the root account in CentOS

[root@localhost backup]# mysql -uroot -p

Input password

Then execute the command

mysql> GRANT PROCESS ON *.* TO 'demo'@'localhost';

This demo should be changed to your own login database account

Then refresh the database

mysql> flush privileges;

All execution processes:

[root@localhost backup]# mysql -uroot -p
Enter password: 
Welcome to the MySQL monitor.  Commands end with ; or \g.
Your MySQL connection id is 61
Server version: 8.0.24 Source distribution

Copyright (c) 2000, 2021, Oracle and/or its affiliates.

Oracle is a registered trademark of Oracle Corporation and/or its
affiliates. Other names may be trademarks of their respective
owners.

Type 'help;' or '\h' for help. Type '\c' to clear the current input statement.

mysql> GRANT PROCESS ON *.* TO 'demo'@'localhost';
Query OK, 0 rows affected (0.01 sec)

mysql> flush privileges;
Query OK, 0 rows affected (0.01 sec)

mysql> exit
Bye
[root@localhost backup]# sh ./mysql_backup.sh
Start exporting the database... 
The export was successful and the file name is : /data/backup/mysql/2021-10-06_003815.sql.gz
[root@localhost backup]# 

This method is accessed locally by the user

Another method is to change localhost to% by using the global access command

mysql> GRANT PROCESS ON *.* TO 'demo'@'%';

Similarly, change the demo to your own MySQL login account, and then execute the above command to refresh the database

I used the first method.

[Solved] Fatal error: Uncaught Error: Class ‘Imagick‘ not found

Resolve fatal error: uncaught error: class’ imageick ‘not found

reason

PHP requires the imageick extension to be installed

environment

CentOS Linux release 7.9
PHP 7.3.26

Installation steps

Download the appropriate ImageMagick program and ImageMagick extension according to the environment

Installing imagemagic

wget http://www.imagemagick.org/download/ImageMagick.tar.gz

tar zxvf ImageMagick.tar.gz 
cd ImageMagick-7.1.0-8/
./configure --prefix=/usr/local/webservice/imagemagick
make && make install

Check whether the installation is successful

/usr/local/webservice/imagemagick/bin/convert -version

Version: ImageMagick 7.1.0-8 Q16-HDRI x86_64 2021-09-18 https://imagemagick.org
Copyright: (C) 1999-2021 ImageMagick Studio LLC
License: https://imagemagick.org/script/license.php
Features: Cipher DPC HDRI OpenMP(3.1) 
Delegates (built-in): fontconfig freetype jng jpeg lzma png x xml zlib
Compiler: gcc (4.8)

Installing the PHP extension: imagick

Download address

https://pecl.php.net/package/imagick
View the appropriate version download

 wget https://pecl.php.net/get/imagick-3.5.1.tgz
 tar zxvf imagick-3.5.1.tgz

cd imagick-3.5.1/
/usr/local/webservice/php73/bin/phpize
./configure --with-php-config=/usr/local/webservice/php73/bin/php-config --with-imagick=/usr/local/webservice/imagemagick
make && make install

Successful installation is displayed

Build complete.
Don't forget to run 'make test'.

Installing shared extensions:     /usr/local/webservice/php73/lib/php/extensions/no-debug-zts-20180731/
Installing header files:          /usr/local/webservice/php73/include/php/

Modify the configuration file and write extension=imagick.so

Add
extension=/usr/local/webservice/php73/lib/php/extensions/no-debug-zts-20180731/imagick.so at the end of vim /usr/local/webservice/php73/etc/php.ini

Restart php-fpm and test whether the installation is successful
systemctl restart php-fpm

php -m | grep imagick

How to Fix PVE Issues: ERROR: migration aborted

2021-09-24 22:11:47 # /usr/bin/ssh -e none -o 'BatchMode=yes' -o 'HostKeyAlias=st-10' [email protected] /bin/true
2021-09-24 22:11:47 [email protected]: Permission denied (publickey,password).
2021-09-24 22:11:47 ERROR: migration aborted (duration 00:00:00): Can't connect to destination address using public key
TASK ERROR: migration aborted

Enter the failed server
root@st -22:~#

ssh-keygen -t rsa

Retract y to generate public key

View public key

cat /root/.ssh/id_rsa.pub

Copy the public key and edit the public key into authorized_Keys file. Delete the wrong part.

Distribute authorized copies to various servers.

scp /root/.ssh/authorized_keys [email protected]:/root/.ssh/

Error in startup after the supervisor modifies the configuration file: error: cannot open an HTTP server: socket.error reported errno.eaddnotavail

 vim /etc/supervisord.conf

Modify the configuration file
remove the comments of the [inet_http_server] module
and modify the default IP, user name and password

after modification, reload the configuration file:

supervisorctl reload

At this time, it is found that the supervisor service has stopped, systemctl status supervisor View Status:

this is generally an error in the configuration file:
note that the local address is not filled in after the port, such as 47.xxx.xxx.xxx , which refers to who can access the server’s supervisor. If it is not filled in, everyone can access it. For example, it can be directly changed to port =: 9001 , and then reload.

 supervisorctl reload
 systemctl start supervisord

If it is set that everyone can access, you can log in to the browser:

I layhill successfully solved the problem through the above methods. Please correct the deficiencies!

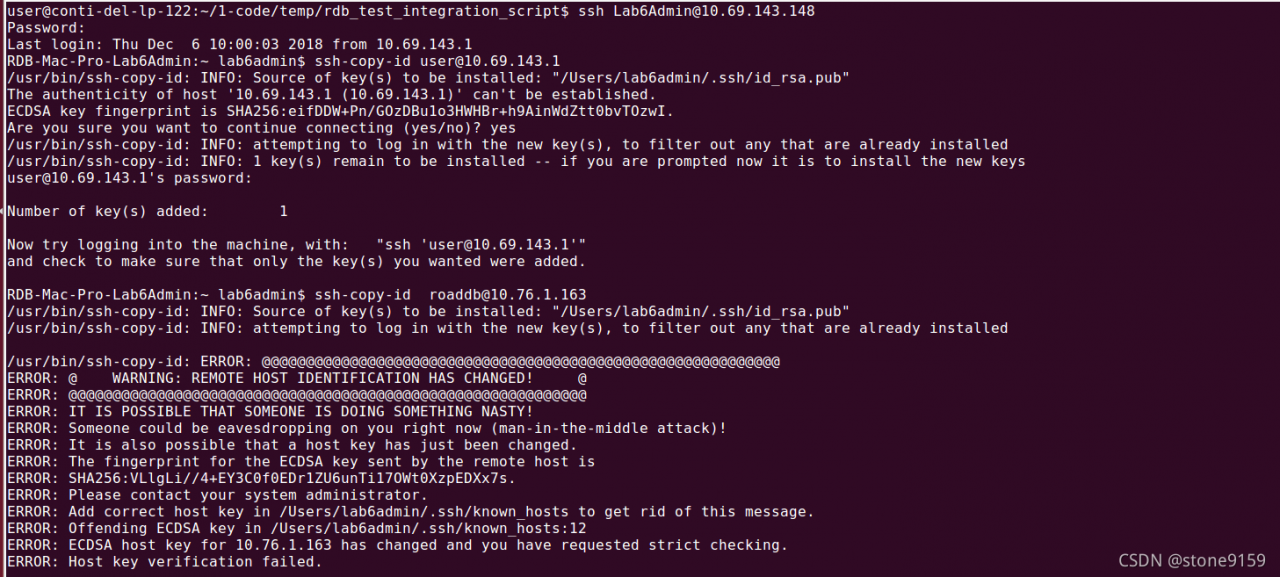
Solutions to remote or adding SSH key errors


Method 1

ssh-keygen -R XX.XX.XX.XX  

Method 2

【1】 Delete the corresponding IP in known_ Hosts related information

vim /.ssh/known_ hosts

The problem is solved. The reason is that after the system is reinstalled, the remote connection is made again. After entering yes, this opportunity writes the information of the remote machine to/users/Wangdong /. SSH/known_ Hosts file, so if you reinstall the system remotely, you must clean up the machine first.