Tag Archives: c++

The C compiler identification is unknown

The environment
CLion+Cmake+Mingw
An error log

-- The C compiler identification is unknown
-- Check for working C compiler: D:/MinGW/bin/gcc.exe
-- Check for working C compiler: D:/MinGW/bin/gcc.exe -- broken
CMake Error at D:/Program Files/JetBrains/CLion 2019.2.3/bin/cmake/win/share/cmake-3.15/Modules/CMakeTestCCompiler.cmake:60 (message):
  The C compiler

    "D:/MinGW/bin/gcc.exe"

  is not able to compile a simple test program.

If it is a CPP program, it may be reported again

-- The CXX compiler identification is unknown

why
CMAKE could not check the C Compiler ID for unknown reasons, causing compilation to fail
The solution
Add the following configuration to the cMakelists.txt file to force the Compiler ID to be specified

INCLUDE(CMakeForceCompiler)
CMAKE_FORCE_C_COMPILER(gcc GNU)
CMAKE_FORCE_CXX_COMPILER(g++ GNU)

Rerun the cmake directive after adding it

Using Visual Studio 2015 to create. DLL and use. DLL

Use Visual Studio 2015 to create.dll and use.dll
In this paper, the implementation of an addition and meet function is taken as an example:
Create a DLL project:
1, File — New — Project — Win32 console application. Give it a name, like myadd. Click OK. Next, select DLL(D) for the application type and click Finish.
>
>
>
>
>
>
>
>
> You can delete it. Create a new one. CPP, name “mydll. CPP”, create a new “mydll.h”
3, write an addition and subtraction function for example; In mydll. CPP, write the following:

#include"stdafx.h"
#include"mydll.h"
int add(int a,int b)
{
    return a+b;
}

int sub(int c,int d)
{
    return c-d;
}

4. Write the following in mydll.h:

#pragma once
_declspec(dllexport)int add(int a, int b);
_declspec(dllexport)int sub(int a, int b);

5. Build — Build the solution. (select Debug X86 mode) and it will be in the project root directory (with.sln directory), under the Debug folder. Generate.dll and.lib files.

> File — New — Project — Win32 Console Application Give it a name like MyDllTest, click OK, Next, Console Application (W), Empty Project (E), Finish;
>
>
>
>
>
>
>
>
>
>
>
>
>
>
>
>
>
>
>
>
>
>
>
> Right click, add an existing item, and add mydll.h to the header file.

#include<iostream>
#include "mydll.h"
using namespace std;

int main()
{

    int ad, su;
    ad = add(100, 200);
    su = sub(10, 20);
    cout << "ad: " << ad << endl;
    cout << "su: " << su << endl;
    getchar();
    return 0;
}

5, in the project “resource file” right click, add – existing item; Select the.lib file and click OK.
6, Build, Solution, Run That’s it.

Collect2: error: LD returned 1 exit status

After verification, one of the reasons caused the factors is:
that you declare a function name, and in. H file defines some methods, but not in. CPP implementation inside, this will appear such mistakes.
and the solution can refer to the following:

the above for the nsight eclipse compiler error, as is shown in the display under the compilation instructions. O file is false, do not implement the method can search and in the documents. H file compared to completion.

A solution to [error] LD returned 1 exit status

[Error] LD Returned 1 Exit Status
[Error] LD returned 1 exit status
Two. Practical operation three. How do you prevent such mistakes?4. Leave a message

[Error] LD returned 1 exit status

3
3
3
3
3
3
3
The function is used elsewhere without a parameter
Two. Practical operation

3
3
3
3
3
3
3
3
3
4. The most important thing is to have patient
Three. How to prevent this kind of mistake?
1. When customizing the function name, you can do this:

Example: I want to define a function, which is the main menu. I can change the function name into pinyin zhu_cai_dan or the phonetic order of each word ZCD

4. Leave a message
1. No exit to
2. If you think that can help support oh
3. [Error] LD returned 1 exit status <>>

Vs2015 failed to compile problem 1

MSB4036 “SetEnvironmentVariable” not found
Error reason: stylistic Microsoft. CodeAnalysis. The Targets to make mistakes
Solution: Replace this file in the path: C:\Program Files (x86)\MSBuild\Microsoft\VisualStudio\v14.0\CodeAnalysis
The original blogger and file link: https://blog.csdn.net/u014411348/article/details/103487246

OpenGL vs2019 configuration (method 1)

OpenGL VS2019 configuration process
The overall configuration process and tools refer to the content of Learnopengl, but I jumped into the pit during the process, and spent some time to climb the pit. I recorded the configuration process in my blog, which is convenient for future reference and passers-by to climb the pit. LearnOpenGL materials address: https://learnopengl.com/Getting-started/Creating-a-window
Tool installation process
1. The development tool VS2019 (to install the component C++), the detailed installation process is “omitted”.
2. Download GLFW, link address: https://www.glfw.org/download.html. Here is to download the 64-bit source file package, into a specified directory, I put the D disk, directory is “D:\OpenGL”, and then decompress. As shown in the figure:

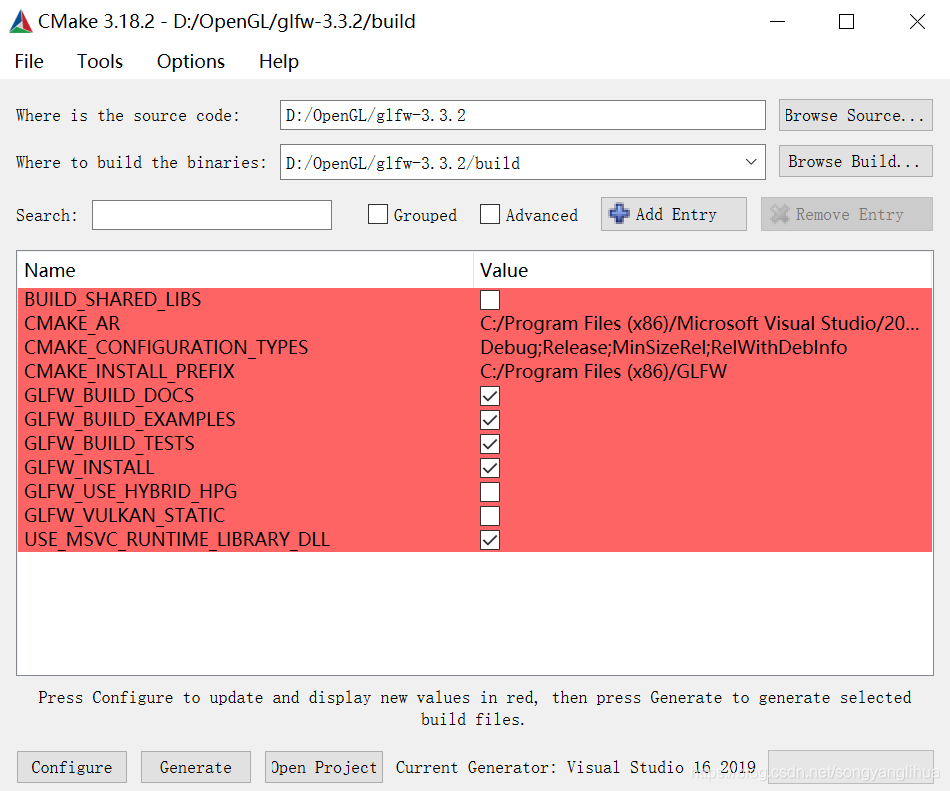
3. Download the Cmake and installation, link address: https://cmake.org/download/. Download the 32 bit installation file here, after downloading the default installation can be. After installation, open the CMake software and configure it through the GUI. The specific configuration is as follows :(1) Select the directory after GLFW decompression in Where is the source code; (2) Create a new build directory in the unzips directory and fill it in “Where to Build the Binaries”; (3) Once the source and destination folders are set, click the Configuretton so that CMAKE can read the required Settings and source code. Then we must choose the generator of the project, and because we are using the Visual Studio 2019, so we will select the 16 option Visual Studio (Visual Studio 2019, also known as Visual Studio (16) (4) the CMake will display possible build options to configure the generated library, click on the Generate , The resulting project file will be generated in your buildlder.
4. You can now find a file named glfw.sln the buildlder and open it using Visual Studio 2019. Because CMake generates a project file that already contains the correct configuration Settings, we just need to build the solution. CMake should have configured the solution automatically so that it can compile to a 64-bit library. Now click Build the solution. This will give us a compiled library file glfw3.libich can be found in build/ SRC /Debugmed. Once the library is generated, we need to make sure that the IDE knows where to find the library and the inclusion files for OpenGL programs.
5. We create a new folder in the d-root directory to hold all the header files/libraries from the third party libraries, which can then be referenced from the IDE/compiler. For example, create the directory "OpenGlResources" under disk D, which contains Libsd i>de folders>here we store all the library files and headers for the OpenGL project, respectively. The requirement now is that each time we create a new project, we have to tell the IDE where to find these directories. Put the produced glfw3.lible into "D:\OpenGLResources\Libs".

Project configuration process
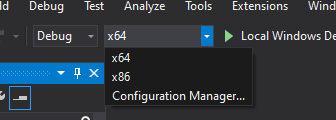
1. First, let's open Visual Studio and create a new project. If multiple options are provided, select C ++ and use Empty Projectdon't forget to give your Project an appropriate name). Since we will be doing everything in 64-bit mode, and the project is 32-bit by default, we need to change the drop-down menu at the top next to Debug from x86 to x64:

2. In Solution Explorer, right-click on the project and add a C++ file, which can be named "main.cpp".
Right-click on a project name in Solution Explorer and go to a VC++ Directoriesgure:

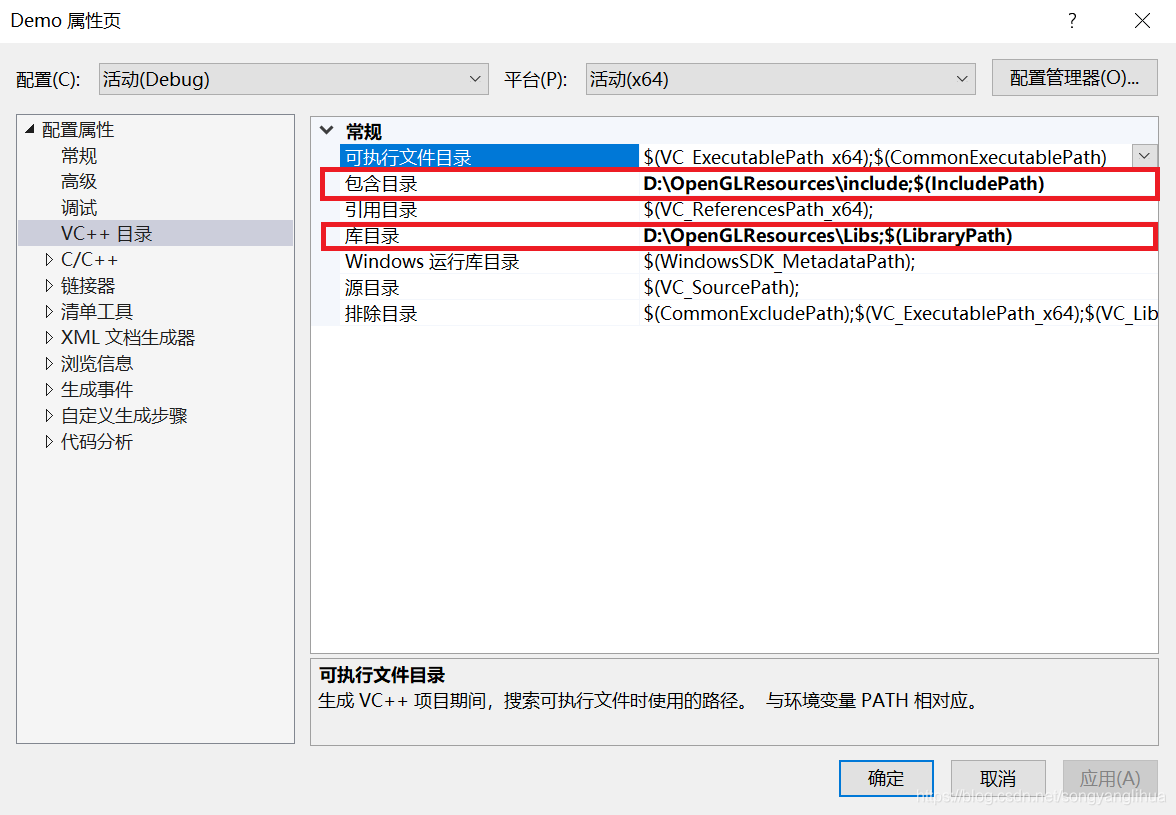
Add the "Libs" and "Include" Directories in "D:\OpenGLResources" for Include Directories and Library Directories, respectively. As shown in the figure:

Here, you can add as many additional directories as you need, and from then on, the IDE will also search for these directories when it searches libraries and header files. Once Includentains folders in GLFW, you can find all header files for GLFW by Include &>; GLFW/.. > . The same goes for library directories.
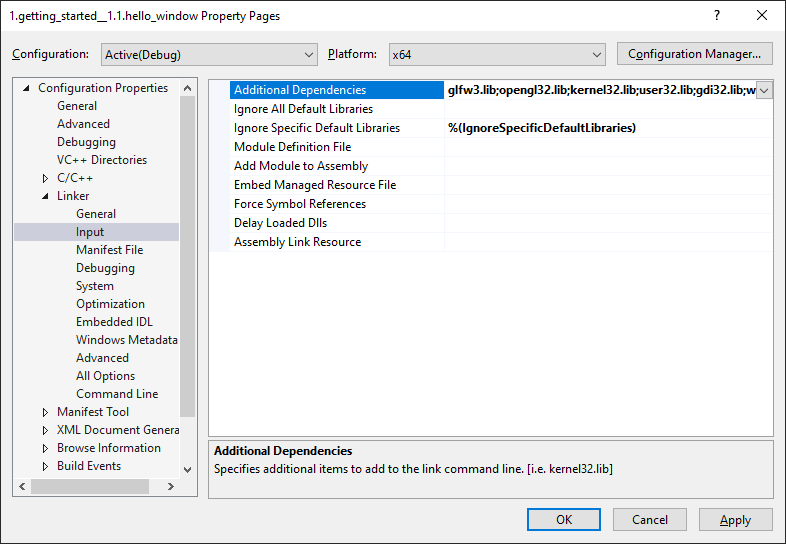
4. Because the VS now can find all the necessary documents, so we can finally through to the would TAB and GLFW link to project the Input :

Then, to link to the library, you must specify the name of the library for the linker. Because the library name is glfw3. Lib , we add it to the Additional Dependencies field (manually or using the & lt; Edit.. > option), and from this point on, GLFW will be linked at compile time. In addition to GLFW, we should also add a link entry openGL32.lib to the OpenGL library. If you are using Windows, the OpenGL library engl32.lib c> with the Microsoft SDK and is installed by default when you install Visual Studio. Since this chapter uses the VS compiler and is on Windows, we will add opengl32.lib the linker Settings. Note that the 64-bit equivalent to the OpenGL library is called openGL32.lib.
This completes the setup and configuration of GLFW.
5. Go to the Glad Web service, make sure the language is set to C ++ and select the OpenGL version of at least 3.3 in the "API" section (this is the version we will be using; Higher versions are also available). Also, make sure that the configuration file is set to Core and the Build Loader option is checked. Ignore the extension for a moment, and then click Build to generate the result library file.
Glad should now have provided you with a ZIP file containing two include folders and a glad.cle. Copy both include folders (gladd k> /code>) into> include (s) directory, that is, "D:\OpenGLResources\include". Then add the glad.cle to your project.
After completing the above steps, you should be able to add the following include directive at the top of the "main.cpp" file:
#include < glad/glad.h>
The Compile button should not give you any errors.
 

Vs2019 nuget configuring OpenGL

The OpenGL library is not well configured, so we will configure it. The OpenGL library is not well configured. Before, the configuration libraries were all header files, and the libraries were a bunch of things to set up. Microsoft has come up with a great solution called NuGet


opens in the browse search nupengl, will find the following two packages
respectively selected two packages, click “install” on the right side. After installing both packages successfully, you will see that there are two more folders in the Packages folder under the project folder, which are the packages that we imported. Now you can use OpenGL functions by adding the corresponding header files in the program. There is no need to configure them in the project properties.

Vs2015 + PCL. 1.8.1 (win10) environment configuration

This weekend did nothing, from Friday night to install the PCL library, the whole is really want to cry, again and again, every time there are dozens of even hundreds of new problems, obviously in accordance with the previous install version 1.8.0 method, I do not know what is wrong. Then on Saturday night to give up to go back to sleep, do not know what they have done, suddenly good, even before 1.8.0 encountered VTK can not use the problem is also solved, happiness comes too TTTTTTTTTTT suddenly !!!!!!!!!
I have also looked at the installation tutorials of many blogs, although they are all similar, but who can guarantee that there may be a place that does not fit and cause problems. Suffice it to say, the way to get yourself installed successfully is the right way. Here is a record of my final successful installation process, for your reference.
Install pcl1.8.1
First, download the pcl1.8.1 installation package for installation, the installation package can be found on the Internet.
Here attached my links: https://pan.baidu.com/s/1-dPRLZ1a8Ktemo2EGXU-Sw extraction code: 66 rb. I have 64 bits here. Here 32-bit or 64-bit depends on how many bits your VS compiler has, not the operating system.
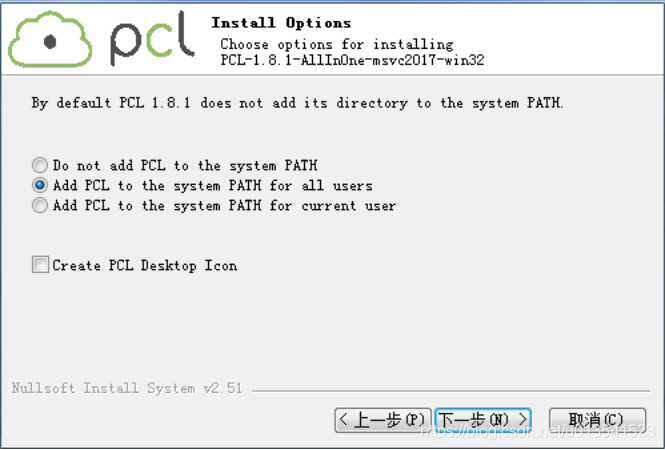
I am selecting the second option, automatically generating system variables, modifying the installation directory, and customizing the installation in C:\pcl1.8.1.


DirectX encountered “unresolved external symbol” when compiling on vs2015__ The solution and reason of “vsnwprintf”

Note: The following error was encountered while compiling DirectX provided sample on VS2015

LNK2001 __vsnwprintf SimpleSample11 C:\Program Files (x86)\Microsoft DirectX SDK (June 2010)\Samples\C++\Direct3D11\SimpleSample11\ DxErr. Lib (dxErr.obj)

Some of the information found on the Internet is summarized as follows
The solution
Add the following compile preprocessor instruction to the source file that reported the error

#pragma comment(lib, "legacy_stdio_definitions.lib")

Error reason
The VS2015 design changed many of the original libraries to inline, and inline functions are not visible to DLLs or LIBs, so there is no library file to link to, so we have to add a special library file to link to the library functions, namely legacy_stdio_defines.lib. There are many Windows 8 SDKs that rely on these methods that have been inlined in the new runtime, and so far it seems that using legacy_stdio_defines.lib can remedy most of the problems left over from this change. According to Microsoft, they will update the Windows SDK in the final VS2015 release to resolve this issue.
Refer to the address

    (VS 2015 CTP 5 C++) _vsnwprintf_s and other functions are not exported in appcrt140.dll, breaking linkage of static libraries C++: Unresolved external symbol _sprintf and _sscanf in Visual Studio 2015missing (stdio) identifiers with external linkage

Vs2017 C + + cannot open source file: “sdkddkver. H”, “stdio. H”, “TCHAR. H”

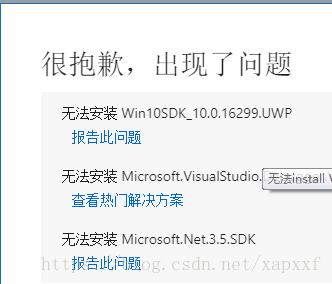
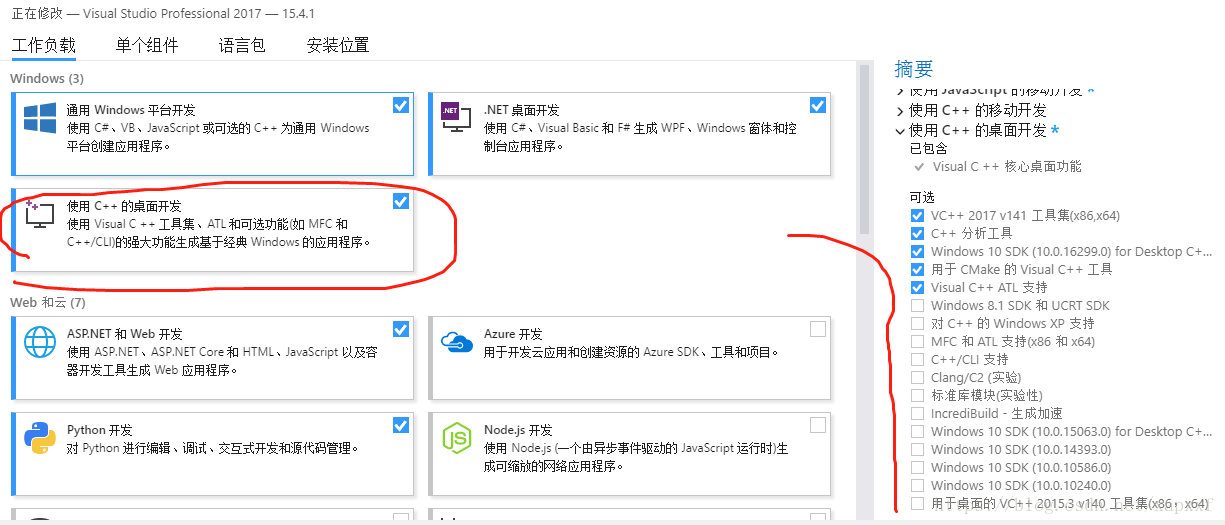
The first time it was installed, the error in the picture appeared. Searched for this for a long time, thought is the installation problem, uninstall reinstall several times…… Thirty grams of stuff, it’s no joke.

But finally found that the reason for this problem is!! In the case of Visual Studio default installation, there are files that are not checked by default, that is, they are not installed by default. (Also should be because Win10SDK installation failed, but how to install also can not install, even if…

, causing problems)
But!!!!! H and stdio.h exist in these files.
It is not installed by default, as shown in the figure below:

Because oneself is this pit for a long time, think the net search is all sorts of separate download, the latter search, and then reconfigure and so on incomparable trouble operation. Here are some of the easiest ways to do it once and for all

Solution:
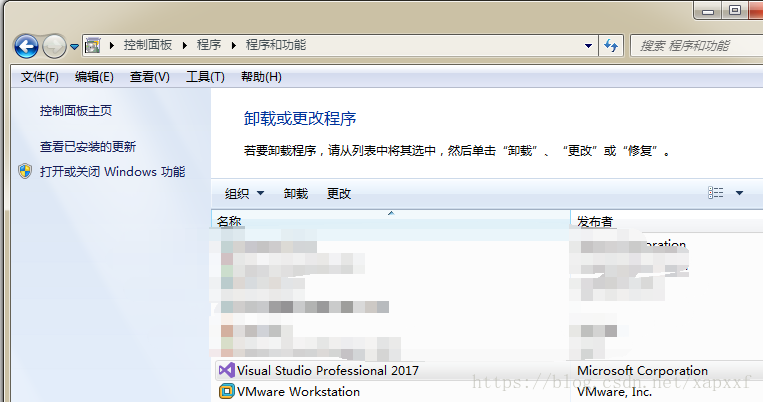
Just go to Programs and Functions, go to VS, right-click, modify, and check those, and you’re done.


Right-click and go to Change
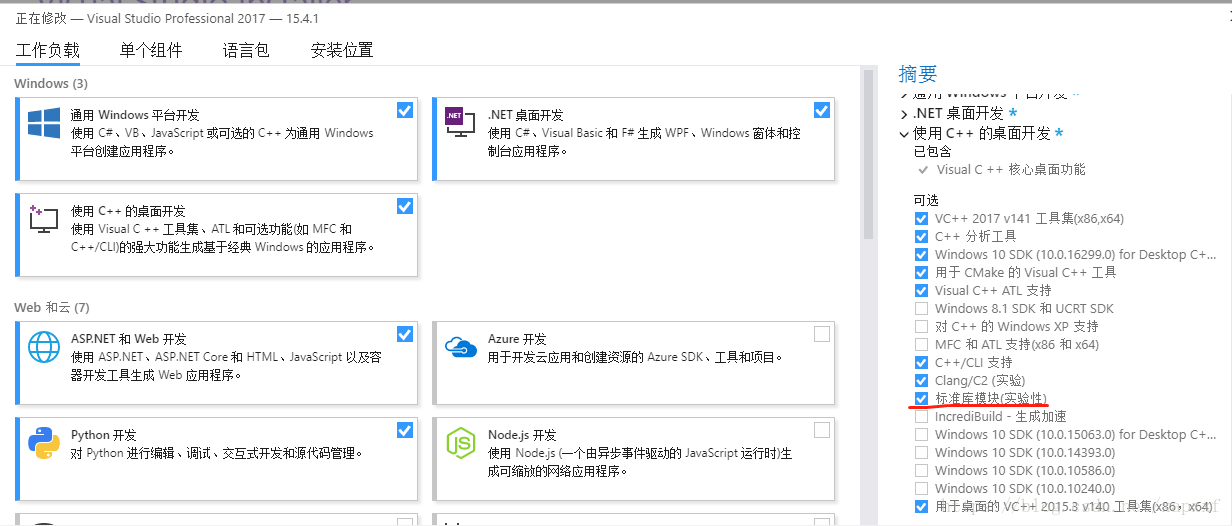
Then you can see:

Then, click More and Select – Modify (check the box). After the completion of the picture, found that I forgot that several are unsolved problems ticked)

C++, check, and then confirm the modification OK, wait for the installation, problem solved. You don’t have to go to download WindowsSDK yourself.

Solve!
(after this can be used, my development needs can basically meet, but this is the installation of Win10SDK failure, the helpless move)

Separate installation, you can reference this article: http://blog.csdn.net/hhh1108/article/details/50352027
There is also a point of benefit, so you can install to other disks. Configure it yourself. VS will be installed on the C drive.

Of course, if you can install the Win10SDK on your computer, you should not have this problem.

The simplest course of configuring OpenGL in vs2015

This may be the simplest configuration of OpenGL related library method, this semester needs to learn graphics, so the Internet to find a variety of configuration OpenGL method, found that many people are copied to copy, many methods are wrong. Otherwise, the PC environment is different and various.lib file lookup errors appear in the configuration. Also many methods need to configure the external environment, is also troublesome. Today I will introduce my own method, do not need to consider the computer environment, convenient and simple.
1. Upgrade to VS2015
I am using VS2015. I do not know about the previous version, nor do I know whether it can be used, so I suggest you to upgrade to 2015. After all, do you use the new version or not?
2. Open VS2015 and create a new Win32 project (won’t create the wall to go).
Name it whatever you want, place it whatever you want.
3. Use NUTGET
This step is the most important and the only step in the configuration process.
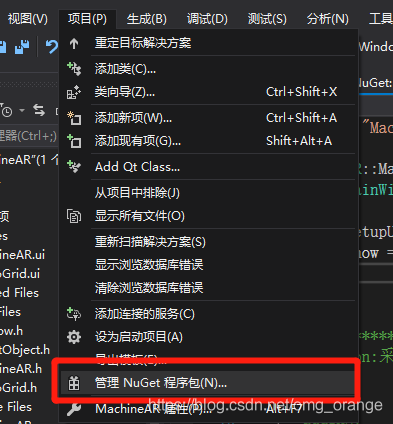
vs2015 toolbars -> NuGet Package Manager-> Manage Nuget Packages for solution
The diagram below
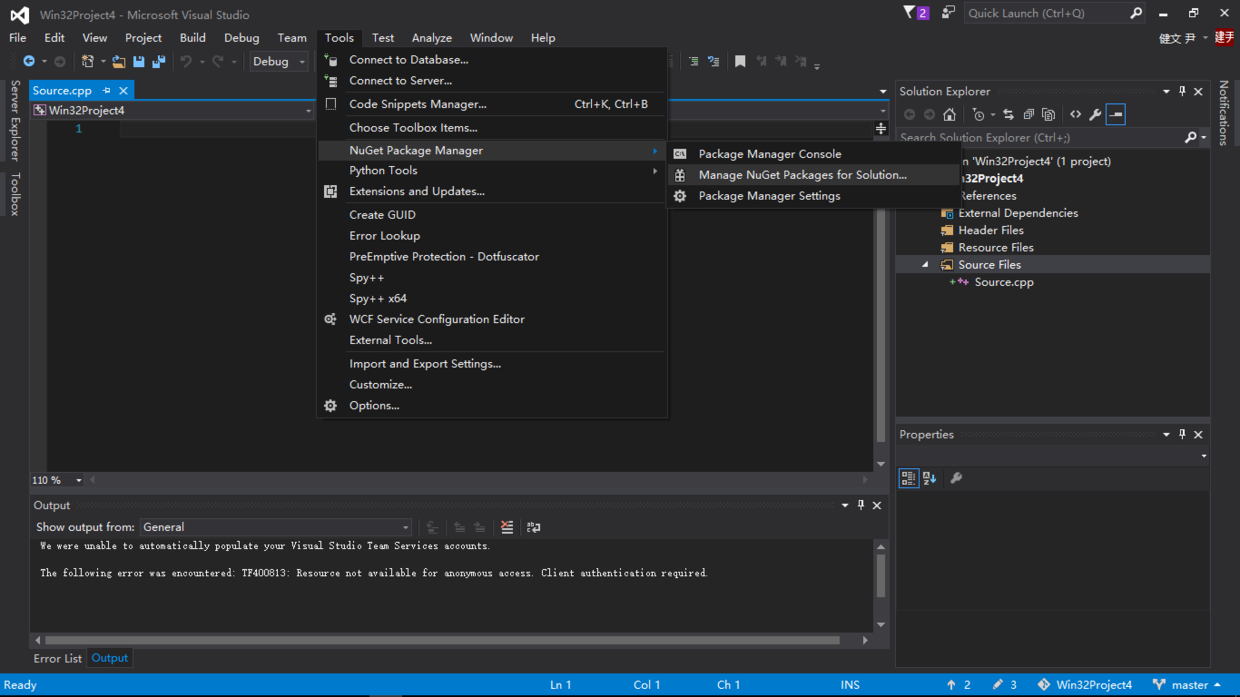
And then you see something like this
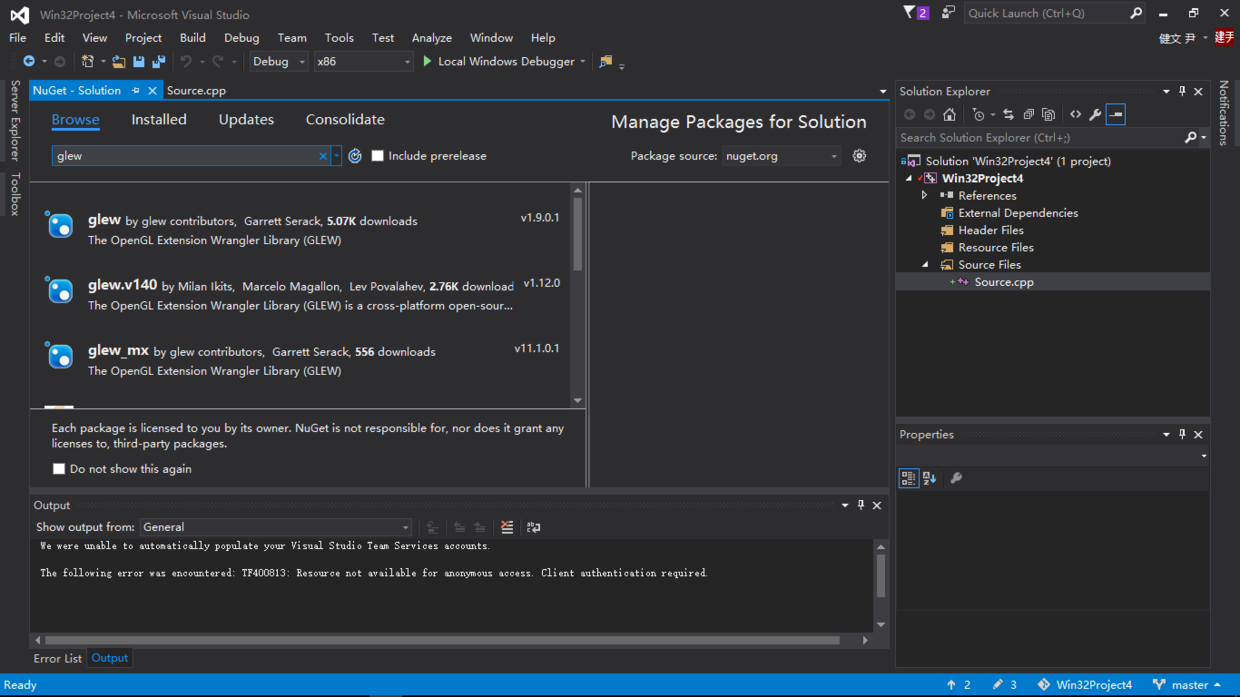
Search the Browse window for any library you want. For example, here I want to configure glew and freeGLUT, I’ll search glew and then click Install at the top.
When configuring FreeGLUT, remember to select the second one. In fact, you can look at the installation amount, and select the one with the highest installation amount as the safest install.
4. Test

#include <stdio.h>
#include <GL/glew.h>
#include <GL/glut.h>
void init()
{
    glClearColor(0.0f, 0.0f, 0.0f, 0.0f);
}

void display()
{
    glClear(GL_COLOR_BUFFER_BIT);
}

int main(int argc, char* argv[])
{
    glutInit(&argc, argv);
    glutInitWindowPosition(100, 100);
    glutInitWindowSize(800, 480);
    glutInitDisplayMode(GLUT_RGBA);

    glutCreateWindow("opengl");

    glewInit();

    init();

    glutDisplayFunc(display);

    glutMainLoop();
    return 0;
}

Run this code, if run successfully indicates that the configuration is successful, do not need any reference code what, super convenient!!
if you’re running failure is your problem, it’s ok with me (low ˇ ∀ ˇ “)