OpenGL VS2019 configuration process
The overall configuration process and tools refer to the content of Learnopengl, but I jumped into the pit during the process, and spent some time to climb the pit. I recorded the configuration process in my blog, which is convenient for future reference and passers-by to climb the pit. LearnOpenGL materials address: https://learnopengl.com/Getting-started/Creating-a-window
Tool installation process
1. The development tool VS2019 (to install the component C++), the detailed installation process is “omitted”.
2. Download GLFW, link address: https://www.glfw.org/download.html. Here is to download the 64-bit source file package, into a specified directory, I put the D disk, directory is “D:\OpenGL”, and then decompress. As shown in the figure:

3. Download the Cmake and installation, link address: https://cmake.org/download/. Download the 32 bit installation file here, after downloading the default installation can be. After installation, open the CMake software and configure it through the GUI. The specific configuration is as follows :(1) Select the directory after GLFW decompression in Where is the source code; (2) Create a new build directory in the unzips directory and fill it in “Where to Build the Binaries”; (3) Once the source and destination folders are set, click the
The overall configuration process and tools refer to the content of Learnopengl, but I jumped into the pit during the process, and spent some time to climb the pit. I recorded the configuration process in my blog, which is convenient for future reference and passers-by to climb the pit. LearnOpenGL materials address: https://learnopengl.com/Getting-started/Creating-a-window
Tool installation process
1. The development tool VS2019 (to install the component C++), the detailed installation process is “omitted”.
2. Download GLFW, link address: https://www.glfw.org/download.html. Here is to download the 64-bit source file package, into a specified directory, I put the D disk, directory is “D:\OpenGL”, and then decompress. As shown in the figure:
3. Download the Cmake and installation, link address: https://cmake.org/download/. Download the 32 bit installation file here, after downloading the default installation can be. After installation, open the CMake software and configure it through the GUI. The specific configuration is as follows :(1) Select the directory after GLFW decompression in Where is the source code; (2) Create a new build directory in the unzips directory and fill it in “Where to Build the Binaries”; (3) Once the source and destination folders are set, click the
Configuretton so that CMAKE can read the required Settings and source code. Then we must choose the generator of the project, and because we are using the Visual Studio 2019, so we will select the 16 option Visual Studio (Visual Studio 2019, also known as Visual Studio (16) (4) the CMake will display possible build options to configure the generated library, click on the Generate , The resulting project file will be generated in your buildlder. 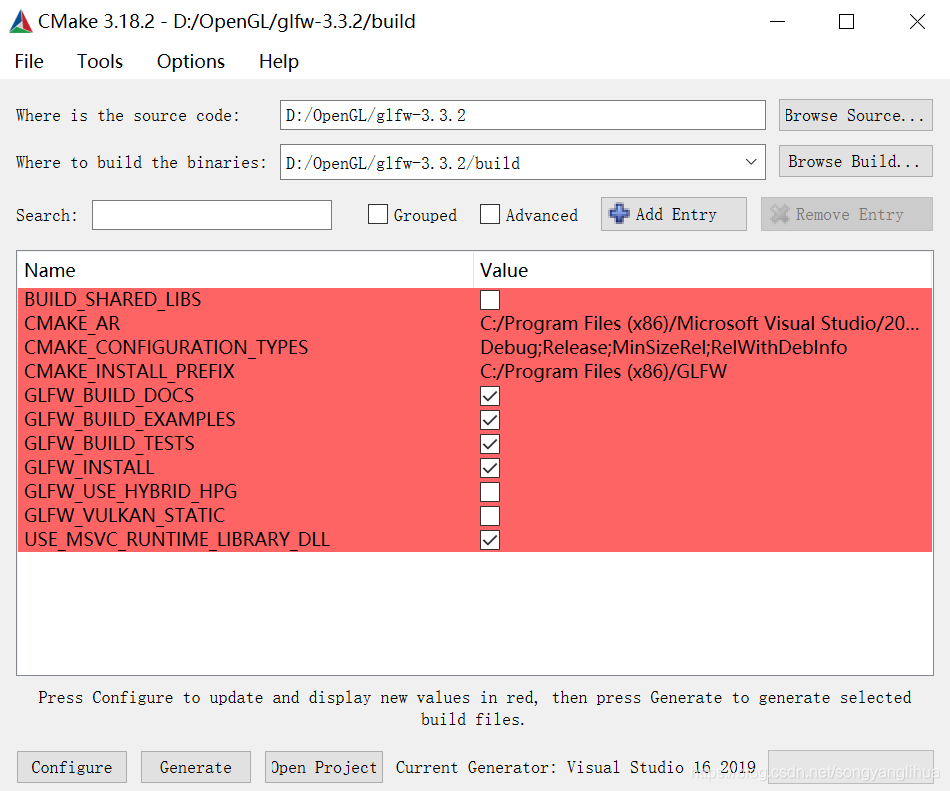
4. You can now find a file named glfw.sln the buildlder and open it using Visual Studio 2019. Because CMake generates a project file that already contains the correct configuration Settings, we just need to build the solution. CMake should have configured the solution automatically so that it can compile to a 64-bit library. Now click Build the solution. This will give us a compiled library file glfw3.libich can be found in build/ SRC /Debugmed. Once the library is generated, we need to make sure that the IDE knows where to find the library and the inclusion files for OpenGL programs.
5. We create a new folder in the d-root directory to hold all the header files/libraries from the third party libraries, which can then be referenced from the IDE/compiler. For example, create the directory "OpenGlResources" under disk D, which contains Libsd i>de folders>here we store all the library files and headers for the OpenGL project, respectively. The requirement now is that each time we create a new project, we have to tell the IDE where to find these directories. Put the produced glfw3.lible into "D:\OpenGLResources\Libs".

Project configuration process
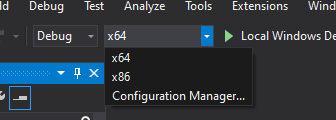
1. First, let's open Visual Studio and create a new project. If multiple options are provided, select C ++ and use Empty Projectdon't forget to give your Project an appropriate name). Since we will be doing everything in 64-bit mode, and the project is 32-bit by default, we need to change the drop-down menu at the top next to Debug from x86 to x64:
2. In Solution Explorer, right-click on the project and add a C++ file, which can be named "main.cpp".
Right-click on a project name in Solution Explorer and go to a VC++ Directoriesgure:

Add the "Libs" and "Include" Directories in "D:\OpenGLResources" for Include Directories and Library Directories, respectively. As shown in the figure:
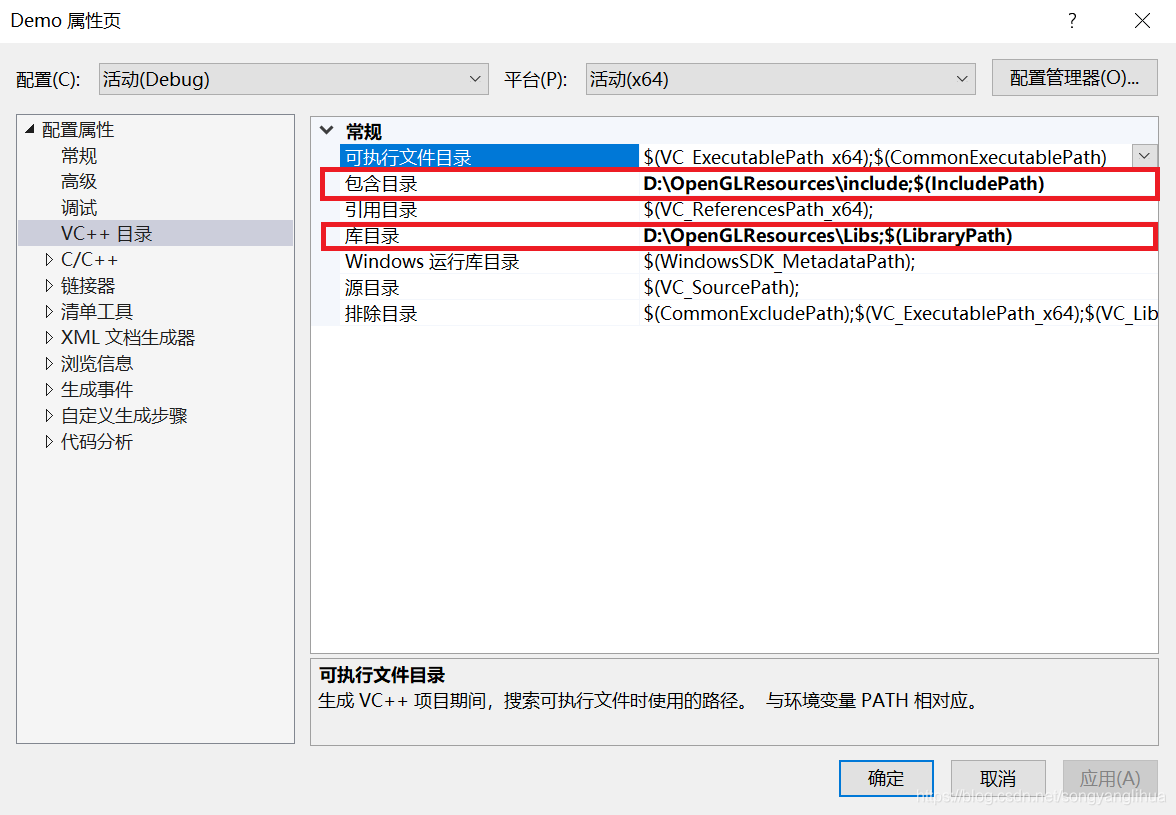
Here, you can add as many additional directories as you need, and from then on, the IDE will also search for these directories when it searches libraries and header files. Once Includentains folders in GLFW, you can find all header files for GLFW by Include &>; GLFW/.. > . The same goes for library directories.
4. Because the VS now can find all the necessary documents, so we can finally through to the would TAB and GLFW link to project the Input :
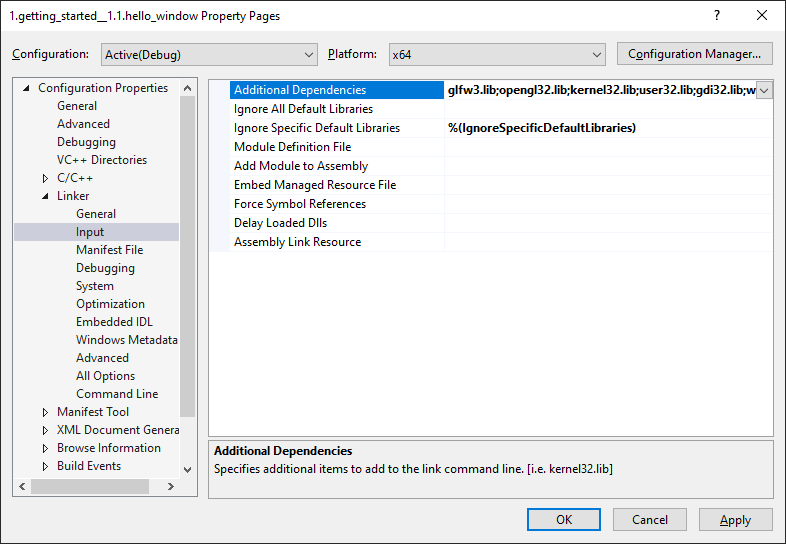
Then, to link to the library, you must specify the name of the library for the linker. Because the library name is glfw3. Lib , we add it to the Additional Dependencies field (manually or using the & lt; Edit.. > option), and from this point on, GLFW will be linked at compile time. In addition to GLFW, we should also add a link entry openGL32.lib to the OpenGL library. If you are using Windows, the OpenGL library engl32.lib c> with the Microsoft SDK and is installed by default when you install Visual Studio. Since this chapter uses the VS compiler and is on Windows, we will add opengl32.lib the linker Settings. Note that the 64-bit equivalent to the OpenGL library is called openGL32.lib.
This completes the setup and configuration of GLFW.
5. Go to the Glad Web service, make sure the language is set to C ++ and select the OpenGL version of at least 3.3 in the "API" section (this is the version we will be using; Higher versions are also available). Also, make sure that the configuration file is set to Core and the Build Loader option is checked. Ignore the extension for a moment, and then click Build to generate the result library file.
Glad should now have provided you with a ZIP file containing two include folders and a glad.cle. Copy both include folders (gladd k> /code>) into> include (s) directory, that is, "D:\OpenGLResources\include". Then add the glad.cle to your project.
After completing the above steps, you should be able to add the following include directive at the top of the "main.cpp" file:
#include < glad/glad.h>
The Compile button should not give you any errors.
Read More:
- Sending message to a handler on a dead thread
- VTK tutorial 1 ——– VTK installation under win10
- How to connect and share printer under win7
- Ubuntu can’t open Gnome terminal and display the error message exited status 8
- Error installing windows8 in virtual machine-HAL_INITIALIZATION_FAILED and
- Android studio auto import auto import
- Manjaro shut down the auto recovery software
- Keras: Cannot convert ‘auto‘ to EagerTensor of dtype float
- failed to render and update auto layout status for….
- Modification method of starting value of MySQL auto increment ID
- MySQL creates tables and sets auto increment of primary keys
- Solution of spring auto injection always report error in IntelliJ idea
- Failed to read auto-increment value from the storage engine in MySQL
- Problem solving module ‘ tensorflow.compat . V2 ‘has no attribute’ contrib ‘and importerror cannot import name’ auto ‘
- Win10 starts infinite loop auto repair, and the repair fails
- Vscode HTML file auto supplement HTML skeleton failure
- phpstudy Error while setting value ‘STRICT_TRANS_TABLES, NO_AUTO_CREATE_USER, NO_ENGINE_SUBSTITUTION