| vtk8.0.0 The install directory
| E: \ PCL1.8.1\3 rdparty \ VTK
Cmake Settings:
[1. Set the source directory is the vtk8.0.0 decompression directory ] and generated directory [is the build directory].
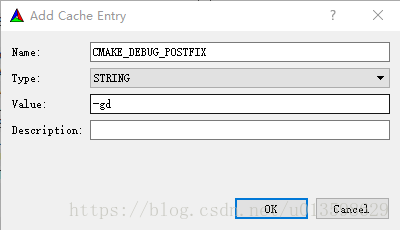
2. Click Add Entry,Name is CMAKE_DEBUG_POSTFIX, Type is String, Value is -GD, and click OK. This is to separate the final generated debug from the release version of the lib.
3. Click Configure, select VisualStudio 15 2017 Win64, and click Finish to wait for the configuration to complete.
After some time, the configuration is finished, and a configuration list will appear. Follow these steps to configure it
BUILD options
BUILD_EXAMPLES, build_shared_libs, BUILD_TESTING
Just tick build_shared_libs, and the other two are up to the individual to select, so it’s a lot faster at compile time, so I just tick build_shared_libs.
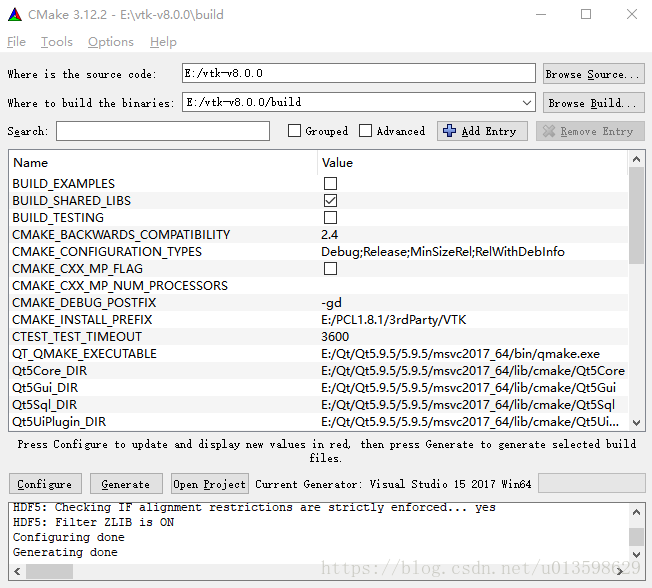
VTK installation directory
CMAKE_INSTALL_POSTFIX- Set to the vtk8.0.0 install directory described in the local directory above
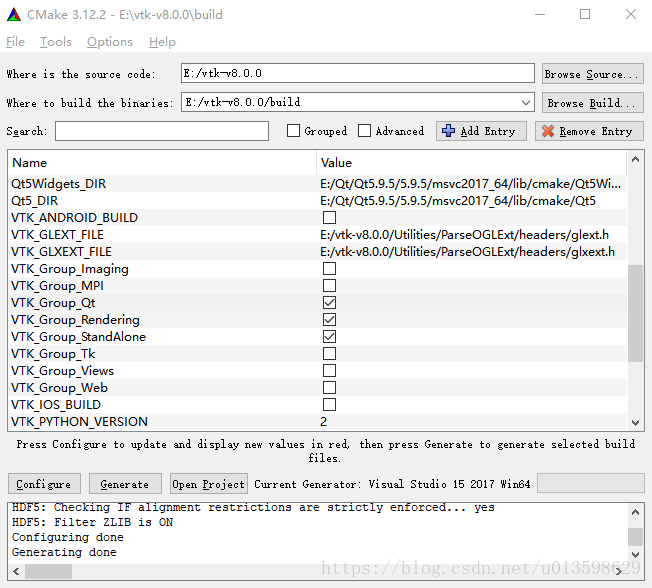
VTK_Group_Qt
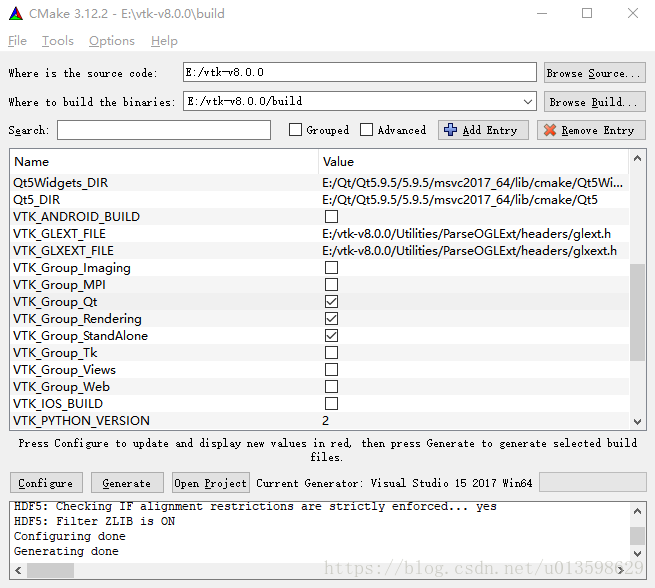
Click Configure and wait for the configuration to finish.
After some time, more configuration options will appear, and then follow the following steps to configure them.
1. Modify Qt5_DIR to E:\Qt\Qt5.9.5\5.9.5\msvc2017_64\lib\cmake\Qt5.
2. Set VKT_QT_VERSION to 5. Click Configure again to continue.
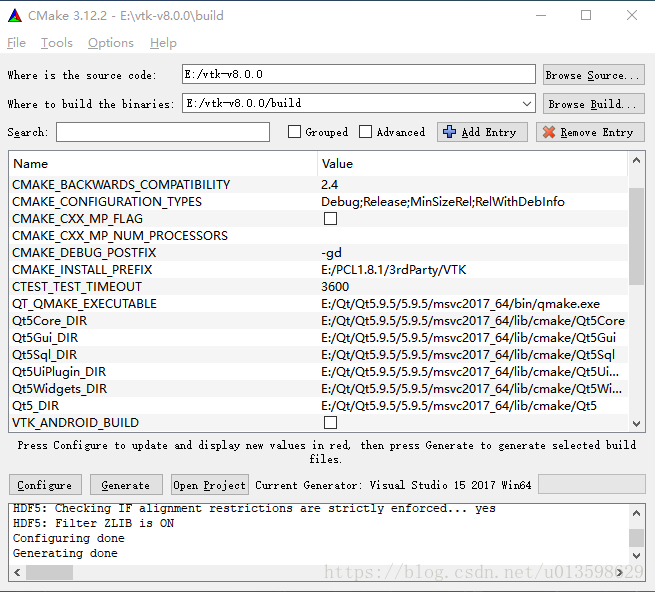
Generate engineering
After the configuration is successful, a Configuring Done prompt appears. Click Generate to build the project. If Generating Done appears, you can click Open Project. VTK. SLN will be opened in VS2017.
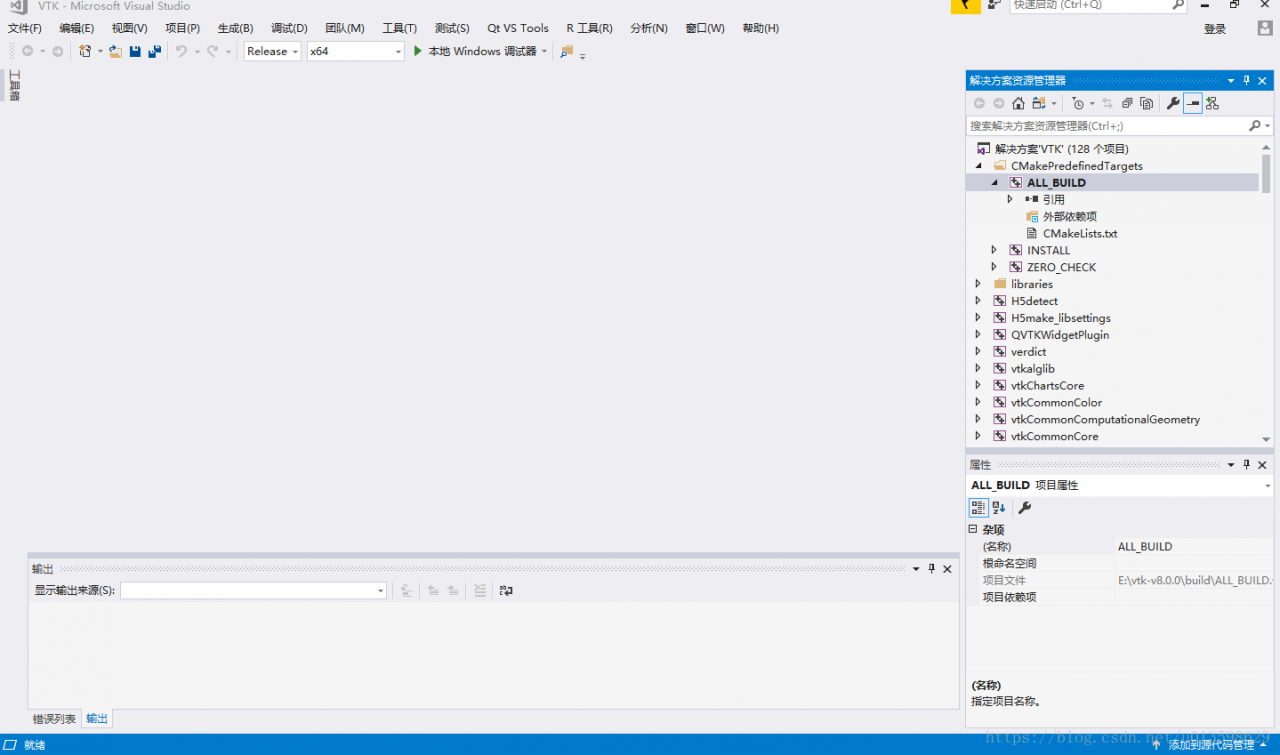
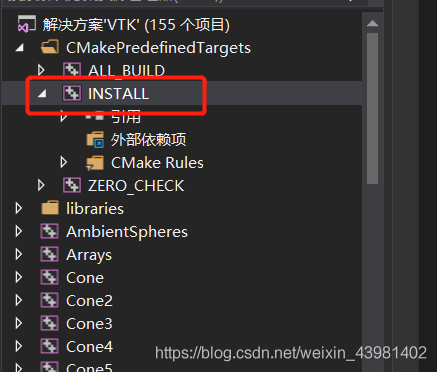
First, configure the solution to Debug in VS2017. In Solution Manager, go to ALL_BUILD, right-click, and click Build. Wait for VS to compile. When finished, find Install, click the right mouse button, and click Create
Switch the solution configuration to Release. In Solution Manager, go to ALL_BUILD, right-click, and click Build. Wait for VS to compile. When finished, find Install, click the right mouse button, and click Create.
After the above steps are completed, the compiled file will be placed under the path set by CMAKE_INSTALL_PREFIX.
Then put the QVTKWidgetPlugin.dll in the E:\vtk-v8.0.0\ Build \bin\Release directory
Copy to E:\Qt\Qt5.9.5\5.9.5\msvc2017_64\plugins\designer.
At this point, open the Designer again and you will see the QVTKWidget.
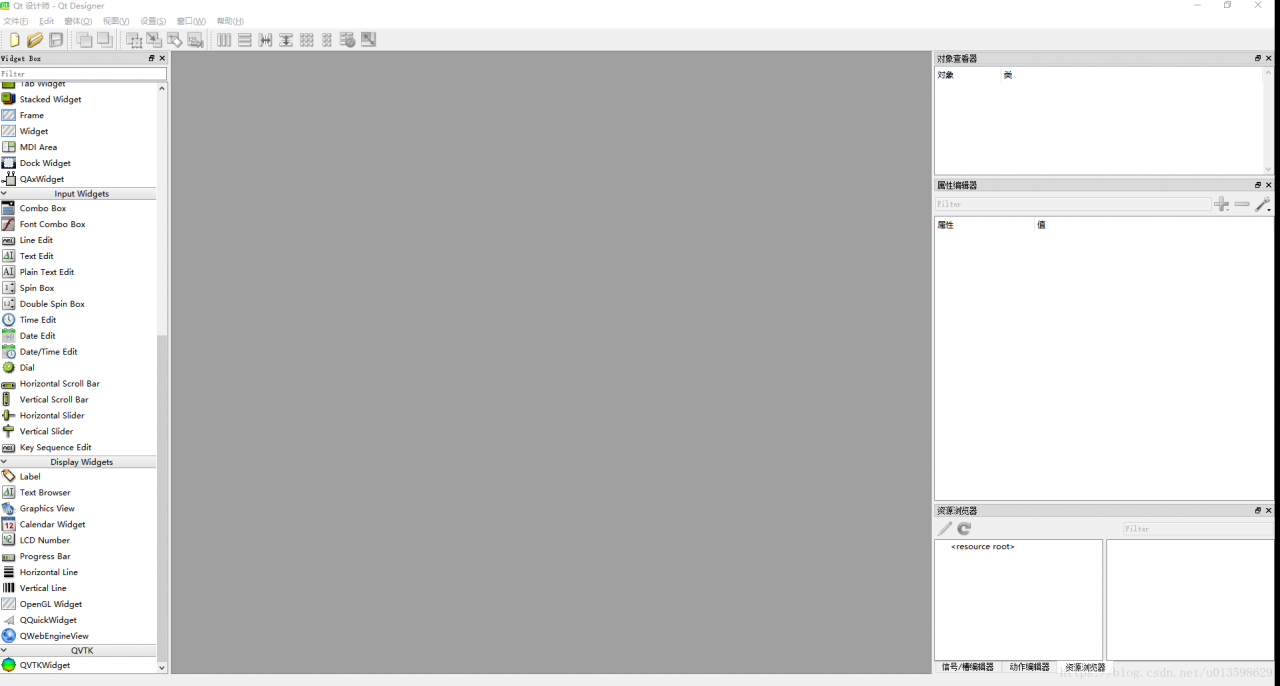
To do a good job, a worker must first sharpen his tools
First of all, we need to prepare the required documents, which are as follows:
(1) cmake, download link cmake download. As for what CMAKE is, I will not introduce it, so a book, want to say it is hard to say. If you look at the suffix,.msi and.zip, you may wonder “what’s the difference?” In my opinion, zip is more convenient than msi. 
(2) VTK file, divided into Source file and Data file. Download link VTK download link. Click the download link and you will see the picture.
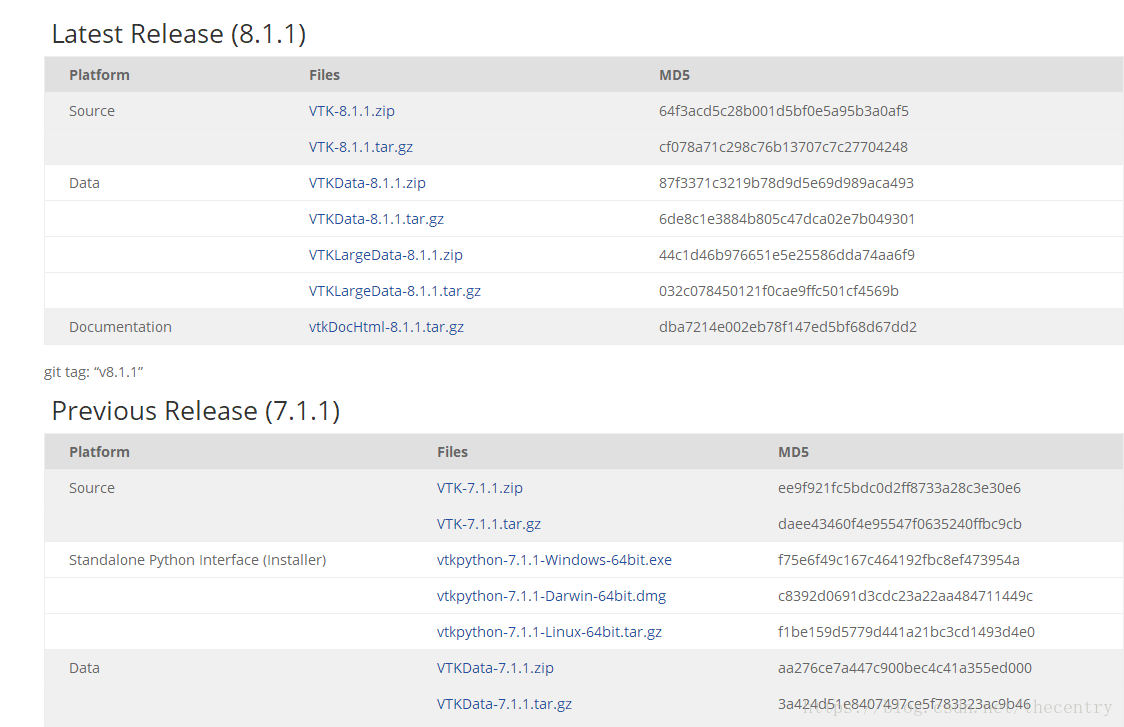
Download zip files for source and zip files for data. Since I’m using VS here, I don’t need to download Python.
After downloading, it is decompressed. I used to decompress the files extracted from Data into the files extracted from Source. I stressed that I decompressed them separately, that is, decompressed them into two folders.
Two, start compiling
(1) Create a new folder in the folder after source unzipped, habitually named build, this folder is used to put the project related files after cmake.
(2) Open cmake
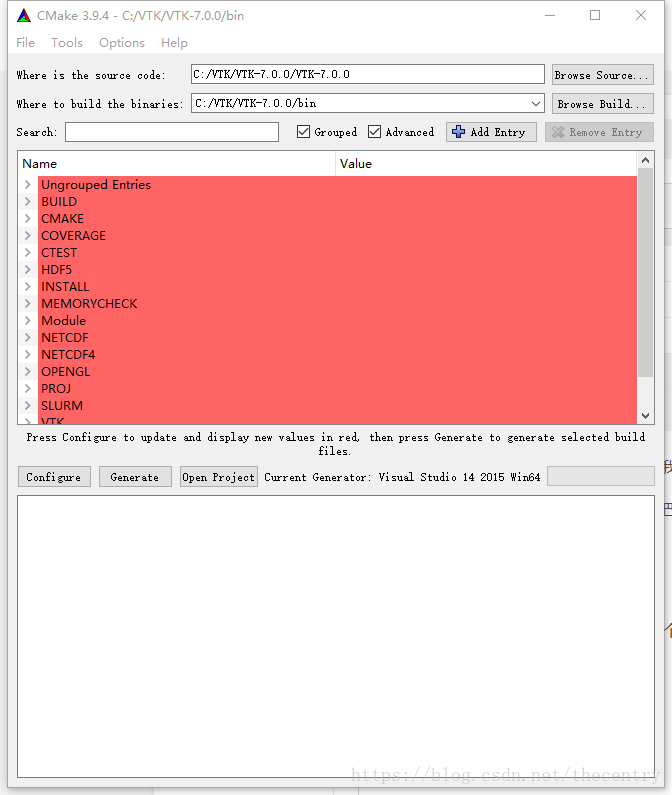
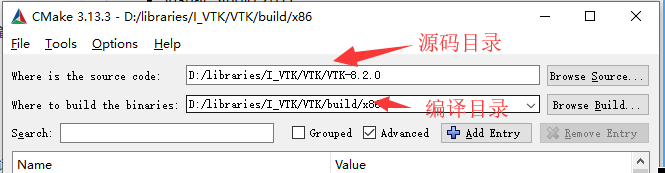
The source code bar is the path after unzips the source, and the build bar is the path of the project generated by CMAKE. The bin folder in the picture is not what I said above, so you can change the destination path to the build folder you created.
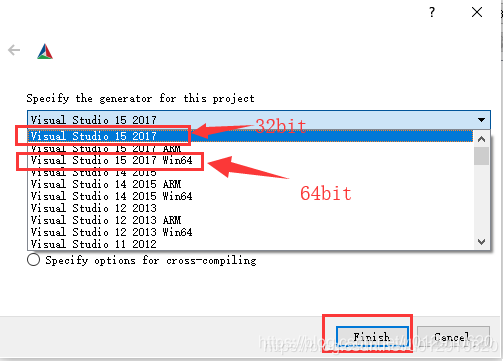
If you want to create a 64-bit VTK, you need to select the 64-bit VSXuan option. If you want to create a 64-bit VTK, you need to select the 64-bit VSXuan option
(3) Make the file options, the specific meaning of the options I will not say
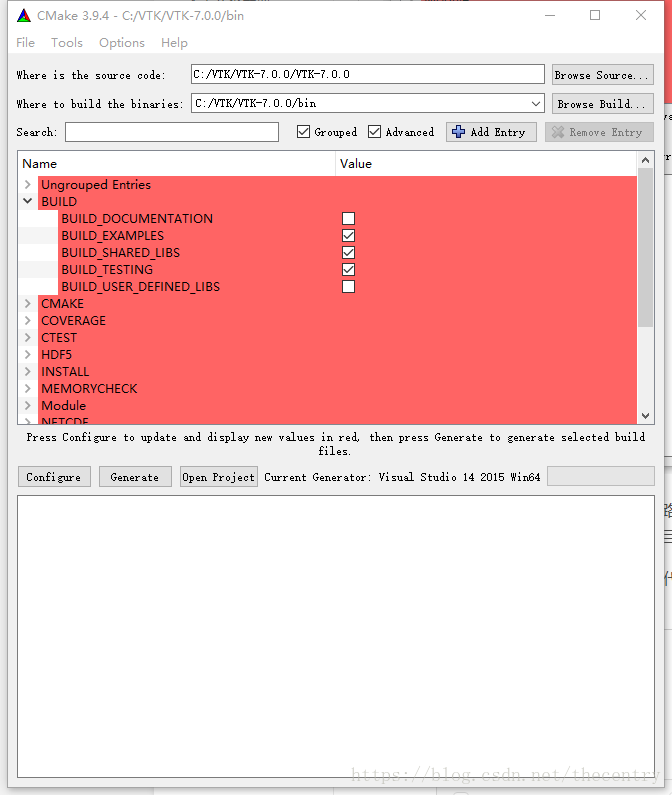
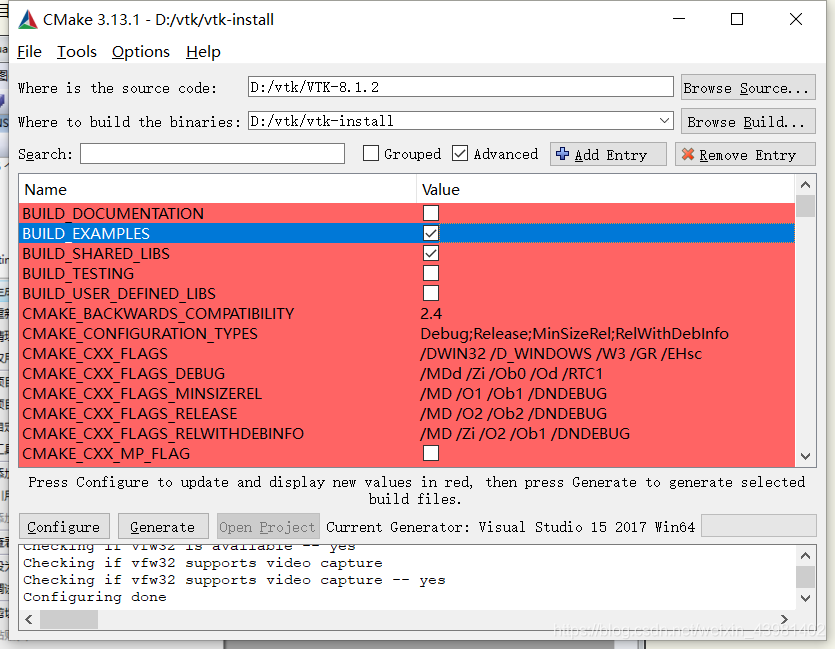
This is the item that should be checked in Build.
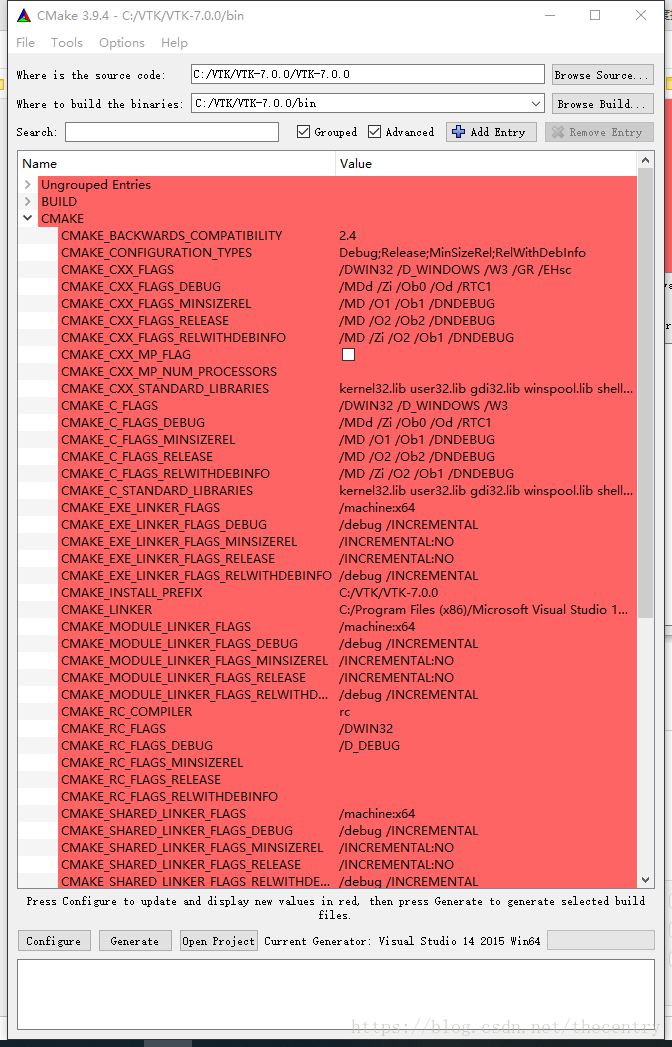
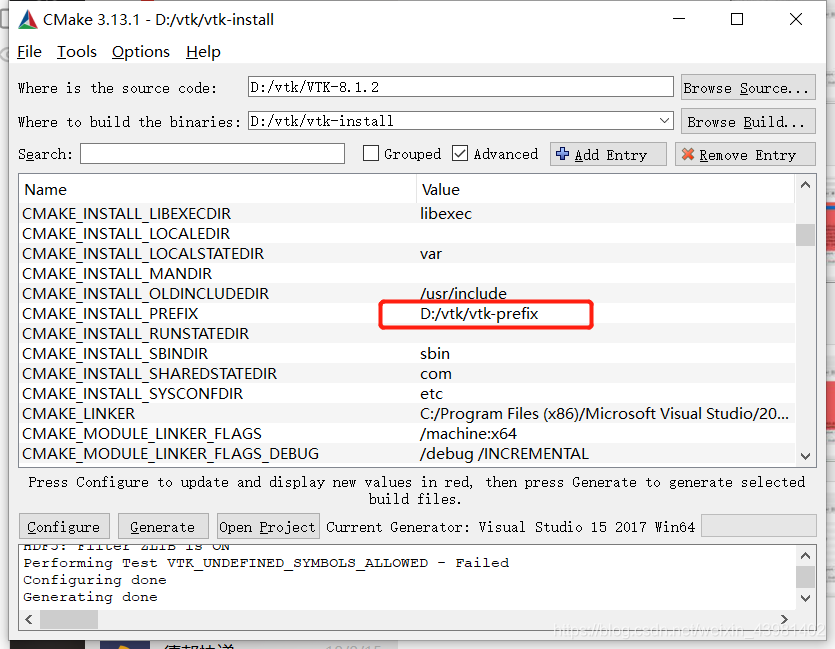
This is the cmake group, but watch out for CMAKE_INSTALL_PREFIX. This is a very important one. You’ll notice that most of the blogs don’t talk about it at the moment, but it will make it much easier to use VTK.
Then is the intall road strength configuration, as shown below:
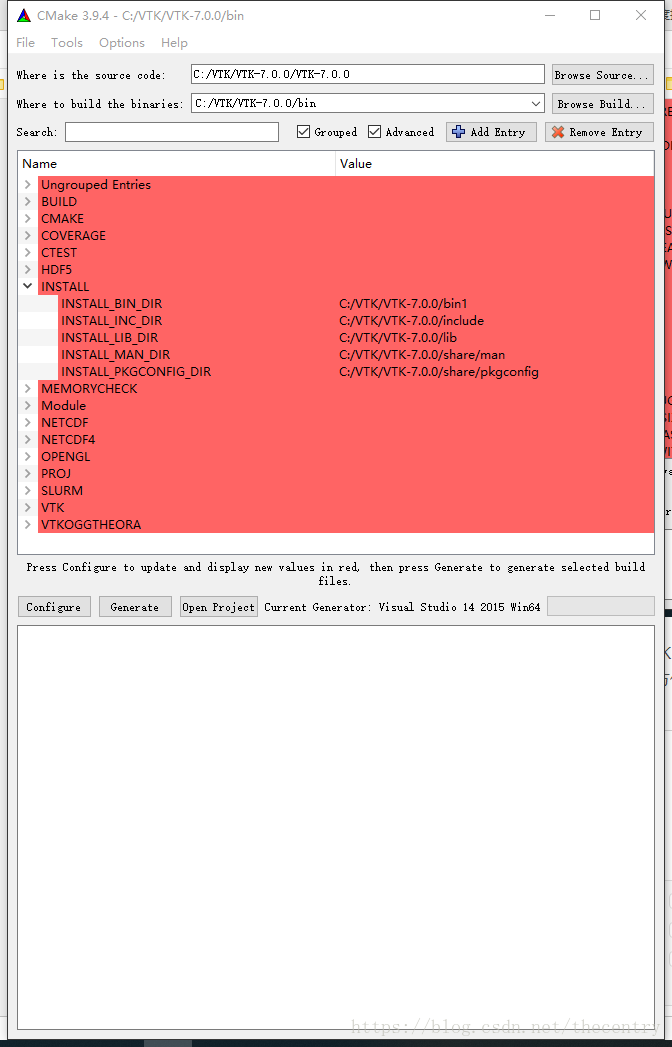
Represent the DLL path, the LIB path, and the VTK header path compiled with VS respectively. You need to set it up by yourself. In the future, you can use VTK just like OpenCV.
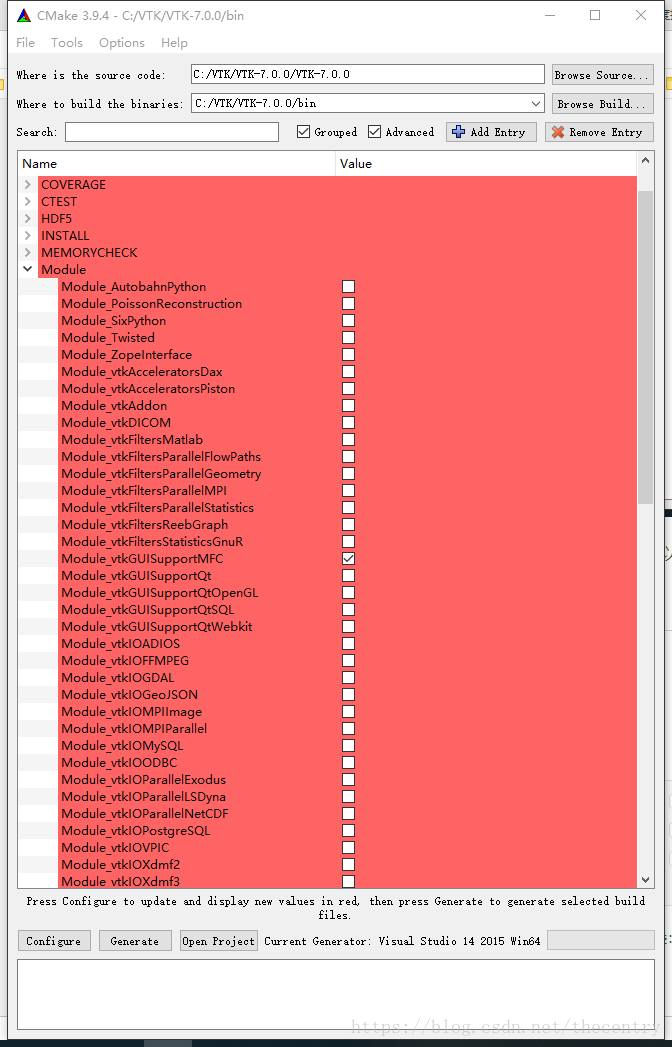
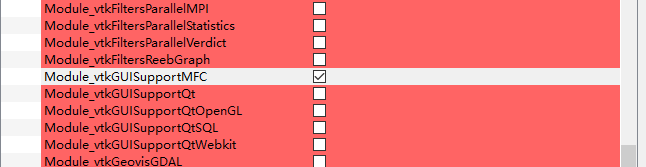
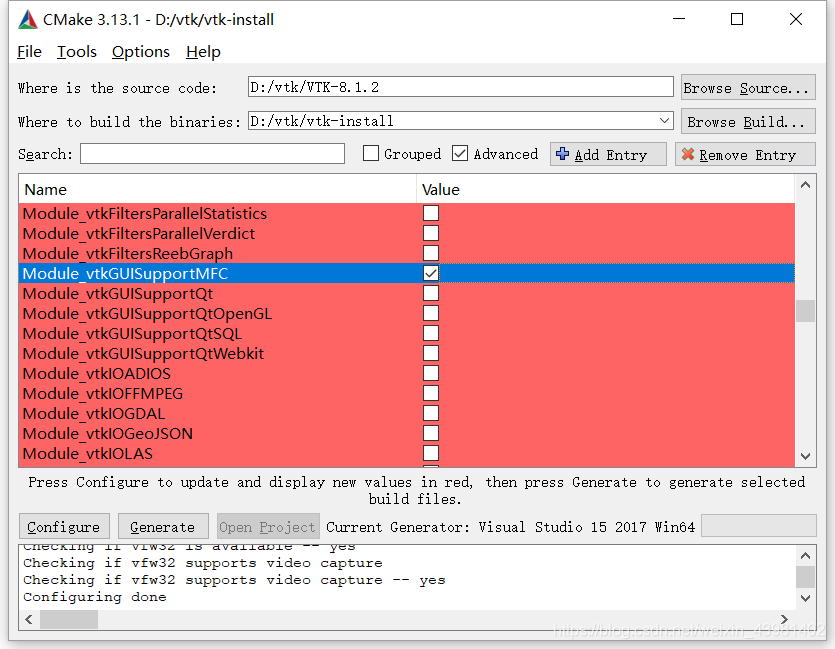
Because I’m using MFC, check the module_vtkguisupportMFC in the Module. Other options seem to be the default.
(4) Click the Configure button, and when the red color turns to white, click the Generate button to Generate the project.
Note: If there is an error when cmake is checked, it may be because the VS installation path has Chinese. Therefore, it is specially reminded that the installation path in Chinese should not appear.
(5) Finally, click Open ProJeroject to open the generated project in VS. As shown in figure:
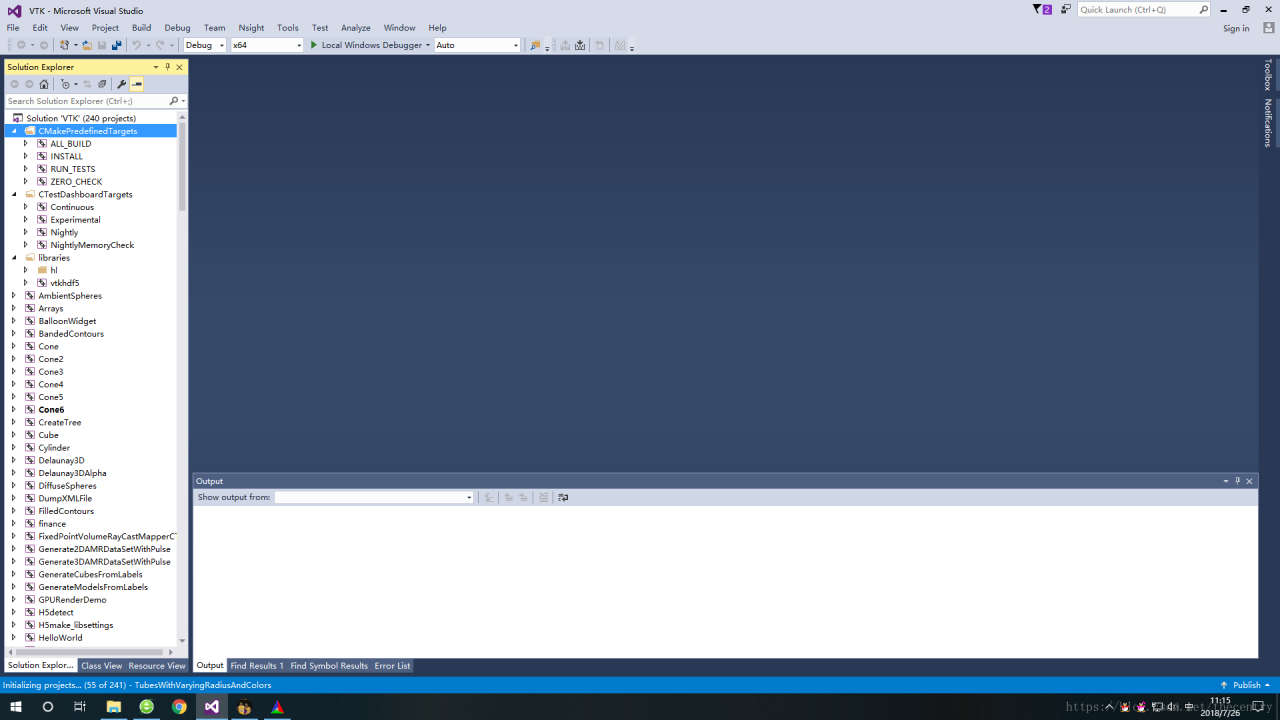
Compile all_build, only install if successful.
While I’m using VS2015, other VSs do the same, I need to remind you that there is one more step you need to take before VS2013 is compiled, and that is to install multiple character sets.

The result after successful compilation is shown in the figure below:
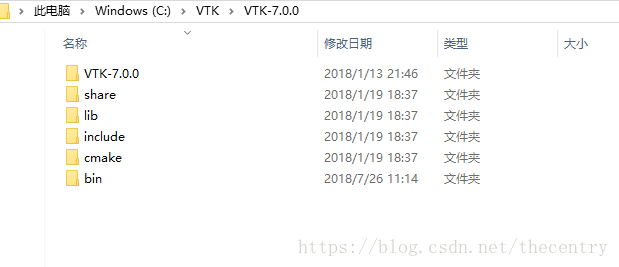
As for the use, and you are familiar with the use of OpenCV is the same.
Because everyone’s level is different, I don’t know if it’s clear or not. If there is a lack of documents, or what questions can be left in the blog question, we discuss together.
And finally, the aforementioned book:
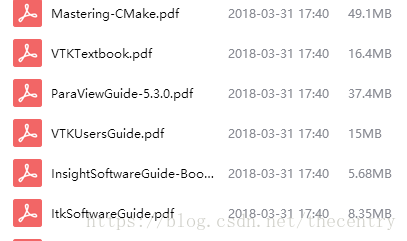
These are books about learning VTK, ITK, and CMAKE. Please leave a comment below if you need any.
To implement RealSense’s PCL point cloud display, VTK support is required. Since the entire platform is implemented in the Qt environment, VTK is compiled as a Qt plug-in. The whole process is not complicated, most of the online articles are not complete, their own carding, share out, I hope this is the last article you read under Qt install VTK plug-in article.
0 Compiling Environment
0.1 Package and version
|
Qt5.9.4
|
msvc2015_64 |
|
VS2015
|
|
|
VTK 8.1.1
|
https://www.vtk.org/download/
|
|
cmake3.11.3
|
Download
|
0.2 Local directory description
|
Qt5.9.4 msvc64 directory
|
C: \ Qt \ Qt5.9.4\5.9.4 \ msvc2015_64
|
|
VTK decompression directory
|
C: \ WS \ VTK \ VTK – 8.1.1
|
|
VTK Build directory
|
C: \ WS, VTK, VTK – 8.1.1, build
|
|
VTK installation directory (containing compiled inc,lib)
|
C:\vtk
|
1 the VTK download
1.1 Download VTK-8.1.1.zip,VTKData-8.1.1.zip files
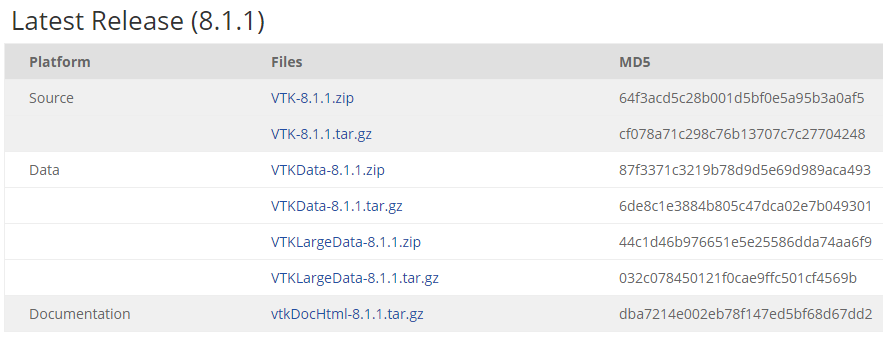
1.2 unzip
Select unzip to the current directory, the two files will be automatically assembled in the vtk-8.1.1 folder after unzip.

2. Configure VTK for Qt
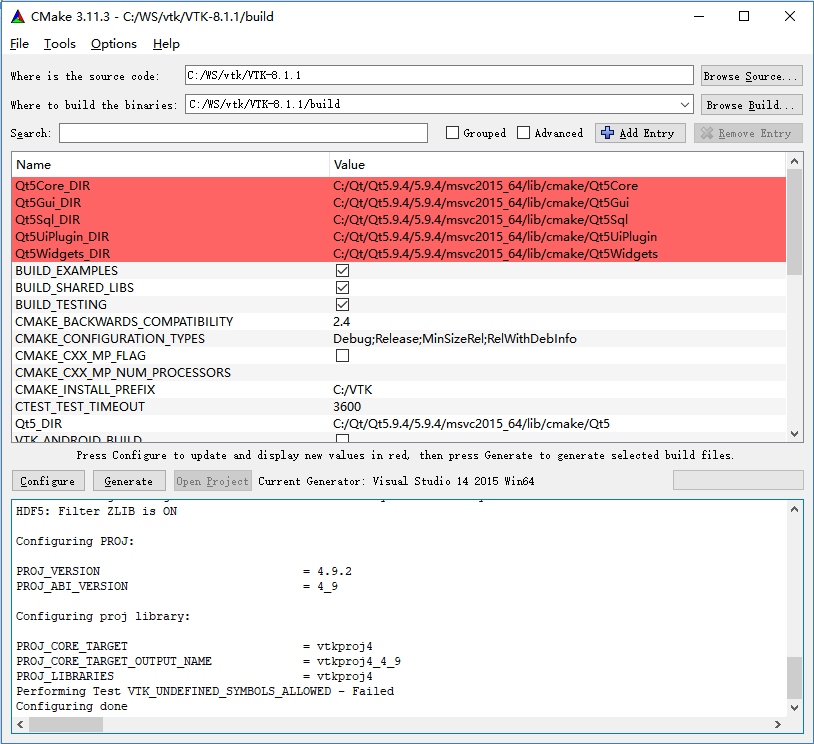
2.1 Start CMake, specify the source directory and compile directory, and click Configure.
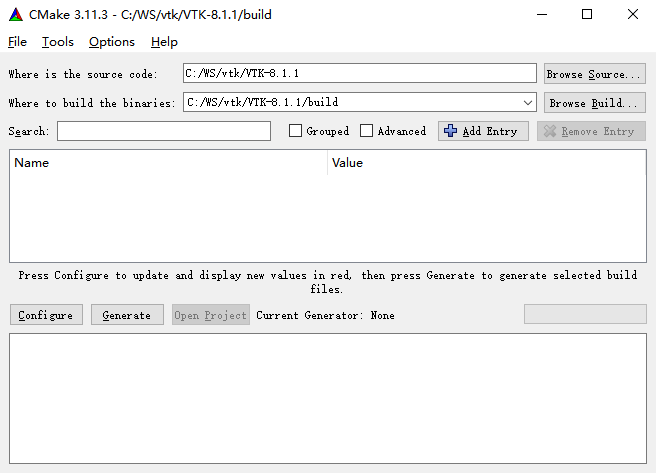
2.2 Specify the VS version
64-bit Visual Studio 14 2015 Win64, 32-bit Visual Studio 14 2015. Click Finish and wait for the configuration to complete.
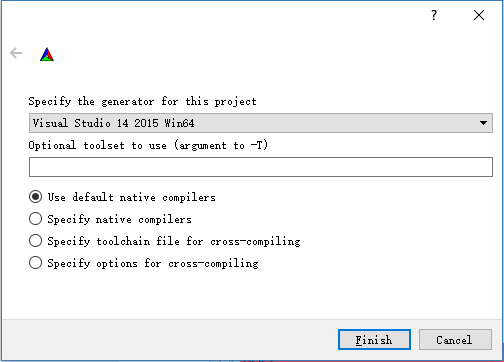
2.3 Configure compilation options (1)
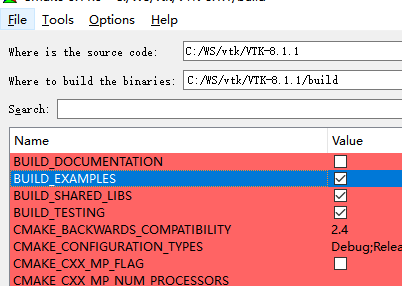
BUILD options
Select Build_Examples, Build_Shared_Libs, and Build_Testing.
Note:
It is not recommended to select Documentation, which requires that Doxygen be installed first.
It is not recommended to remove TESTING as this will cause errors to be reported at the later VS compilation stage and header files to be modified.
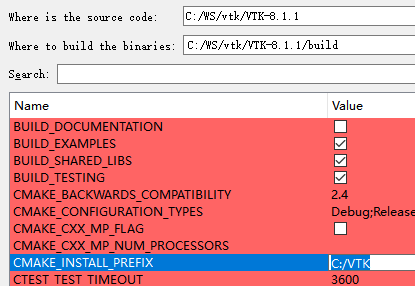
VTK installation directory
Include, lib, DLL (bin), and so on.
VTK_Group_Qt
Set the target environment for compilation to Qt.
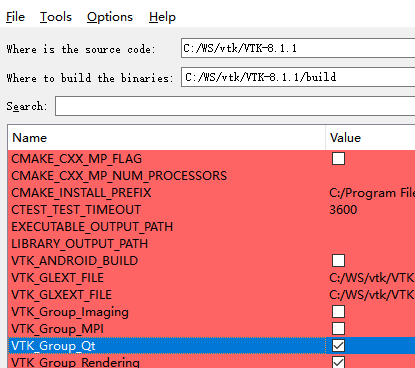
Once you have done all three Settings, click Configure.
2.4 Configure compilation options (2)
After the first configuration is complete, the user is prompted for Qt5_DIR and VKT_QT_VERSION.
Amend the Qt5_DIR to C:/Qt/Qt5.9.4 5.9.4 msvc2015_64/lib/cmake/Qt5.
Set VKT_QT_VERSION to 5.
Click Configure again to continue.
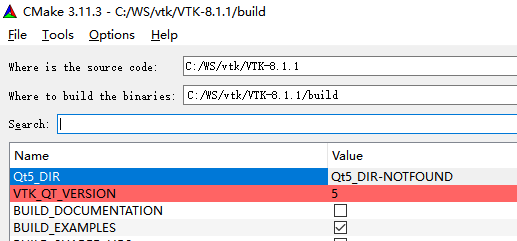
2.5 the Generate engineering
When the configuration is successful, a Configure Done prompt appears. Click Generate to build the project.
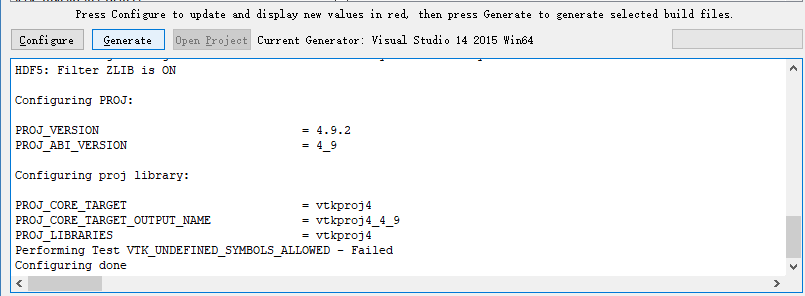
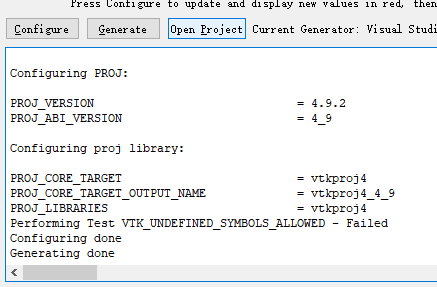
2.6 Start VS2015 and start compiling
Generating done indicates that VS2015 project has been generated successfully. Click Open Project, VS2015 will start and Open the Project.
3 Compile VTK project in VS2015
3.1 build
After opening the project, the default startup item is ALL_BUILD, and you can directly select Build. Both the Release and Debug versions need to be built, so two compilations are performed.
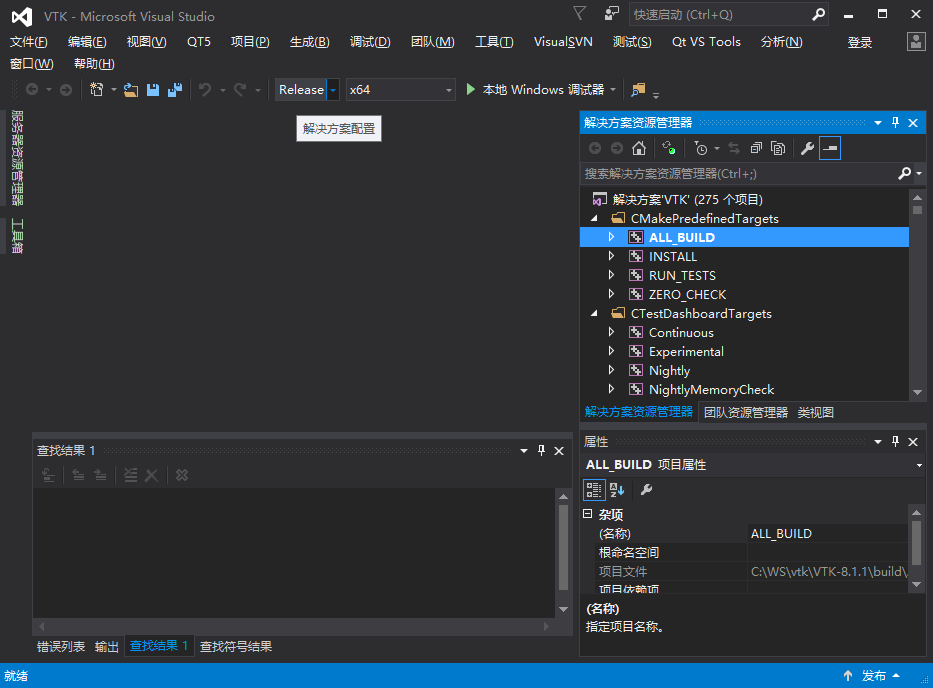
It’s been a long time, long time… . And it worked.
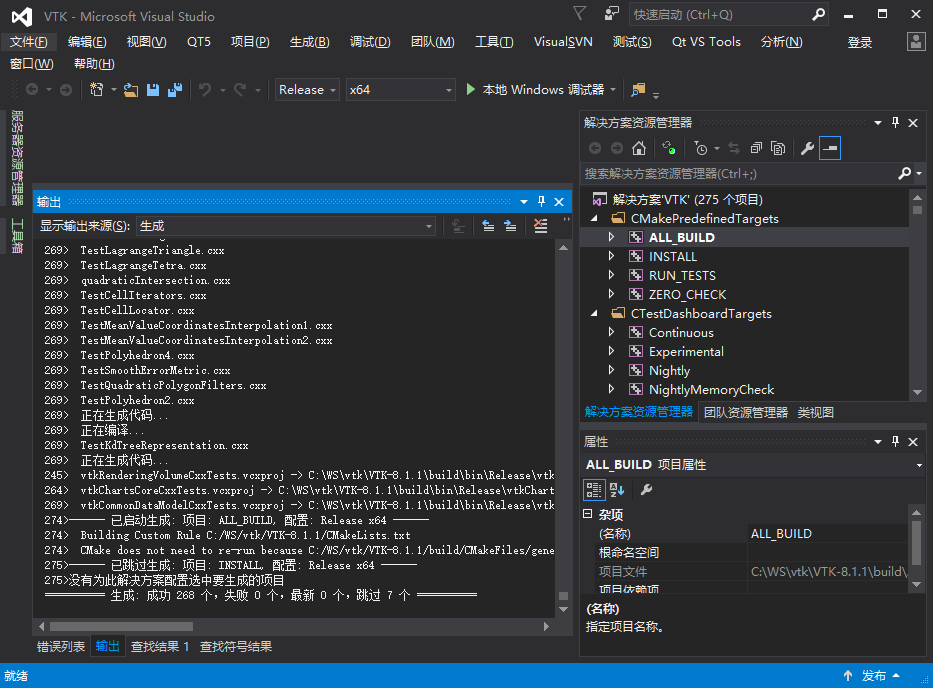
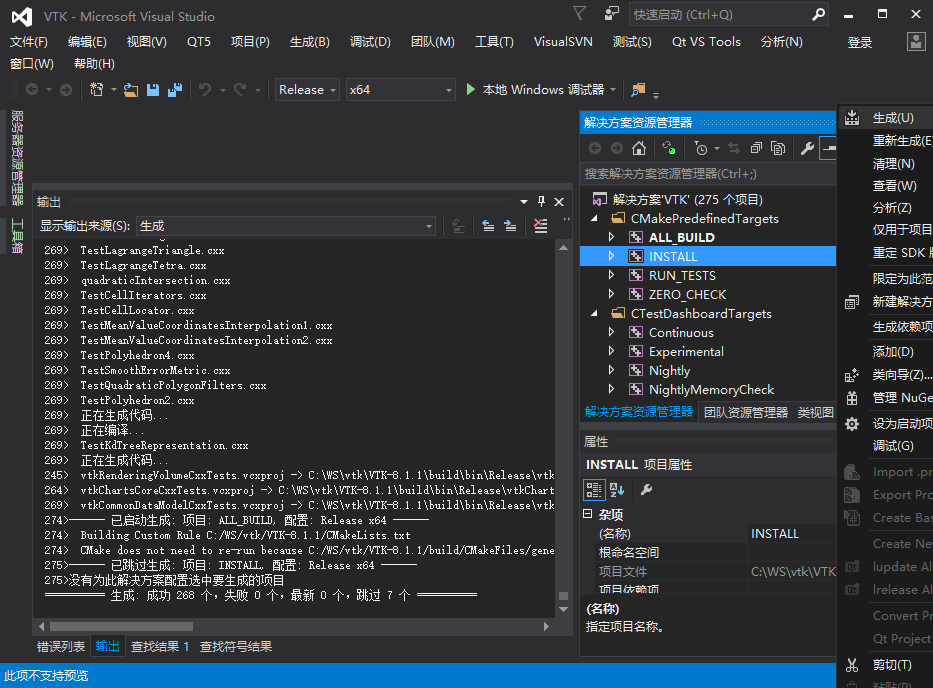
3.2 installation
Select Install, right-click Build.
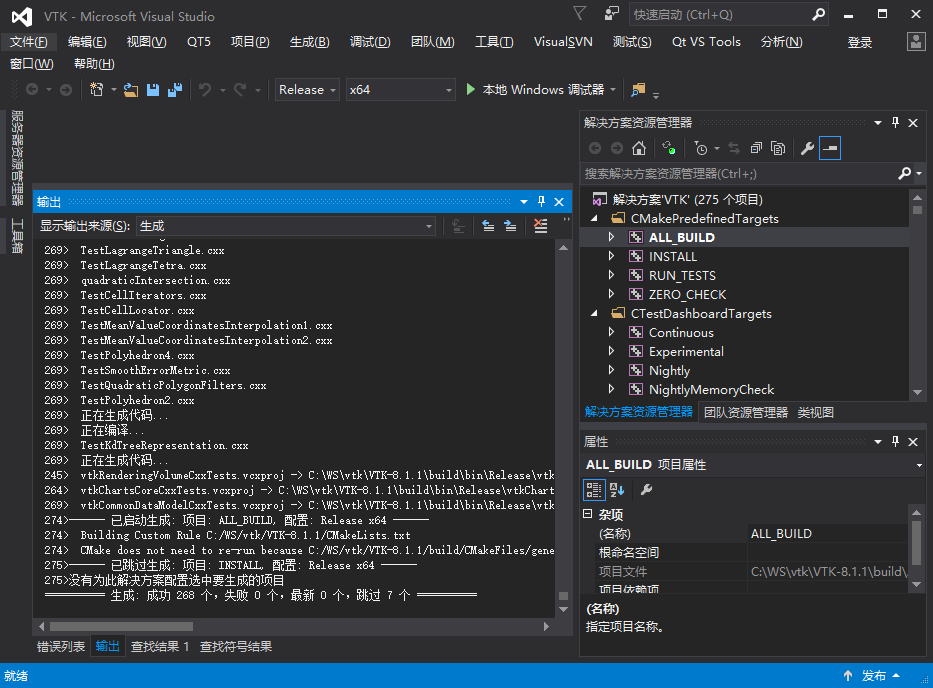
Install OK.
3.3 Compiling results
The results of VS2015 compilation include four parts.
1. Include does not distinguish between Release and Debug versions
2. Lib does not discriminate versions
3. The DLL selects debug and release versions according to the input configuration.
4. Plugin DLL is only available in Release versions.
The four compiled results are placed in two locations.
The.h and.lib files are stored in the C:\VTK directory (step 2.3 configuration). Please do not use DLL files under C:\VTK, because there is no distinction between release and debug.
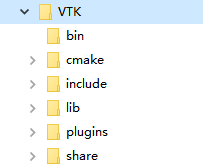
The.dll file is placed in C:\WS\ VTK \ vtk-8.1.1 \build\bin (step 2.1 configuration).
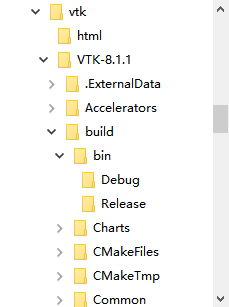
3.4 Compile test successfully (you can skip this step if you don’t want to test)
Compiled DLLs and EXEs in vtk-8.1.1\ build\bin\Release\
Copy qt5gui.dll, qt5core. DLL, qt5Widgets. DLL from the Qt directory to this directory or the debug directory. (Environment variables can also be configured)
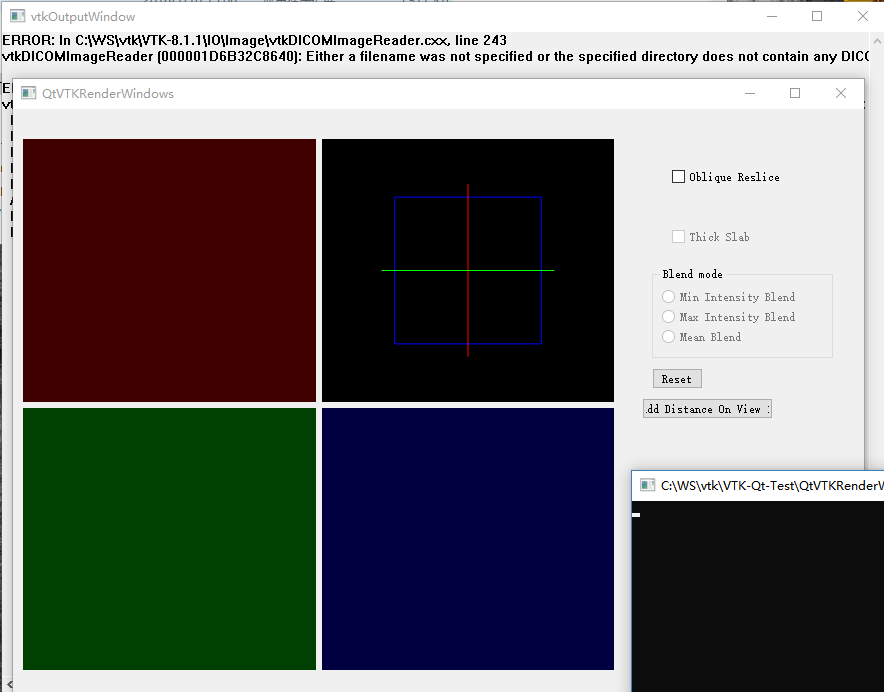
Run qtvtkrenderWindows.exe in this directory, and see as shown in the figure, the compilation of exe is successful after startup.
4. Install the QVTKWidget plug-in for Qt Designer
4.1 installation
Will be C: \ WS, VTK, VTK – 8.1.1, build \ bin \ Release \
Copy the QVTKWidgetPlugin.dll to the C:\Qt\Qt5.9.4\5.9.4\msvc2015_64\plugins\designer\ directory.
Note: Be sure to copy the Release version.
4.2 validation
Start Qt Designer.
There are two versions, usually 32-bit at the top and 64-bit at the bottom. Select according to the compiled version.
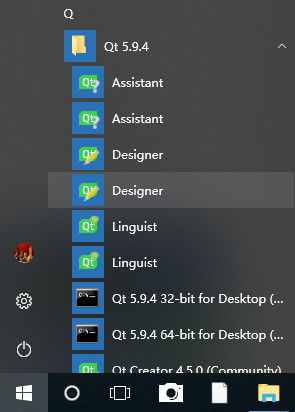
At the bottom of the left-hand Widget Box you can see the QVTKWidget description installed successfully.

5 supplementary
5.1 Use VTK in VS2015 environment
You need to install the Qt Visual Studio Tools extension in the VS2015 extension and update. Note that QTPackage cannot use the QVTKWidget, do not install.
Installation steps
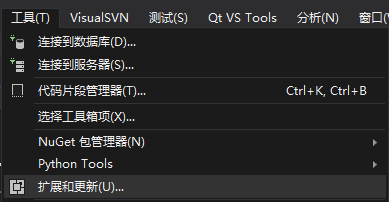
1. Select Extend and Update from the Tools menu
2. Select Qt Visual Studio Tools for installation online. There is also a QTPackage that cannot be used, do not install it.

3. After successful installation, Qt VS Tools will appear on the menu. Click Launch Qt Designer to see it.
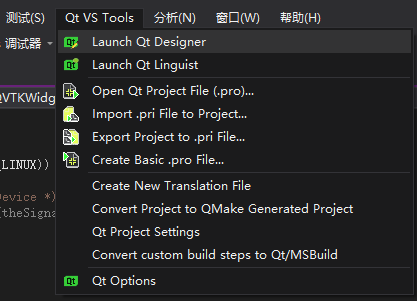
5.2 Use VTK in the Qt Creator environment
Designer in Qt Creator environment cannot see QVTKWidget, so it cannot be dragged and dropped directly. You need to drag and drop QWidget first, and then select QWidget to be promoted to QvtkWidget.
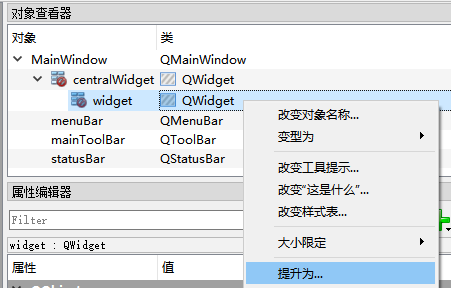
I want to display point cloud in Qt interface, but the VTK of PCL 1.8.1 lacks qvtkwidgetPlugin.dll, so I need to recompile it.
1. VTK source source
Link: https://pan.baidu.com/s/10kMCNJ-5UiYqRTOvrlrR9A extraction code: ug7p 2. The build folder is created by yourself in the D:/vtk-v8.0.0 directory

3. Click the Configure button in the lower left corner
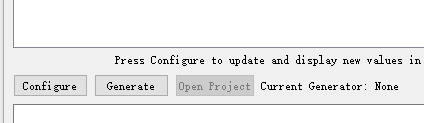
After waiting for some time, the following screen appears
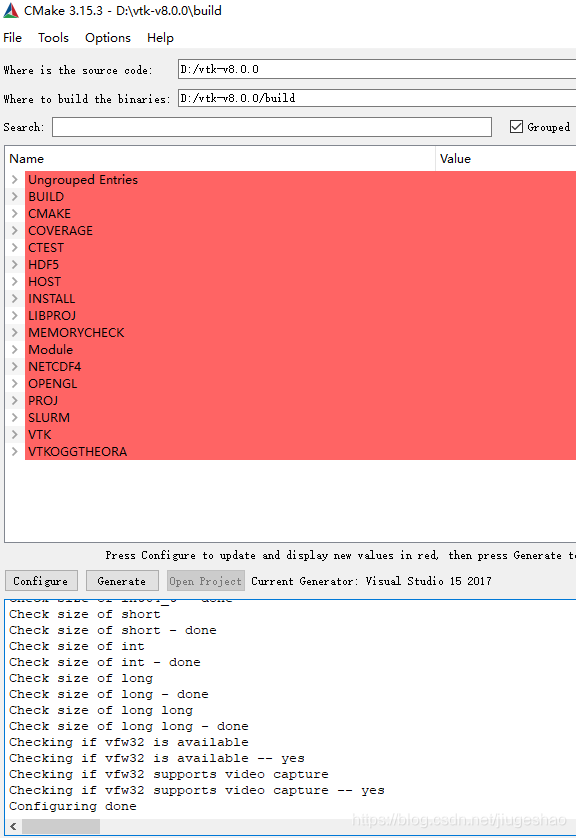
The Build option checks the following three
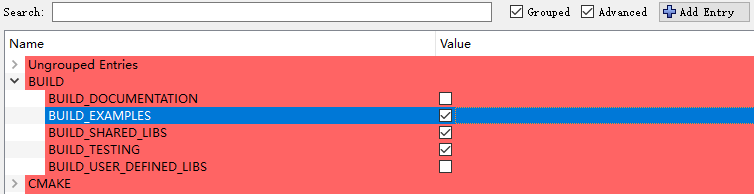
The CMake option CMAKE_INSTALL_PREFIX is set to the following path, which is where a directory structure similar to the VTK that comes with PCL will be generated when you run the install project in the compiled solution
The following is checked in the VTK options

Click Configure again and report the following error when the configuration is complete
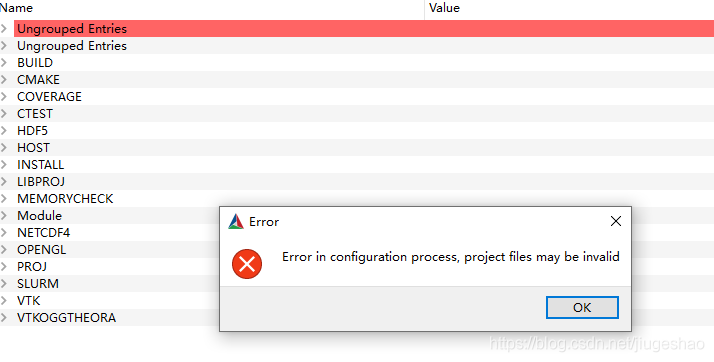
The two lines at the red position below are modified as follows:
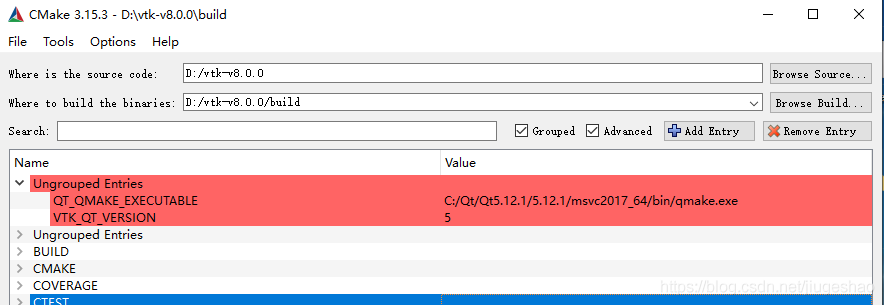
Then click the Configure button again. Then click the configuration Ungrouped Entries again
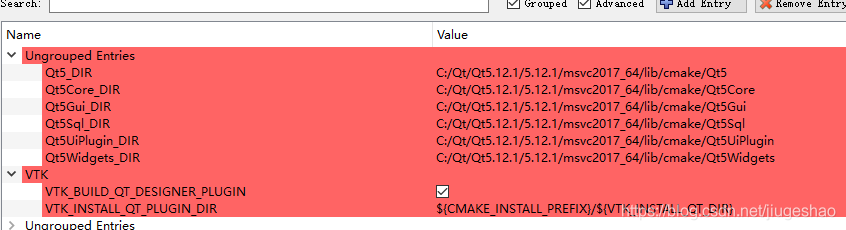
Click Configure again, no more errors
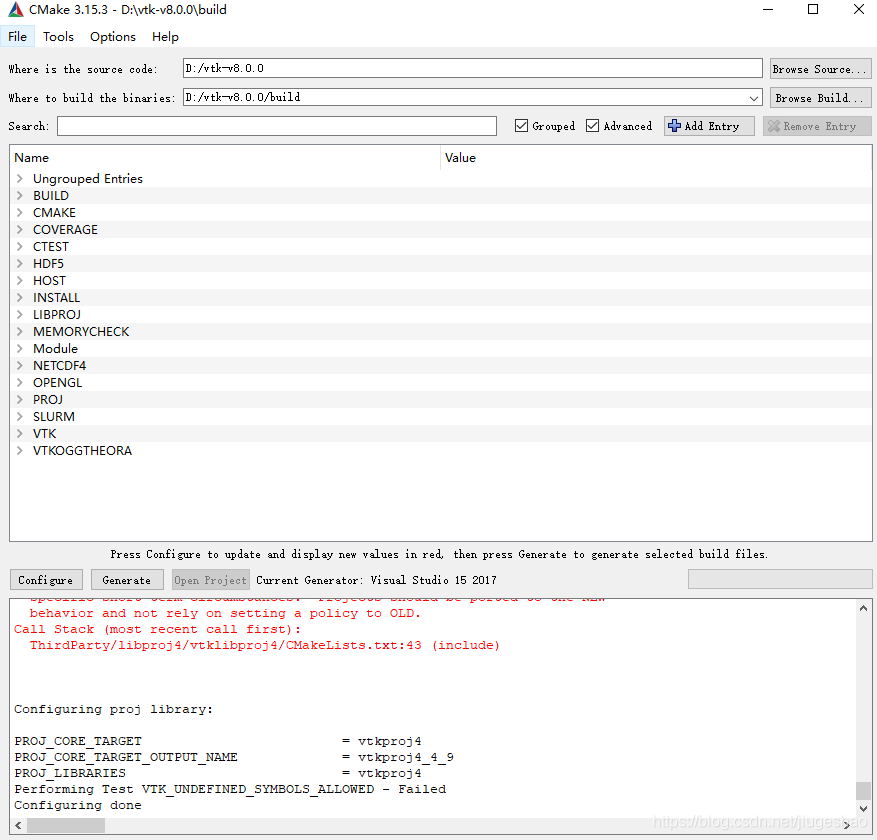
Click Generate to Generate the project
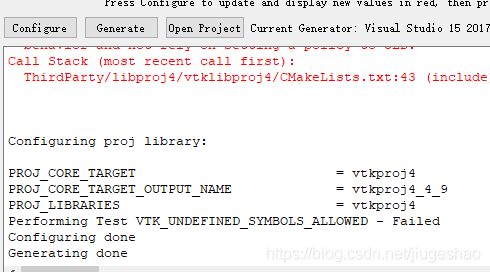
Then click the Open Project button to Open the solution with VS2017
Check the environment, currently I have Debug, x64
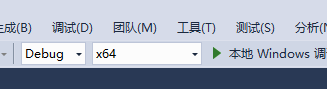
Then click on the generate ALL_BUILD project, which will last for a long time.
1 error message was found at the end
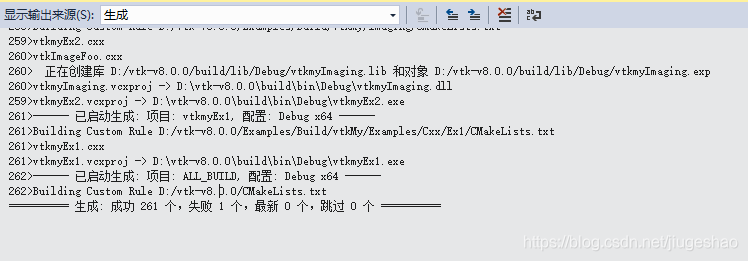
Some files did not download in time
1> — [download 83% complete] 1> — [download 84% complete] 1> CMake Error at D:/VTK – v8.0.0/CMake/ExternalData CMake: 1005 (the message) : 1 & gt; The Object MD5 = 9 e68ff1b1cc914ed88cd84f6a8235021 not found at: 1 & gt; 1> http://midas3.kitware.com/midas/api/rest?method=midas.bitstream.download& checksum=9e68ff1b1cc914ed88cd84f6a8235021& algorithm=MD5 (“HTTP response code said error”) 1> http://www.vtk.org/files/ExternalData/MD5/9e68ff1b1cc914ed88cd84f6a8235021 (” the Timeout was reached “) 1 & gt; Call Stack (most recent call first): 1> D:/VTK – v8.0.0/CMake/ExternalData CMake: 1027 (_ExternalData_download_object) 1 & gt; 1>
D:\vtk-v8.0.0\build\ExternalData\Objects\MD5 :\vtk-v8.0.0\build\ExternalData\Objects\MD5
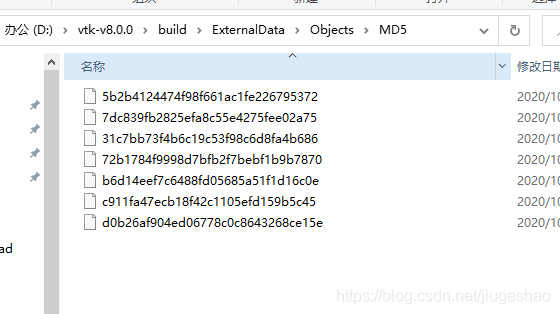
Here I will upload a copy, and replace the folder MD5 after unzipping
Link: https://pan.baidu.com/s/1GItTKoBPeiil20RXgMwyYg extraction code: k4tz
It then regenerates into the next ALL_BUILD project
After success, generate only the INSTALL project
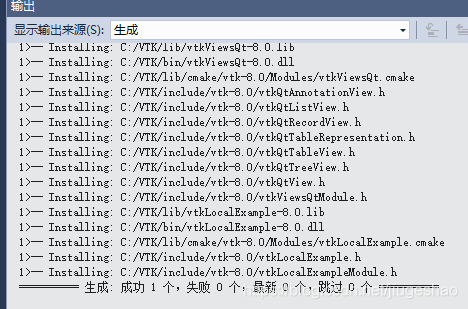
Then go to the C disk directory C:\VTK and look at this folder
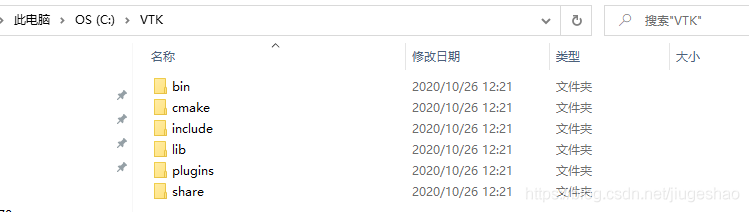
Similar to the VTK structure that comes with PCL1.8.1. There is a plugins folder, and then replace this folder with the following folder in PCL1.8.1
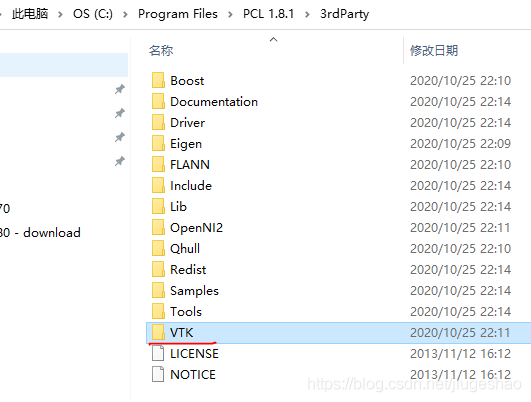
Since the debug version of VTK shipped with PCL1.8.1 contains the -gd keyword, you can use the following Python script to modify the file name
#!/usr/bin/env python
# -*- coding: utf-8 -*-
# author:jiugeshao
import os
import sys

filepath= r'C:/VTK/lib'
fileList = os.listdir(filepath)
currentpath = os.getcwd()
os.chdir(filepath)

for fileName in fileList:
    result = "lib" in fileName
    if(result):
      os.rename(fileName,fileName.replace(".lib","-gd.lib"))

os.chdir(currentpath)
The format of the lib name in the modified folder is as follows:
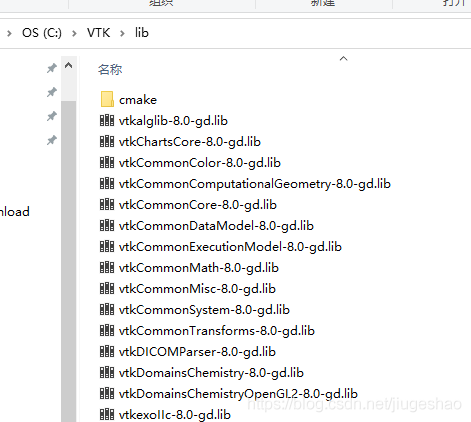
Switch to Release x64 and compile ALL_BUILD. After compiling, remember to compile INSTALL
You can run the example QtVTKRenderWindows project
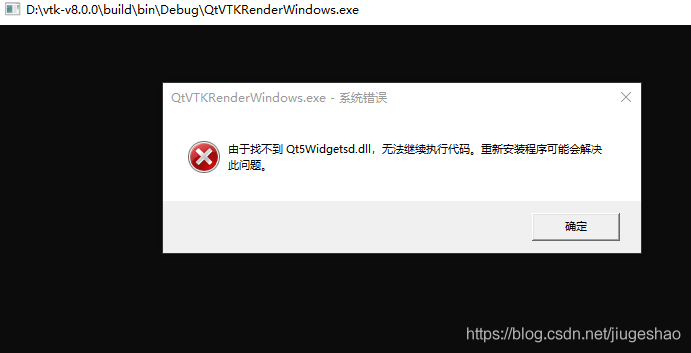
When running under DEBUG, report an error
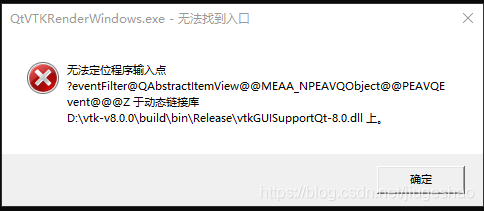
Unable to locate program input vtkguisupportqt-8.0. DLL by running error under release
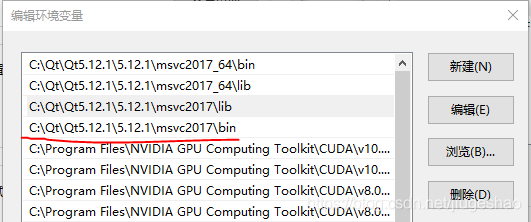
Note the environment variables at this point, since I installed both 32bit and 64bit versions of QT, I added bin and lib to the environment variables.
Also note that these four paths are placed at the top (environment variables can be sorted).
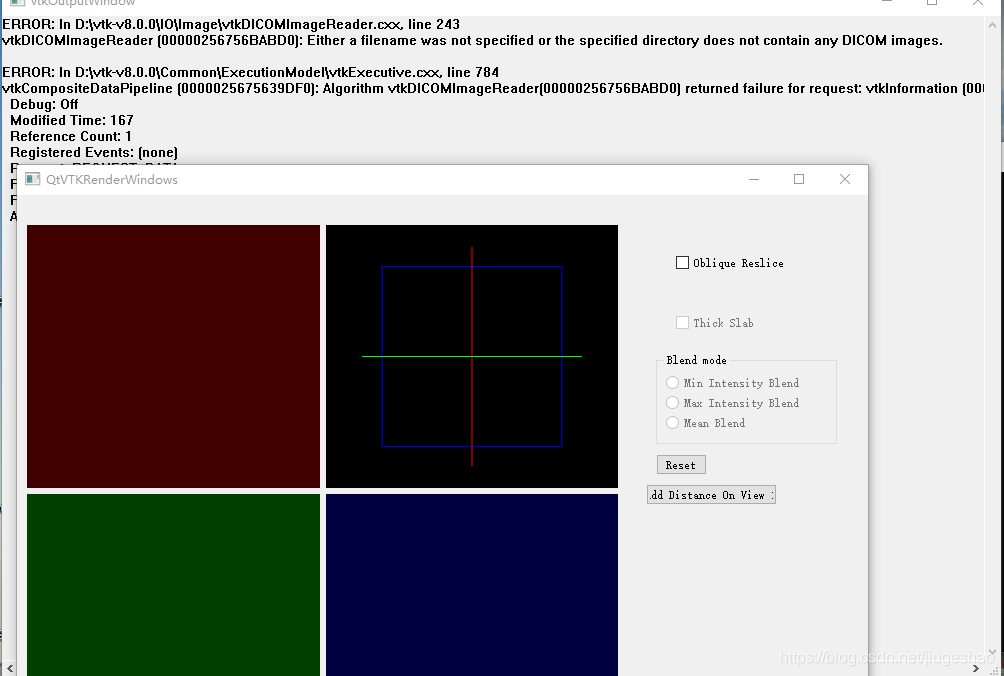
When running QTVTKrenderWindows project in debug mode, the interface can be displayed, but there is an error message in VTKOutputWindow
Either a filename was not specified or the specified directory does not contain any DICOM images.
I upload a DICOM diagram here
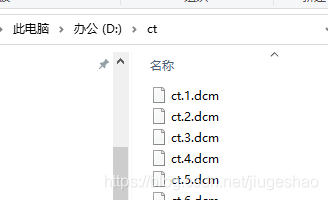
I put it under the folder D:\ ct
Link: https://pan.baidu.com/s/1adDaWCQaTwgnLVARf2nQkg
extraction code: h793.
and then open the QtVTKRenderingWindows CXX file, modify the following way
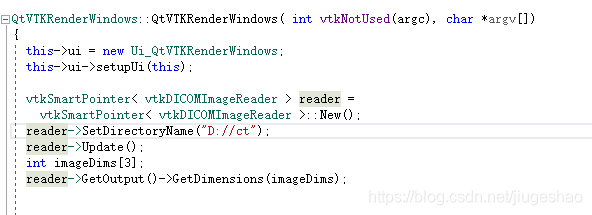
This will show the following interface in both debug and release mode:
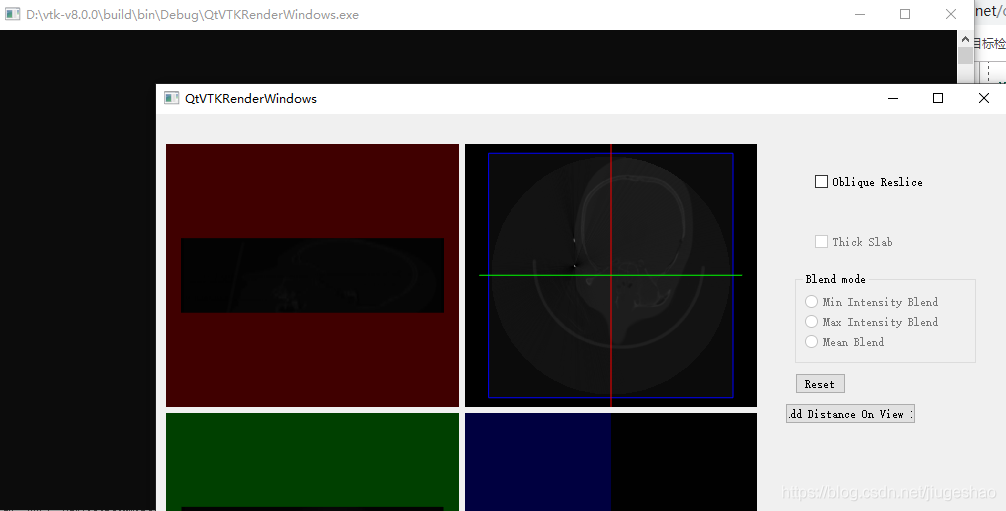
After I compiled the debug version and release version of VTK, see Baidu net disk
Link: https://pan.baidu.com/s/199YssGsprlm99zkuI5eM3g
extraction code: 3 ip5
VTK8.2.0 + VS2015 + Win10 compilation and configuration
Special thanks to the “cook a delicious fish” blogger for technical support please refer to: VTK8.2.0+ITK4.13.2+VS2015 configuration
Only the VTK library is compiled here, not the examples and data contained in the VTK.
because the project needs to use only the VS2015 version, and the compilation process is also applicable to VS2017 and VS2019;
1 Download the source code
1.1 VTK source code can be downloaded from VTK official website
Download address: https://vtk.org/download/
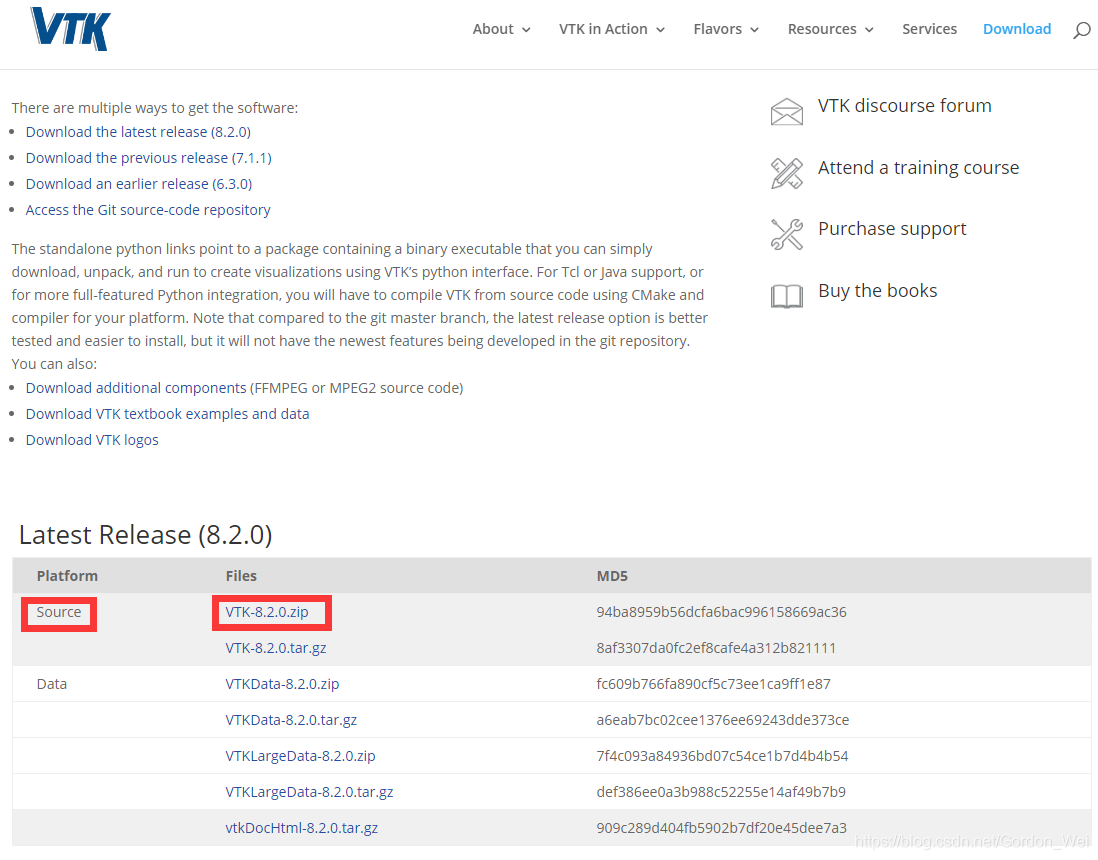
in 8.2.0 release version of the Source select a package to download.
1.2 CMake official website download
Download address: https://cmake.org/download/
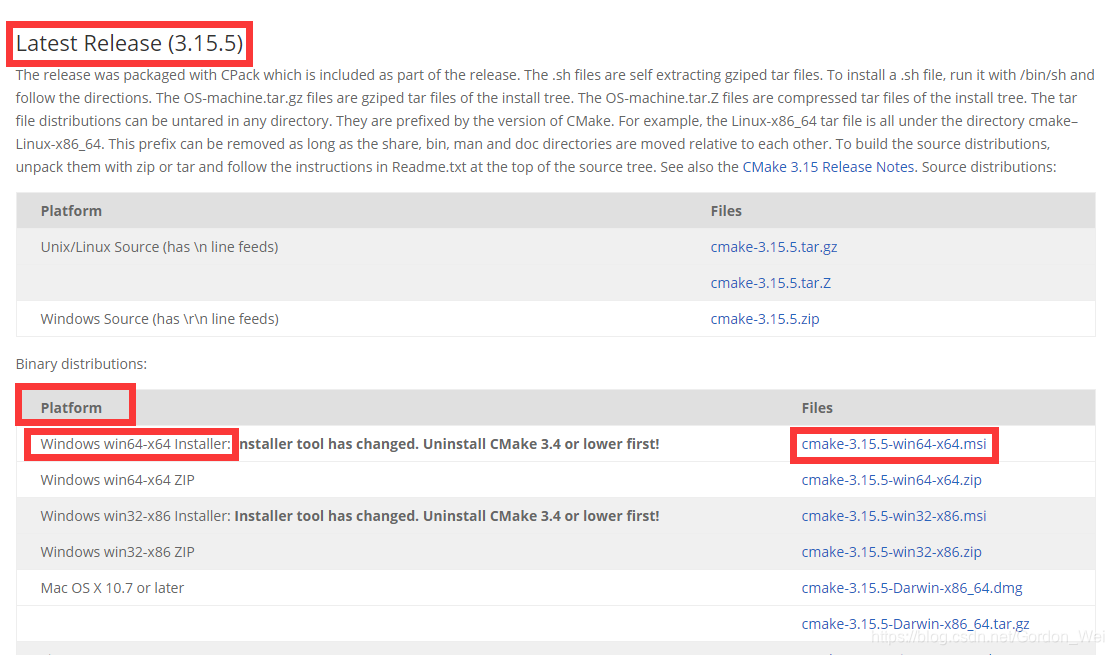
select the latest Release version, choose according to your Windows Platform, I am a 64 – bit system, so choose Windows win64 – X64 Installer installation package, download can be installed directly after, best as an administrator to install.
2. Generate VS2015 project file of VTK using CMAKE
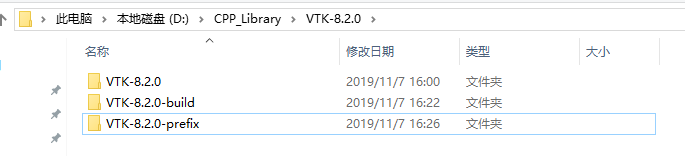
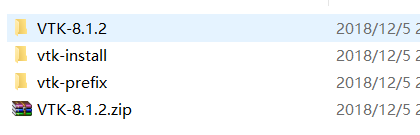
Unzip the VTK source code to get the vtk-8.2.0 folder, open it and see if there is a layer of VTK8.2.0 available when creating a new folder vtk-8.2.0-build and vtk-8.2.0-prefix.
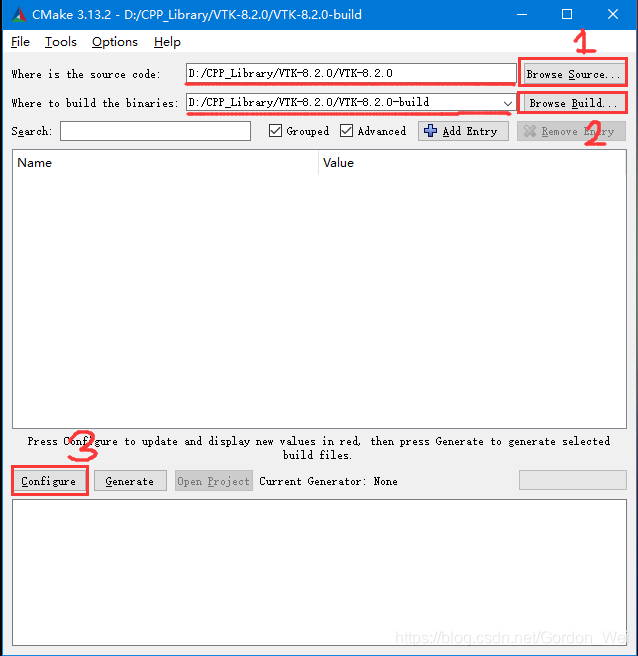
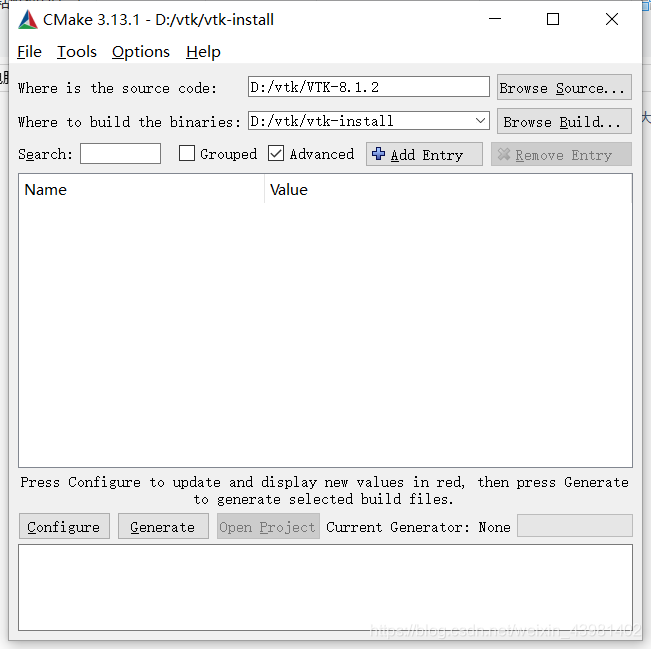
2.1 Open the installed Cmake (cmak-gui) (please ignore that my version is not the latest version) and select the VTK source path and the VTK generation path as the previous step, click Configure.
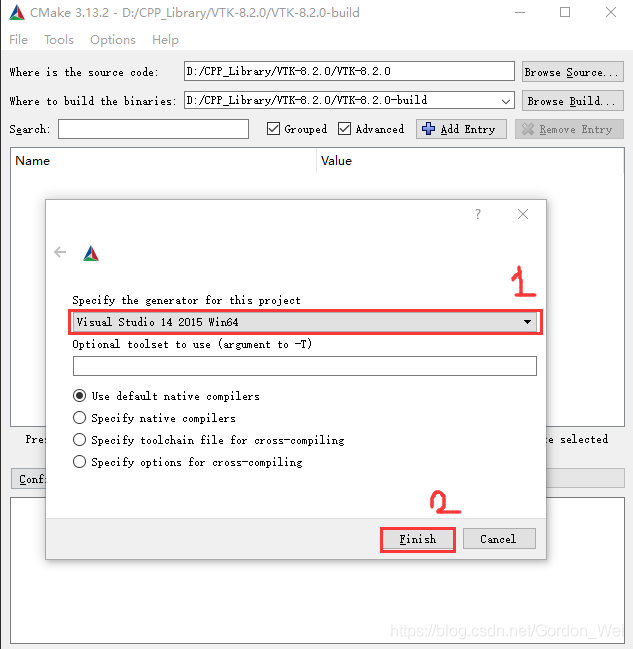
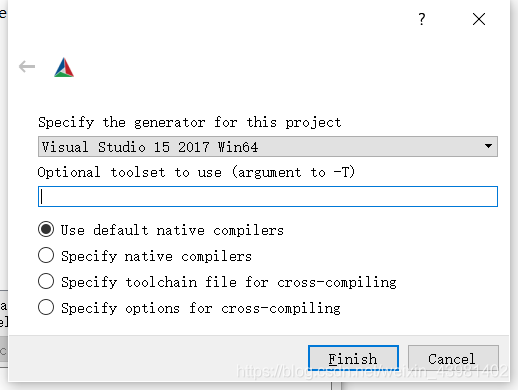
I am VS2015 64-bit version, click Finish to start loading the configuration and wait until the red area appears and the Configuring done appears.
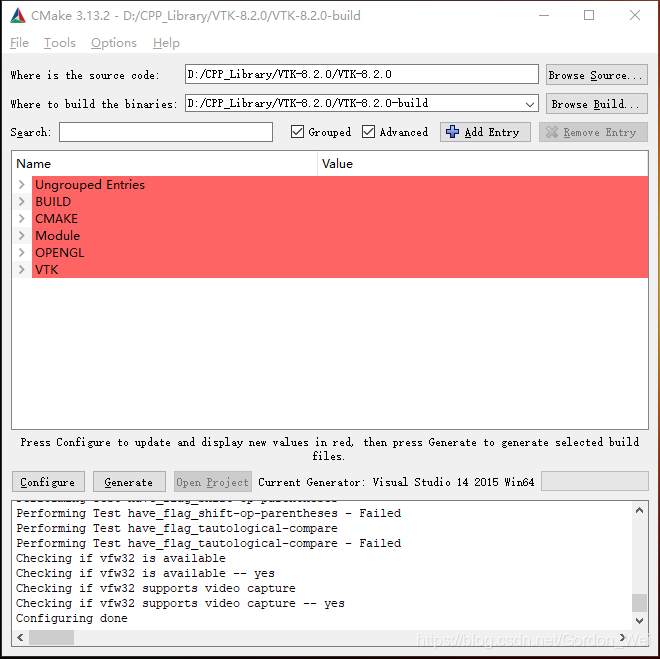
2.3 Modify configuration parameters
2.3.1 Tickle BUILD_SHARED_LIBS under Build (I didn’t check it for example tests if I want to check it)
2.3.2 Modify the CMAKE_INSTALL_PREFIX option path to the vtk-8.2.0-prefix path created earlier
2.3.3 If you want to support MFC, check the MODULE_VTKGUISUPPORTMFC option under Module
2.3.4 Click the Configure button until the red part disappears, and click the Generate button to Generate the project file
2.3.5 Here refer to “VTK8.2.0 Compile, Installation and Test Case Run (Win10 + VS2017 + QT5, Release+Debug)” to set the value of CMAKE_DEBUG_POSTFIX. This variable represents the character added after the output filename in Debug mode, set to “_D”, then the filename generated in Debug mode will have the suffix “_D”. In order to distinguish between the files used in Release and Debug mode (I did not set it, you can set it, so that when you create a Release after the Debug version, you will not overwrite the files you created before)

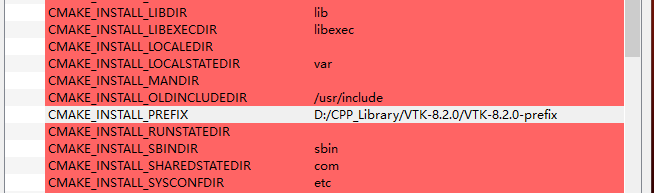
3 Enter the generated VS2015 project file and compile the VTK library
3.1 Open before the new VTK-8.2.0-Build folder, use VS2015 to open VTK. SLN (it is best to open Win10 as an administrator to modify C disk data is very sensitive, may lead to compilation failure, close 360 and other defense software, close no necessary programs) 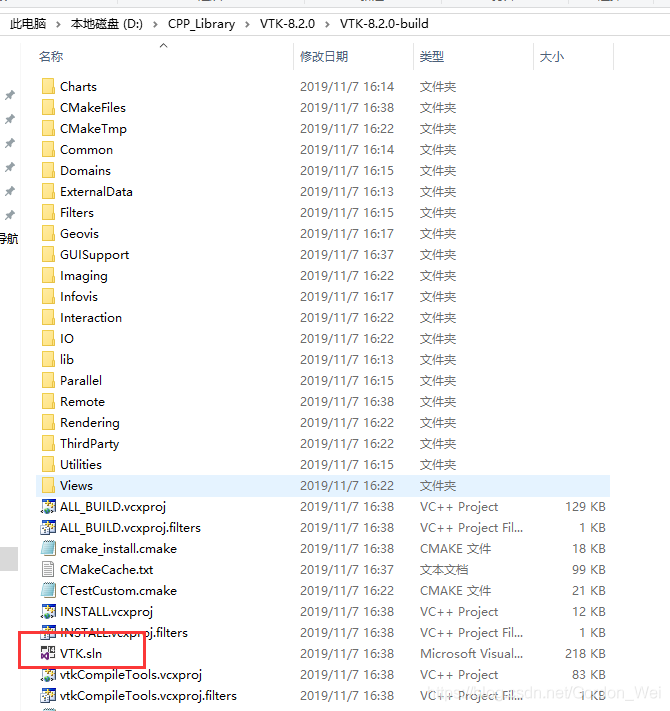
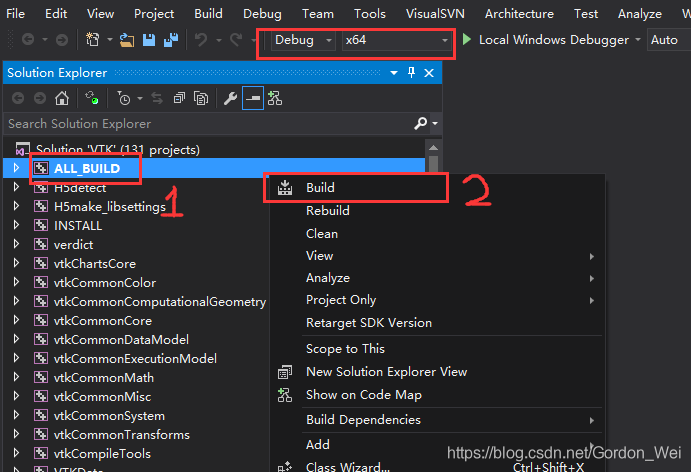
3.2 The default attribute is debug x64, right-click ALL_BUILD and select Build for compilation. It is better not to operate the computer during the Build period. After completion, check whether the output is all successful.
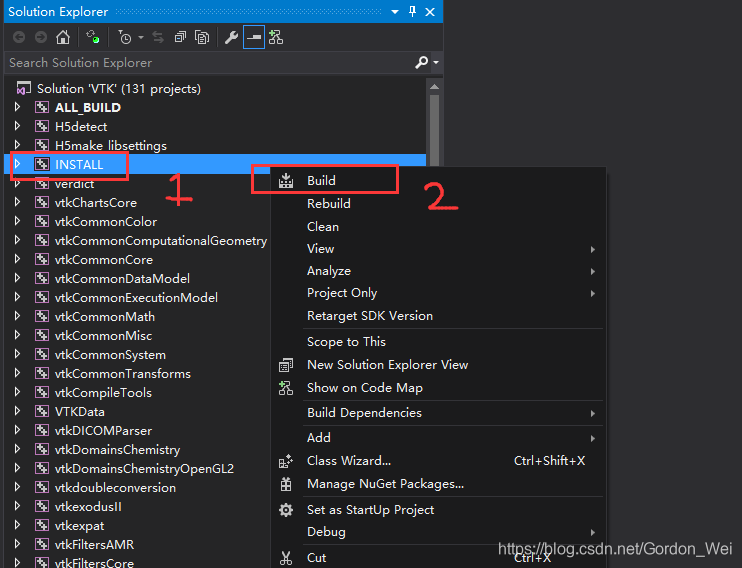
3.3 Copy the include, bin, lib, and share files from the vtk-8.2.0-prefix files to your own VTK library folder. For example: Create a new VTK820 folder with Debug and Release, because include and share files are shared by debug and release versions, put include and share folders in VTK820, and copy the generated bin and lib files to the corresponding folders. For example, the bin and lib files generated by vtk-8.2.0-prefix under debug environment are placed in the Debug folder of VTK820.
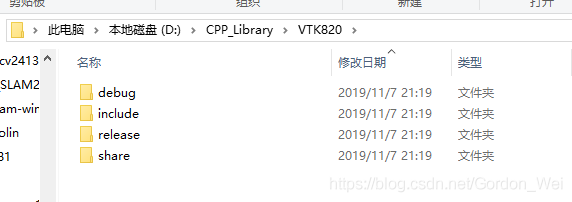
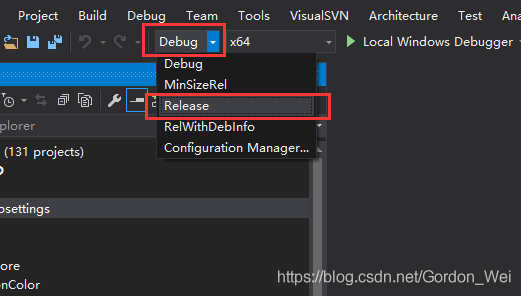
3.4 After changing Debug to Release in VS2015, repeat the operation of 3.2 to generate the Release version of VTK library (note: the bin and lib generated under vtk-8.2.0-prefix will be overwritten and copied ahead of time). Save the library files to the Release as described in 3.3
4. Use of VTK
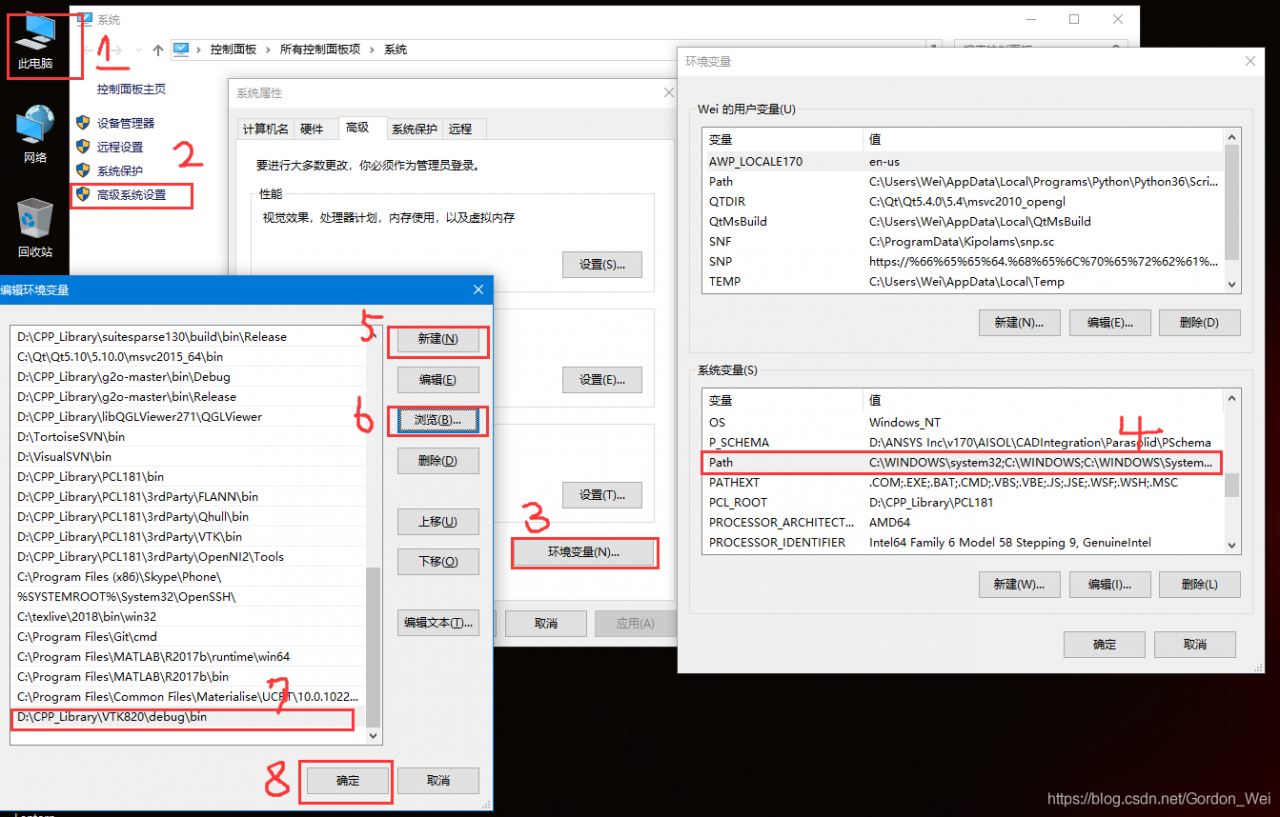
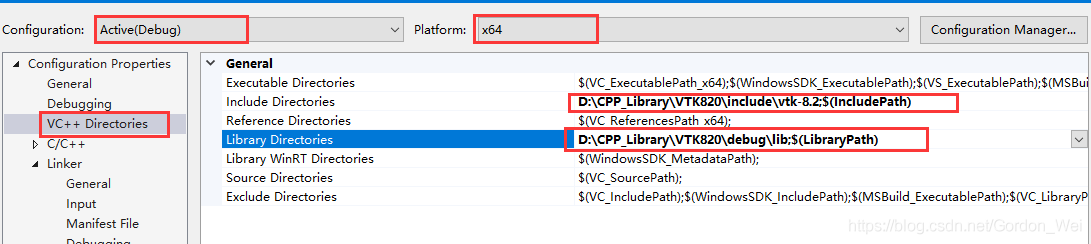
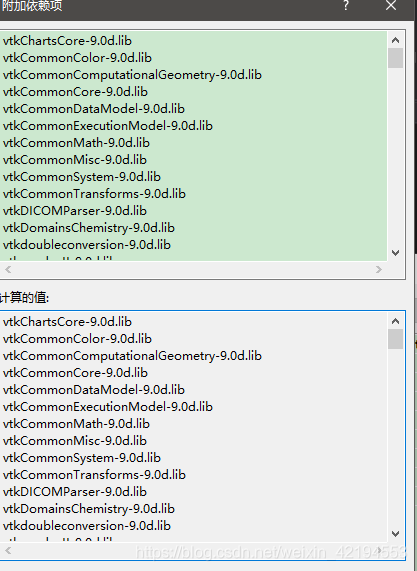
Configure the VTK library, including (1) add the environment variable VTK820 bin folder directory (debug and release used to fill which is OK) (after configuration need to restart VS or restart the computer), create a new console application (2) modify the project properties contain directory and lib library directory, (3) and use the lib file name to Link->; Iput-> Additional Dependencies (there is a method to get all the lib names, create a new.txt file under the lib file, and type dir /b *.lib>;
ah
a>
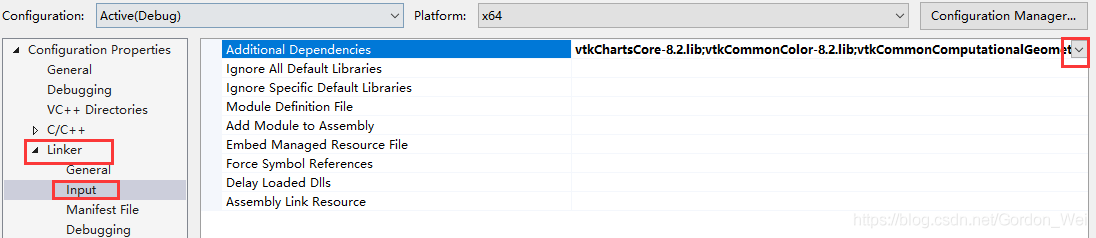
This article referred to the following articles in the installation process, and I would like to express my thanks to the following bloggers! :
https://blog.csdn.net/anhec/article/details/86777302
I. Preparation before installation
Visual Studio 2017 qt5cmakevtk source (https://vtk.org/download/)
Two. VTK compilation
My compile directory is as follows

Run CMake as follows
Click Configure, select Visual Studio 15 2017 (32bit) or Visual Studio 15 2017 Win64 (64bit), and click Finish.
When configure is complete, manually modify some of the parameters as follows:
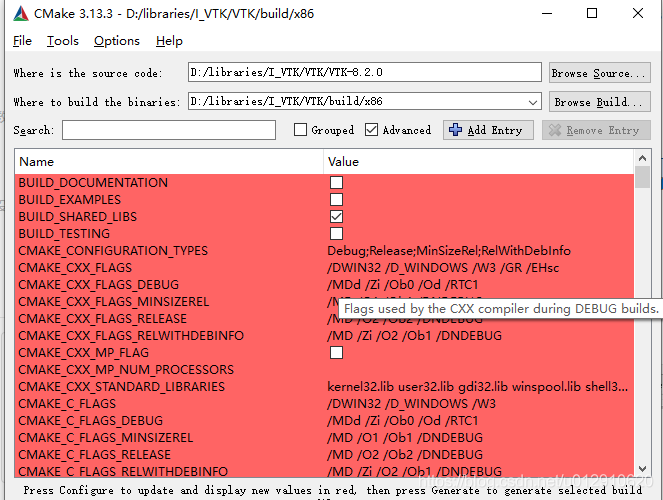
BUILD_SHARED_LIBS, unchecked if static lib generation is needed; BUILD_EXAMPLES, which generate test cases, check the suggested box for easy post-compile testing; CMAKE_DEBUG_POSTFIX, which means that in debug mode the filename is followed by the specified character;  VTK_Group_Qt, VTK supports Qt; CMAKE_INSTALL_PREFIX, set the VTK installation directory (D:\libraries\I_VTK\VTK\bin\x86 or D:\libraries\I_VTK\VTK\bin\x64); VTK_Group_Qt, VTK supports Qt; CMAKE_INSTALL_PREFIX, set the VTK installation directory (D:\libraries\I_VTK\VTK\bin\x86 or D:\libraries\I_VTK\VTK\bin\x64);
Click Configure again to Configure the Qt path

Select the Qt path: (32bit) D:\libraries\Qt\Qt5.12.0\5.12.0\msvc2017\lib\cmake\Qt5
(64 – bit) D: \ libraries \ Qt \ Qt5.12.0\5.12.0 \ msvc2017_64 \ lib \ cmake \ Qt5
Click Configure again (change the red color if it still appears, then click Configure) and click Generate when you’re done.
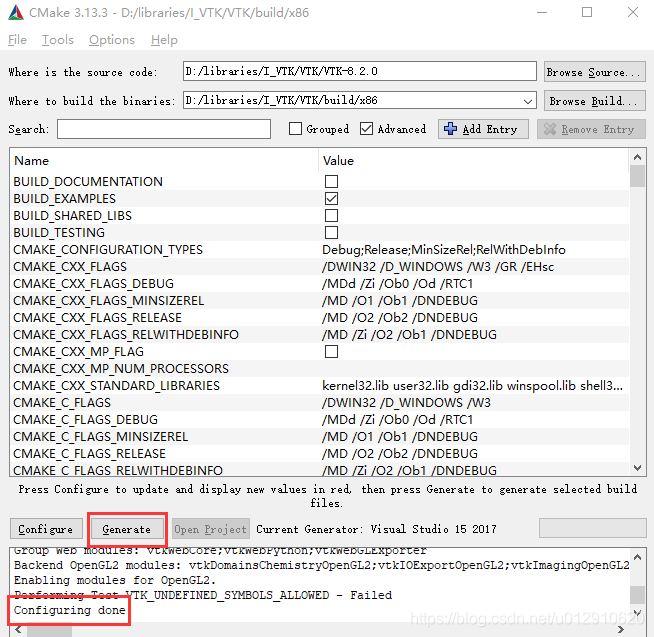
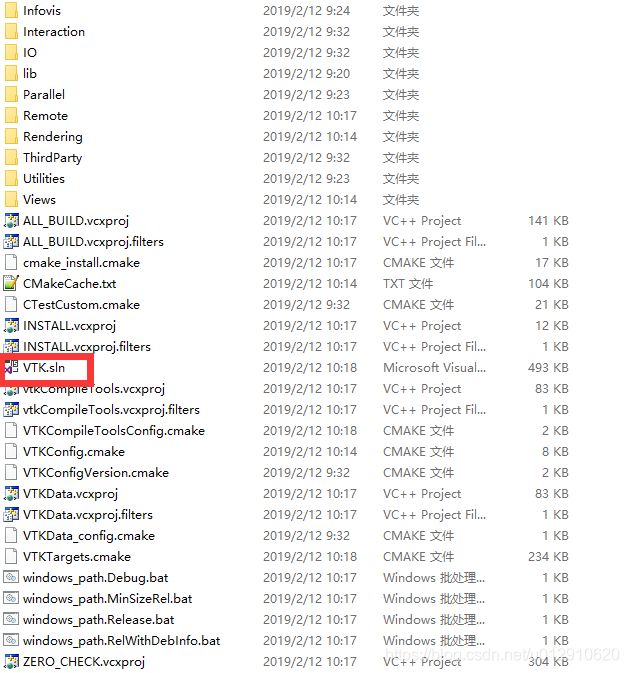
III. VS2017 compilation
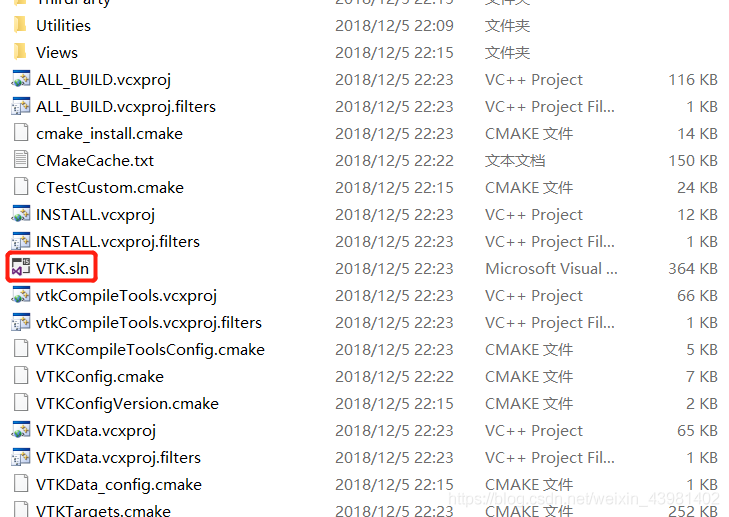
Open vtk.sln with vs2017, then right-click ALL_BUILD, click build, wait for some time, all compile successfully;
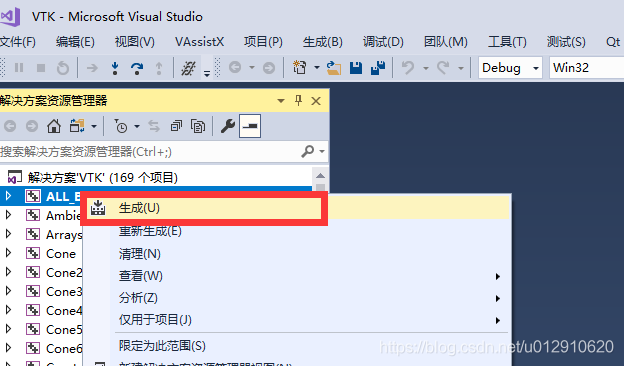
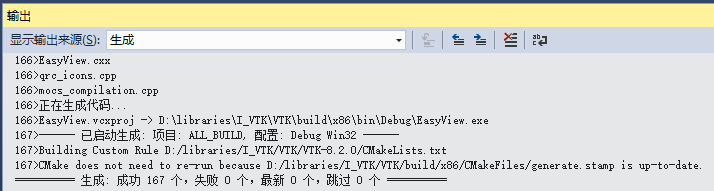
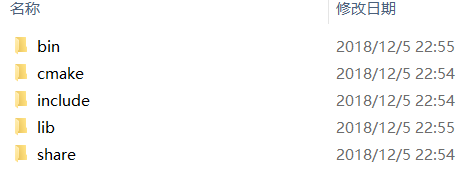
Right-click Install again and select Project Only –>; Only generate INSTALL, after completion you can see in the installation directory (D:\libraries\I_VTK\VTK\bin\x86), see the related lib, include, etc
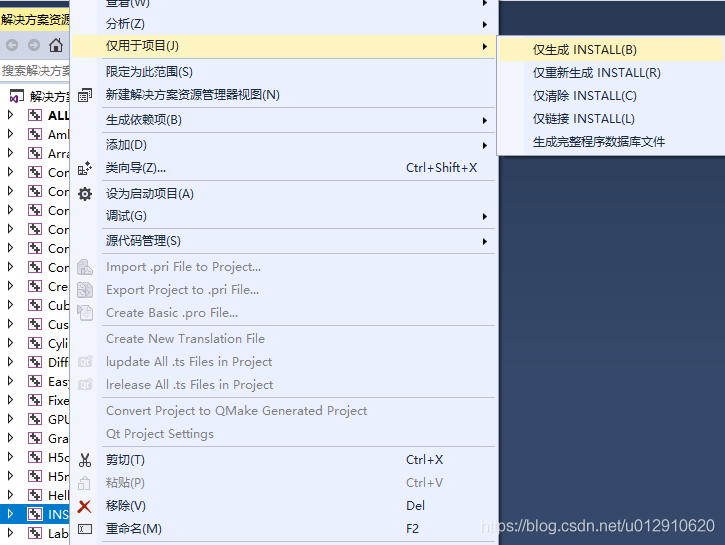
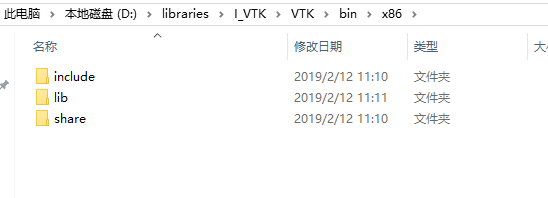
In VS2017, change the configuration from Debug to Release, repeat ALL_BUILD and INSTALL above;
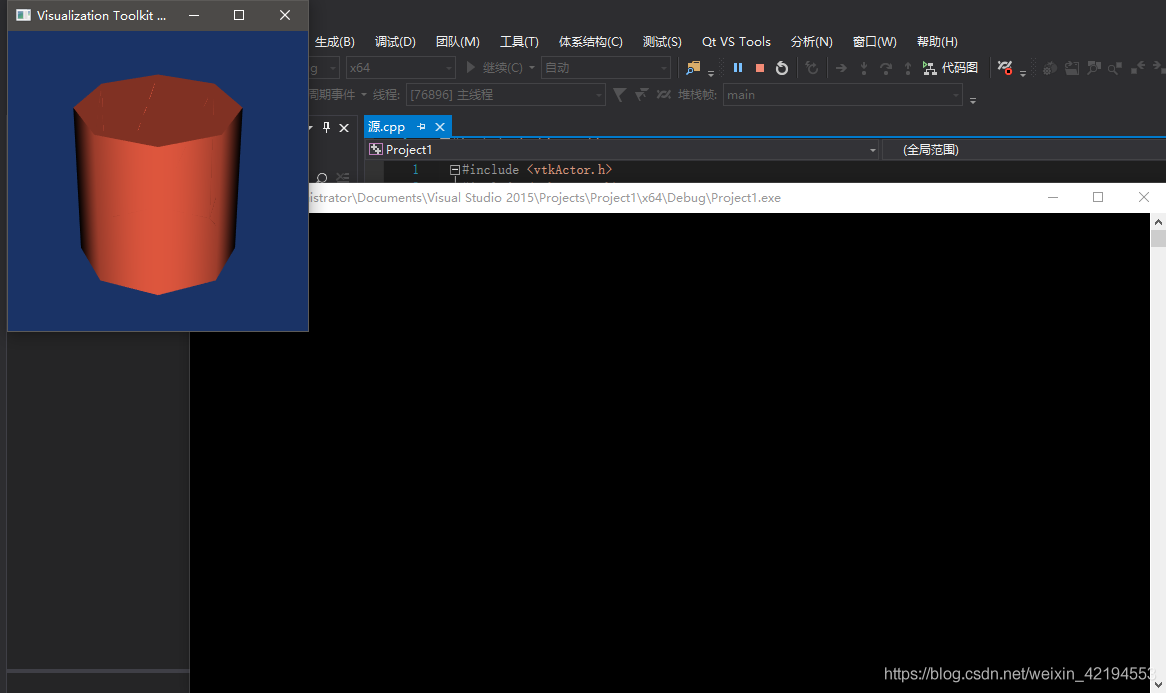
Test three.
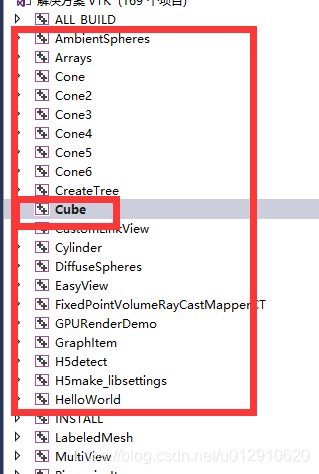
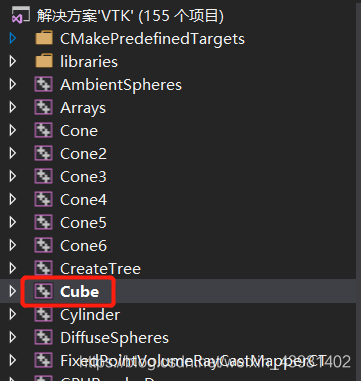
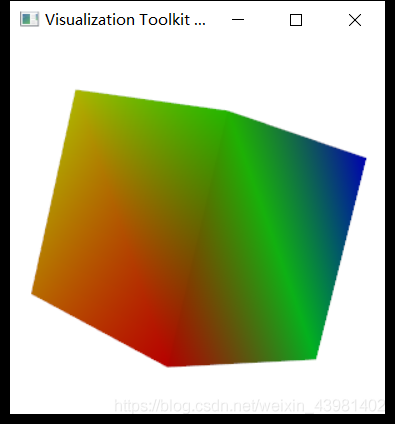
Select Cube and run
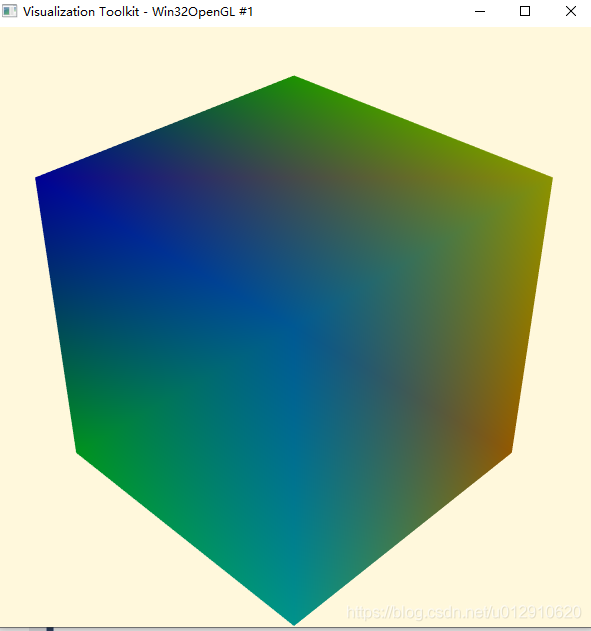
3 possibilities
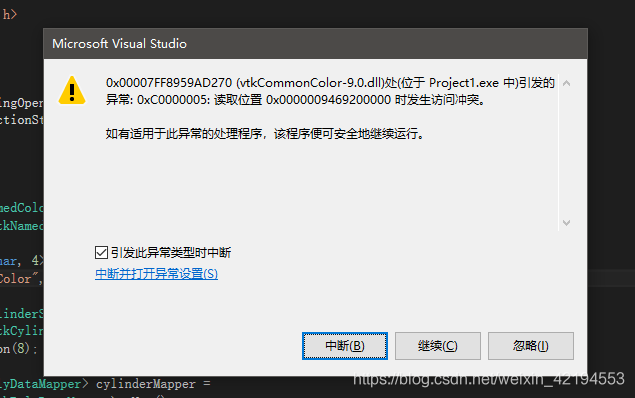
1 “data out of bounds or defined pointer not freed.
2: Null Pointers are most likely. It is best to explicitly assign values before using Pointers!
should be a pointer problem
3 “memory access error, check the pointer, whether empty, whether out of bounds, etc
Calling COM+ gives you the desired result and returns an error after the last return 0 sentence.
error location in comip.h
void _Release() throw()
{
if (m_pInterface! = NULL) {
m_pInterface – & gt; Release(); // Error reported here
}
}
When I encounter this problem myself, I use m_pInterface->; Release(); Comment out the program no longer reports an error.
Some other ways online:
1.m_pInterface-> Release () into m_pInterface = NULL from http://topic.csdn.net/u/20091120/16/8a9c8d91-9a39-416b-8d8d-8c2cd2a71d3e.html
2. In the program implementation: PTR ->; Release(); To PTR. Release (); From http://topic.csdn.net/u/20091120/16/8a9c8d91-9a39-416b-8d8d-8c2cd2a71d3e.html
3. One statement is that it is a matter of scope. I don’t know much about it. See: http://stackoverflow.com/questions/2653797/why-does-couninitialize-cause-an-error-on-exit
This method has been tried, but it also works. See the following instructions for details.
I’m working on a C++ application to read some data from an Excel file. I’ve got it working, but I’m confused about one part. Here’s the code (simplified to read only the first cell).
//Mostly copied from http://www.codeproject.com/KB/wtl/WTLExcel.aspx

#import "c:\Program Files\Common Files\Microsoft Shared\OFFICE11\MSO.DLL"
#import "c:\Program Files\Common Files\Microsoft Shared\VBA\VBA6\VBE6EXT.OLB"
#import "C:\Program Files\Microsoft Office\Office11\excel.exe" rename ("DialogBox","ExcelDialogBox") rename("RGB","ExcelRGB") rename("CopyFile", "ExcelCopyFile") rename("ReplaceText", "ExcelReplaceText") exclude("IFont", "IPicture")

_variant_t varOption((long) DISP_E_PARAMNOTFOUND, VT_ERROR);

int _tmain(int argc, _TCHAR* argv[])
{
    DWORD dwCoInit = 0;
    CoInitializeEx(NULL, dwCoInit);
    Excel::_ApplicationPtr pExcel;
    pExcel.CreateInstance(_T("Excel.Application"));
    Excel::_WorkbookPtr pBook;
    pBook = pExcel->Workbooks->Open("c:\\test.xls", varOption, varOption, varOption, varOption, varOption, varOption, varOption, varOption, varOption, varOption, varOption, varOption);
    Excel::_WorksheetPtr pSheet = pBook->Sheets->Item[1];
    Excel::RangePtr pRange = pSheet->GetRange(_bstr_t(_T("A1")));
    _variant_t vItem = pRange->Value2;
    printf(_bstr_t(vItem.bstrVal));
    pBook->Close(VARIANT_FALSE);
    pExcel->Quit();
    //CoUninitialize();
    return 0;
}
I had to comment out the call to CoUninitialize for the program to work. When CoUninitialize is uncommented, I get an access violation in the _Release function in comip.h on program exit.
Here’s the code from comip. h, for what it’s worth.
void _Release() throw()
{
    if (m_pInterface != NULL) {
        m_pInterface->Release();
    }
}
I’m not very experienced with COM programming, so there’s probably something obvious I’m missing.
Why does the call to CoUninitialize cause an exception? What are the consequences of not calling CoUninitialize? Am I doing something completely wrong here?
ANSWER!
The problem you are having is one of scope. The short answer is to move the CoInit and CoUninit into an outer scope from the Ptrs. For example:
//Mostly copied from http://www.codeproject.com/KB/wtl/WTLExcel.aspx

#import "c:\Program Files\Common Files\Microsoft Shared\OFFICE11\MSO.DLL"
#import "c:\Program Files\Common Files\Microsoft Shared\VBA\VBA6\VBE6EXT.OLB"
#import "C:\Program Files\Microsoft Office\Office11\excel.exe" rename ("DialogBox","ExcelDialogBox") rename("RGB","ExcelRGB") rename("CopyFile", "ExcelCopyFile") rename("ReplaceText", "ExcelReplaceText") exclude("IFont", "IPicture")

_variant_t varOption((long) DISP_E_PARAMNOTFOUND, VT_ERROR);

int _tmain(int argc, _TCHAR* argv[])
{
    DWORD dwCoInit = 0;
    CoInitializeEx(NULL, dwCoInit);
    {
        Excel::_ApplicationPtr pExcel;
        pExcel.CreateInstance(_T("Excel.Application"));
        Excel::_WorkbookPtr pBook;
        pBook = pExcel->Workbooks->Open("c:\\test.xls", varOption, varOption, varOption, varOption, varOption, varOption, varOption, varOption, varOption, varOption, varOption, varOption);
        Excel::_WorksheetPtr pSheet = pBook->Sheets->Item[1];
        Excel::RangePtr pRange = pSheet->GetRange(_bstr_t(_T("A1")));
        _variant_t vItem = pRange->Value2;
        printf(_bstr_t(vItem.bstrVal));
        pBook->Close(VARIANT_FALSE);
        pExcel->Quit();
    }
    CoUninitialize();
    return 0;
}
The longer answer is that the Ptrs destructors (which calls Release) are being called on exit from main. This is after CoUnit which, basically, shuts down the communication channel between your app and the COM object.
What are the consequences of not calling CoUnit?For short lived in-process COM servers, there really isn’t any negative consequence.
Convex hull detection of point cloud is more commonly used. PCL comes with Convex hull detection ConvexHull, which is a relatively simple function. Set the dimension setDimension of ConvexHull, and record it here
Header: #include <; pcl/surface/convex_hull.h>
	pcl::PointCloud<pcl::PointXYZ>::Ptr cloud(new pcl::PointCloud<pcl::PointXYZ>);
	pcl::io::loadPCDFile<pcl::PointXYZ>("bun_45.pcd", *cloud);

	pcl::ConvexHull<pcl::PointXYZ> hull;
	hull.setInputCloud(cloud);
	hull.setDimension(3);

	std::vector<pcl::Vertices> polygons;
	pcl::PointCloud<pcl::PointXYZ>::Ptr surface_hull(new pcl::PointCloud<pcl::PointXYZ>);
	hull.reconstruct(*surface_hull, polygons);

	cout << surface_hull->size() << endl;

	// ---------------------- Visualizer -------------------------------------------
	boost::shared_ptr<pcl::visualization::PCLVisualizer> viewer(new pcl::visualization::PCLVisualizer);
	viewer->setBackgroundColor(255,255,255);

	pcl::visualization::PointCloudColorHandlerCustom<pcl::PointXYZ> color_handler(cloud, 255, 255, 0);
	viewer->addPointCloud(cloud, color_handler, "sample cloud");
	viewer->setPointCloudRenderingProperties(pcl::visualization::PCL_VISUALIZER_POINT_SIZE, 6, "sample cloud");

	pcl::visualization::PointCloudColorHandlerCustom<pcl::PointXYZ> color_handlerK(surface_hull, 255, 0, 0);
	viewer->addPointCloud(surface_hull, color_handlerK, "point");
	viewer->setPointCloudRenderingProperties(pcl::visualization::PCL_VISUALIZER_POINT_SIZE, 6, "point");

	//viewer->addPolygon<pcl::PointXYZ>(surface_hull, 0, 0, 255, "polyline");

	while (!viewer->wasStopped())
	{
		viewer->spinOnce(100);
	}
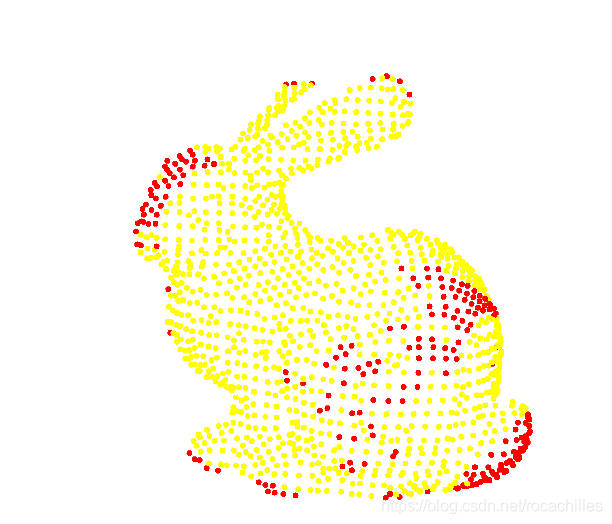
Adopting Stanford Rabbit Point Cloud, the effect is shown in the figure below:
If the point cloud in a certain convex hull is further separated from the scene, Crophull can be used for filtering
CropHull filtering can refer to: https://blog.csdn.net/zfjBIT/article/details/92795689
Thanks for the correction of Xiao snail. If we get the convex hull curve, further triangulation is needed. It is not correct to connect the convex hull points only
|
 :
:  :
:  :
:  :
:  :
:  :
:  :
:  :
:  :
:  :
:  :
:  :
: 
 Then check to post an article