1, open registry
, Win+R call out “run”, type “Regedit” in the box, enter to open registry.
3, if the popup “Do you allow this application to make changes to your computer” permissions, select “Yes”
the registry, find and enter HKEY_CURRENT_USER\Software\Microsoft\Windows NT\CurrentVersion\AppCompatFlags\Layers If found the following entry (C: Keil\UV4\ uv4.exe), — this path is the actual installed path of Keil in your computer.
4, after delete, restart Keil, test debugging is feasible
C language program running results flash back how to do
Learn to compile C language friends may encounter such a problem, program debugging when there is no error, but when running the results will find that the program results flash back, resulting in no results. The following solutions are given for such problems.
Take the simplest program, for example
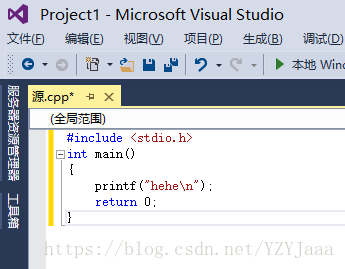
} getchar();} getchar(); Can. It is important to note that this approach is not suitable for all programs, but we will look at the second approach next.

Method 2: & lt; 1> Start by adding the header file #include <; stdlib.h> As shown in figure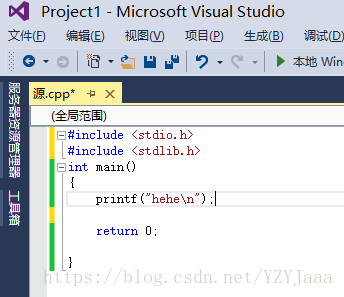
& lt; 2> Then write a line at the end of the program’s main function (system(“pause”));
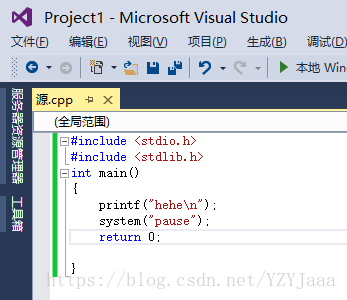
Obviously, when the first method does not work, the second method can be used, and it works in all cases.
Take the simplest program, for example
} getchar();} getchar(); Can. It is important to note that this approach is not suitable for all programs, but we will look at the second approach next.
Method 2: & lt; 1> Start by adding the header file #include <; stdlib.h> As shown in figure
& lt; 2> Then write a line at the end of the program’s main function (system(“pause”));
Obviously, when the first method does not work, the second method can be used, and it works in all cases.
The perfect solution of VS2010 console program running in a flash
When the console application in VS2010 is running, the result screen will flash, whether you use F5 or Ctrl + F5, so you can’t see the result. There are a lot of ways on the Internet, which is to add a pause statement to the program at the end or to get user input from the console statement. There’s a better solution:
Right click on your project entry, select the last item “Property/Properties” on the pop-up menu, and in the left column, find “Configuration Properties”
-> Connector – & gt; System, after clicking on the System item, subSystem in the right column configuring the value of the subSystem to “Console “.
After doing this, press Ctrl+F5 again and the program will stop at the console screen and prompt you to “Press any key to continue.” That’s the perfect solution.
Right click on your project entry, select the last item “Property/Properties” on the pop-up menu, and in the left column, find “Configuration Properties”
-> Connector – & gt; System, after clicking on the System item, subSystem in the right column configuring the value of the subSystem to “Console “.
After doing this, press Ctrl+F5 again and the program will stop at the console screen and prompt you to “Press any key to continue.” That’s the perfect solution.
VS2010 debugging window flash solution
These days the development integration environment has been changed to VS2010, just started to use, some places are not very understand, by consulting the relevant documents, is now solved.
Take the VS2010 debugging window flash through the solution is as follows:
#include < iostream>
using namespace std;
void main()
int add(int,int,int);
float business (int);
int x, y, z, sum;
cout< < “Input x, y, z:”;
cin> > x> > y> > z;
the sum = add (x, y, z);
cout< <” sum=”< < sum< < endl;
cout< <” average=”< < average(sum)< < endl;
// system (” pause “);
}
}
Int add (int a, int b, int c)
{return (a+b+c); }
float business (int s)
{return (s/3.0); }
This is the test code.
The solution is as follows:
If you are compiling (F5), you can run the program (Ctrl+F5). If it is still flashing, use the following method to solve it.
method one:
1. If the c + + files, in the final to write a program before (return) add: system (” pause “);
= #include”stdlib.h”;
= #include”stdlib.h”; Then add: system(“pause”) at the end of the program (before the return).
Method 2:
. Right click on the current project – Properties
2> 3. Change the SUBSYSTEM configuration in System Options, select the first ‘/ CONSOLE’ in the drop-down menu and then select ‘Start Executing (Don’t Debug)’, that is Ctrl +F5;
This solves the flash window problem once and for all.
Take the VS2010 debugging window flash through the solution is as follows:
#include < iostream>
using namespace std;
void main()
int add(int,int,int);
float business (int);
int x, y, z, sum;
cout< < “Input x, y, z:”;
cin> > x> > y> > z;
the sum = add (x, y, z);
cout< <” sum=”< < sum< < endl;
cout< <” average=”< < average(sum)< < endl;
// system (” pause “);
}
}
Int add (int a, int b, int c)
{return (a+b+c); }
float business (int s)
{return (s/3.0); }
This is the test code.
The solution is as follows:
If you are compiling (F5), you can run the program (Ctrl+F5). If it is still flashing, use the following method to solve it.
method one:
1. If the c + + files, in the final to write a program before (return) add: system (” pause “);
= #include”stdlib.h”;
= #include”stdlib.h”; Then add: system(“pause”) at the end of the program (before the return).
Method 2:
. Right click on the current project – Properties
2> 3. Change the SUBSYSTEM configuration in System Options, select the first ‘/ CONSOLE’ in the drop-down menu and then select ‘Start Executing (Don’t Debug)’, that is Ctrl +F5;
This solves the flash window problem once and for all.
Solve the problem of flash back in Visual Studio 2010
Many people will face such a problem, VS2010 flash back, clearly the program is successful, clearly there is no mistake, the lack of a flash at the end.
The flashback problem is primarily a caching problem, which is added at the end of the program, after the main function
getchar();
getchar();
getchar();
getchar();
Solve the problem.
Reproduced in: https://www.cnblogs.com/yijianzhongqing/p/5208854.html
Why does the result screen flash when visual studio runs the program?
When the console application in VS is running, the result screen will flash, whether using F5 or Ctrl + F5, and the result will not be visible. There are a lot of ways on the Internet, which is to add a pause statement to the program at the end or to get user input from the console statement. There’s a better solution:
Right click on your project entry, select the last item “Property/Properties” on the pop-up menu, and in the left column, find “Configuration Properties”
-> The linker – & gt; System, after clicking on the System item, subSystem in the right column configuring the value of the subSystem to “Console “.
After doing this, press Ctrl+F5 again and the program will stop at the console screen and prompt you to “Press any key to continue.” That’s the perfect solution.
Flash back of running program in Visual Studio 2017
Just a little bit of a problem, write it down first
VS Window Flashback, I have two situations so far
Solution 1:
Right-click on Project –>; Property – & gt; Configure properties –> Connector – & gt; System – & gt; Subsystem (on the right side of window) –>; SUBSYSTEM:CONSOLE Drop down SUBSYSTEM selection CONSOLE
If you still back off
Solution 2:
Do not click on the green symbol, that is the local debugger, the debugger runs and ends, the console will not appear,
Direct Ctrl + F5 to run!
VS Window Flashback, I have two situations so far
Solution 1:
Right-click on Project –>; Property – & gt; Configure properties –> Connector – & gt; System – & gt; Subsystem (on the right side of window) –>; SUBSYSTEM:CONSOLE Drop down SUBSYSTEM selection CONSOLE
If you still back off
Solution 2:
Do not click on the green symbol, that is the local debugger, the debugger runs and ends, the console will not appear,
Direct Ctrl + F5 to run!
Solution to the problem of console flash in vs2017 runtime
F5 is the command to start debugging, Ctrl + F5 is the command to start debugging (not debugging). If you change the command to Ctrl + F5, you can display the output normally and “Press any key to continue… “One word, and the problem is settled.
However, some people will find that after pressing Ctrl + F5, the program will still flash, so you can try the following method to solve this problem:
① Right click on the name of your project on the right and select the property at the bottom.
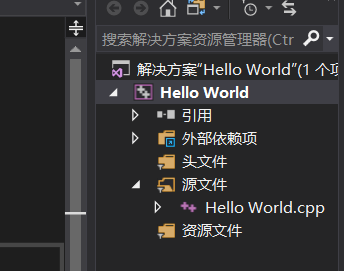
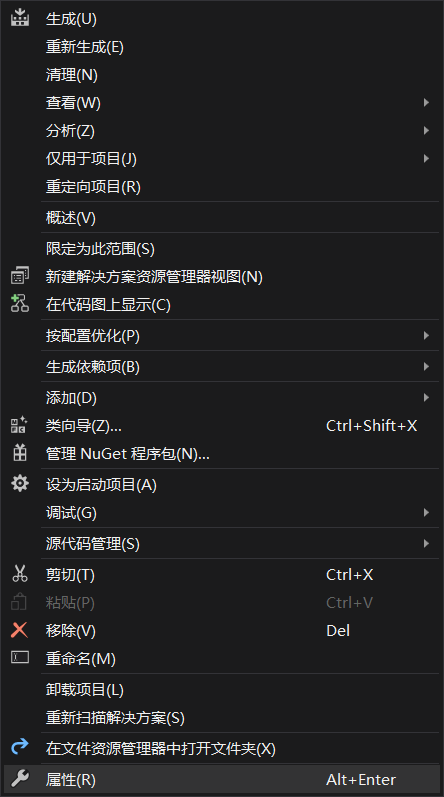
② select the configuration properties in turn ->; Connector – & gt; system
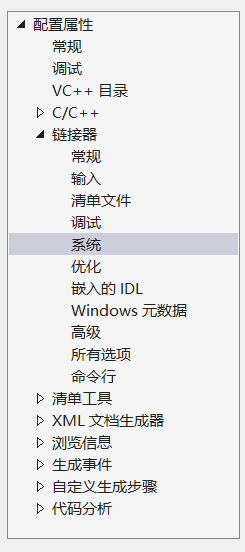
We locate the SUBSYSTEM on the right, click the down arrow on the right and select the CONSOLE

Finally make sure to save, you can try again after the operation by pressing Ctrl + F5 to run ~
There’s actually another way to do it, in return 0; Enter system (” pause “) on the previous line;
Vs output flashback
To modify the project configuration, right-click on the project, select Properties from the right-click menu, and then select “Configuration Properties –>” from the list to the left of the pop-up dialog. The linker – & gt; System “, and then in the list on the right, in the first “subsystem” value, select “Console (/SUBSUSTEM:CONSOLE)”
As shown in the figure below:
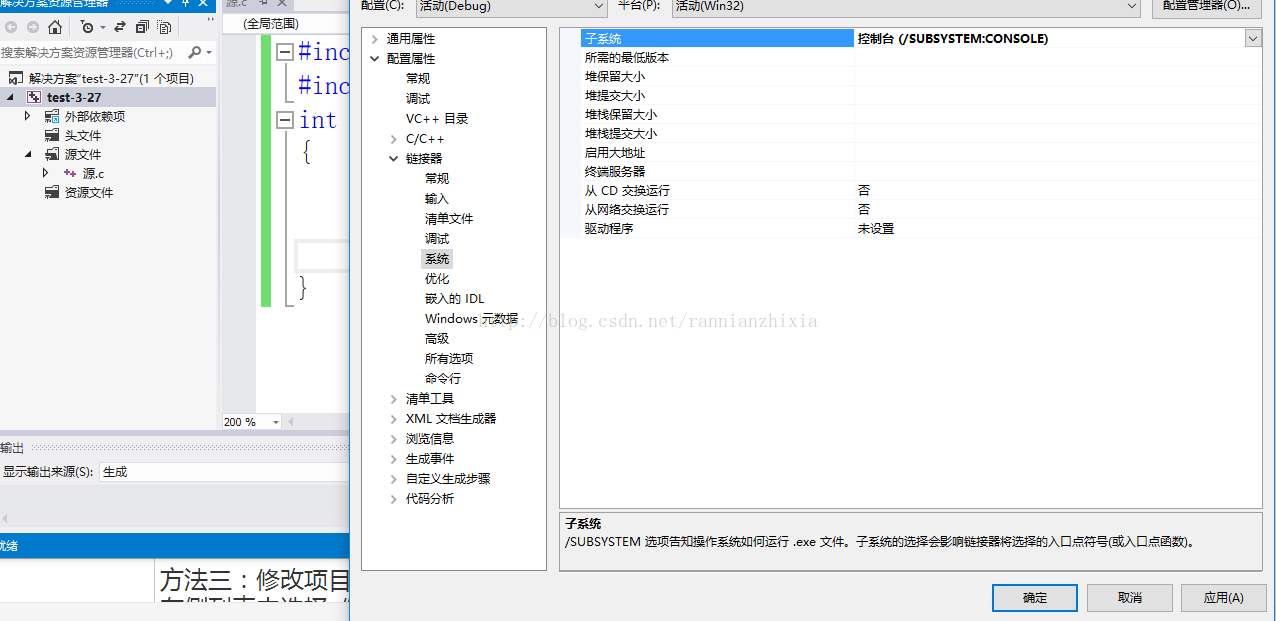
As shown in the figure below:
How to solve the problem that the console window disappears in a flash after visual studio 2017 runs
“Press any key to continue with Visual Studio 2017” will not appear in the console window after running the program using Ctrl+F5. “Or” Please press any key to continue.” The main reason for this is that an “Empty Project” is used to build the Project instead of a “Win32 Console Application”.
At this point, just select “Project”>” The attribute “& gt; It will appear as shown in the image below, then select “System”> SUBSYSTEM “, changing “SUBSYSTEM” to “/SUBSYSTEM: CONSOLE”; I can solve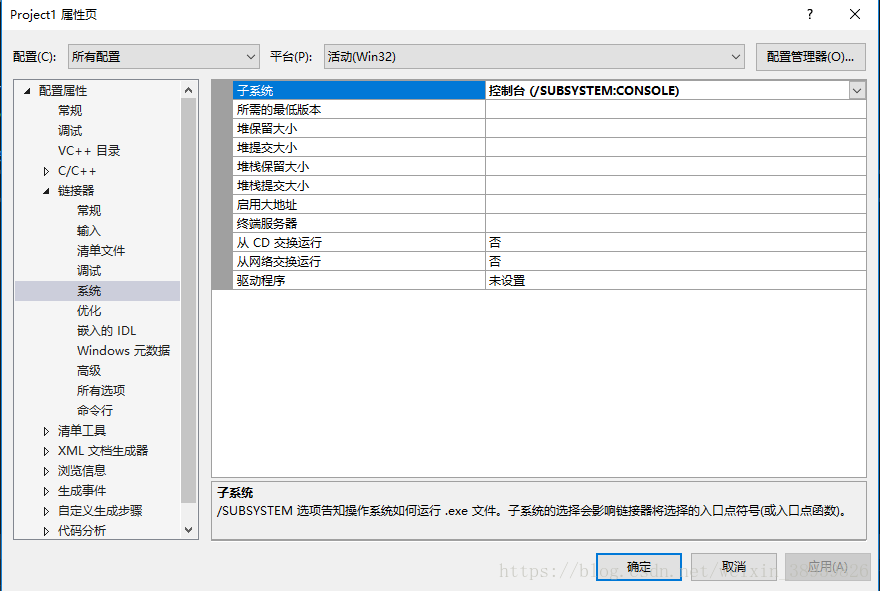
At this point, just select “Project”>” The attribute “& gt; It will appear as shown in the image below, then select “System”> SUBSYSTEM “, changing “SUBSYSTEM” to “/SUBSYSTEM: CONSOLE”; I can solve
Three methods of how to remove the flashback of running result box in VS
First of all, we will often encounter the situation of running the results after coding in VS, and then suddenly flashing back, which is very bad, high for half a day, nothing to see. And I don’t know how to solve it.
Now, here are three ways to do it:
The first two, you probably know.
1 & gt; That’s when return 0; I’m going to do a getchar (); Getchar is waiting for input, so it effectively stops the result screen running;
2 & gt; Similar to the first method, in return 0; Pause a system(“pause”); The statement;
3 & gt; This is a little bit trickier. So first let’s go over how to create a C file. This is a simple one, but it will be used in this method: Go to New – Project – Win32 Console Empty Project – Type File Name – View – Solution Explorer – Source Files – Type Name, C. And when we get there, we’re done. Solution in the solution explorer, right-click the solution explorer, select properties – configuration properties – linker – system – a SUBSYSTEM, the SUBSYSTEM to CONSOLE (\ SUBSYSTEM: the CONSOLE), with respect to ok, this does not need to input, the SUBSYSTEM click on the right side of the blank area, there will be a drop-down options, then click “ok” to continue to write files, continues to run, you will find that yi, amazing.
The advantage of the third method is that it is more cross-platform. If your computer has this problem and someone else doesn’t, it will inevitably run wrong. But the disadvantage of this is that every time you write a file you have to change it.
I hope I can help you.
Now, here are three ways to do it:
The first two, you probably know.
1 & gt; That’s when return 0; I’m going to do a getchar (); Getchar is waiting for input, so it effectively stops the result screen running;
2 & gt; Similar to the first method, in return 0; Pause a system(“pause”); The statement;
3 & gt; This is a little bit trickier. So first let’s go over how to create a C file. This is a simple one, but it will be used in this method: Go to New – Project – Win32 Console Empty Project – Type File Name – View – Solution Explorer – Source Files – Type Name, C. And when we get there, we’re done. Solution in the solution explorer, right-click the solution explorer, select properties – configuration properties – linker – system – a SUBSYSTEM, the SUBSYSTEM to CONSOLE (\ SUBSYSTEM: the CONSOLE), with respect to ok, this does not need to input, the SUBSYSTEM click on the right side of the blank area, there will be a drop-down options, then click “ok” to continue to write files, continues to run, you will find that yi, amazing.
The advantage of the third method is that it is more cross-platform. If your computer has this problem and someone else doesn’t, it will inevitably run wrong. But the disadvantage of this is that every time you write a file you have to change it.
I hope I can help you.
Solution to flash back of visual studio 2017 running program
Find the project in Solution Explorer, right-click on the project –>; Property – & gt; Configure properties –> L Linker –> System – & gt; Subsystem (on the right side of window) –>; SUBSYSTEM:CONSOLE) SUBSYSTEM drop down box select CONSOLE (/SUBSYSTEM:CONSOLE).