Category Archives: How to Fix

Ambari shield big data components

article directory

  • 1. Question:
  • 2. If the Ambari cluster has been successfully deployed, the operation steps are as follows:
  • 3. If the Ambari cluster has not been deployed, the steps are as follows:

1. Question:

  • in the Ambari page, shielding the big data component, make it on the installation page, big data component is not visible to the user, can not be installed.

2. If the Ambari cluster has been successfully deployed, the steps are as follows:

In

  1. /var/lib/ambari - server/resources/sports/HDP/3.1/services directory, delete all the big data component directory and the directory content; Ambari-agent cache: rm-rf /var/lib/ambari-agent/cache/*
  2. restart all ambari-agent nodes: ambari-agent restart

3. If the Ambari cluster has not been deployed, follow these steps:

  1. modify the Ambari source code, in Ambari \ambari-server\ SRC \main\resources\ HDP\3.1\services directory, delete the big data component directory and all contents under the directory;
  2. recompile Ambari source code;
  3. unified deployment of Ambari cluster;

Maven global configuration

IDE no other Settings method to configure Maven globally (one time Maven)

recently when I was writing code with idea, I found that every time I opened a new project, I had to reconfigure Maven, which was particularly troublesome. Baidu online many idea one-time configuration Maven method.
found File--> Other Settings
but I didn't find in my idea other Settings

so I began to baidu have no other idea Solution for Settings option. Some people say File--> Settings--> Other Settings other Settings in Settings

the end result is, of course, I didn't find it.
I finally found the Default Settings changed his name Settings For New Projects

then go to configuration with respect to OK

once again into the idea of Settings, found that the Maven has been configured.

generally speaking, I'm not careful enough. I wish I could help others.
is recorded for query purpose.

K8s configure HTTPS with existing certificate

existing certificate

import certificate

#kubectl create secret tls example-secret --key cert/xxx.key --cert cert/xxx.pem

note that the name and suffix can be changed, such as the possibility that the certificate suffix is CRT.

ingressde yaml file configuration example:

apiVersion: extensions/v1beta1
kind: Ingress
metadata:
  name: example
spec:
  tls:
    - hosts:
        - www.example.com
      secretName: example-secret
  rules:
  - host: www.example.com
    http:
      paths:
      - backend:
          serviceName: example
          servicePort: 80

Check

kubectl get secret

self-generated certificate

can do its own ca, generate its own certificate,. But this way your debugging can also used as a production environment, most browsers will prompt site is not safe, you can configure the browser to trust your own ca, but other users can’t all such operations, so you can go to some free certificate application website to apply for free use, although there is a life, but also is a kind of emergency plans.

How to solve the problem of “08001” when JDBC connects to MySQL

Connection to MySQL – @localhost failed.

[08001] Could not create connection to database server. Attempted reconnect 3 times. Giving up.

is because the connection string of MySQL needs to configure the ServerTimezone attribute, which can be used in UTC, Hongkong, Asiz/Shanghai, etc.

if you use UTC, there will be a time difference of 8 hours, so Hongkong or Asiz/Shanghai is recommended.

for example:

jdbc:mysql://localhost:3306/?serverTimezone=Asia/Shanghai

jdbc:mysql://localhost:3306/MyDB?serverTimezone=Asia/Shanghai

HBase import CSV file

  1. upload the file to Linux and then pass it to HDFS
hadoop fs -put  1.csv /
  1. enter the shell command of hbase and create hbase table
create 'amazon_key_word','MM'
  1. import data by command

format: hbase [class] [separator] [row key, column family] [table] [import file]

hbase  org.apache.hadoop.hbase.mapreduce.ImportTsv  -Dimporttsv.separator="," -Dimporttsv.columns=HBASE_ROW_KEY,MM:dept,MM:search_word,MM:Search_ranking,MM:asin,MM:name,MM:click_v,MM:conversion,MM:asin2,MM:name2,MM:click_v2,MM:conversion2,MM:asin3,MM:name3,MM:click_v3,MM:conversion3 amazon_key_word /1.csv

Note that the first column data is hbase rowkey

ERROR in static/js/app.xxxxxxx.js from UglifyJs Unexpected token: operator (>)

:
vue family barrel USES the vue-qrcode-directive component to generate the two-dimensional code in the project. There is no error in using NPM run dev in the development process. To NPM run build packaging ERROR, such as the ERROR in the static/js/app f1ecb9a5673e78cc442b. Js from UglifyJs Unexpected token: operator (& gt;) [./~/_vue – [email protected] @ vue – qrcode – directive/index, js: 4, 0] [static/js/app. F1ecb9a5673e78cc442b. Js: 17412]

analysis reason :
weback default webpack. Optimize. UglifyJsPlugin cannot compress es6 code files. Along the way, we can simply convert es6 code to ES5 using Babel.
the reason must still be on webpack.config.js. After repeated observations. The problem occurred in the loader configuration, where an item was configured for js file transformation.

solution : (the same problem occurs in _quill-image-drop-module, _vue-qrcode-directive)

module: {
  rules: [
    {
        test: /\.js$/,
        loader: "babel-loader",
        include: [
          resolve("src"),
          resolve("test"),
          resolve(
            "node_modules/[email protected]@quill-image-drop-module"
          ),
          resolve(
            "node_modules/[email protected]@vue-qrcode-directive"
          )
        ],
      }
  ]
}

How to Use paho.mqtt.cpp

install deploy

preparation

$ sudo apt-get install build-essential gcc make cmake cmake-gui cmake-curses-gui
$ sudo apt-get install libssl-dev 
$ sudo apt-get install doxygen graphviz

paho.mqtt.c installation

$ git clone https://github.com/eclipse/paho.mqtt.c.git
$ cd paho.mqtt.c
$ git checkout v1.3.1

$ cmake -Bbuild -H. -DPAHO_WITH_SSL=ON -DPAHO_ENABLE_TESTING=OFF
$ sudo cmake --build build/ --target install
$ sudo ldconfig

paho.mqtt.cpp installation

$ git clone https://github.com/eclipse/paho.mqtt.cpp
$ cd paho.mqtt.cpp
$ cmake -Bbuild -H. -DPAHO_BUILD_DOCUMENTATION=TRUE -DPAHO_BUILD_SAMPLES=TRUE
$ sudo cmake --build build/ --target install
$ sudo ldconfig

basically USES

The registered version of ArcEngine can edit the data in SDE (How to Fix 0x80040356 Error)

1, the problem put forward

in my last post (ArcGIS edits SDE’s vector data (set) (fixes versioning issues)) solved the unregistered uneditable problem of editing SDE in ArcGIS, and the same idea can be solved in ArcEngine. This is a relatively simple problem, so to make it longer, I’ve put together a post on my usual approach to solving the ArcEngine problem, skipping the second part if I’m in a hurry.

2. Solution </h2 b>

I have always believed that a problem the best solution for the first is to help document, the second is baidu Google, so in after already know how to solve the problems in ArcGIS can look up relevant content in the help document, we search “RegisterAsVersioned” in the help document, the following results were obtained:

This tells us that we should call the “IVersionedObject” interface, as ArcGIS always does, and of course the latest interface, IVersionedObject3.

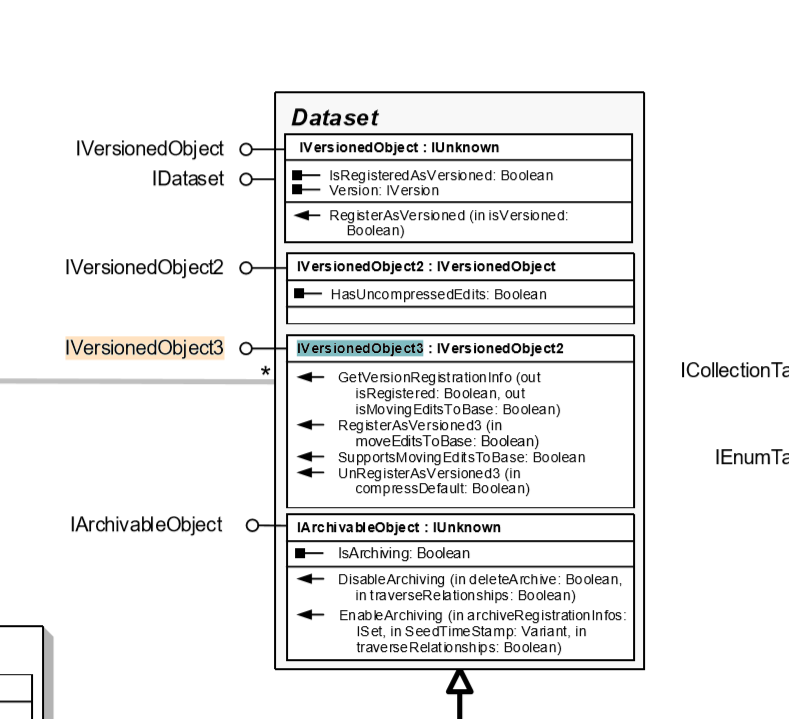
we focus to the next object model diagram (installation under the path of ao), the interface is in ESRI ArcGIS. Geodatabase namespace, so you can open “GeoDatabaseObjectModel”, search IVersionedObject3, get this interface is here, this is an abstract class:

so we can to implement it like this: </ p>

IVersionedObject3 versionedObject = pDataSet as IVersionedObject3;

The next steps for

are basically the same as in arcgis.

3. Code implementation: </h2 b>

I find a lot of information on the net, most of these code editing mode setting is not only the versioning patterns, but did not say how version, so, first to determine whether the data set is already registered version, if the registered version set directly edit mode without versioning editor, otherwise, you need to first register edition to edit. By this logic, the code should look like this:

                if (pWorkspace.Type == esriWorkspaceType.esriRemoteDatabaseWorkspace)
                {
                    IVersionedObject3 versionedObject = pDataSet as IVersionedObject3;
                    if (versionedObject != null && !versionedObject.IsRegisteredAsVersioned)
                    {
                        versionedObject.RegisterAsVersioned(true);
                    }
                    pEngineEditor.EditSessionMode = esriEngineEditSessionMode.esriEngineEditSessionModeVersioned;
                }
                //else
                //{
                //    pEngineEditor.EditSessionMode = esriEngineEditSessionMode.esriEngineEditSessionModeNonVersioned;
                //}
                pEngineEditor.StartEditing(pWorkspace, pMap);

if you edit the sde data set update without a registered version, an error is reported: HRESULT:0x80040356

How to install cuda10.01in Ubuntu18.04

1. https://developer.nvidia.com/cuda-downloads

download base installer

2. Execute the following code

  • sudo dpkg-i cuda-repo-ubuntu1804-10-1-local-10.1.105-418.39_1.0-1_amd64.deb
  • sudo apt-key add /var/cuda-repo-< version> Pub (for success in the previous step)
  • sudo apt-get update
  • sudo apt-get install cuda

3. Add environment variable

opens in ~ directory. Bashrc file: gedit ~/. Bashrc

Add two lines to the end of the file:

the export PATH =/usr/local/cuda – 10.1/bin: $PATH </ p>

export LD_LIBRARY_PATH =/usr/local/cuda – 10.1/lib64: $LD_LIBRARY_PATH </ p>

finally execute: source ~/. Barshrc

4. Check whether

has been installed successfully

nvcc -V

if output

nvcc: NVIDIA…..

Copyriht …

Built on…

Cuda version information, etc.

installed successfully

Differences between shell script variable assignment and C language variable assignment

in C, you can occasionally see variable assignments as follows:

x1 = x2 = 1;

this means that the variable x1 is equal to the variable x2 is equal to 2, and the execution is the same thing as

x1 = 1;
x2 = 1;

but in shell script assignment, meaning is different, if the command line x1 = x2 = 1, then the expression means the variable x1 is equal to x2 = 1, where x2 = 1 this is a string as a whole, there is no x2 variable, the test is as follows:

xxxxxx@STB-240:~$ Test1=Test2=1
xxxxxx@STB-240:~$ 
xxxxxx@STB-240:~$ echo $Test1
Test2=1
xxxxxx@STB-240:~$ echo $Test2

xxxxxx@STB-240:~$ 
xxxxxx@STB-240:~$ 

note: under the shell, only the value before the first equals sign is a variable, followed by the value of the variable.

FCOS No CUDA runtime is found, using CUDA_HOME=’/usr/local/cuda-10.0′

FCOS appears No CUDA runtime is found, using CUDA_HOME=’/usr/local/cuda-10.0′

  • appear below error </ li>
    • reason for the error </ li>
    • view version </ li>
    • solution (cuda10.0 and torch did not match the 1.2.0) </ li> </ ul>

    )

    appears with the following error

    AssertionError:
    The NVIDIA driver on your system is too old (found version 10000).
    Please update your GPU driver by downloading and installing a new
    version from the URL: http://www.nvidia.com/Download/index.aspx
    Alternatively, go to: https://pytorch.org to install
    a PyTorch version that has been compiled with your version
    of the CUDA driver.

    error cause

    cuda version does not match the torch version
    . On my machine, the pytorch version is too new, while the cuda version is too old to match.
    is usually the torch version that does not fit

    view version

    NVCC -v

    # or pip3 list
    PIP list

    cuda10.0 with torch 1.3.1 mismatch </ p>

    solution (cuda10.0 and torch 1.2.0 match only)

    uninstall the original torch1.3.1
    pip3 uninstall torch
    # or
    PIP uninstall torch

    reshipment torch1.2.0
    pip3 install torch 1.2.0 torchvision </ mark> 0.4.0 -f https://download.pytorch.org/whl/torch_stable.html
    PIP install torch 1.2.0 torchvision </ mark> 0.4.0 – f https://download.pytorch.org/whl/torch_stable.html

    after checking whether torch1.2.0 has been installed successfully,
    pip3 list
    # or
    PIP list

    the final version of the cuda with torch version match go to website check can
    see pytorch website https://pytorch.org/get-started/previous-versions/ to see such a </ p>

tensorflow2.1 Error:Could not create cudnn handle: CUDNN_STATUS_INTERNAL_ERROR

system environment :

OS: UBUNTU18.04
CUDA:10.1
Tensorflow 2.1
cuDNN: 7.6.5
TensorRT: 6.0.15(tf2.1 supports TensorRT6.0)
GPU: RTX2080(8G)*2

use the new version tensorflow (2.1 support CUDA version 10.1, 2.0 supports version 10.0), appeared the following error (error repetition code address: https://github.com/keras-team/keras/blob/master/examples/cifar10_cnn.py) : </ p>

2020-01-16 21:49:19.892263: E tensorflow/stream_executor/cuda/cuda_dnn.cc:329] Could not create cudnn handle: CUDNN_STATUS_INTERNAL_ERROR
2020-01-16 21:49:19.897303: E tensorflow/stream_executor/cuda/cuda_dnn.cc:329] Could not create cudnn handle: CUDNN_STATUS_INTERNAL_ERROR
2020-01-16 21:49:19.897396: W tensorflow/core/common_runtime/base_collective_executor.cc:217] BaseCollectiveExecutor::StartAbort Unknown: Failed to get convolution algorithm. This is probably because cuDNN failed to initialize, so try looking to see if a warning log message was printed above.
	 [[{{node conv2d_1/convolution}}]]


Through the discussion of issues in tensorflow library, we know that the problem is on the video memory allocation of rtx2070/2080 graphics card. According to the method mentioned in issues, add the following code at the beginning of the program :

# gpus= tf.config.experimental.list_physical_devices('GPU')
gpus= tf.config.list_physical_devices('GPU') # tf2.1版本该函数不再是experimental
print(gpus) # 前面限定了只使用GPU1(索引是从0开始的,本机有2张RTX2080显卡)
tf.config.experimental.set_memory_growth(gpus[0], True) # 其实gpus本身就只有一个元素

but in my own context there is another error :

ValueError: Memory growth cannot differ between GPU devices

look at the hint should be the cause of conflict between gpus, so I try to use only one GPU:

import os
os.environ['CUDA_VISIBLE_DEVICES']='1' 

, this will solve the error