1, problem
import maven project error cannot run
2.
code has a problem is not the latest code
3. Solve
update git pull project to import
again
1, problem
import maven project error cannot run
2.
code has a problem is not the latest code
3. Solve
update git pull project to import
again
JSONP0
1 IE era compromise
what is cognate ?
source: protocol + domain name + port
if two url protocols, the domain name and port number are identical, then the two url are of the same origin.
http://www.baidu.com and http://baidu.com are different sources because they are not exactly the same
same-origin policy definition
if JS runs in source A, then JS can only get the data in A, but not the data in source B.
even if JS is downloaded from source B and runs in A, it cannot read the data from source B.
in simple terms, the same-origin policy is that pages from different sources are not allowed to access data from each other
why is
to protect user privacy
if do not have the same-origin policy
unable to distinguish between the sender
here if the page to access the page B (different source), then A will send the request, the request (if) the hacker and almost normal request there is no difference between referer distinguishing (only request), if you don’t check the referer background, that is no different with normal.
isn’t it good to check referer?
what if, in case you don’t check it, the whole page is in danger?The safety of the chain depends on the weakest link. So in case you forget to check it, you have a big problem.
to share data, it should be declared in advance. If A wants to access the data of B, it only needs to write B in the response header of A to access it, and the specific syntax can be checked by MDN.
yes, it’s that simple.
IE does not support CORS
then JSONP appears.
JSONP works as follows: A can refer to B’s JS, but cannot access data. So we write to the JS object , and then A references JS, and then we will get the data successfully.
steps
0
1
and then the data will be read successfully.
I won’t show you the
code, but it’s that simple.
IntelliJ IDEA has actually been supported for Java 8 Stream debugging, which has not been used much before. Today IntelliJ IDEA demonstrates how to debug the Stream chain calls in Java 8.
Stream code:
        String[] words = new String[]{"Hello", "World"};
        List<String> collect1 = Arrays.stream(words)
                .map(e -> e.split(""))
                .flatMap(Arrays::stream)
                .distinct()
                .collect(Collectors.toList());
set a breakpoint on the first line, then enter debug mode. When the breakpoint enters, click Trace Current Stream Chain button:
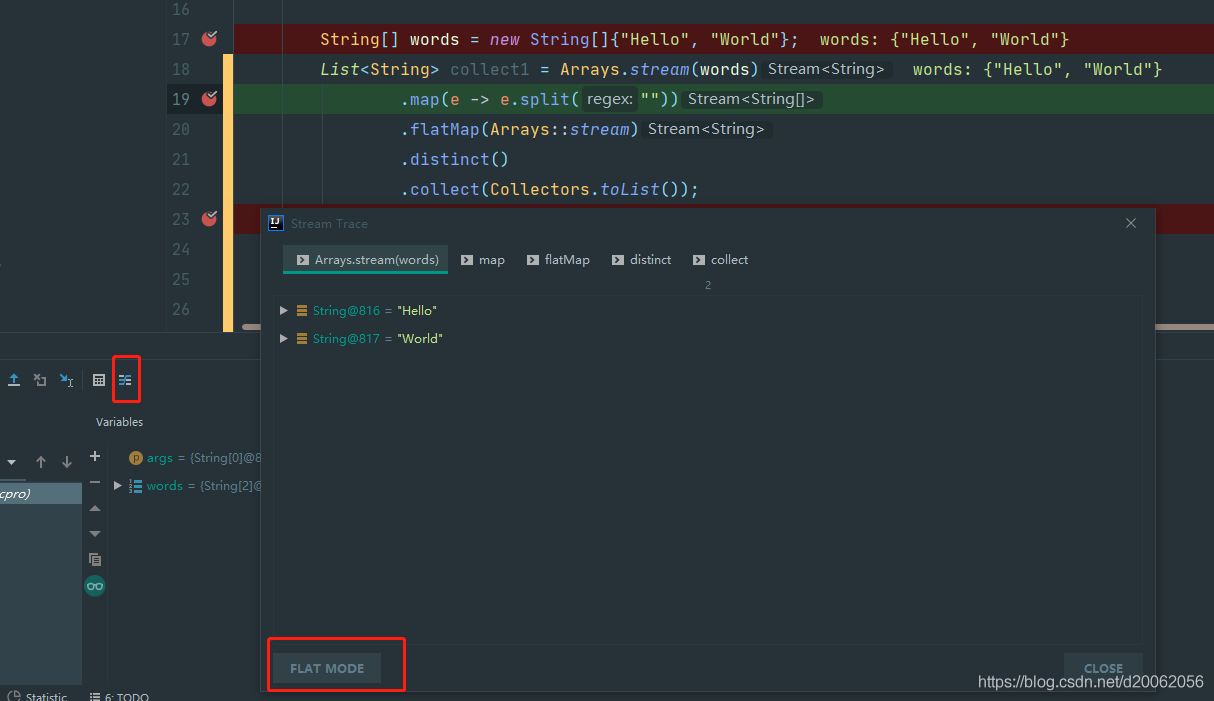
then it will automatically enter the current Stream tracking debugging window, which will show the tabs of each chained call. Click each TAB to see the tracking results of each step.
can also click Flat Mode to enter Flat Mode and display all tracking results at once:
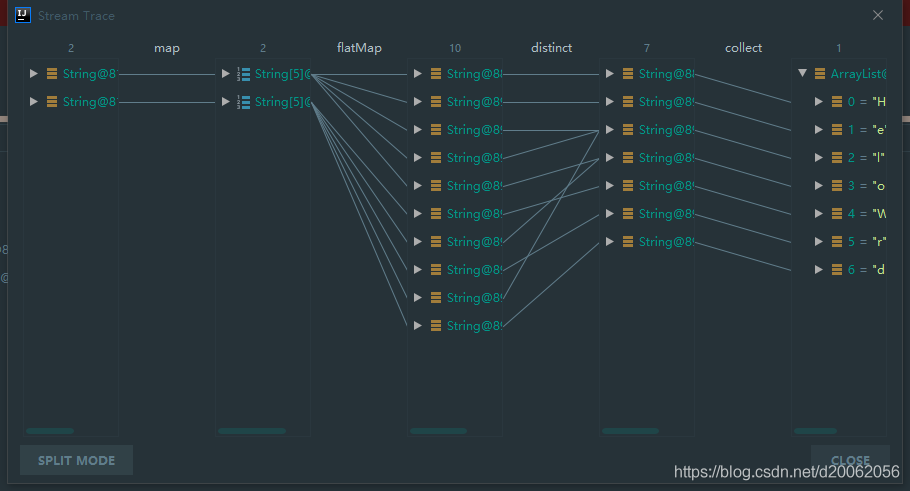
OK, very convenient!
I am writing an article for the first time, mainly records the process of this code, the requirements of the teacher is on the nano version of reading to the GPS data from the python and parses the latitude and longitude, the rate and the number of satellite late by GUI graphical and less on the reading of the GPS in the nano tutorial, there are also the article use the GPS module but is not conducive to I work late, so their imitation has written a series of simple code.
first download and install cutecom to see if nano has read the GPS data. Use the command:
sudo apt-get install cutecom
is followed by Nano installation of pthon3-serial and pynmea2.
I remember using sudo apt-get intsall python3-serial last night, but PIP install pyserial
is also available online
as for which can try by itself, I think this process is not important, as long as pyserial is installed successfully, pyserial is understood to be python serial communication module, through which we can read the serial port tool.
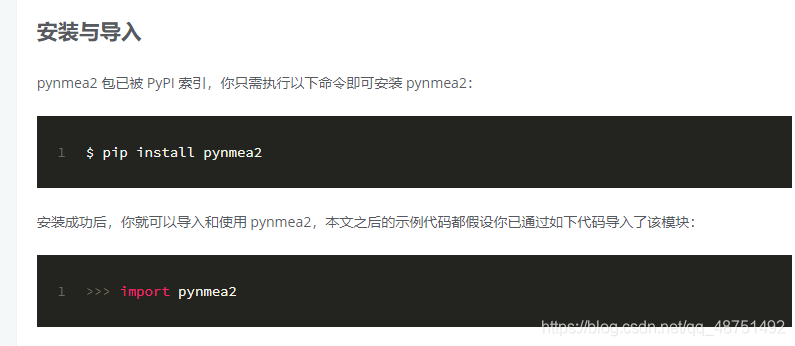
I want to mention that the file PIP is not found with PIP, but rather we use python3 and PIP should be called pip3 so that the installation is successful. Pynmea2 is understood as a third party module for handling the NMEA 0183 protocol. Used by us to resolve the NAME 0183 protocol. http://gnss.help/2018/03/01/pynmea2-readme/index.html this is my reference page. And then you write your own code.
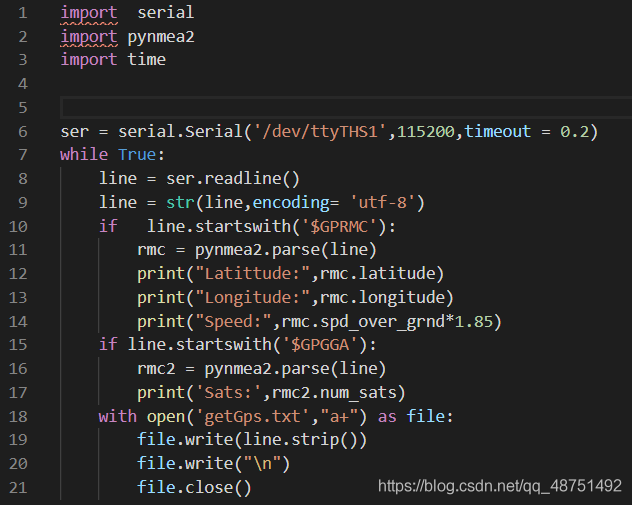
is first to import two downloaded modules, followed by import time module, I don’t know what is the use is to follow them to add.
the ser is a serial port assignment in ser (about this), the first one is behind your serial port of the serial port is usually ttyTHS1 USB is usually ttyUSB0 these names should be available through cutecom, the second is the baud rate I use the default 115200 online is a lot of the people followed 9600 change, the timeout I followed others change, I feel it doesn’t matter how much I feel OK. This is followed by a while statement. Line 8 USES pyserial to read the serial data and assign it to the line variable, line 9 because line reads bytes and then needs to be changed to a string (that’s about it), followed by the GPRMC in the two if statements. This is what you read using GPS, line 11 USES pynmea2.parse () to parse 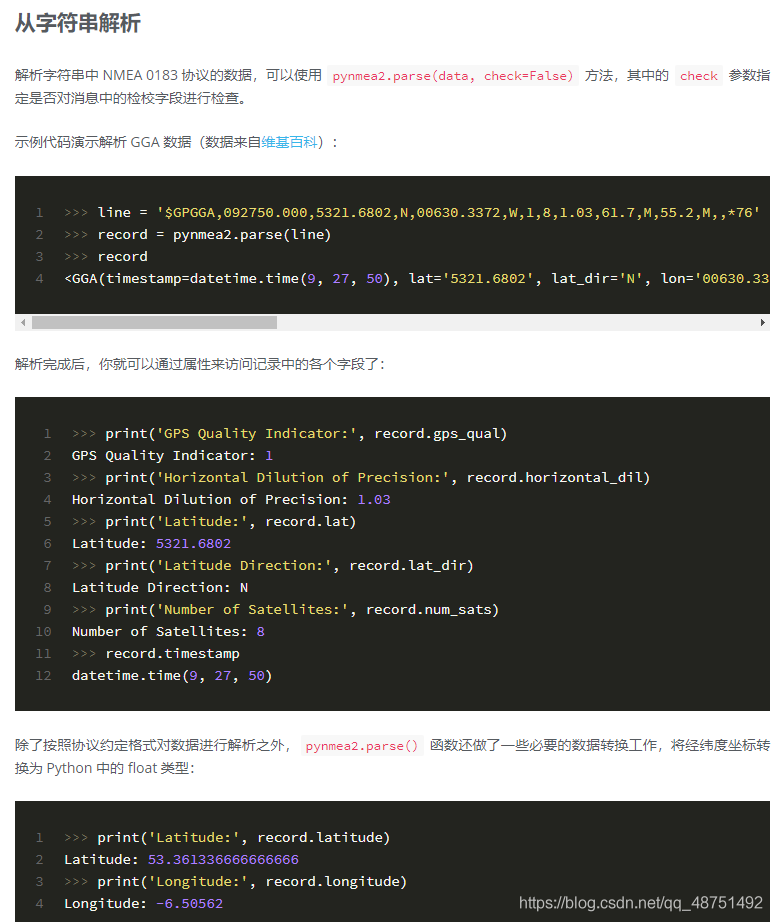
let me mention why I use this instead of using lists like many other tutorials on the web. The main reason is that I think GPS signals can be unstable and lead to parsing errors. This method is also very useful, but I just don’t know if it will go wrong. If you add a break at the end of the if statement, you can stop the loop, because there are two if statements here. We’d better add a break at the second if. If you add a break at the first if, it will make the second if unusable, then it will just exit the while statement.
18 is saved into TXT file at the beginning, mainly I have been written in a+ way, at the beginning I was using W or W+ to try to find TXT only GPGGA data after the interview. 19 changed to STR, because Python can only be a string, 20 is a blank line, 21 needs to be saved.
. Well, that’s about it. I won’t go into much detail. Don’t understand can go baidu once. First time write success, go to the next refueling!
#springBoot integration with the first mybatis project
1. Create a new normal maven project
2. Use idea’s easycode to automatically generate the controller, entity, service and dao layer code
3. Simple pom configuration, independent of error
java.lang.annotation.AnnotationFormatError: Invalid default: public abstract java.lang.Class tk.mybatis.spring.annotation.MapperScan.factoryBean()依赖如下:<dependency> <groupId>org.mybatis.spring.boot</groupId> <artifactId>mybatis-spring-boot-starter</artifactId> <version>2.1.0</version> </dependency> <dependency> <groupId>com.oracle</groupId> <artifactId>ojdbc6</artifactId> <version>11.2.0.4</version> </dependency>4. 配置简单的yml,不配置会报找不到mybatis:
mapper-locations:类路径:mapper/* . xml
directory
1. Encountered
2. Resolution
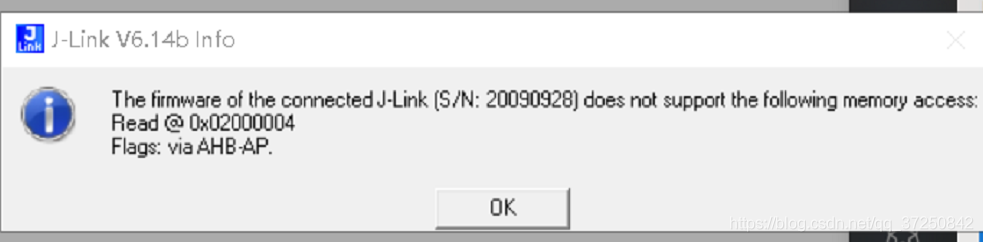
recently my tutor gave me a project related to UWB, using stm32 chip. When I downloaded The program with Keil5, The J-Link driver detected all that could be done, but ran out of The Firmware of The connected J-link does not support The following memory access. Later consult the elder brother also is to encounter this kind of problem for the first time, then turn to omnipotent Internet, discover also have similar problem.

(you can see that there is already a j-link driver in the device manager)
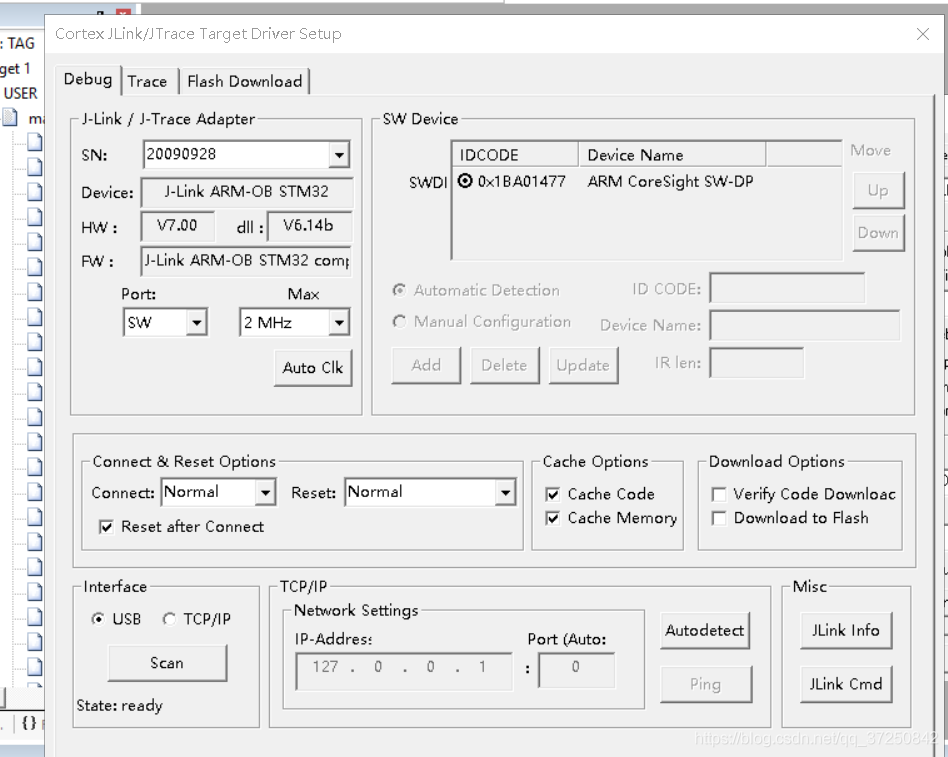
(Keil5’s magic wand can also be detected, note the DLL)
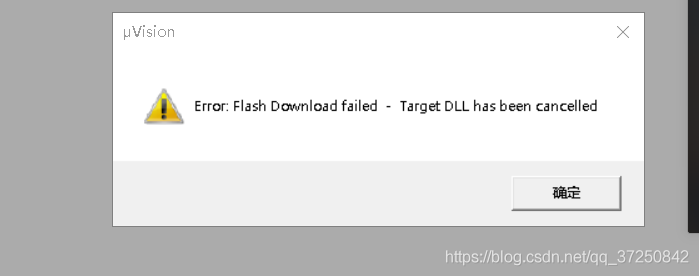
(download program, two error, mentality explosion)
2. When The firmware of The connected j-link does not support The following memory access, I received a second error (Flash download faied-taget DLL has been cancelled). Therefore, I tried to find out The reason from The DLL.
also refers to a lot of big guys’ solutions, basically is to replace the jlinkarm. DLL under the installation path of Keil5 with jlinkarm. DLL under the j-link installation path. So I tried it myself, and it worked.
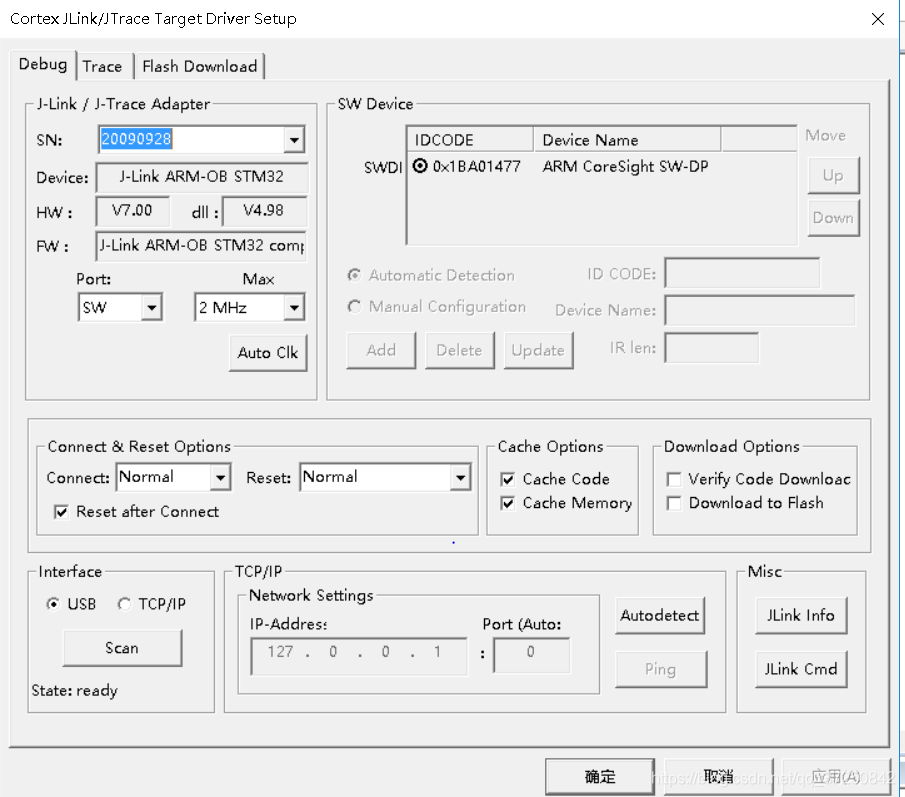

(after modifying the DLL, it was ok)
later when using uwb serial port debugging, it was very happy to see that the data could be successfully sent!
tool: libjpeg-turbo can be quickly decoded, Azure Kinect Sensor SDK is used in this tool
https://github.com/microsoft/Azure-Kinect-Sensor-SDK/blob/release/1.3.x/src/record/internal/matroska_read.cpp
libjpeg-turbo Github
https://github.com/libjpeg-turbo/libjpeg-turbo
can be compiled from github source code with cmake. To install nmake, check to see if there is a release
libjpeg-turbo released on sourceforge compiled 2.0.3 version:
libjpeg – turbo 2.0.3
https://sourceforge.net/projects/libjpeg-turbo/files/2.0.3/
Exe libjpeg-turbo-2.0.3-vc64. Exe
install (unzip) :
libjpeg-turbo64 folder:
├─bin
├─classes
├─doc
├─include
├─lib
│  └─pkgconfig
└─man
    └─man1
structure similar to OpenCV library
, I downloaded libjpeg-turbo-2.0.3-gcc64. Exe . A file under lib, in order to cooperate with vs, I still use libjpeg-turbo-2.0.3-vc64
is then configured as follows.
VC++ Directories/Include Directories new: $(LIBJEPEGTURBO_PATH)\ Include
LIBJEPEGTURBO_PATH : D:\libjpeg-turbo-gcc64 create a new environment variable: %LIBJPEGTURBO_PATH%\bin corresponding to dynamic library location Linker/General/Addtional Lib Dir $(LIBJEPEGTURBO_PATH)\lib corresponding static Library location
VC++ Directories/Library Directories new $(LIBJPEGTURBO_PATH)\lib
Linker/Input/Addtional Dependencies new turbojpeg. Lib
refer to the introduction method of Azure- kinect-sdk for libjpeg. When linking, introduce lib
target_link_libraries(k4a_playback PUBLIC
    k4a::k4a
    k4ainternal::logging
    ebml::ebml
    matroska::matroska
    libyuv::libyuv
    libjpeg-turbo::libjpeg-turbo
)
program #include "turbojpeg. H "
summary: mysql does not support update to return data. Only Postgres is supported.
this is the definition tip, and the return value is an array of Numbers and a Model array.


That means only Postgres plus configuration is supported.
...
  /**
   * Return the affected rows (only for postgres)
   */
  returning?: boolean;

  /**
is very angry.
1. Backup the original server data
gitlab-rake gitlab:backup:create RAILS_ENV=production
2. The backups, which are generally located in /var/opt/gitlab/, automatically generate filenames such as 1595350598_2020_07_22_10.0.0_gitlab_backup.tar
Note : due to Gitlab’s own compatibility issues, the higher version of Gitlab cannot recover the data backed up by the lower version. Note that you need to deploy the same version of Gitlab
on server b as on server a
3. After backups, copy the tar file that was just generated to the corresponding directory on the new server:
4. Restore data on new server
gitlab-rake gitlab:backup:restore RAILS_ENV=production BACKUP=1595350598_2020_07_22_10.0.0
BACKUP time point must be consistent with the original server BACKUP after the file name
1. Connect to the server installed by gitlab via xshell
2. Enter the gitlab-rails console production into the gitlab console. Only after entering the console can you enter the gitlab query statement and it will be parsed
gitlab-rails console production
3. Enter user = user.where (id:1). First query the user object with id 1, because the default for super admin users is 1
user = User.where(id:1).first
4. Enter user.password= ‘password’ and fill in your new password position to
user.password='密码'
5. Then enter user.save! Save the user object
user.save
Log in to the login page to test
idea connect to database error Server returns invalid timezone. Need to set ‘serverTimezone’ property
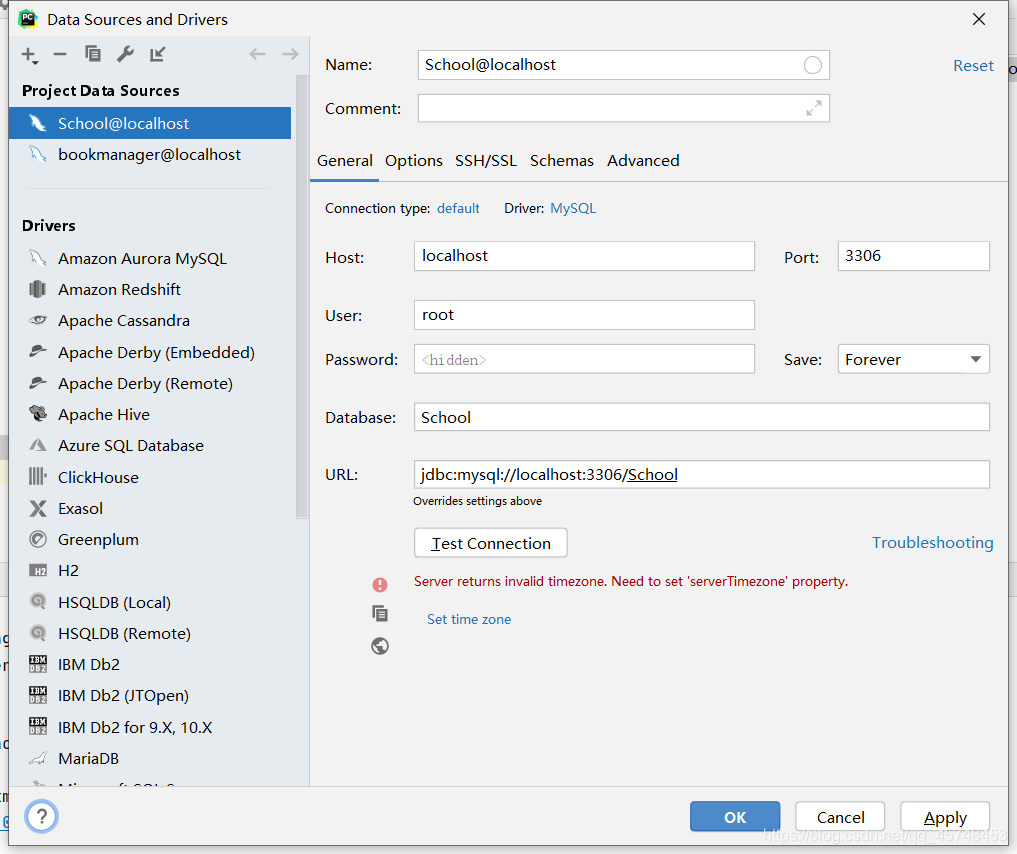
the reason is that the default time zone in MySQL driver is UTC, which is eight hours different from local time (China), so the link cannot be connected.

click on Set time zone
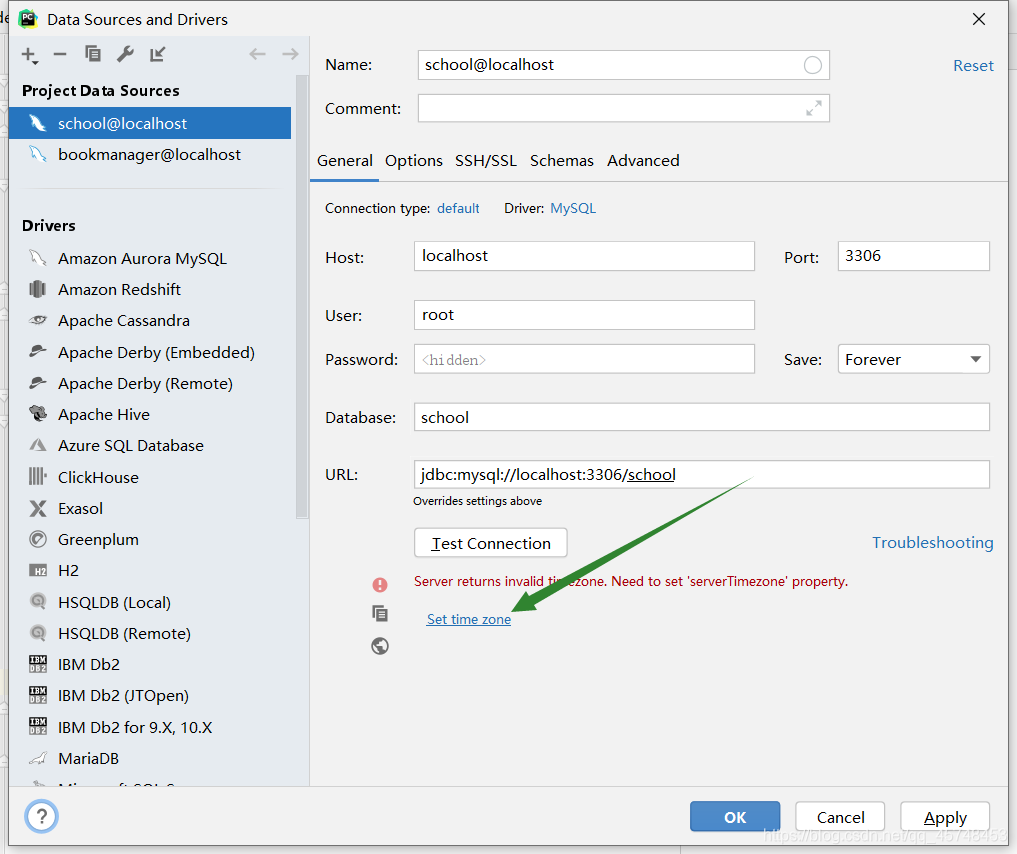
1. Fill in GMT in the box and save! 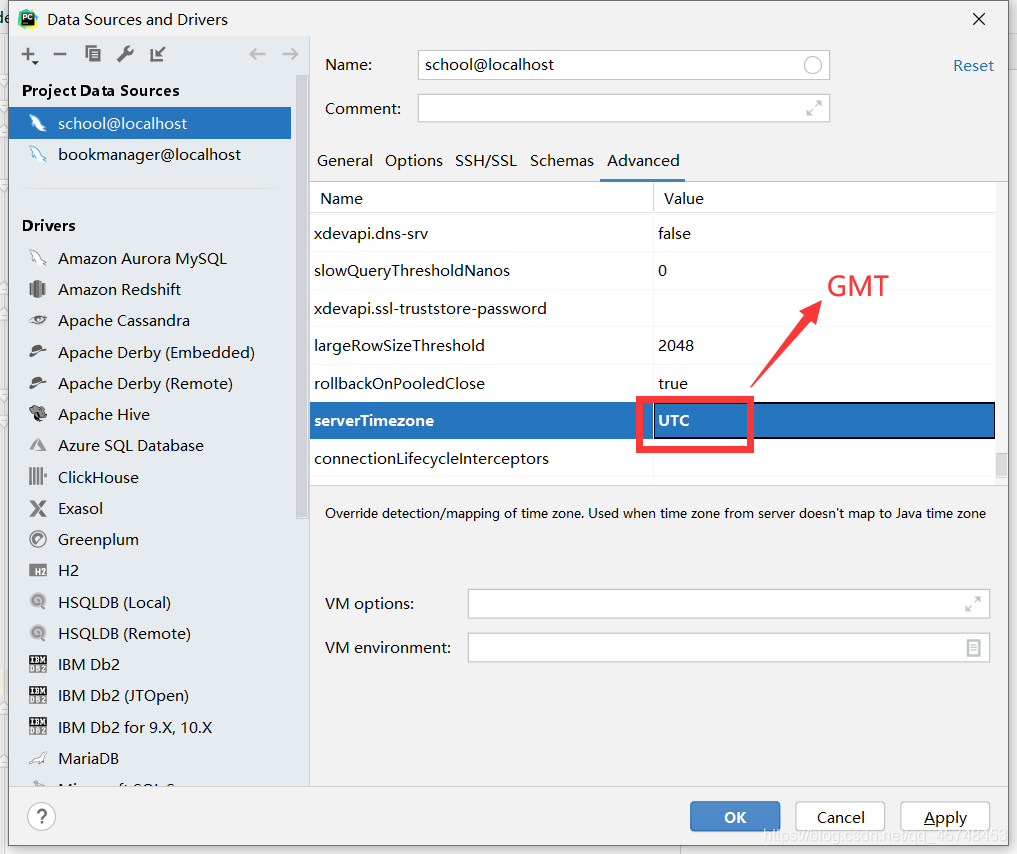
2. You can also add:?After the URL. serverTimezone=GMT
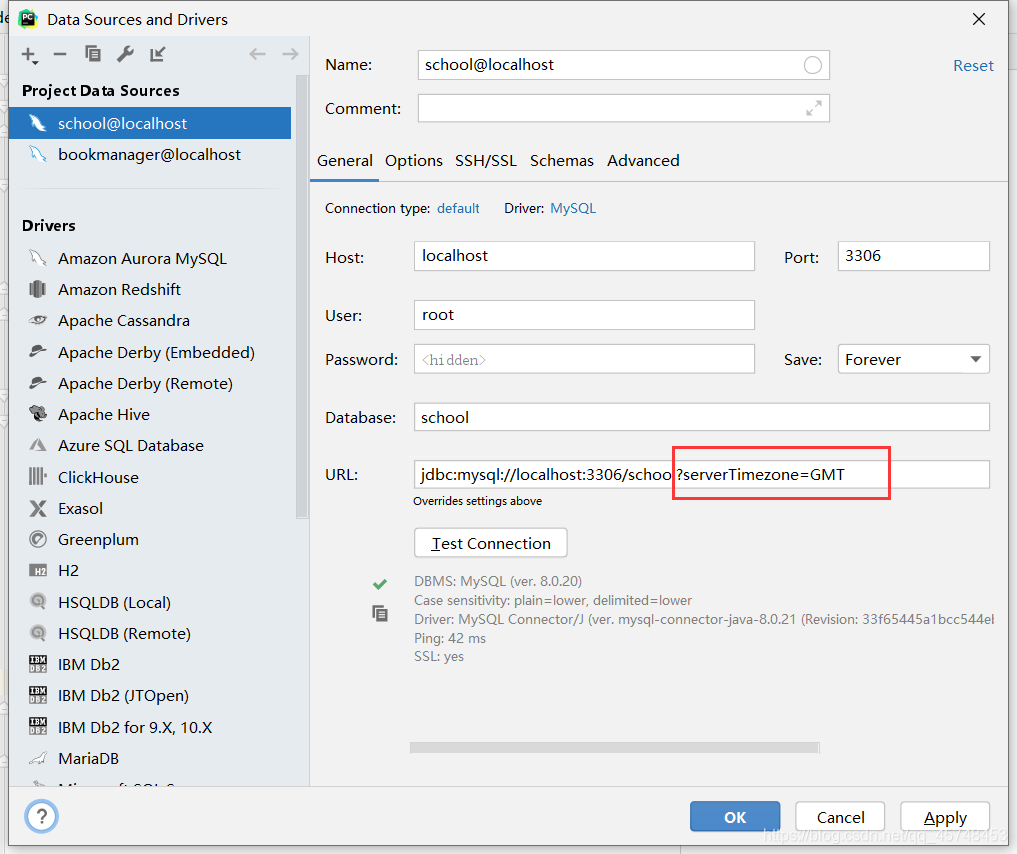
PS:
GMT (Greenwich Mean Time) : Greenwich Mean Time
UTC: world Standard Time
CST (China Standard Time) : China Standard Time
GMT + 8 = UTC + 8 = CST
to remove a file from Git, you must remove it from the list of traced files (specifically, from the staging area) and commit it. You can do this with the git rm command, along with removing the specified file from the working directory so that it does not appear in the untracked file list in the future.
if you simply manually delete a file from your working directory, running git status will show you the Changes not passage for commit section (i.e., without a listing) :
$ rm grit.gemspec
$ git status
On branch master
Changes not staged for commit:
  (use "git add/rm <file>..." to update what will be committed)
  (use "git checkout -- <file>..." to discard changes in working directory)

        deleted:    grit.gemspec

no changes added to commit (use "git add" and/or "git commit -a")
and then run git rm to record the removal of the file:
$ git rm grit.gemspec
rm 'grit.gemspec'
$ git status
On branch master
Changes to be committed:
  (use "git reset HEAD <file>..." to unstage)

        deleted:    grit.gemspec
When
is finally committed, the file is no longer in version management. If you have modified a file before deleting it and it is already in the staging area, you must use the force delete option -f to avoid losing the modified content after deleting the file by mistake.
is another situation where we want to delete a file from the Git repository (that is, remove it from the staging area), but still want to keep it in the current working directory. In other words, simply delete from the trace list. For example, some large log files or a pile of . A compiled files are accidentally included in the warehouse. Remove the trace but do not delete the files, so that they can be added later to the .gitignore files
$ git rm --cached readme.txt
can be followed by the name of the file or directory, or glob mode can be used. For example:
$ git rm log/\*.log
notice that the backslash \ precedes the asterisk *, because Git has its own file-pattern extension matching mode, so we don’t use the shell to expand it, but the shell extension only deletes files in the specified directory without recursively matching. The above example specifies the directory, so the effect is the same, but the following example matches recursively, so a backslash must be added. . This command deletes all files under the log/ directory with the extension . Log . Something like this:
$ git rm \*~
recursively deletes all files ending in ~ in the current directory and its subdirectories.
untracking files still has one command: git update-index — support-unchanged < Untracked file & GT;
note: this command can only cancel the file before the commit to the temporary area, you can use git reset < The file name & gt; returns a file in the staging area to before the staging area, and then untraces it.
>>> a = torch.Tensor([[1,2], [3,4], [5, 6]])
>>> a
tensor([[1., 2.],
        [3., 4.],
        [5., 6.]])
>>> a.mul(a)
tensor([[ 1.,  4.],
        [ 9., 16.],
        [25., 36.]])

# a*a等价于a.mul(a)
2, matrix multiplication, x.m m (y), the matrix size to meet: (I, n) x (n, j)
>>> a
tensor([[1., 2.],
        [3., 4.],
        [5., 6.]])
>>> b = a.t()  # 转置
>>> b
tensor([[1., 3., 5.],
        [2., 4., 6.]])

>>> a.mm(b)
tensor([[ 5., 11., 17.],
        [11., 25., 39.],
        [17., 39., 61.]])