Category Archives: How to Fix

Multiple exceptions are caught in a single catch block

in Java7, the catch block has been upgraded to handle multiple exceptions in a single catch block.

code before Java7:

catch (IOException ex) {
     logger.error(ex);
     throw new MyException(ex.getMessage());
catch (SQLException ex) {
     logger.error(ex);
     throw new MyException(ex.getMessage());
}catch (Exception ex) {
     logger.error(ex);
     throw new MyException(ex.getMessage());
}

in Java7, we can catch all these exceptions with a catch

catch(IOException | SQLException | Exception ex){
     logger.error(ex);
     throw new MyException(ex.getMessage());
}

if multiple exceptions are handled with a catch block, they can be separated by a pipe, in which case the exception parameter variable ex is defined as final and cannot be modified. This feature will generate less bytecode and reduce code redundancy.

finally welcome to visit my personal website: 1024s

Tensorflow import error: DLL load failed: the specified module could not be found

1, background

there was a problem after my tensorflow version was updated recently, and the error was also very vague: DLL load failed: the specified module could not be found. Let me start with my context:

win10 + pycharm

anaconda3 (python3.6)

tensorflow1.9

ii. Problem description

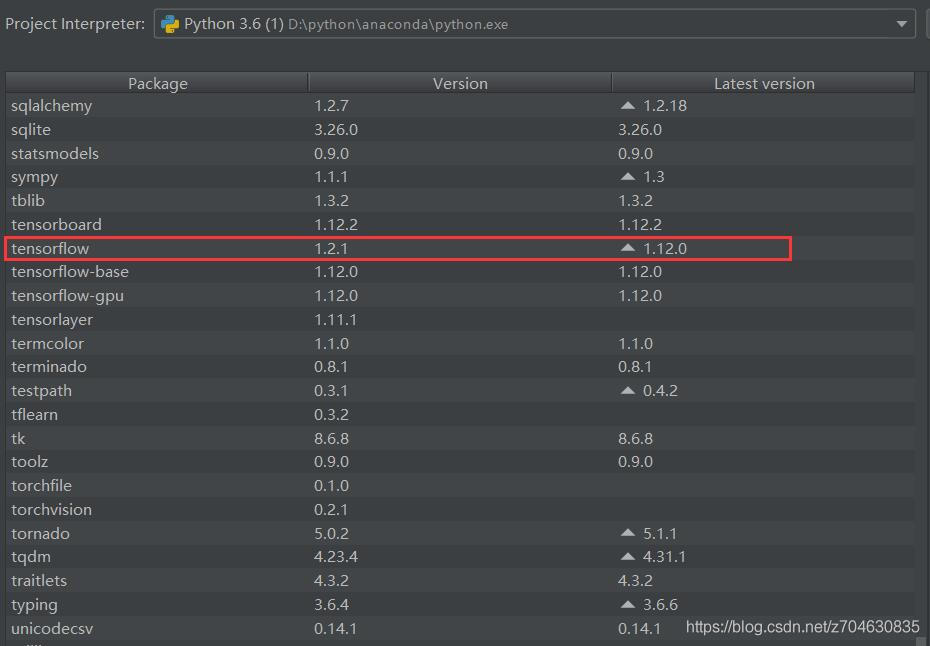
used its own version of tensorflow, which was 1.9, for almost a year and never had any problems. Later, I saw that the version of TensorFlow was updated to 1.12, so I thought I would update it. However, after the update, the error of importing tensorFlow was reported. After that, even lowering the tensorflow version to 1.2 still gives an error:

when import tensorflow, there will be an error message:

D:\python\anaconda\python.exe D:*****.py
Traceback (most recent call last):
  File "D:\python\anaconda\lib\site-packages\tensorflow\python\pywrap_tensorflow.py", line 58, in <module>
    from tensorflow.python.pywrap_tensorflow_internal import *
  File "D:\python\anaconda\lib\site-packages\tensorflow\python\pywrap_tensorflow_internal.py", line 28, in <module>
    _pywrap_tensorflow_internal = swig_import_helper()
  File "D:\python\anaconda\lib\site-packages\tensorflow\python\pywrap_tensorflow_internal.py", line 24, in swig_import_helper
    _mod = imp.load_module('_pywrap_tensorflow_internal', fp, pathname, description)
  File "D:\python\anaconda\lib\imp.py", line 243, in load_module
    return load_dynamic(name, filename, file)
  File "D:\python\anaconda\lib\imp.py", line 343, in load_dynamic
    return _load(spec)
ImportError: DLL load failed: 找不到指定的模块。

During handling of the above exception, another exception occurred:

Traceback (most recent call last):
  File "D:/python/item/64-MARTAGAN/train_marta_gan.py", line 7, in <module>
    import tensorflow as tf
  File "D:\python\anaconda\lib\site-packages\tensorflow\__init__.py", line 24, in <module>
    from tensorflow.python import pywrap_tensorflow  # pylint: disable=unused-import
  File "D:\python\anaconda\lib\site-packages\tensorflow\python\__init__.py", line 49, in <module>
    from tensorflow.python import pywrap_tensorflow
  File "D:\python\anaconda\lib\site-packages\tensorflow\python\pywrap_tensorflow.py", line 74, in <module>
    raise ImportError(msg)
ImportError: Traceback (most recent call last):
  File "D:\python\anaconda\lib\site-packages\tensorflow\python\pywrap_tensorflow.py", line 58, in <module>
    from tensorflow.python.pywrap_tensorflow_internal import *
  File "D:\python\anaconda\lib\site-packages\tensorflow\python\pywrap_tensorflow_internal.py", line 28, in <module>
    _pywrap_tensorflow_internal = swig_import_helper()
  File "D:\python\anaconda\lib\site-packages\tensorflow\python\pywrap_tensorflow_internal.py", line 24, in swig_import_helper
    _mod = imp.load_module('_pywrap_tensorflow_internal', fp, pathname, description)
  File "D:\python\anaconda\lib\imp.py", line 243, in load_module
    return load_dynamic(name, filename, file)
  File "D:\python\anaconda\lib\imp.py", line 343, in load_dynamic
    return _load(spec)
ImportError: DLL load failed: 找不到指定的模块。


Failed to load the native TensorFlow runtime.

See https://www.tensorflow.org/install/errors

for some common reasons and solutions.  Include the entire stack trace
above this error message when asking for help.

Process finished with exit code 1

my error message is: DLL load failed: the specified module cannot be found; Specified Module Could not be Found DLL Load Failed: The Specified Module could not be found

. Solution

this is new, the current solution is less online, after a search, finally found a similar problem and I post on making the first link: https://github.com/tensorflow/tensorflow/issues/25597, are described in detail below.

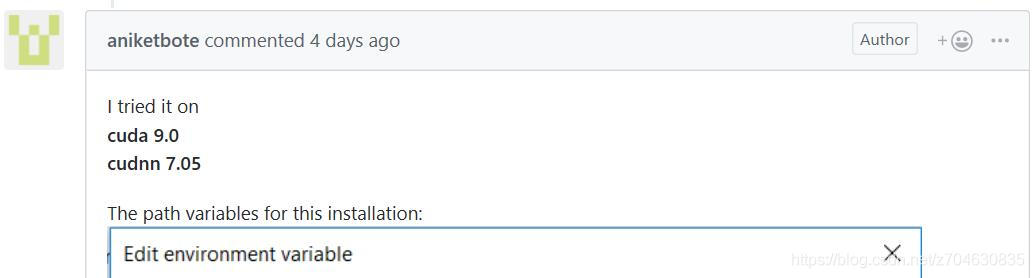
attachment situation is similar to mine, give the attachment environment first:

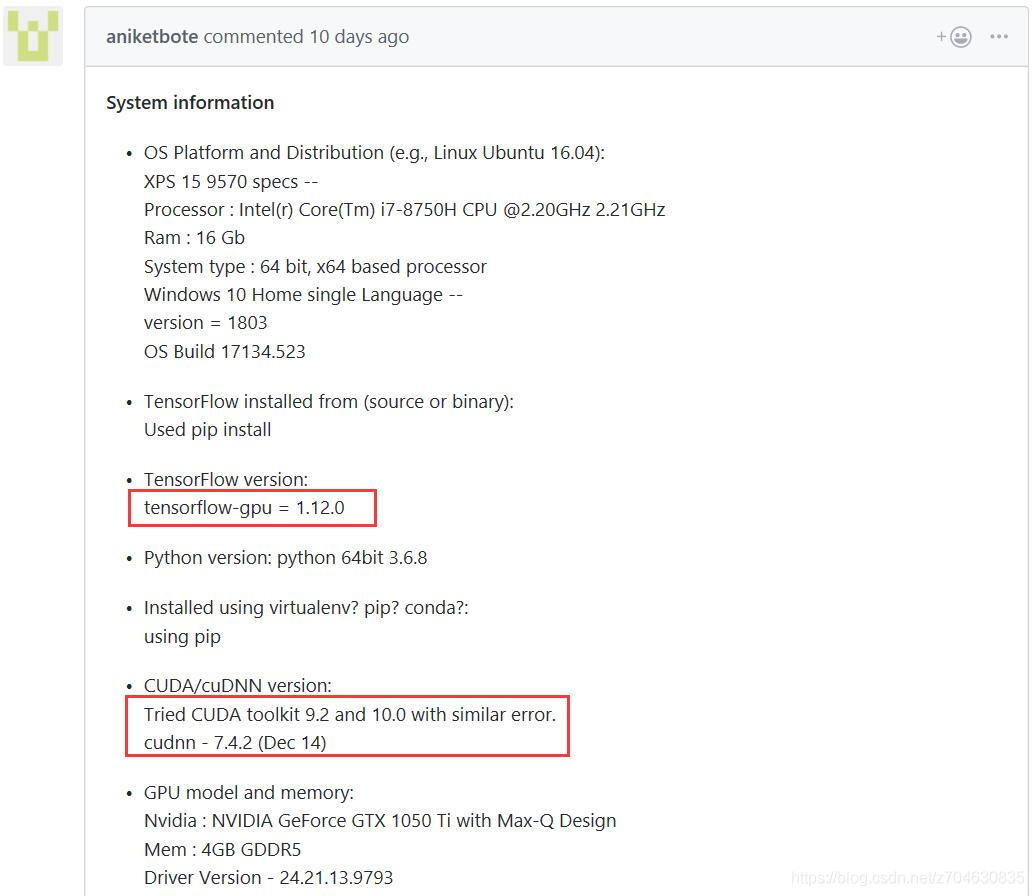
you can see that the sponsor also updated the tensorflow version to 1.12 before it encountered this problem. The following is a detailed description of how to configure your environment, and mentions that this error still occurs with CUDA9.2 and CUDA10.0 versions.

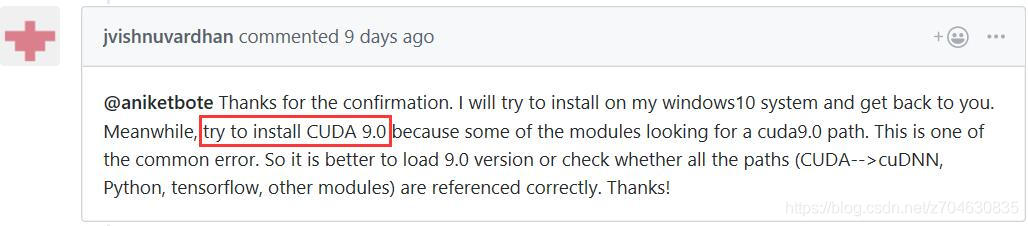
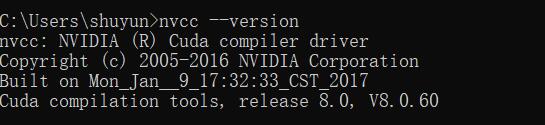
to solve this problem, it has been proposed to install CUDA9.0:

then the host reconfigured his environment to CUDA9.0 and cuDNN7.05

about how to view your CUDA version, you can open CMD, in CMD NVCC –version can be viewed:

here are some of the methods I’ve tried, but none of them solve the problem :

(1) install other versions of CUDA. But it didn’t solve the problem…

(2) update VS2015, reference blog: tensorflow installation issues and github. But it doesn’t solve the problem…

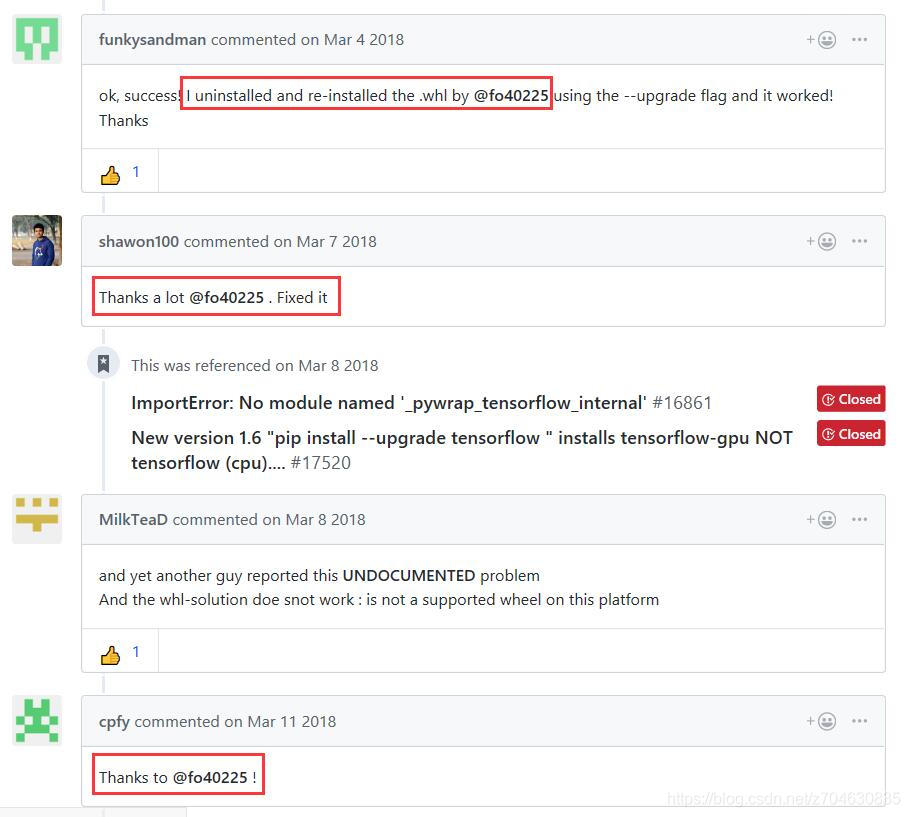
(3) continue to check the post on github, found that many people are thanking the layer master fo40255, is the layer master message above (2), reinstall the.whl file, but I did not try this method, I will mention my method later, below casually pick a paragraph of reply:

finally summed up my own way to solve this problem:

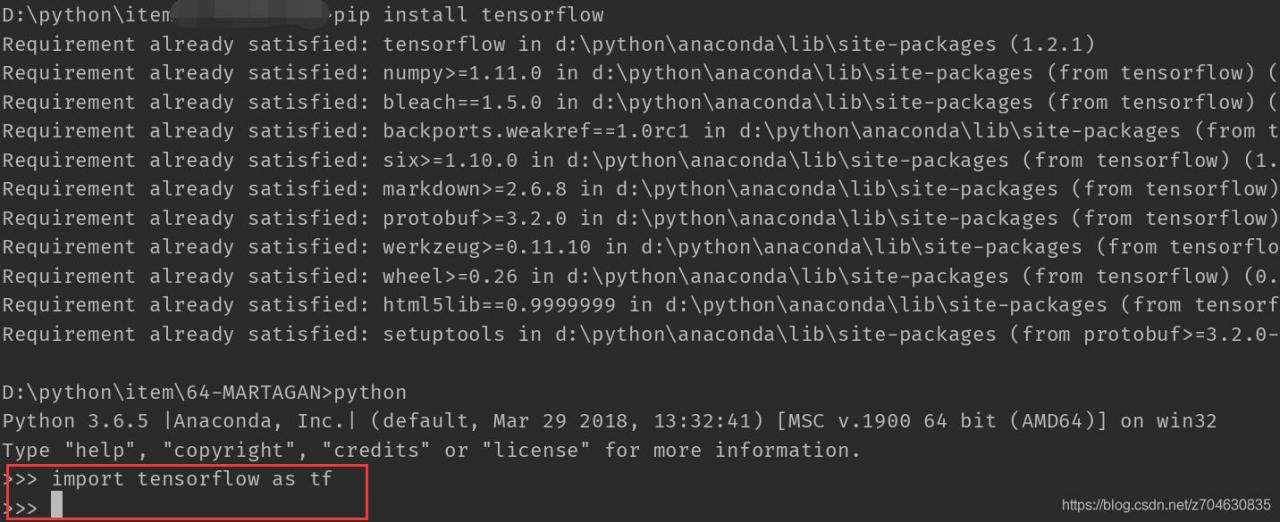
(1) open CMD and enter PIP uninstall tensorflow, that is, uninstall tensorflow.

(2) reinstall after uninstalling and enter PIP install tensorflow.

(3) after the installation of a simple test, no error. in short, if it breaks, reload… (that’s how I redid it anyway)

of course, if reinstall will not solve the problem, you can consider the above fo40255 layer of the main method, cover again. WHL file, the file link here also is given, by the way: https://github.com/fo40225/tensorflow-windows-wheel/tree/master/1.6.0/py36/CPU/sse2

Introducing pair in Java

describes Pair

in Java
In this article, we discussed a very useful programming concept called Pair. Pairing provides a convenient way to handle simple key-value associations, especially useful when we want to return two values from a method.

is available in the core Java library using the implementation of Pair. In addition, some third-party libraries, such as Apache Commons and Vavr, have exposed this functionality in their respective apis.

core Java pairing implementation

Pair class
In the javafx.util package, the class constructor takes two arguments, the key and the corresponding value:

Pair class

    Pair<Integer, String> pair = new Pair<>(1, "One");
    Integer key = pair.getKey();
    String value = pair.getValue();

The

example describes a simple Integer to String mapping using the Pair class. In the example, the getKey method returns the key object, and the getValue method returns the corresponding value object.

AbstractMap. SimpleEntry and AbstractMap. SimpleImmutableEntry

SimpleEntry is defined in the abstract class AbstractMap and is constructed in a similar way to Pair:

    AbstractMap.SimpleEntry<Integer, String> entry 
      = new AbstractMap.SimpleEntry<>(1, "one");
    Integer key = entry.getKey();
    String value = entry.getValue();

has keys and values that can be obtained using standard getter and setter methods.

The AbstractMap class also contains a nested class that represents an immutable pairing: the SimpleImmutableEntry class.

    AbstractMap.SimpleImmutableEntry<Integer, String> entry
      = new AbstractMap.SimpleImmutableEntry<>(1, "one");

applications with variable pairing, in addition to the configuration value cannot be modified, try to modify will throw an UnsupportedOperationException anomalies.

Apache Commons

the Apache Commons library, org.apache.com mons. Lang3. The tuple package provides Pair abstract class, cannot be instantiated directly.
has two subclasses, which represent mutable and immutable pairs: ImmutablePair and MutablePair. Both implement access to key/value and setter and getter methods:

    ImmutablePair<Integer, String> pair = new ImmutablePair<>(2, "Two");
    Integer key = pair.getKey();
    String value = pair.getValue();

try in ImmutablePair setValue method, will throw an UnsupportedOperationException anomalies. But execution on variable pairings is perfectly normal:

    Pair<Integer, String> pair = new MutablePair<>(3, "Three");
    pair.setValue("New Three");

Vavr library
The immutable Tuple2 class in the

Vavr library provides pairing:

    Tuple2<Integer, String> pair = new Tuple2<>(4, "Four");
    Integer key = pair._1();
    String value = pair._2();

in this implementation, an object cannot be modified after it has been created, so the update method returns a new instance after the change:

    tuplePair = pair.update2("New Four");

summary

this article discusses the Java pairing concept and shows examples of its different implementations, core Java and third-party provided implementations.

In Python sys.argv Usage of

Argv is the command line parameter

that you get when you run a python file

the following code file is a.py, when I am not using the IDE tool, only the command line window to run, go to the directory where the file is, input: python a py output results as follows

import sys
a=sys.argv
b=len(sys.argv)
print(a)
print(b)

输出:
['a.py']
1

is the same code as above, when I run it, input: python a. zhang output:

['a.py', 'zhang']
2

continue running input: python a.p zhang kang output:

['a.py', 'zhang', 'kang']
3
, I don’t have to tell you that you get it. Now get the input parameter values:
python a. zhang kang

#encoding=utf-8
import sys
a=sys.argv[0]
b=sys.argv[1]
c=sys.argv[2]
print("filename:",a)
print("param1:",b)
print("param2:",c)

输出:
('filename:', 'a.py')
('param1:', 'zhang')
('param2:', 'kang')

org.springframework.core.NestedIOException: Failed to parse mapping resource: ‘file

look at the Console

org.springframework.core.NestedIOException: Failed to parse mapping resource: 'file [D:\workspace\management-center\target\classes\mybatis\dataportal\TBusSystemMapper.xml]'; nested exception is org.apache.ibatis.builder.BuilderException: Error parsing Mapper XML. Cause: java.lang.IllegalArgumentException: Mapped Statements collection already contains value for com.rbac.rbacshow.dataportal.dao.TBusDomainDao.delete
	at org.mybatis.spring.SqlSessionFactoryBean.buildSqlSessionFactory(SqlSessionFactoryBean.java:523)
	at org.mybatis.spring.SqlSessionFactoryBean.afterPropertiesSet(SqlSessionFactoryBean.java:380)
	at org.mybatis.spring.SqlSessionFactoryBean.getObject(SqlSessionFactoryBean.java:547)
	at com.rbac.rbacshow.common.config.mybatis.DataportalMybatisConfig.secondSessionFactory(DataportalMybatisConfig.java:46)
	at com.rbac.rbacshow.common.config.mybatis.DataportalMybatisConfig$$EnhancerBySpringCGLIB$$6c8c604a.CGLIB$secondSessionFactory$2(<generated>)
	at com.rbac.rbacshow.common.config.mybatis.DataportalMybatisConfig$$EnhancerBySpringCGLIB$$6c8c604a$$FastClassBySpringCGLIB$$f8c5550d.invoke(<generated>)
	at org.springframework.cglib.proxy.MethodProxy.invokeSuper(MethodProxy.java:228)
	at org.springframework.context.annotation.ConfigurationClassEnhancer$BeanMethodInterceptor.intercept(ConfigurationClassEnhancer.java:358)
	at com.rbac.rbacshow.common.config.mybatis.DataportalMybatisConfig$$EnhancerBySpringCGLIB$$6c8c604a.secondSessionFactory(<generated>)
	at sun.reflect.NativeMethodAccessorImpl.invoke0(Native Method)
	at sun.reflect.NativeMethodAccessorImpl.invoke(NativeMethodAccessorImpl.java:62)
	at sun.reflect.DelegatingMethodAccessorImpl.invoke(DelegatingMethodAccessorImpl.java:43)
	at java.lang.reflect.Method.invoke(Method.java:498)
	at org.springframework.beans.factory.support.SimpleInstantiationStrategy.instantiate(SimpleInstantiationStrategy.java:162)
	at org.springframework.beans.factory.support.ConstructorResolver.instantiateUsingFactoryMethod(ConstructorResolver.java:588)
	at org.springframework.beans.factory.support.AbstractAutowireCapableBeanFactory.instantiateUsingFactoryMethod(AbstractAutowireCapableBeanFactory.java:1173)
	at org.springframework.beans.factory.support.AbstractAutowireCapableBeanFactory.createBeanInstance(AbstractAutowireCapableBeanFactory.java:1067)
	at org.springframework.beans.factory.support.AbstractAutowireCapableBeanFactory.doCreateBean(AbstractAutowireCapableBeanFactory.java:513)
	at org.springframework.beans.factory.support.AbstractAutowireCapableBeanFactory.createBean(AbstractAutowireCapableBeanFactory.java:483)
	at org.springframework.beans.factory.support.AbstractBeanFactory$1.getObject(AbstractBeanFactory.java:306)
	at org.springframework.beans.factory.support.DefaultSingletonBeanRegistry.getSingleton(DefaultSingletonBeanRegistry.java:230)
	at org.springframework.beans.factory.support.AbstractBeanFactory.doGetBean(AbstractBeanFactory.java:302)
	at org.springframework.beans.factory.support.AbstractBeanFactory.getBean(AbstractBeanFactory.java:202)
	at org.springframework.beans.factory.config.DependencyDescriptor.resolveCandidate(DependencyDescriptor.java:208)
	at org.springframework.beans.factory.support.DefaultListableBeanFactory.doResolveDependency(DefaultListableBeanFactory.java:1138)
	at org.springframework.beans.factory.support.DefaultListableBeanFactory.resolveDependency(DefaultListableBeanFactory.java:1066)
	at org.springframework.beans.factory.support.ConstructorResolver.resolveAutowiredArgument(ConstructorResolver.java:835)
	at org.springframework.beans.factory.support.ConstructorResolver.createArgumentArray(ConstructorResolver.java:741)
	at org.springframework.beans.factory.support.ConstructorResolver.instantiateUsingFactoryMethod(ConstructorResolver.java:467)
	at org.springframework.beans.factory.support.AbstractAutowireCapableBeanFactory.instantiateUsingFactoryMethod(AbstractAutowireCapableBeanFactory.java:1173)
	at org.springframework.beans.factory.support.AbstractAutowireCapableBeanFactory.createBeanInstance(AbstractAutowireCapableBeanFactory.java:1067)
	at org.springframework.beans.factory.support.AbstractAutowireCapableBeanFactory.doCreateBean(AbstractAutowireCapableBeanFactory.java:513)
	at org.springframework.beans.factory.support.AbstractAutowireCapableBeanFactory.createBean(AbstractAutowireCapableBeanFactory.java:483)
	at org.springframework.beans.factory.support.AbstractBeanFactory$1.getObject(AbstractBeanFactory.java:306)
	at org.springframework.beans.factory.support.DefaultSingletonBeanRegistry.getSingleton(DefaultSingletonBeanRegistry.java:230)
	at org.springframework.beans.factory.support.AbstractBeanFactory.doGetBean(AbstractBeanFactory.java:302)
	at org.springframework.beans.factory.support.AbstractBeanFactory.getBean(AbstractBeanFactory.java:197)
	at org.springframework.beans.factory.support.BeanDefinitionValueResolver.resolveReference(BeanDefinitionValueResolver.java:351)
	at org.springframework.beans.factory.support.BeanDefinitionValueResolver.resolveValueIfNecessary(BeanDefinitionValueResolver.java:108)
	at org.springframework.beans.factory.support.AbstractAutowireCapableBeanFactory.applyPropertyValues(AbstractAutowireCapableBeanFactory.java:1531)
	at org.springframework.beans.factory.support.AbstractAutowireCapableBeanFactory.populateBean(AbstractAutowireCapableBeanFactory.java:1276)
	at org.springframework.beans.factory.support.AbstractAutowireCapableBeanFactory.doCreateBean(AbstractAutowireCapableBeanFactory.java:553)
	at org.springframework.beans.factory.support.AbstractAutowireCapableBeanFactory.createBean(AbstractAutowireCapableBeanFactory.java:483)
	at org.springframework.beans.factory.support.AbstractBeanFactory$1.getObject(AbstractBeanFactory.java:306)
	at org.springframework.beans.factory.support.DefaultSingletonBeanRegistry.getSingleton(DefaultSingletonBeanRegistry.java:230)
	at org.springframework.beans.factory.support.AbstractBeanFactory.doGetBean(AbstractBeanFactory.java:302)
	at org.springframework.beans.factory.support.AbstractBeanFactory.getBean(AbstractBeanFactory.java:202)
	at org.springframework.beans.factory.config.DependencyDescriptor.resolveCandidate(DependencyDescriptor.java:208)
	at org.springframework.beans.factory.support.DefaultListableBeanFactory.doResolveDependency(DefaultListableBeanFactory.java:1138)
	at org.springframework.beans.factory.support.DefaultListableBeanFactory.resolveDependency(DefaultListableBeanFactory.java:1066)
	at org.springframework.context.annotation.CommonAnnotationBeanPostProcessor.autowireResource(CommonAnnotationBeanPostProcessor.java:518)
	at org.springframework.context.annotation.CommonAnnotationBeanPostProcessor.getResource(CommonAnnotationBeanPostProcessor.java:496)
	at org.springframework.context.annotation.CommonAnnotationBeanPostProcessor$ResourceElement.getResourceToInject(CommonAnnotationBeanPostProcessor.java:627)
	at org.springframework.beans.factory.annotation.InjectionMetadata$InjectedElement.inject(InjectionMetadata.java:169)
	at org.springframework.beans.factory.annotation.InjectionMetadata.inject(InjectionMetadata.java:88)
	at org.springframework.context.annotation.CommonAnnotationBeanPostProcessor.postProcessPropertyValues(CommonAnnotationBeanPostProcessor.java:318)
	at org.springframework.beans.factory.support.AbstractAutowireCapableBeanFactory.populateBean(AbstractAutowireCapableBeanFactory.java:1264)
	at org.springframework.beans.factory.support.AbstractAutowireCapableBeanFactory.doCreateBean(AbstractAutowireCapableBeanFactory.java:553)
	at org.springframework.beans.factory.support.AbstractAutowireCapableBeanFactory.createBean(AbstractAutowireCapableBeanFactory.java:483)
	at org.springframework.beans.factory.support.AbstractBeanFactory$1.getObject(AbstractBeanFactory.java:306)
	at org.springframework.beans.factory.support.DefaultSingletonBeanRegistry.getSingleton(DefaultSingletonBeanRegistry.java:230)
	at org.springframework.beans.factory.support.AbstractBeanFactory.doGetBean(AbstractBeanFactory.java:302)
	at org.springframework.beans.factory.support.AbstractBeanFactory.getBean(AbstractBeanFactory.java:197)
	at org.springframework.beans.factory.support.DefaultListableBeanFactory.preInstantiateSingletons(DefaultListableBeanFactory.java:761)
	at org.springframework.context.support.AbstractApplicationContext.finishBeanFactoryInitialization(AbstractApplicationContext.java:867)
	at org.springframework.context.support.AbstractApplicationContext.refresh(AbstractApplicationContext.java:543)
	at org.springframework.boot.context.embedded.EmbeddedWebApplicationContext.refresh(EmbeddedWebApplicationContext.java:122)
	at org.springframework.boot.SpringApplication.refresh(SpringApplication.java:693)
	at org.springframework.boot.SpringApplication.refreshContext(SpringApplication.java:360)
	at org.springframework.boot.SpringApplication.run(SpringApplication.java:303)
	at org.springframework.boot.SpringApplication.run(SpringApplication.java:1118)
	at org.springframework.boot.SpringApplication.run(SpringApplication.java:1107)
	at com.rbac.rbacshow.RbacShowApplication.main(RbacShowApplication.java:13)
	at sun.reflect.NativeMethodAccessorImpl.invoke0(Native Method)
	at sun.reflect.NativeMethodAccessorImpl.invoke(NativeMethodAccessorImpl.java:62)
	at sun.reflect.DelegatingMethodAccessorImpl.invoke(DelegatingMethodAccessorImpl.java:43)
	at java.lang.reflect.Method.invoke(Method.java:498)
	at org.springframework.boot.devtools.restart.RestartLauncher.run(RestartLauncher.java:49)
Caused by: org.apache.ibatis.builder.BuilderException: Error parsing Mapper XML. Cause: java.lang.IllegalArgumentException: Mapped Statements collection already contains value for com.rbac.rbacshow.dataportal.dao.TBusDomainDao.delete
	at org.apache.ibatis.builder.xml.XMLMapperBuilder.configurationElement(XMLMapperBuilder.java:120)
	at org.apache.ibatis.builder.xml.XMLMapperBuilder.parse(XMLMapperBuilder.java:92)
	at org.mybatis.spring.SqlSessionFactoryBean.buildSqlSessionFactory(SqlSessionFactoryBean.java:521)
	... 93 more
Caused by: java.lang.IllegalArgumentException: Mapped Statements collection already contains value for com.rbac.rbacshow.dataportal.dao.TBusDomainDao.delete
	at org.apache.ibatis.session.Configuration$StrictMap.put(Configuration.java:872)
	at org.apache.ibatis.session.Configuration$StrictMap.put(Configuration.java:844)
	at org.apache.ibatis.session.Configuration.addMappedStatement(Configuration.java:668)
	at org.apache.ibatis.builder.MapperBuilderAssistant.addMappedStatement(MapperBuilderAssistant.java:302)
	at org.apache.ibatis.builder.xml.XMLStatementBuilder.parseStatementNode(XMLStatementBuilder.java:109)
	at org.apache.ibatis.builder.xml.XMLMapperBuilder.buildStatementFromContext(XMLMapperBuilder.java:135)
	at org.apache.ibatis.builder.xml.XMLMapperBuilder.buildStatementFromContext(XMLMapperBuilder.java:128)
	at org.apache.ibatis.builder.xml.XMLMapperBuilder.configurationElement(XMLMapperBuilder.java:118)
	... 95 more

, this is your mapper namespace with duplicate

Java uses the same event listener for the same type of component

description

  • Java USES the same event listener for the same type of component to simplify the program and avoid writing duplicate code.
  • distinguishes different components by setting the name.

program code

import javax.swing.*;
import java.awt.*;
import java.awt.event.*;

public class TextEve2 {

	public static void main(String[] args) {
		JFrame jf=new JFrame("test event");
		//创建多个同类型的事件源
		TextField tf1=new TextField(30);
		tf1.setName("tf1");
		TextField tf2=new TextField(30);
		tf2.setName("tf2");
		//注册事件监听器
		tf1.addTextListener(new MyTextListener());
		tf2.addTextListener(new MyTextListener());

		//添加组件
		Component strut = Box.createVerticalStrut(5);
		Box vBox = Box.createVerticalBox();
		vBox.add(tf1);
		vBox.add(strut);
		vBox.add(tf2);
		JPanel panel=new JPanel(new FlowLayout(FlowLayout.LEFT,5,10));
		panel.add(vBox);
		jf.add(panel);
		jf.setDefaultCloseOperation(JFrame.EXIT_ON_CLOSE);
		jf.pack();
		jf.setVisible(true);
	}

	//自定义事件监听器
	private static class MyTextListener implements TextListener{
		@Override
		public void textValueChanged(TextEvent e) {
			TextField tf = (TextField) e.getSource();
			//根据不同事件源,执行不同的逻辑
			String name = tf.getName();
			switch (name){
				case "tf1":
					System.out.println("文本1内容= "+tf.getText());
					break;
				case "tf2":
					System.out.println("文本2内容= "+tf.getText());
					break;
				default:
					break;
			}
		}
	}
}


Pysot installation and model testing

installation steps

– download the project file

https://github.com/STVIR/pysot.git

create conda environment

https://github.com/STVIR/pysot/blob/master/INSTALL.md

the second installation, manual configuration environment, the command is as follows, to add tsinghua source https://pypi.tuna.tsinghua.edu.cn/simple

conda create --name pysot python=3.7
conda activate pysot

conda install numpy
conda install pytorch=0.4.1 torchvision cuda90 -c pytorch
pip install opencv-python

pip install pyyaml yacs tqdm colorama matplotlib cython tensorboardX

# change dir to project

python setup.py build_ext --inplace

download model file

the baidu cloud https://github.com/STVIR/pysot/blob/master/MODEL_ZOO.md file download, only copy pysot/experiments in the file mode, PTH, not to replace the corresponding congfig. Yaml

configure the environment variable

export PYTHONPATH=/path/to/pysot:$PYTHONPATH

to export PYTHONPATH =/home/Cody/PycharmProjects/pysot: $PYTHONPATH

or use pycharm to configure

https://blog.csdn.net/sements/article/details/105495812/

demo run
Reference

https://blog.csdn.net/sements/article/details/105495812/

here use pycharm to run, select the corresponding Python compiler, and run -> Edit Configurations, set and select the running demo.py file, and add the running parameter

in paramters

–config .. /experiments/siamrpn_r50_l234_dwxcorr/config.yaml
–snapshot .. /experiments/siamrpn_r50_l234_dwxcorr/model.pth
–video ../demo/bag. Avi

effect display

Run demo.py, pop up the display box, select the area with the left mouse button and press enter to

The routine of benewake tfmini-s / tfmimi plus / tfluna / tf02 Pro / tf03 radar on Python

test environment

Window 10, Python 3.8.6

requirements library

numpy pyserial

Routines

#创建日期:2020年10月10日
#版本:初版
#此程序对应北醒TF系列默认配置下串口版本有效
#此程序只提供参考和学习

# -*- coding: utf-8 -*-
import serial.tools.list_ports
import time
import numpy as np

ser = serial.Serial()
ser.port = 'COM13'    #设置端口
ser.baudrate = 115200 #设置雷达的波特率

def getTFminiData():
   while True:
      count = ser.in_waiting #获取接收到的数据长度
      if count > 8:
         recv = ser.read(9)#读取数据并将数据存入recv
         #print('get data from serial port:', recv)
         ser.reset_input_buffer()#清除输入缓冲区
         if recv[0] == 0x59 and recv[1] == 0x59:  # python3
            distance = np.int16(recv[2] + np.int16(recv[3] << 8))
            strength = recv[4] + recv[5] * 256
            print('distance = %5d  strengh = %5d' % (distance, strength))
            ser.reset_input_buffer()

         if recv[0] == 'Y' and recv[1] == 'Y':  # python2 //此处标示出文件读取成功
            lowD = int(recv[2].encode('hex'), 16)
            highD = int(recv[3].encode('hex'), 16)
            lowS = int(recv[4].encode('hex'), 16)
            highS = int(recv[5].encode('hex'), 16)
            distance = np.int16(lowD + np.int16(highD << 8))
            strength = lowS + highS * 256
            print('distance = %5d  strengh = %5d' % (distance, strength))
      else:
         time.sleep(0.005) #50ms
if __name__ == '__main__':
   try:
      if ser.is_open == False:
         try:
            ser.open()
         except:
            print('Open COM failed!')
      getTFminiData()
   except KeyboardInterrupt:  # Ctrl+C
      if ser != None:
         ser.close()

output as follows:

distance =    38  strengh =  8685
distance =    39  strengh =  8522
distance =    38  strengh =  8441
distance =    38  strengh =  8383
distance =    38  strengh =  8355
distance =    38  strengh =  8323
distance =    38  strengh =  8290
distance =    38  strengh =  8261
distance =    39  strengh =  8241
distance =    39  strengh =  8231
distance =    38  strengh =  8234

Viewing Android dependency tree using gradle

the command

has been used to view the android dependency tree until now

./gradlew: app: dependencies

or operate

directly in the gradle shortcut command on the right

although this command does the job, it prints out all the dependency trees under every step gradle executes, including debugApk, debugCompile, releaseApk, releaseCompile, compile, etc. It takes a long time, but the final result set is also a large one, not to be looked at.

, but we actually only need the dependency tree from the compile time, so we can configure a parameter after the command.

command:

./gradlew :app:dependencies –configuration compile

where the compile configuration compile says you only need to print out the dependencies in the compile environment


it is important to note that when the same stock is in multiple versions, gradle will automatically use the highest version of the library applied everywhere. The library with “(*)” in the figure above indicates that the library has been overwritten.

The method of Java jumping out of loop

said in the previous sentence:

Today, when writing a program, I need to jump out of the loop. I can’t remember, but I checked online, as follows:

as you know, in Java, if you want to break out of a for loop, there are generally two ways: break and continue.

break is a break out of the current for loop, as shown in the following code:

package com.xtfggef.algo; 
 
public class RecTest { 
 
    /**
     * @param args
     */ 
    public static void main(String[] args) { 
        for(int i=0; i<10; i++){ 
            if(i==5){ 
                break; 
            } 
            System.out.print(i+" "); 
        } 
    } 
} 

output: 0 1 2 3 4

means that the break breaks out of the current loop.

continue is to break out of the current loop and open the next loop, as shown below:

package com.xtfggef.algo; 
 
public class RecTest { 
 
    /**
     * @param args
     */ 
    public static void main(String[] args) { 
        for (int i = 0; i < 10; i++) { 
            if (i == 5) { 
                continue; 
            } 
            System.out.print(i+" "); 
        } 
    } 
} 

output: 0 1 2 3 4 6 7 8 9

jump out of a multi-layer loop

the above two methods cannot jump out of a multi-layer loop. If you need to jump out of a multi-layer loop, you need to use a label, define a label, and then you need to jump

, use the break label line, the code is as follows:

package com.xtfggef.algo; 
 
public class RecTest { 
 
    /**
     * @param args
     */ 
    public static void main(String[] args) { 
 
        loop: for (int i = 0; i < 10; i++) { 
            for (int j = 0; j < 10; j++) { 
                for (int k = 0; k < 10; k++) { 
                    for (int h = 0; h < 10; h++) { 
                        if (h == 6) { 
                            break loop; 
                        } 
                        System.out.print(h); 
                    } 
                } 
            } 
        } 
        System.out.println("\nI'm here!"); 
    } 
}

Output:

012345

I’m here!

the meaning is obvious!

Method of modifying file and folder permission by Chmod command in Linux

in Linux to modify a folder or file permissions, we need to use Linux chmod command to do, I wrote a few simple example below you can consult.
chmod [who] [+ |-| =] [mode] filename

u
u
u
u
u
u
u
u
u
u
u
g stands for “group user”, that is, all users with the same group ID as the file owner.
o stands for other (others) users.
a stands for “all” users. It is the system default. The
action symbol can be:
+ to add a permission.
– cancel a permission.
= grant the given permission and cancel all other permissions, if any.
the permissions represented by the setting mode can be any combination of the following letters:
r readable.
w can be written.
x executable. The
X attribute is appended only if the target file is executable for some users or if the target file is a directory.
s sets the process’s owner or group ID to the file’s owner at file execution time. Mode “U + S” to set the file user ID bit, “G +s” to set the group ID bit.
t saves the text of the program to the switching device.
u has the same permissions as the file owner.
g has the same permissions as the user in the same group as the file owner.
o has the same permissions as other users. Instance

modify attributes of the file read/write method, such as: the index. The HTML file is modified to write readable executable:

code below copy code chmod 777 index. HTML
directory to modify all write readable executable file attributes can be:

code below copy code chmod 777.
the folder name with the suffix to use * to instead of it.
such as: Modify the properties of all HTM files:
code copy code
chmod 777 *. HTM
method to modify folder properties
change directory /images/xiao to writable readable executable
code copy code
chmod 777 /images/xiao
modify all folder properties
code copy code
chmod 777 *
Just replace the folder name with *

to modify all files and folders in the folder and subfolder properties to be writable readable executable
code as follows copy code
chmod -r 777 /upload

summarizes the difference in permissions between directories and files under Linux.
files: read file contents (r), write data to file (w), execute file as command (x).
directory: read the files contained in the directory name (r), write information into the directory links (add and remove the index point), and search the directory (can use the directory name as a path name to access files and subdirectories) it contains specific said is:

(1) have read permissions users can’t use CD into the directory: also must have execute permission to enter.
(2) users with execute permission will only be able to access files in the directory if they know the file name and have read rights.
(3) you must have read and execute permissions to list directories ls, or use the CD command to enter directories.
(4) has write permissions to the directory and can create, delete, or modify any file or subdirectory under the directory, even if the file or subdirectory belongs to another user.