Category Archives: How to Fix

Some problems and solutions of Java Web

Java web part problem and solution

The
error is based on the number of errors that occur in the writing process. Careful examination, rigorous scholarship!

JSP images cannot display properly?
found problem: path problem, path is incomplete.

shows a serious error, how many lines:
is generally in the select statement related character input error, carefully check.

request-getparameter (” ID “) where the parameter comes from
where the JSP page jumps over, the ID is the ID from the jump join of that page.

solve the import project, add Tomcat and JDK after the project appears Red Cross : modify the JDK version of the project and eclipse version of the JDK version. J compiler and project facts in
project (JAVA, WWM, and runtimes modified Tomcat version on the right).

Java web project, after starting Tomcat, display:
information.

describes a source server that was unable to find a representation of the target resource or was unwilling to expose an existing representation of the resource.
tries to find that since there was a related shop project originally, although the name was changed later, the new import project named shop was affected. When adding to Tomcat, the Path name was shop3 in web modules, and when accessing with the browser, it should be noted that the Path name was shop3 instead of shop.

2020.10.18
eclipse json file error, because eclipse thinks that json file does not need annotation, so compile error.
address: Prefrences, validation, json validator, cancel manual, build. Again, right click and validation on the json file that is in error.

valicat trial expires, modify system time before the probation period:
address: https://jingyan.baidu.com/article/adc815133376b6b622bf7354.html

Publishing to Tomcat v9.0 Server at localhost…
Publishing the configuration…
Error file to E:/download/apache-tomcat-9.0.38-windows-x64/apache-tomcat-9.0.38/backup\ sys_loginmapper.xml :
E:\ Download \ Apache-Tomcat-9.0.38-Windows-x64 \ Apache-Tomcat-9.0.38 \conf\ SYs_loginmapper.xml (the system cannot find the specified file)
E:\download\apache-tomcat-9.0.38-windows-x64\apache-tomcat-9.0.38\conf\ sys_loginmapper.xml (the system could not find the specified file)
OK

resolve in eclipse-> Project Explorer-> Servers-> Under Tomcat, sys_loginmapper. XML file was found and copied to:
Error file to E:/download/apache-tomcat-9.0.38-windows-x64/apache-tomcat-9.0.38/backup to solve the problem.

start Tomcat anomalies: Java. Lang. NoClassDefFoundError: javax.mail/XML/bind/is thrown.
j is the JDK version problem, I used jdk11, changed to jdk8 can be used normally, the reason for the error should be the introduction of JDK 9 and the version of Java modularity mechanism.

start Tomcat error:
Could not publish server configuration for Tomcat v9.0 server at localhost. Multiple Contexts have a path of “/ MRBBS”. Project Explorer-> Servers-> Server.xml file was found under Tomcat, and found at the bottom:
< The Context the docBase = “MRBBS” path = “/ MRBBS” reloadable = “true” source = “org. Eclipse. JST. Jee. Server: MRBBS”/& gt;
delete duplicate content, you can.

start Tomcat outbreak exception:
Could not get JDBC Connection;
Request processing failed; Nested exception is org. Mybatis. Spring. MyBatisSystemException: nested exception is
org. Apache. Ibatis. Exceptions. PersistenceException:
why : When the Spring container manages the PropertySource, not only does it read its own properties file, but it also reads both JVM system properties and
JVM system env properties into the container.
so at this point the username read in spring-transaction.xml is not the username above JDBC.
solution , change the username on jdbc.properties to user (as long as it is not called username), and change the values in the spring-transaction.xml corresponding to
to correspond:

When Tomcat is started, an exception occurs:
serverTimezone problem.
JDBC in the configuration file. The properties of add after url:
url = JDBC: mysql:// 127.0.0.1:3306/MRBBS
url = JDBC: mysql:// 127.0.0.1:3306/MRBBS?ServerTimezone =Asia/Shanghai
change to east area 8 time.
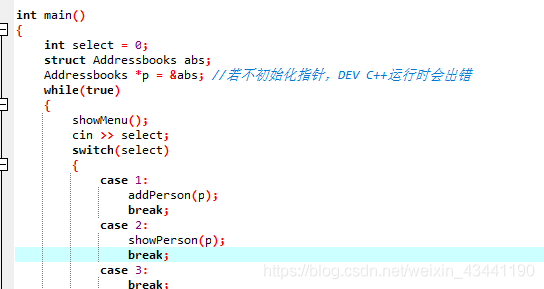
Global lock, table lock and row lock in MySQL

🔒 global lock

locks the entire database instance. Use the Flush tables with read lock (FTWRL) to keep the entire database read-only, after which the database update statement (add, delete), data definition statement (build, modify table structure), and update class transaction commit statement will be blocked

locks the entire database, so an obvious use case for global locks would be to do a full library logical backup; There is another way to use set global readonly=true to make the entire library read-only, with one big difference:

exception handling, if the client is abnormal to disconnect, MySQL will automatically release the global lock, so that the whole library back to the normal state; After the entire library is set to READOnly, the database will remain readOnly after the exception is disconnected, resulting in the database being unwritable for a long time.

🔒 table level lock

MySQL has two table level locks: table lock and meta data lock (MDL)

table lock syntax lock tables... Read /write, unlock unlock talbes. It is automatically released when the client is disconnected. In addition to restricting the reading and writing of other threads, table locks also restrict the following operation objects of this thread. For example, thread A executes lock tables t1 read,t2 write, while other threads write t1 and read t2 are blocked. Before tables, A thread can only read t1 and write t2

metadata lock is automatically added when accessing a table to ensure that the table structure cannot be modified

when accessing data

🔒 row locks

MySQL row lock is implemented in each storage engine, InnoDB on the support of row lock, MyISAM engine does not support row lock

row lock is the lock that locks A row of records in the table. When A is processing this row of data and B also wants to process this data, B can only continue

after A has finished processing

two-stage locking protocol

in InnoDB transactions, row locks are added when they are needed, but they are not immediately released when they are not needed, but wait until the current transaction is completed.

so if more than one row needs to be locked in a transaction, put the rows that are most likely to cause concurrency as far back as possible.

an 🌰 :

the ticketing business of a ticketing system is approximately:

  1. customer A ticket, A balance to deduct price

  2. cinema B account balance increase ticket

  3. record transaction log

    , the point of concurrency is cinema B to increase revenue. If each customer purchases tickets in the business order of 1, 2, and 3, then concurrent point 2 will hold the lock for a long time. If you change it to 3, 1, or 2 after processing the concurrent points, the row-level lock is released, reducing the wait time for locks between things.

    deadlock and deadlock detection

    different threads hold each other’s locks, A and B release the lock, B and A release the lock, then deadlock

    deadlock treatment strategy:

    1. one strategy is to go straight into the wait until the timeout occurs. This timeout can be set with the parameter innodb_lock_wait_timeout to

    2. to initiate deadlock detection. When a deadlock is found, it will actively roll back a transaction in the death chain bar to allow other transactions to continue execution. The parameter innodb_deadlock_detect is set to on, indicating that this logic is turned on,

      . Note here:

      (1) deadlock detection is performed only when there is a row lock on the accessed row

      (2) not all transactions are scanned for each deadlock detection. For example, at some point, the transaction waiting state is like this:

      , B is waiting for A, D is waiting for C, and now there is an E, and it is found that E needs to wait for D, then E will judge whether there will be deadlock with D and C, this detection does not care about B and A

Opencv’s imread() function returns null when reading images

program code is as follows:

		// 导入图像
		std::stringstream ss;
		ss <<  "/home/wang/桌面/LearningVO-master/build/dataset/00/image_0/"
			<< std::setw(6) << std::setfill('0') << img_id << ".png";

		cv::Mat img(cv::imread(ss.str().c_str(), 0));
		assert(!img.empty());

picture path is as follows:

but the program will assert failed.

my solution:

OpenCV absolute path seems to be a problem, change the absolute path to relative path:

		// 导入图像
		std::stringstream ss;
		ss <<  "./dataset/00/image_0/"
			<< std::setw(6) << std::setfill('0') << img_id << ".png";

		cv::Mat img(cv::imread(ss.str().c_str(), 0));
		assert(!img.empty());

note that this relative path is relative to the path to execute the command in the terminal; Also write “/Home/ XXX/” instead of” ~/ XXX/” in the Home directory, otherwise an error will occur.

modified, the program runs normally.

Leetcode 34 finds the first and last position of an element in the sorted array (medium)

given an ascending array of integers nums, and a target value target. Find the starting and ending positions in the array for the given target value.

your algorithm’s time complexity must be O(log n).

if there is no target value in the array, return [-1, -1].

example 1 :

enter : nums =,7,7,8,8,10 [5], target = 8
output: [3, 4]

sample 2 :

enter : nums =,7,7,8,8,10 [5], target = 6
output: [1, 1]

thought and code

O(log n) is the complexity of

class Solution {
    public int[] searchRange(int[] nums, int target) {

        int[] res = new int[] {-1, -1};

        if (nums.length < 1) return res;

        int firstIndex = search(nums, target - 1);
        
        // 如果大于target-1 的第一个索引就超级界 或者 第一个索引的值不是target 那么就说明当前数组没有目标值
        if (firstIndex == nums.length || nums[firstIndex] != target) return res;
        else res[0] = firstIndex;
		
        res[1] = search(nums, target) - 1;

        return res;    
    }

    public int search(int[] nums, int target) {
        // 找到大于target值的第一个位置
        int l = 0, r = nums.length;
        while (l < r) {
            int m = l + (r - l) / 2;
            if (target >= nums[m]) l = m + 1;
            else r = m;
        }
        return l;
    }
}

Deep understanding of async await asynchronous programming synchronization

we know that the JavaScript code executes sequentially, so let’s look at the result of the execution of the following code:

function a(){
    return new Promise((resolve,reject)=>{
        resolve("a")
    })
}
function b(){
    return new Promise((resolve,reject)=>{
      setTimeout(() => {
        resolve("b")
      }, 2000);
    })
}
function c(){
    return new Promise((resolve,reject)=>{
        resolve("c")
    })
}
 function execute(){
    let a1= a()
    a1.then(res=>{
        console.log(res);
    })
    let b1= b()
   b1.then(res=>{
    console.log(res);
   })
    let c1= c()
   c1.then(res=>{
    console.log(res);
   })
}
execute()


so how to show it in order, that is, C wait for B to execute after the execution. The following

function a(){
    return new Promise((resolve,reject)=>{
        resolve("a")
    })
}
function b(){
    return new Promise((resolve,reject)=>{
      setTimeout(() => {
        resolve("b")
      }, 2000);
    })
}
function c(){
    return new Promise((resolve,reject)=>{
        resolve("c")
    })
}
async function execute(){
    let a1=await a()
    //用了await之后,就不用.then了直接得到结果
   console.log(a1)
    let b1=await b()
    console.log(b1)
    let c1=await c()
   console.log(c1)
}
execute()

Map to vector pair map.second sort

in leetcode501, there are two little points to learn.

1. Insert element

as an array

map has several insertion methods, please refer to the link for specific differences.

void searchBST(TreeNode* cur, unordered_map<int, int>& map) { // 前序遍历
    if (cur == NULL) return ;
    map[cur->val]++; // 以数组方式插入,统计元素频率
    searchBST(cur->left, map);
    searchBST(cur->right, map);
    return ;
}

. Map into vector sort

needs to be sorted by the occurrence times, that is, by the second element of map, but map is sorted by default for first(key), so I want to convert to vector sorting. Define and initialize the statement as . pair< int, int> > vec(map.begin(), map.end()); , after custom collation sort(vec.begin(), vec.end(), CMP);

the whole code is

class Solution {
private:

void searchBST(TreeNode* cur, unordered_map<int, int>& map) { // 前序遍历
    if (cur == NULL) return ;
    map[cur->val]++; // 统计元素频率
    searchBST(cur->left, map);
    searchBST(cur->right, map);
    return ;
}
bool static cmp (const pair<int, int>& a, const pair<int, int>& b) {
    return a.second > b.second;
}
public:
    vector<int> findMode(TreeNode* root) {
        unordered_map<int, int> map; // key:元素,value:出现频率
        vector<int> result;
        if (root == NULL) return result;
        searchBST(root, map);
        vector<pair<int, int>> vec(map.begin(), map.end());
        sort(vec.begin(), vec.end(), cmp); // 给频率排个序
        result.push_back(vec[0].first);
        for (int i = 1; i < vec.size(); i++) { 
            // 取最高的放到result数组中
            if (vec[i].second == vec[0].second) result.push_back(vec[i].first);
            else break;
        }
        return result;
    }
};

How to set the custom blood bar UI in UE4 and how to call it

to set up a custom UI plug-in:

1. Select Widget Blueprint

2. Drag into a Horizontal Box, ProgressBar

3. Set control Size to Fill

4. Adjust the fill color and opacity of the control

3. Call

returns to the main UI design scenario, dragging the custom control, the health control, to the desired visit location.

as shown in the figure below:

The

effect is as follows:

Solve the problem that the value in the disabled tag cannot be passed to the server

disable tag values do not pass values to the server

<input type="text" name="did" value="${dept.did}" disabled="disabled"/><br/>

solution

  1. replace the field disabled in the form with readonly (if necessary, add a gray background color to the form)

    <input type="text" name="did" value="${dept.did}" readonly/><br/>
    

  2. you can write a hidden attributes, one for the value of a is used to display

    for example: add a hidden TAB and the name and value are set to the same value as the disable tag to successfully pass the value

    <input type="hidden" name="did" value="${dept.did}" >
    <input type="text" value="${dept.did}" disabled="disabled"/><br/>
    

    disabled

    similarity

    • can make text boxes cannot be entered.
    • can be modified by js script.
    • want to cancel, can only delete the corresponding attribute, set flase invalid

    different points

    disabled

    • input cannot receive focus
    • using the TAB key will skip the element
    • disabled will not respond to any event (e.g. the click event is invalid). The value of the disabled element
    • is not committed. The
    • disabled property can be used on all form elements.

    readonly

    • input can receive focus
    • use the TAB key does not skip elements
    • readonly will respond to events.
    • readonly element values are submitted. The
    • readonly property is only valid for type= “text”, textarea, and type= “password”.

    disabled will not be submitted to the server can’t be serialized but can be js can’t be modified on the interface all controls have disabled property

    readonly will be submitted to the server can be serialized can be js value assignment interface can’t modify all controls not necessarily have readonly property such as select drop down box

Constructing docker image of multi arch

sometimes we want to build images that can run on machines with different hardware architectures (mainly arm architectures) to better meet the requirements of a heterogeneous distributed environment. Previously, the usual solution was to prepare multiple machines with different hardware architectures and compile and distribute them separately, but now Docker has a new (albeit experimental) buildx feature that solves this problem nicely.

buildx can be described in the relevant information, and it will not be repeated here. If you want to run locally, you can refer to this article: BUILDING DOCKER IMAGES FOR KUBERNETES RUNNING ON ARM. However, it is difficult to complete the configuration locally according to the actual measurement based on the current network environment, because it needs to connect with Docker.io in the whole process and need to download a large amount of data, so it is likely to disconnect halfway… So take a detour, use some third-party platform to complete the build, and release it to a mirrored warehouse.

I chose github actions because I saw that there were written actions on github, which greatly simplifies the configuration. With this script, you can build an image across the hardware architecture and publish it to docker hub:

  docker:
    name: Publish Docker Image
    runs-on: ubuntu-18.04
    env:
      REPO: ${{ secrets.ENTITY_DOMAIN_REPO }}

    steps:
      - name: Set up QEMU
        uses: docker/setup-qemu-action@v1
        with:
          platforms: all

      - name: Set up Docker Buildx
        id: buildx
        uses: docker/setup-buildx-action@v1
        with:
          version: latest

      -
        name: Available platforms
        run: echo ${{ steps.buildx.outputs.platforms }}
        # 可以在这里看到可以兼容哪些平台

      - name: Login to Docker Registry
        run: echo '${{ secrets.DOCKERHUB_PASS }}' | docker login -u ${{ secrets.DOCKERHUB_USER }} --password-stdin

      - name: Build Docker Image
        run: docker buildx build -t $REPO:latest --platform linux/amd64,linux/arm64 --push .
        # 在--platform后面指定需要兼容的平台列表