It struck me as odd that, unlike languages such as Java, C\C++, Switch /case statements are not available in Python. We can implement the switch/ Case statement in several ways.
Use the if… Elif… Elif… Else to realize the switch/case
You can use if… Elif… elif.. An else sequence instead of a switch/case statement is the easiest way to think about it. However, with more branches and frequent modifications, this alternative is not easy to debug and maintain.
Use a dictionary to implement switch/ Case
A dictionary can be used to implement switch/ Case in a way that is easy to maintain and reduces the amount of code. The following is a switch/ Case implementation using a dictionary simulation:
def num_to_string(num):
    numbers = {
        0 : "zero",
        1 : "one",
        2 : "two",
        3 : "three"
    }

    return numbers.get(num, None)

if __name__ == "__main__":
    print num_to_string(2)
    print num_to_string(5)
The execution results are as follows:
two
None
The Python dictionary can also include functions or Lambda expressions, as follows:
def success(msg):
    print msg

def debug(msg):
    print msg

def error(msg):
    print msg

def warning(msg):
    print msg

def other(msg):
    print msg

def notify_result(num, msg):
    numbers = {
        0 : success,
        1 : debug,
        2 : warning,
        3 : error
    }

    method = numbers.get(num, other)
    if method:
        method(msg)

if __name__ == "__main__":
    notify_result(0, "success")
    notify_result(1, "debug")
    notify_result(2, "warning")
    notify_result(3, "error")
    notify_result(4, "other")
The execution results are as follows:
success
debug
warning
error
other
The above example shows that the Switch /case statement can be fully implemented with a Python dictionary, and is flexible enough. is especially handy at run time to add or remove a switch/case option from a dictionary.
Switch/Case can be implemented in a class using scheduling methods
If you are not sure which method to use in a class, you can use a scheduling method at run time to determine. The code is as follows:
class switch_case(object):

    def case_to_function(self, case):
        fun_name = "case_fun_" + str(case)
        method = getattr(self, fun_name, self.case_fun_other)
        return method

    def case_fun_1(self, msg):
        print msg

    def case_fun_2(self, msg):
        print msg

    def case_fun_other(self, msg):
        print msg


if __name__ == "__main__":
    cls = switch_case()
    cls.case_to_function(1)("case_fun_1")
    cls.case_to_function(2)("case_fun_2")
    cls.case_to_function(3)("case_fun_other")
The execution results are as follows:
case_fun_1
case_fun_2
case_fun_other
conclusion
Personally, using a dictionary to implement the switch/case is the most flexible, but it is also difficult to understand.


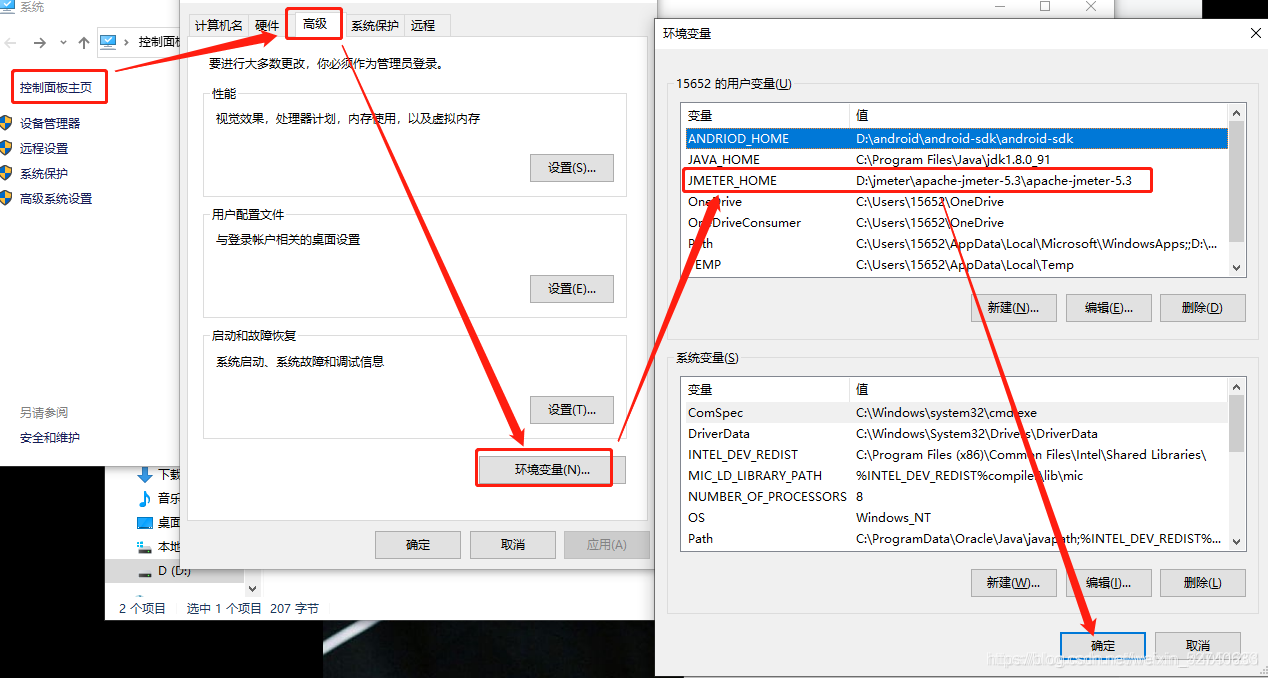
 in HBuilder X
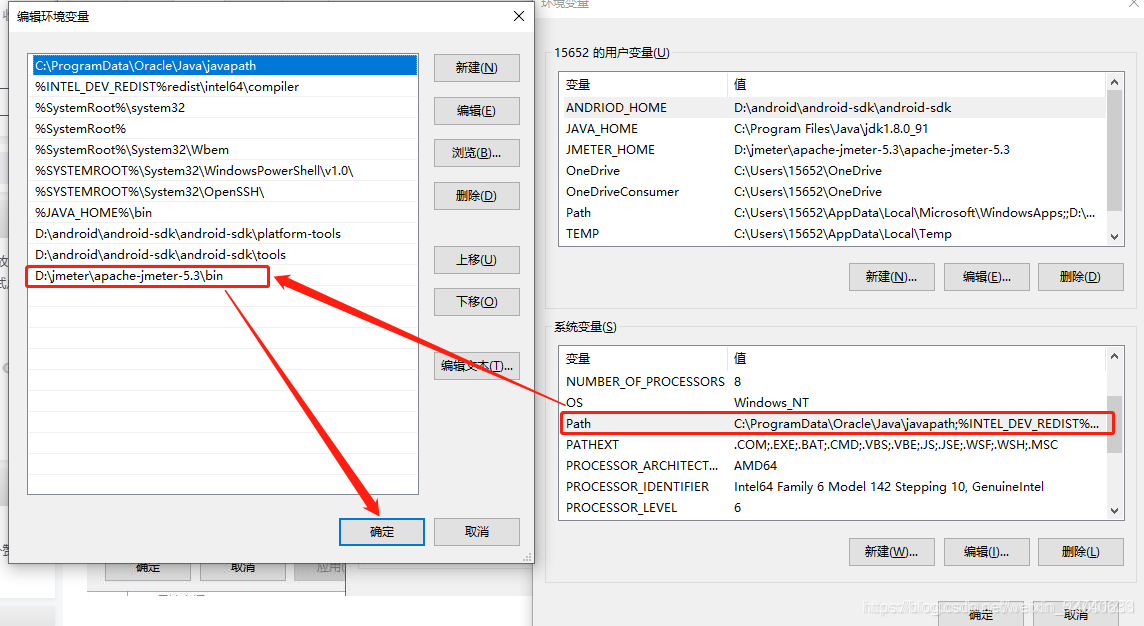