GLVERTEX2F (GLFLOAT, GLFLOAT) is a function that displays two parameters in the window. If you want to display two parameters in the window, the values of the parameters range from 0.0 to 1.0.
glBegin(GL_LINES):
vertex2f *(A);
glVertex2f*(A);
glVertex2f*(B);
glVertex2f * ©;
AB and CD… There will be linear connections between, but no linear connections between BC and DE
GlBegin (GL_LINE_STRIP) :
glVertex2f * (A);
glVertex2f*(B);
glVertex2f * ©;
AB and CD… There will be linear connections between BC and DE
Category Archives: How to Fix
Summary of problems encountered in compiling opengl code
one
Error 1 C2381: “exit” : redefinition; __declspec(noreturn) “This type of error is caused by the wrong order of reference header files,
Solutions:
Switch the inclusion order of the header file:
#include < GL/glut.h>
#include < stdlib.h>
#include
Error 1 C2381: “exit” : redefinition; __declspec(noreturn) “This type of error is caused by the wrong order of reference header files,
Solutions:
Switch the inclusion order of the header file:
#include < GL/glut.h>
#include < stdlib.h>
#include
stdlib.h>
#include < GL/glut.h>
Refer to the link https://www.cnblogs.com/rainbow70626/p/10732342.html
two
E:\OPENGL_Project\lightwithView\lightwithView\lightInViewSpace. Obj lightwithView”
“Error 13 error LNK2019: Cannot resolve external symbol __imp__glClearColor@16, which is referenced in function _main E:\OPENGL_Project\lightwithView\ lightWithview \ lightinViewSpace. Obj lightwithView”
Glew32s.lib is a static library, not a dynamic library, so Glut. h is added.
#include < GLEW/glew.h> It must be preceded by #define GLEW_STATIC
three
LINK: warning LNK4098: default library ‘MSVCRT’ conflicts with other libraries Please use/NODEFAULTLIB: the cause of the library “is trying to incompatible library links, such as SOIL link libraries, originally provided by the website is libSOIL. A file, but directly use the static library files may output of the error, and error” unparsed external symbol __alloca in function _stbi_zlib_decode_noheader_buffer reference “, this time as long as the SOIL’s own project on its own compiler to generate the corresponding SOIL. The lib files, Replace libsoil. LIB file, problem solved!
https://blog.csdn.net/iscassucess/article/details/8302264 this link explain more clearly, you can refer to.
Common problems of shadow map in OpenGL
Shadow maps are a common technique in games,
The principle is to view the entire scene from the light space with the light viewing matrix (binding the depth cache with the frame cache), and the resulting scene is not rendered
The second drawing, the depth buffer into the shader, all point transformation to the light space, the z coordinates, and the depth of the original cache value contrast, if the resulting value is less than the value of the depth buffer is proved that the pixels in the most close to the rear of the light source location, so this point can’t render, reason for shadow covered place.
This is what I get, the light source is rotated around (0,0,0) with a radius of 50. In the middle is a physical model. The entire lighting system is the simplest (an improved version of Feng’s lighting).
![]()
Problem 1. Boundary problem: there is a plane in front of the light source, the space outside the plane is the area affected by light, and the area inside the plane is the area not affected by light.
![]()
The problem is very simple. In the light space analysis, the light space, like the view space, has a cone:
![]()
The areas outside the cone that are not located on the upper ledge are all clipped out of the light space.
To make the cone black outside the edge, since the second time the shader calls the depth cache, it will also call some areas in the depth cache, which will result in the wrong result on the boundary.
To solve this problem, when setting the depth cache, you need to set all colors outside the bounds to black :
![]()
And that will give you the right answer.
Problem 2. Texture error
Textures are rendered in striped red, blue and green colors.
This is because the texture is not formatted correctly, the image is formatted in RGBA format, but the texture is formatted in RGB format, which will result in the wrong result:
![]()
As shown in the figure above, setting the image format to GL_RGBA will solve this problem when reading the image from the library
![]()
Problem 3. Follow the tutorial, but there are no shadows, the whole scene is bright
If there is no compiler error in the shader, please check whether the two matrix Settings are consistent (that is, whether the matrix of optical space is directly passed into the second shader).
In the second shading, set the observation matrix to the light space matrix to see if the whole scene can be seen in the light space observation matrix.
If the whole scene is not visible in light space, the entire depth cache is infinite (i.e. 1.0F), and all the points are in front of the occlusion, so you will see the whole scene lit up.
Question 4. According to the tutorial to write, there is no shadow, the whole scene is dark
The problem may be that your light source is so close to the model that the whole scene is completely blocked by the model from the light space. Another possibility is that the first rendering of the depth cache was not written,
This also results in the equivalent of a large flat surface in front of you.
Question 5. Where there is shadow, there is light, and where there is light, there is shadow
The reason for this problem is that there is a logic error in the shader of the second rendering, and the shadow is 1, which means there is a shadow (for example in Learnopengl tutorial). Therefore, it is necessary to use (1-shadow) in the final calculation of Feng’s illumination.
Multiplied by stolid and ambient, not shadow
Problem six. A layer of gray, according to the tutorial to eliminate but not the effect
The gray is caused by the principle defect of Shadowmap. It is possible that multiple adjacent pixels of the rendered graph correspond to the depth value in the same depth cache, resulting in the wrong corresponding of the depth value, so there will be streaks.
If the tutorial minus the value of a fixed doesn’t work, minus the value can be more a little bit small. This means that you draw volume is very big, I draw when I was led to this situation, this is because the tutorial is a very small unit to draw, so it’s bigger than the offset, but I draw the unit is very big, (100.0 f) so I need to reduce the value of the more, you can test several times, each time reduce an order of magnitude, by the way, I use a value of 0.00001, this is a very small value, the results after the application of the this value is true.
The principle is to view the entire scene from the light space with the light viewing matrix (binding the depth cache with the frame cache), and the resulting scene is not rendered
The second drawing, the depth buffer into the shader, all point transformation to the light space, the z coordinates, and the depth of the original cache value contrast, if the resulting value is less than the value of the depth buffer is proved that the pixels in the most close to the rear of the light source location, so this point can’t render, reason for shadow covered place.
This is what I get, the light source is rotated around (0,0,0) with a radius of 50. In the middle is a physical model. The entire lighting system is the simplest (an improved version of Feng’s lighting).
Problem 1. Boundary problem: there is a plane in front of the light source, the space outside the plane is the area affected by light, and the area inside the plane is the area not affected by light.
The problem is very simple. In the light space analysis, the light space, like the view space, has a cone:
The areas outside the cone that are not located on the upper ledge are all clipped out of the light space.
To make the cone black outside the edge, since the second time the shader calls the depth cache, it will also call some areas in the depth cache, which will result in the wrong result on the boundary.
To solve this problem, when setting the depth cache, you need to set all colors outside the bounds to black :
And that will give you the right answer.
Problem 2. Texture error
Textures are rendered in striped red, blue and green colors.
This is because the texture is not formatted correctly, the image is formatted in RGBA format, but the texture is formatted in RGB format, which will result in the wrong result:
As shown in the figure above, setting the image format to GL_RGBA will solve this problem when reading the image from the library
Problem 3. Follow the tutorial, but there are no shadows, the whole scene is bright
If there is no compiler error in the shader, please check whether the two matrix Settings are consistent (that is, whether the matrix of optical space is directly passed into the second shader).
In the second shading, set the observation matrix to the light space matrix to see if the whole scene can be seen in the light space observation matrix.
If the whole scene is not visible in light space, the entire depth cache is infinite (i.e. 1.0F), and all the points are in front of the occlusion, so you will see the whole scene lit up.
Question 4. According to the tutorial to write, there is no shadow, the whole scene is dark
The problem may be that your light source is so close to the model that the whole scene is completely blocked by the model from the light space. Another possibility is that the first rendering of the depth cache was not written,
This also results in the equivalent of a large flat surface in front of you.
Question 5. Where there is shadow, there is light, and where there is light, there is shadow
The reason for this problem is that there is a logic error in the shader of the second rendering, and the shadow is 1, which means there is a shadow (for example in Learnopengl tutorial). Therefore, it is necessary to use (1-shadow) in the final calculation of Feng’s illumination.
Multiplied by stolid and ambient, not shadow
Problem six. A layer of gray, according to the tutorial to eliminate but not the effect
The gray is caused by the principle defect of Shadowmap. It is possible that multiple adjacent pixels of the rendered graph correspond to the depth value in the same depth cache, resulting in the wrong corresponding of the depth value, so there will be streaks.
If the tutorial minus the value of a fixed doesn’t work, minus the value can be more a little bit small. This means that you draw volume is very big, I draw when I was led to this situation, this is because the tutorial is a very small unit to draw, so it’s bigger than the offset, but I draw the unit is very big, (100.0 f) so I need to reduce the value of the more, you can test several times, each time reduce an order of magnitude, by the way, I use a value of 0.00001, this is a very small value, the results after the application of the this value is true.
There are some other problems, such as the resolution is not enough to lead to the edge is not clear and so on, this kind of problem can find some anti-aliasing method to solve, is to take the average edge.
If you have a problem can leave a message at the bottom, you can also find me to source.
(to be continued….)
Solve the problem of VC6.0 open crash and OpenGL glut32.lib library
VC6.0 Open crashes
Recently, I learned OpenGL and tried to debug with VC6, but found that after installing VC6, ADD and OPEN projects could not be used, so I summarized the simplest solution. This method is very common, just for the sake of going directly to my blog to find it after I encountered it again. (1) First copy the FileTool. DLL file to the folder “VC6 installation path “\Common\MSDev98\AddIns
FileTool. DLL available download address: http://download.csdn.net/detail/yangxkl/4061390
(2) manually register the DLL regsvr32 “VC6 installation path \Common\MSDev98\AddIns\FileTool. DLL “in CMD
(3) Right click on the toolbar, Customise… -> Add-ins and Macro Files
Select the Filetool Developer Studio Add-In add-on,
Then click Close
add after the success, the VC on the interface of two more green menu button, an A, one is O, implements the increase and the two button to open the file.
(4) If the module “xxx. DLL “is loaded, but the call to DllRegisterServer fails, it is a problem to add the DLL by hand.
:
program – attachments – command prompt, click the right mouse button on the “command prompt”, select “run as an administrator” command, this time will open the DOS command window, now as normal type Regsvr32 xxx. DLL, can be registered successfully.
This will successfully increase the DLL file. To this VC6.0 open crash problem is solved.
Fatal error LNK1104: cannot open file “glut32.lib” : fatal error LNK1104: cannot open file “glut32.lib” : fatal error LNK1104: cannot open file “glut32.lib”
Glut. lib is a standalone library that does not come with standard OpenGL, and can be downloaded online
Download Glut-3.7.6-bin.zip (Glut32.lib Glut32.dll Glut.def Glut.h)
Available glut – 3.7.6 – bin. Zip download address: http://download.csdn.net/download/dragoo1/1148263
Put the glut32.lib file in the VC6 interface and go to the library files path of tools-options-dictinaries… In the vc98/lib directory, place glut32.dll in C :/ Windows /system32.
All OK.
The.h,.dll, and.lib files in “Glut-3.7.6-bin” are copied to the root directory of the project folder and are included in the “#include” Glut.h “method.
Everything is OK!
Three, attached VS2008 to add header directory and Lib directory method
H file directory:
in turn, click on the “Project – configuration properties – C/C + + – regular”,
Project – & gt; Property-> C/C++-> General-> Additional Include Directories
b :
G> “Project — Configuration Properties — Linker — General” and put the Directories
project> in the Additional Include Directory. ProPerty-> Link-> General-> Additional Include Directories
>, go to “Linker Directories” and add lua51.lib
put ->; Additional Dependencies
or
# pragma comment (lib, “lua51. Lib”)
Summary of OpenGL simple solar system simulation
For some herself also don’t know why, I have a strange tenderness in c + +, always have the urge to want to use c + + programming task, but I really don’t like to always inside the black box of the console input and output, and the operation mechanism of MFC temporarily and I don’t know, one is a string file has been completed, looking at halo, OpenGL is accord with the need, and there is a glut can help implement simple forms in the console, speak quite enough as a simple to use, complex use later to say again.
I am completely a beginner, with reference to the “OpenGL Introduction Tutorial” this document and some references on the network can be scraped together to complete this simple solar system model. (here to thank the makers of this tutorial and the sharer, I feel to write quite good, there is a download on the Internet, I am from baidu library to get, they also passed a to the resources) why is the solar system model?Because I love it, and a lot of people have done it, and I don’t understand it, but there’s a code to learn. Needless to say, the first on a renderings:

The starting point of any project should be a requirement analysis. The requirement is very simple, which is to display a model that looks like the solar system on the screen, and just look like it. It takes time and effort to make an accurate model of the solar system, and no one pays for it. Then the design phase, as object-oriented programming, look for the object, the eight planets in the solar system as well as the sun itself, in order to look more beautiful point, track should also be mapped, so the object has two, all objects to achieve a draw method, is used to draw themselves, to design a myObj parent class can be easily performed as part of the paint job, I think now that each orbit to a certain object, then the track can be used as a private attribute of the object, it should be a dependency. The class diagram is as follows:

The basic information for the star ASTER includes the radius of the star, the revolution period revolution_solar, the revolution period self, the orbit orbit, and the revolution radius distance. Orbit has only one radius property. There are also some auxiliary properties that are defined in the implementation and are not listed in the class diagram.
With the class diagram, you can enter the coding stage, the first need to configure the development environment, I am using VS2010, development is using OpenGL, download address Baidu Google, I do not remember the original download address, passed a copy to the resources inside. Tutorial there said to be integrated development libraries to vs inside, but I don’t like it, don’t often use it is not necessary to change the development environment, as long as it is good to set a single project, the DLL file to the operation of the generated files,. H file saved to the project folder,..lib file loaded in the code should be able to use relative paths, but I don’t know where the base path is temporarily, so chose to set the attributes of the project, particular way is:
Right-click the project name in the Solution Explorer and select Properties ->; Linker-> General, add an absolute lib directory to Additional Librarydirectories. The lib file is loaded using #pragma comment (lib).
There are many examples in the tutorial, and each knowledge point is also very clear, do not repeat. Inside I met a little problem when system is realized in lesson 5 day month, if you use the tutorial to the parameters of the inside, in the window is what also can’t see, but if I ten times to reduce the parameters of the unified, can appear normal, though I searched some articles of coordinate transformation, but at present still don’t know why will appear this problem, if such as morally scaling should not appear different results?Doesn’t OpenGL accept parameters that are too large?
Said a little bit about the questions about the gluLookAt function, may be my personal problem, in understanding the function of the time a little effort, this function has nine parameters, divided into three groups, the first group is about the viewpoint of movement, a viewpoint is initially at point (0, 0), if not after the perspective projection transformation of coordinates, then draw the images will appear in the view’s location, similar to someone put something in your eyes, things just don’t see behind, can move through the first coordinate, then draw the solution to the object, But the advantage of Glulookat is that you don’t have to calculate the position of every object. You can view it from any Angle. It doesn’t matter if you just plot on the plane of the xyz axis, but what if you want to see the whole system at 45 degrees or 75 degrees?The position of each object is not easy to calculate. The way I understand this function works is that the developer first draws the whole system in the coordinate system, and then realizes the change of observation Angle through this function, and OpenGL automatically calculates the relative position of each object. This function must be placed before the other coordinate changes, and I feel that it is executed in the last order of the system drawing. The above is irresponsible conjecture, without any theoretical support, hereby declare…
Well, going a bit too far, the second set of parameters are the coordinates of the center of the viewpoint. The perspective projection itself is a four-prism, and the line between the viewpoint and the center is the same as a perpendicular from the vertex to the bottom.
The third parameter is the direction, that is, what do you think of the observer, the tutorial says from the point of (0, 0) to the point of attachment to determine positive direction, such as if set to (0, 0), is similar to normal viewing screen, (0, 1, 0) means the person is in upside down the screen, (0, 0, 1) said looked down at the keyboard, (0, 1) said from behind the display looked down at the keyboard…
There are still some problems with lighting and material Settings, we will talk about it later. The whole project has been uploaded to resources, please download it if necessary.
The first time you set up the project, you mistakenly selected Windows Application, which can be found in Properties ->; Linker-> system-> Subsystem changes to Console.
Modify the icon of the Console program to add resource->; Open Resource. H and set the ID of your icon to a minimum. To open Resource. H, open the.rc file (select View Code) and then open it in an include< file. resource.h> Select Open Document.
I am completely a beginner, with reference to the “OpenGL Introduction Tutorial” this document and some references on the network can be scraped together to complete this simple solar system model. (here to thank the makers of this tutorial and the sharer, I feel to write quite good, there is a download on the Internet, I am from baidu library to get, they also passed a to the resources) why is the solar system model?Because I love it, and a lot of people have done it, and I don’t understand it, but there’s a code to learn. Needless to say, the first on a renderings:
The starting point of any project should be a requirement analysis. The requirement is very simple, which is to display a model that looks like the solar system on the screen, and just look like it. It takes time and effort to make an accurate model of the solar system, and no one pays for it. Then the design phase, as object-oriented programming, look for the object, the eight planets in the solar system as well as the sun itself, in order to look more beautiful point, track should also be mapped, so the object has two, all objects to achieve a draw method, is used to draw themselves, to design a myObj parent class can be easily performed as part of the paint job, I think now that each orbit to a certain object, then the track can be used as a private attribute of the object, it should be a dependency. The class diagram is as follows:
The basic information for the star ASTER includes the radius of the star, the revolution period revolution_solar, the revolution period self, the orbit orbit, and the revolution radius distance. Orbit has only one radius property. There are also some auxiliary properties that are defined in the implementation and are not listed in the class diagram.
With the class diagram, you can enter the coding stage, the first need to configure the development environment, I am using VS2010, development is using OpenGL, download address Baidu Google, I do not remember the original download address, passed a copy to the resources inside. Tutorial there said to be integrated development libraries to vs inside, but I don’t like it, don’t often use it is not necessary to change the development environment, as long as it is good to set a single project, the DLL file to the operation of the generated files,. H file saved to the project folder,..lib file loaded in the code should be able to use relative paths, but I don’t know where the base path is temporarily, so chose to set the attributes of the project, particular way is:
Right-click the project name in the Solution Explorer and select Properties ->; Linker-> General, add an absolute lib directory to Additional Librarydirectories. The lib file is loaded using #pragma comment (lib).
There are many examples in the tutorial, and each knowledge point is also very clear, do not repeat. Inside I met a little problem when system is realized in lesson 5 day month, if you use the tutorial to the parameters of the inside, in the window is what also can’t see, but if I ten times to reduce the parameters of the unified, can appear normal, though I searched some articles of coordinate transformation, but at present still don’t know why will appear this problem, if such as morally scaling should not appear different results?Doesn’t OpenGL accept parameters that are too large?
Said a little bit about the questions about the gluLookAt function, may be my personal problem, in understanding the function of the time a little effort, this function has nine parameters, divided into three groups, the first group is about the viewpoint of movement, a viewpoint is initially at point (0, 0), if not after the perspective projection transformation of coordinates, then draw the images will appear in the view’s location, similar to someone put something in your eyes, things just don’t see behind, can move through the first coordinate, then draw the solution to the object, But the advantage of Glulookat is that you don’t have to calculate the position of every object. You can view it from any Angle. It doesn’t matter if you just plot on the plane of the xyz axis, but what if you want to see the whole system at 45 degrees or 75 degrees?The position of each object is not easy to calculate. The way I understand this function works is that the developer first draws the whole system in the coordinate system, and then realizes the change of observation Angle through this function, and OpenGL automatically calculates the relative position of each object. This function must be placed before the other coordinate changes, and I feel that it is executed in the last order of the system drawing. The above is irresponsible conjecture, without any theoretical support, hereby declare…
Well, going a bit too far, the second set of parameters are the coordinates of the center of the viewpoint. The perspective projection itself is a four-prism, and the line between the viewpoint and the center is the same as a perpendicular from the vertex to the bottom.
The third parameter is the direction, that is, what do you think of the observer, the tutorial says from the point of (0, 0) to the point of attachment to determine positive direction, such as if set to (0, 0), is similar to normal viewing screen, (0, 1, 0) means the person is in upside down the screen, (0, 0, 1) said looked down at the keyboard, (0, 1) said from behind the display looked down at the keyboard…
There are still some problems with lighting and material Settings, we will talk about it later. The whole project has been uploaded to resources, please download it if necessary.
The first time you set up the project, you mistakenly selected Windows Application, which can be found in Properties ->; Linker-> system-> Subsystem changes to Console.
Modify the icon of the Console program to add resource->; Open Resource. H and set the ID of your icon to a minimum. To open Resource. H, open the.rc file (select View Code) and then open it in an include< file. resource.h> Select Open Document.
Problems encountered in configuring OpenGL development environment in vs2015
Configuration process address: https://blog.csdn.net/qq_19003345/article/details/76098781
I don’t need to go into details of the process, you can see the original blog address below, I used the last way in the blog
Problems encountered during configuration:
Error in “file glad.h cannot be found” and “file khrplatform.h cannot be found” :
#include <; #include <; glad/glad.h> Instead of # include "Includes/glad/glad. H" #include < KHR/khrplatform.h> Instead of # include ".. /KHR/khrplatform.h"
The problem that the normal of the model is no longer perpendicular to the surface after unequal scaling
If the model matrix performs unequal scaling, the vertex changes will cause the normal vector to no longer be perpendicular to the surface. Therefore, we cannot transform the normal vector with this model matrix. The following figure shows the effect of the model matrix with unequal scaling applied on the normal vector:

Whenever we apply an unequal scaling (note: equal scaling does not break the normals because the direction of the normals is not changed, just the length of the normals, which is easily fixed by normalization), the normal vector is no longer perpendicular to the corresponding surface, and the light is broken.
The trick to fixing this behavior is to use a model matrix that is customized for the normal vector. This Matrix is called the Normal Matrix, and it uses some manipulation of linear algebra to remove the effect of the incorrect scaling of the Normal vector.
The normal matrix is defined as “the transpose of the inverse matrix in the upper left corner of the model matrix”.
The specific derivation process is as follows:
VertexEyespace = ModelViewMatrix * vertex;
modelEyeSpace = modelViewMatrix * vec4(normal, 0);
We know that the line segment T is equal to P2-P1; P2 and P1 are the positions of two vertices.
T’ = T * modelViewMatrix = (p2 – p1) * modelview;
= p2 * modelview – p1 * modelview;
So this is the same thing as p’ 2 – p’1
Assumptions:
N = Q2-Q1;
Because the dot product of the line segment and the normal has to be equal to 0
dot(T,N) = 0;
So the dot product of the converted line segment with the normal line has to be equal to 0 for that to happen
dot(T’,N’) = 0;
Let’s say the top left submatrix of the view is M
And then let’s assume that G is the correct matrix to transform the normal vector
To:
dot(G*N, M*T) = 0;
According to the dot product formula dot (t, n) = | t | | | * n * cosine alpha.
To:
Dot (T’, N’) = dot(G*N, M*T) = inverse(GN) * MT;
We know that the product of the matrix Gn and the inverse of Gn is the element matrix.
inverse(GN)*GN = I
And transpose(GN)*GN = I of the orthogonal matrix
When I multiply both sides by my transformation matrix
transpose(GN)*inverse(GN) * GN = inverse(GN)
Have to
transpose(GN) = inverse(GN)
so
dot(T’, N’) = transpose(GN) * MT;
After disassembly:
dot(T’, N’) = transpose(G) * transpose(N) * M*T;
Assume that transpose(G) * M = I
dot(N’, T’) = dot(N, T) = 0;
So that gives us what we want
G = transpose(inverse(M))
That’s the whole derivation of the inverse transpose of the upper left corner of the model matrix.
Also: the normal vector is only a directional vector and cannot represent a specific position in space. Also, the normal vector has no homogeneous coordinates (the w component in the vertex positions). That means that the displacement should not affect the normal vector. Therefore, if we were to multiply the normal vector by a model matrix, we would remove the displacement part from the matrix and only select the 3 by 3 matrix in the upper left corner of the model matrix (note that we could also set the w component of the normal vector to 0 and multiply it by a 4 by 4 matrix; This also removes the displacement). For the normal vector, we just want to scale and rotate it.
The final approach is:
Normal = mat3(transpose(inverse(model))) * aNormal;
Small problems encountered in compiling OpenGL under VS2010
When you first compile and run, you run into the problem of not finding some library files: it is common to run into the compiler error that some library files are missing, so the program will not compile, here
http://download.csdn.net/detail/yesheng0/4519312 provides a solution and library files to download.
At compile run time, I also ran into a problem with the messagebox method, saying what type cannot be converted, actually this is
For Unicode problems, just change this: Project menu ->; Final attribute ->; Configure properties ->; Conventional – & gt; Project default value ->; Unicode changed to Unset.
Haha, even if the program didn’t make an error, when VS still makes this error:
error LNK2019: Unable to resolve the external symbol _gluPerspective@32, / font>>
select “Items” menu –>; Final ‘Attributes’ -> Configure property “->” The linker “- & gt;” Input “- & gt; Add opengl32.lib, glu32.lib, glaux. Lib (note that when adding input, each line has a ) to the “attached dependencies”
Ha ha, oneself sum up once, later forgot to keep oneself to use.
![]()
Beginners of OpenGL (1): preparation
Because the lab is going to do a 3D eyeball reconstruction project, my boss asked me to familiarize myself with OpenGL programming. The following contents refer to Learnopengl CN and github address.
>
GLFW+ Glad +VS2017, refer to the above tutorial for the specific process.
GLFW is a C library specifically for OpenGL that provides some minimal interfaces for rendering objects. It allows users to create OpenGL contexts, define window parameters, and process user input.
Because OpenGL is just a standard/specification, the specific implementation is made by the driver developer for the specific graphics card. Due to the numerous versions of OpenGL drivers, the location of most of its functions cannot be determined at compile time and needs to be queryed at run time. So it falls to the developer to get the function address at run time and save it in a function pointer for later use. Fortunately, there are libraries that make this process easier, and Glad is the latest and most popular library out there.
Configuration properties of the project: new project – solution Right attribute, vc + + directory contains the directory directory, library, respectively, to include and libc folders added
Linker — Input — Add glfw3.lib, opengl32.lib.
To create the project later without having to configure it, go to View — Other Windows — Properties Manager and set the parent properties directly.
Check the version of OpenGL on your computer: Install the OpenGL Extensions Viewer to see the version number. For compatibility reasons, use version 3.3 as shown in the tutorial.
To use it you need to add:
#include <glad\glad.h>
#include <GLFW\glfw3.h>
Note that the GLAD header file contains the correct OpenGL header (e.g. GL/ GL.h), so you need to include GLAD before any other OpenGL dependent header files.
Create window
Instantation of GLFW window:
// glfw: initialize and configure
	// ------------------------------
	glfwInit();
	glfwWindowHint(GLFW_CONTEXT_VERSION_MAJOR, 3);
	glfwWindowHint(GLFW_CONTEXT_VERSION_MINOR, 3);
	glfwWindowHint(GLFW_OPENGL_PROFILE, GLFW_OPENGL_CORE_PROFILE);
Set the version number to 3.3 and use the core mode.
Next create the window object:
	 // glfw window creation
	// --------------------
	GLFWwindow* window = glfwCreateWindow(SCR_WIDTH, SCR_HEIGHT, "LearnOpenGL", NULL, NULL);
	if (window == NULL)
	{
		std::cout << "Failed to create GLFW window" << std::endl;
		glfwTerminate();
		return -1;
	}
	glfwMakeContextCurrent(window);
Glad is used to manage OpenGL function Pointers, so we need to initialize GLAD before calling any OpenGL functions:
	// glad: load all OpenGL function pointers
	// ---------------------------------------
	if (!gladLoadGLLoader((GLADloadproc)glfwGetProcAddress))
	{
		std::cout << "Failed to initialize GLAD" << std::endl;
		return -1;
	}
One more important thing to do before we start rendering is to tell OpenGL the size of the render window, the Viewport, so that OpenGL only knows how to display data and coordinates based on the size of the window. We can set the Dimension of the window by calling the glViewport function. The first two arguments to the glViewport function control the position in the bottom left corner of the window. The third and fourth parameters control the width and height (in pixels) of the render window.
// glfw: whenever the window size changed (by OS or user resize) this callback function executes
// ---------------------------------------------------------------------------------------------
void framebuffer_size_callback(GLFWwindow* window, int width, int height)
{
	// make sure the viewport matches the new window dimensions; note that width and
	// height will be significantly larger than specified on retina displays.
	glViewport(0, 0, width, height);
}
A Callback Function is registered on the window and is called every time the window size changes.
We also need to register this function, telling GLFW that we want this function to be called whenever the window is resized, and it will be called the first time it is displayed:
glfwSetFramebufferSizeCallback(window, framebuffer_size_callback);To maintain the display until we actively close, we need to keep drawing the image, so we need to add a Render Loop:
        // render loop
	// -----------
	while (!glfwWindowShouldClose(window))
	{
		// input
		// -----
		processInput(window);

		// glfw: swap buffers and poll IO events (keys pressed/released, mouse moved etc.)
		// -------------------------------------------------------------------------------
		glfwSwapBuffers(window);
		glfwPollEvents();
	}
The GLFWWindowShouldClose function checks once before we start each loop to see if GLFW has been asked to exit. If so, the function returns true and the render loop ends, after which we can close the application.
ProcessInput checks whether the user has pressed ESE:
// process all input: query GLFW whether relevant keys are pressed/released this frame and react accordingly
// ---------------------------------------------------------------------------------------------------------
void processInput(GLFWwindow *window)
{
	if (glfwGetKey(window, GLFW_KEY_ESCAPE) == GLFW_PRESS)
		glfwSetWindowShouldClose(window, true);
}
The GLFWSWAPBuffers function swaps the color buffer (a large buffer that stores the color value of each pixel of the GLFW window), which is used to draw in this iteration, and will be displayed on the screen as the output.
The glfwpolleEvents function checks if any events have been triggered (such as keyboard input, mouse movement, etc.), updates the state of the window, and calls the corresponding callback function (which can be set manually through the callback method).
Error c2951: template declaration can only be used at the global, namespace, or class scope. Error c2598: link specification must be at the global scope
Check where you put more or less parentheses in your code, especially if, else statements, right
Summary of problems encountered in using OpenGL in QT
Configure environment VS2015 + QT5.9
: Error LNK2019: Unable to parse the external symbol – **.
: Error LNK2019: Unable to parse the external symbol – **.
solution
en cmake, put BUILD_SHARED_LIBS on the box, recompile to generate glfw3.lib and glfw3dll. DLL, add them to Qt’s pro, compile to pass.
Problem – Glad include
in Pro after configuration Glad path, add
#include <glad/glad.h>If the position is not appropriate, an alarm will appear:
error: C1189: #error: OpenGL header already included, remove this include, glad already provides it containing glad must precede all penGL *** h>rs.
GlDrawElements ()
call function drawelements () e> :
Error -
RtlWerpReportException failed with status code :-1073741823. Will try to launch the process directly
1. ***Pointer s>uffer error, vertex index out of bounds reference vertex array;
br bb3 GlbindVertexArray (0)
GlbindV>xArray (0)
GlbindVertexArray (0)
GlbindVerTexArray (0)
br> <>>
GlbindVerTexArray (0);
glBindBuffer(GL_ELEMENT_ARRAY_BUFFER,0);
3. Call makeCurrent()fore binding VAO.
(To be continued)
Some pitfalls in OpenGL learning
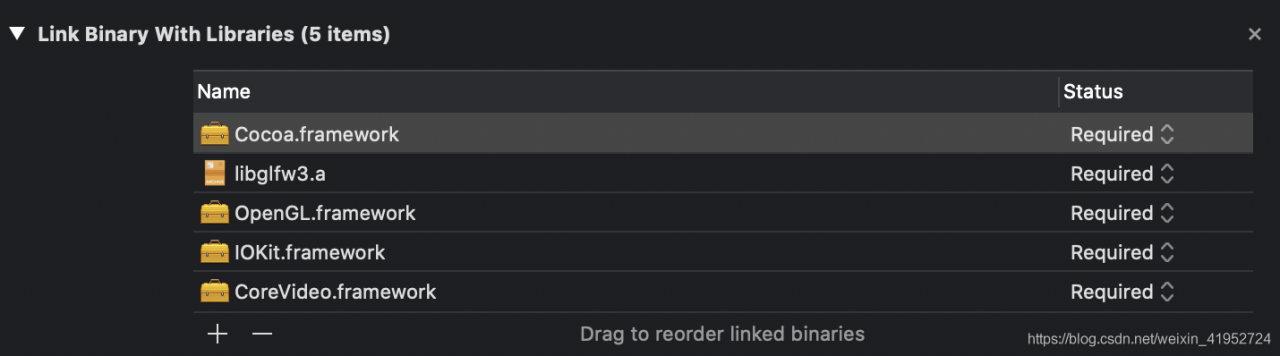
On a Mac, you need to set (otherwise it will report a lot of errors and the answer is almost impossible to find online) :
XCode:

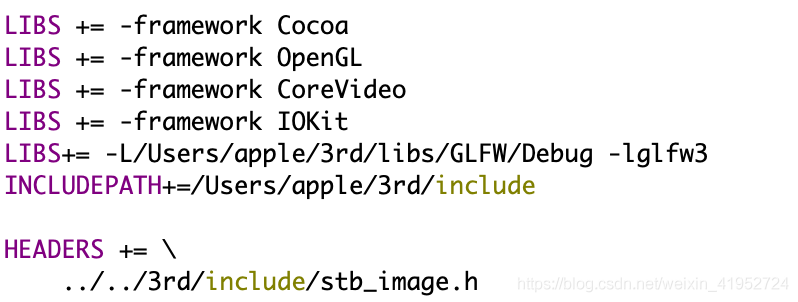
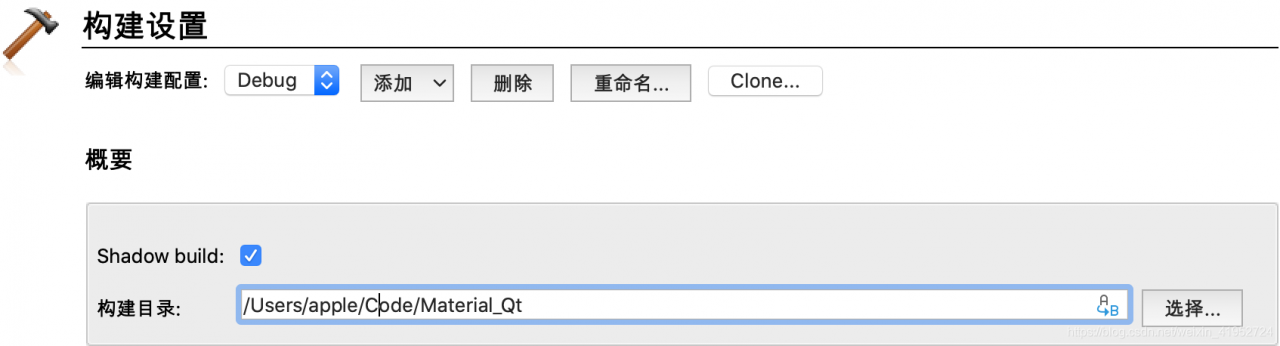
Qt:
May the world be bug-free
XCode:
Qt:
May the world be bug-free