Background:
Today, I built a webapp folder, and found that idea could not identify it as the resource folder of web application
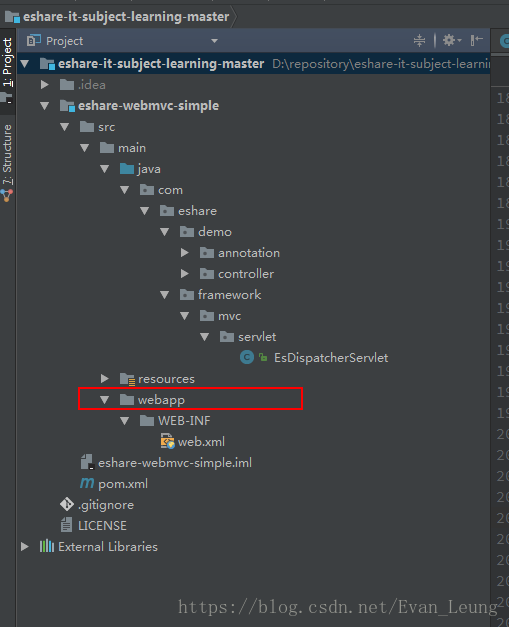
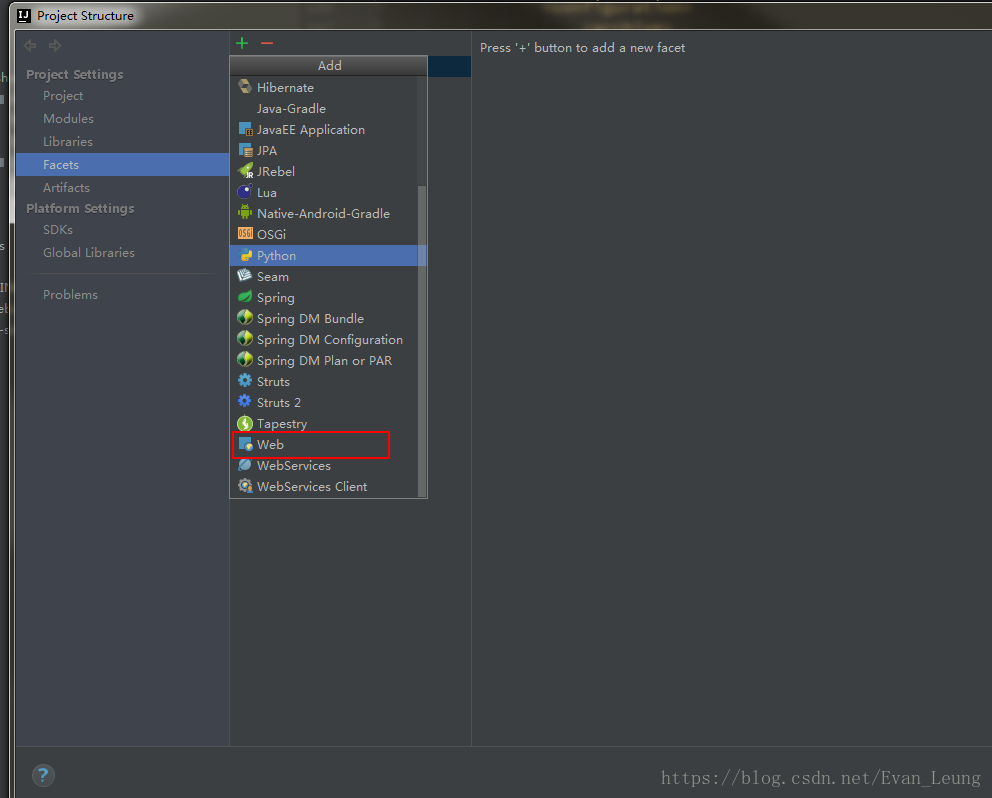
Solution
Open the project structure configuration, as shown in the following figure
Background:
Today, I built a webapp folder, and found that idea could not identify it as the resource folder of web application
Solution
Open the project structure configuration, as shown in the following figure
Struts234987;”29190;” 20005;”28431;” 27934;29616;”20915;” 26696;”22914520146;”27979″
21319;- 32423;- 21040;- struts-2.3.15.1d21363;- 209151;
1
struts2-core-2.0.14.jar
2
struts2-core-2.3.15.1.jar GA.jar Common-lang3-3.1.jar
226863;”liblibliblib”36733;”
http://mirror.bit.edu.cn/apache//struts/binaries/struts-2.3.15.1-all.zip
3-20462;- 259130; web.xml
<filter>
<filter-name>struts2</filter-name>
<filter-class> org.apache.struts2 Yeah. dispatcher.FilterDispatcher
</filter-class>
</filter>
<filter-mapping>
<filter-name>struts2</filter-name>
<url-pattern>/*</url-pattern>
</filter-mapping>
259130;”
<filter>
<filter-name>struts2</filter-name>
<filter-class> org.apache.struts2 Yeah. dispatcher.ng.filter StrutsPrepareAndExecuteFilter
</filter-class>
</filter>
<filter-mapping>
<filter-name>struts2</filter-name>
<url-pattern>/*</url-pattern>
</filter-mapping>
23436;”209151;
http://struts.apache.org/release/2.3.x/docs/s2-016.html
http://struts.apache.org/release/2.3.x/docs/s2-017.html
http://struts.apache.org/release/2.3.x/docs/version-notes-23151.html
Preface: This article aims at the complete Unicode dot matrix font library (other font library calculation methods are different)
solution: part of the dot matrix font library does not meet the business requirements and needs to be changed again (not the whole font library)
note: the two software used in this article are provided with download link at the back!
Steps:
1. Get the Unicode code of the character to be modified
(example: á Unicode code 0x00e1)
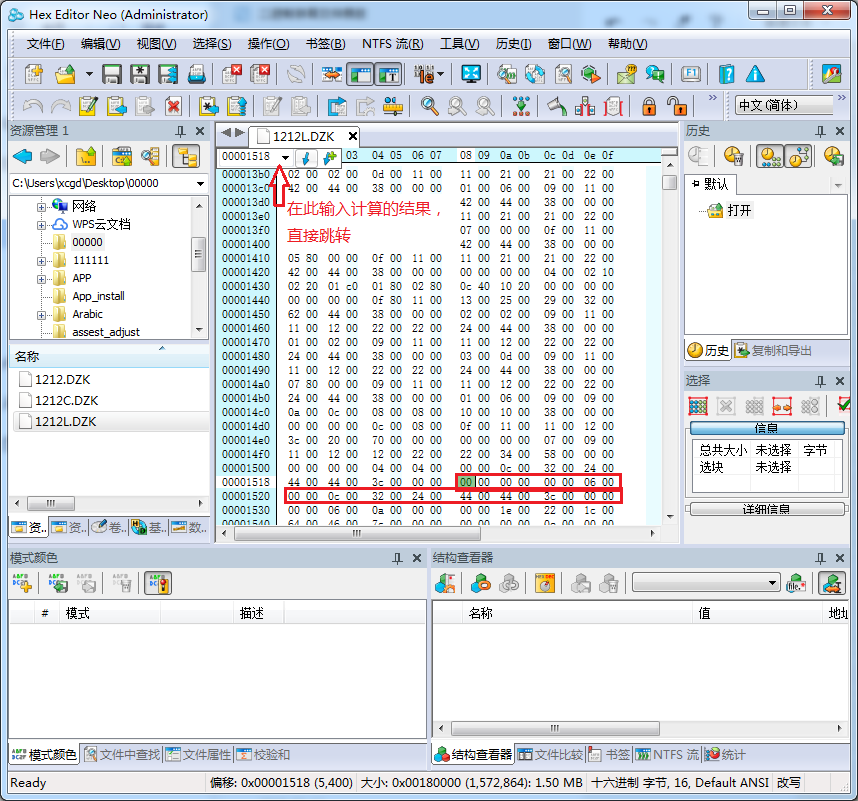
2. Calculate the position of characters in binary file;
Calculation formula: index = number of bytes occupied by Unicode * characters (need to be converted to decimal and then converted to hexadecimal)
In this example, (0x00e1) converts 225225 * 24 (bytes occupied by characters in the font) = 5400 to hexadecimal
1518)
3. According to the calculated position, find the corresponding data (24 consecutive bits after the position (12 * 2)):
As shown in the picture
The red box is the data of this character in the font,
4. Get the desired character lattice data
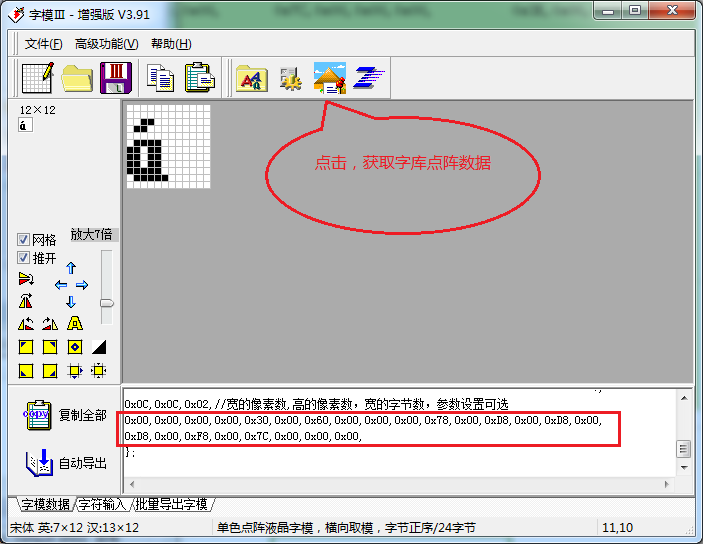
5. Replace the original data, complete the
Software resources:
Hex Editor Neo download address: https://www.xp510.com/xiazai/Application/program/20476.html
Download address of font 3: CSDN
Download
above! thank you!
Centos7 Ping Baidu solution under VMWare
When I was writing Vue project, I wrote the following code in JS to report an error
import Vue from 'vue'
import App from './App.vue'

new Vue({
  el: '#app',
  component: {
    App
  },
  template: '<App/>'
})
Solution:
1. Define a variable XXX to accept the created Vue, and then add XXX to use
import Vue from 'vue'
import App from './App.vue'

let myOwn = new Vue({
  el: '#app',
  component: {
    App
  },
  template: '<App/>'
})
Vue.use ({ xxx })
2. Add a comment line above the new Vue so that eslint does not check for ‘no new’
import Vue from 'vue'
import App from './App.vue'

/* eslint-disable no-new */
new Vue({
  el: '#app',
  component: {
    App
  },
  template: '<App/>'
})
The solution of importing idea: cannot resolve symbol ‘log’ when running someone else’s project (halo blog system)
When importing other people’s projects, the log will report an error and prompt cannot resolve symbol ‘log’. After online query, you can install the Lombok plug-in. Here’s what the Lombok plug-in does.
The official introduction is as follows:
Project Lombok makes java a spicier language by adding 'handlers' that know how to build and compile simple, boilerplate-free, not-quite-java code.Lombok can make Java concise and fast by adding some “handlers”.
About Lombok:
Lombok can simplify java code in the form of simple annotations and improve the development efficiency of developers. For example, JavaBeans often need to be written in development. They need to spend time to add corresponding getter/setter, and maybe also need to write constructor, equals and other methods. Moreover, they need to be maintained. When there are many attributes, there will be a large number of getter/setter methods, which are very lengthy and not too technical. Once the attributes are modified, it is easy to forget to modify the corresponding methods.
Lombok can automatically generate constructor, getter/setter, equals, hashcode and toString methods for attributes at compile time through annotation. The magic is that there are no getter and setter methods in the source code, but there are getter and setter methods in the bytecode file generated by compilation. This saves the trouble of manually rebuilding the code and makes it look simpler.
terms of settlement:
1.1ctrl + Alt + s open Settings
Search or directly select plugins and search Lombok installation in the marketplace
After installation, as shown in the figure
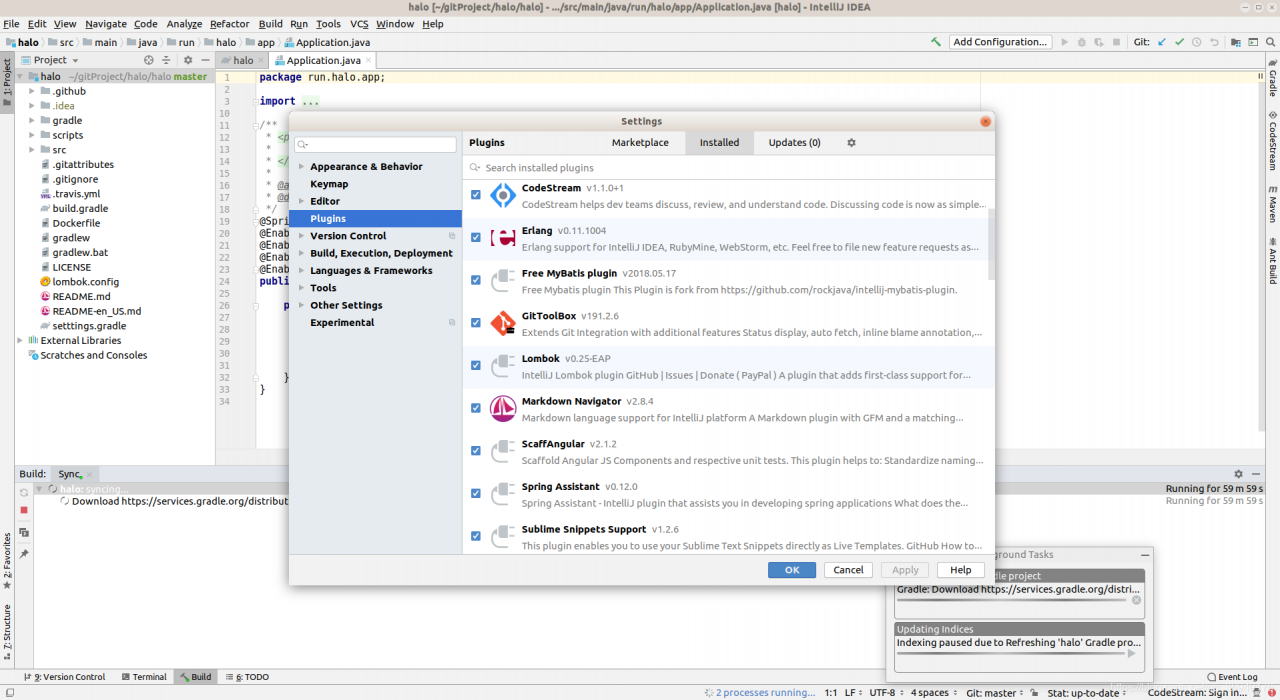
After recompiling, you can run the project, and the log error disappears
Three errors: non zero exit value 1; non zero exit value 2; non zero exit value 3
Note that the dependent package, library dependent package and LIBS package should not be repeated
1.Error:Execution failed for task ‘: app:transformClassesWithDexForDebug ’.
com.Android.build . api.transform.TransformException : com.android.ide . common.process.ProcessException : org.gradle.process . internal.ExecException : Process ‘command ‘F:\Program Files (x86)\Java\jdk1.8.0_ 31\bin\ java.exe ” finished with non-zero exit value 1
This is because the dependency packages are duplicated (like V4 and nineoldandroids), as shown in the figure. The dependency on easeui is implemented in app, but the dependency on this package is added to both app and library files. So report this error, modify it and report it again, just clean and rebuild it
2.Error:Execution failed for task ‘: app:transformClassesWithDexForDebug ’.
com.android.build . api.transform.TransformException : com.android.ide . common.process.ProcessException : org.gradle.process . internal.ExecException : Process ‘command ‘F:\Program Files (x86)\Java\jdk1.8.0_ 31\bin\ java.exe ” finished withnon-zero exit value 2
This error is in the app’s build.Gradle Just add the following sentence to it.
android {
defaultConfig {
    ...
    multiDexEnabled true
}
}
3.Error:Execution failed for task ‘:app:transformClassesWithDexForDebug’.
com.android.build.api.transform.TransformException: com.android.ide.common.process.ProcessException: org.gradle.process.internal.ExecException: Process ‘command ‘F:\Program Files (x86)\Java\jdk1.8.0_31\bin\java.exe” finished withnon-zero exit value 3
This error is added to the app.bulid, and then rebuild, and then run it again. 4g can be modified depending on the computer configuration (2g, 3g, 6g, 8g).
dexOptions {
    javaMaxHeapSize "4g"
}In order to ensure the stable operation of the system, we often limit the flow of requests. If we do not limit the flow, massive requests are likely to crush the system. It is often a good choice to discard some requests to ensure that most of the requests can respond normally
The most commonly used current limiting method is the token bucket, which is simple to implement and highly reliable. It only needs to add a token to the token bucket at a constant rate. After the request comes, go to the token bucket to get the token. If the token is empty, access will be denied.
But token bucket is difficult to use, because it is difficult to determine the appropriate amount of traffic limit. If it is too large, the system can’t bear it. If it is too small, the hardware performance can’t be fully utilized. Moreover, the hardware of each machine may be inconsistent. You can’t put a set of token bucket parameters on different servers. Even if you find the right parameters, with the iterative update of your system version, the original parameters may not be so suitable. It is often very difficult to find a suitable parameter.
We can use smartratelimiter to solve this problem. It can find a suitable parameter according to your hardware.
It will start a coroutine to monitor the CPU and memory usage of the hardware. If the CPU and memory usage exceeds the warning value, it will reduce the token generation rate and the traffic into the system. If the utilization rate of CPU and memory is too low and the real request rate is higher than the token generation rate, the system is considered to be unsaturated. At this time, the token generation rate will be increased and the flow into the system will be increased. In this way, the most appropriate parameter value can be found according to the hardware condition of the machine.
OK, no more nonsense, just code
Let’s look at the data structure first
type TokenBucket struct {
	Capacity          int64        //Token bucket capacity can cache some tokens
	Ch chan bool //Token bucket
	CountPerSecond int64 //The number of tokens generated per second
	AddTimer *time.Ticker //Timer for adding tokens
	RealPerSecond int64 //actually requests per second
	Counter int64 //Counter
	RealPerSenconds *Queue //Queueue for caching requests per second
	ResetCounterTimer *time.Ticker // timer to reset the counter
	UpdateTimer *time.Ticker //Update the timer that generates the token rate
	CpuPercent float64 // warning value of cpu usage
	MemPercent float64 //Warning value of memory usage
}
Create a token bucket
func NewTokenBucket(capacity int64, countPerSecond int64, cpuPercent float64, memPercent float64) *TokenBucket {
	tokenBucket := &TokenBucket{
		Capacity:          capacity,
		Ch:                make(chan bool, capacity),
		CountPerSecond:    countPerSecond,
		AddTimer:          time.NewTicker(time.Duration(int64(time.Second)/countPerSecond)),
		RealPerSenconds:   &Queue{},
		ResetCounterTimer: time.NewTicker(1 * time.Second),  //每Reset the counter every second
		UpdateTimer: time.NewTicker(10 * time.Second), //default 10 seconds to try to update the token generation rate
		CpuPercent: cpuPercent,
		MemPercent: memPercent,
	}
	//Start the token generation process
	go tokenBucket.add()
	//Start the token generation rate update procedure
	go tokenBucket.updateRate()
	//start the request rate logging concatenation
	go tokenBucket.resetAndSaveCounter()
	return tokenBucket
}
Next, let’s take a look at the core method to update the token bucket generation rate
/**
If the cpu usage or memory usage is greater than the warning value, the token generation rate decreases by 10%.
If the cpu usage and memory usage are less than 80% of the warning value, and the real request token rate is greater than the token generation rate, the token generation rate is increased by 10%.
*/
func (tokenBucket *TokenBucket) updateRate() {
	for {
		select {
		case <-tokenBucket.UpdateTimer.C:
			v, _ := mem.VirtualMemory()
			//Memory usage
			mem := v.UsedPercent
			//cpu usage
			cc, _ := cpu.Percent(10*time.Second, false)
			if cc[0] > tokenBucket.MemPercent || mem > tokenBucket.MemPercent {
				tokenBucket.CountPerSecond = tokenBucket.CountPerSecond - tokenBucket.CountPerSecond/10
				tokenBucket.doUpdateRate()
			}

			if cc[0] < tokenBucket.MemPercent-tokenBucket.MemPercent/5 &&
				mem < tokenBucket.MemPercent-tokenBucket.MemPercent/5 &&
				tokenBucket.RealPerSecond > tokenBucket.CountPerSecond {
				tokenBucket.CountPerSecond = tokenBucket.CountPerSecond + tokenBucket.CountPerSecond/10
				tokenBucket.doUpdateRate()
			}
			fmt.Printf("memory usage: %f,cpu usage: %f,current token bucket speed limit:%d,real speed: %d\n",
				mem, cc[0], tokenBucket.CountPerSecond, tokenBucket.RealPerSecond)
		}
	}

}

func (tokenBucket *TokenBucket) doUpdateRate() {
	t := tokenBucket.AddTimer
	defer t.Stop()
	//Create a new Ticker and replace the original
	tokenBucket.AddTimer = time.NewTicker(tokenBucket.getDuration())
}
Next, let’s see how to get the actual number of requests per second
/**
The real token request rate is the maximum value of requests per second in the last 10s
*/
func (tokenBucket *TokenBucket) resetAndSaveCounter() {
		for {
			select {
			case <-tokenBucket.ResetCounterTimer.C:
				//If the queue is greater than 10, discard the first value stuffed untilsize=10
				for i := 0; i < len(*tokenBucket.RealPerSenconds)-10; i++ {
					tokenBucket.RealPerSenconds.Pop()
				}

				tokenBucket.RealPerSenconds.Push(tokenBucket.Counter)
				//Counter zeroing
				for {
					if atomic.CompareAndSwapInt64(&tokenBucket.Counter, tokenBucket.Counter, 0) {
						break
					}
				}
				var temp int64
				for _, value := range *tokenBucket.RealPerSenconds {
					if temp < value {
						temp = value
					}
				}
				tokenBucket.RealPerSecond = temp
			}
		}

}
Next, there are two ways to get a token
/**
Get the token and return directly if you don't get it
*/
func (tokenBucket *TokenBucket) GetToken() bool {
	atomic.AddInt64(&tokenBucket.Counter, 1)
	select {
	case <-tokenBucket.Ch:
		return true
	default:
		return false
	}
}

/**
Get the token and wait until the timeout if you don't get it
*/
func (tokenBucket *TokenBucket) TryGetToken(timeout time.Duration) bool {
	atomic.AddInt64(&tokenBucket.Counter, 1)
	t := time.NewTimer(timeout)
	defer t.Stop()
	select {
	case <-tokenBucket.Ch:
		return true
	case <-t.C:
		return false
	}
}
Finally, add a token
func (tokenBucket *TokenBucket) add() {
	for {
		select {
		case <-tokenBucket.AddTimer.C:
			tokenBucket.doAdd()
		}
	}
}

func (tokenBucket *TokenBucket) doAdd() {
	if int64(len(tokenBucket.Ch)) < tokenBucket.Capacity {
		tokenBucket.Ch <- true
	}
}
Source code address: click here
If it helps you, please click star on GitHub, thank you!
SQL Server 2008 does not allow remote connection by default, and SA account is disabled by default. If you want to use SSMS to connect to SQL Server 2008 on remote server locally, you need to do two parts of configuration:
SQL Server 2008 does not allow remote connection by default, and SA account is disabled by default. If you want to use SSMS to connect to SQL Server 2008 on remote server locally, you need to do two parts of configuration:
1. SQL Server Management Studio Express (SSMS)
2. SQL Server Configuration Manager/SQL Server Configuration Manager (SSCM)
There are two points to note:
12005’s peripheral application configurator changed place in 2008
2. Some settings take effect and need to restart SQL server
Step 1: open SSMS, connect to database with windows identity, log in, right-click and select “properties”
Step 2: select “security” on the left and “SQL server and windows authentication mode” on the right to enable mixed login mode
Step 3: select “connect”, check “allow remote connection to this server”, and then click “OK”
Step 4: expand “security” & gt; “login” & gt; “Sa”, right-click and select “properties”
Step 5: select “general” on the left and “SQL server authentication” on the right, and set the password
Step 6: select “status”, select “enable”, and click “OK”
Step 7: right click the database and select aspect
Step 8: set “server configuration” and “remoteaccessenabled” property to “true”, and click “OK”
Step 9: so far, SSMS has been set up. Exit first, stop and restart SQL Server service, and then log in with SA. Success means that the SA account has been enabled
Step 10: start to configure SSCM
Start SQL Server Configuration Manager in windows menu
Select “SQL Server service” on the left and make sure that “SQL Server” and “SQL server browser” on the right are running (if not, go to “Microsoft SQL Server 2012localdb” and re open SQL configuration manager)
Step 11: the following is the English version of the interface. As shown in the figure: the TCP/IP on the right is “disabled” by default. Double click to open the settings panel and change it to “enabled”
Step 12: select the “IP addresses” tab and set the port “1433”
Step 13: as shown in the figure, change “TCP/IP” of “client protocols” to “enabled”
Step 14: after configuration, restart SQL Server 2008.
At this point should be able to use, but still want to confirm the firewall.
After SQL Server 2005/2008 Express is installed, remote connection is disabled by default. If remote access is required, manual configuration is required.
Turn on firewall settings. take SQLServr.exe (C:\Program Files\Microsoft SQL Server\MSSQL10.SQLEXPRESS\MSSQL\Binn\ sqlservr.exe )Add to the allowed list.
More articles, related information, and so on, WeChat official account: fish science and technology information. Or click the link: http://mp.weixin.qq.com/mp/homepage?__ biz=MzU5MjY1ODg0NA==&hid=3&sn=c8b9f858ce938d785e3f799a8cb59574&scene=18#wechat_ redirect
Link address
Solution
create an empty NDK build file in the home directory of NDK, close the dialog box and try again
http://stackoverflow.com/questions/36043047/adt-23-doesnt-like-ndk11
1、Plugin with id ‘ com.android.application ’ not found.

Solution:
add in the build file:
buildscript {
    repositories {
        mavenCentral()
    }
    dependencies {
        classpath 'com.android.tools.build:gradle:1.0.+'
    }
}