tail -40000 logs. [1-9]{4}ms”grip -C 4 -E
Category Archives: How to Fix
Solution to the warning of too low TDR value in new sp
In Windows environment, the following window may pop up when you open the new version of SP to prompt that your TDR (timeout detection recovery) is too low. Click continue anyway to enter the software, but it may bring problems such as software crash and too high delay. This paper gives a solution to this problem combined with official documentation.
Why does GPU driver crash?
In order to prevent any rendering or GPU computing from causing system lock, windows system will shut down any GPU driver that rendering for a short period of time.
There is a key in the registry of windows that controls how long the system should wait before shutting down the driver. However, the software does not have permission to change this setting, and this value can only be changed manually.
You can get more details about TDR at the following links: https://docs.microsoft.com/en-us/windows-hardware/drivers/display/tdr-registry-keys
terms of settlement:
You can modify the TDR value in two ways:
Increase the TDR delay value (this is the safest way) – & gt; modify “tdrdelay” and “tdrddidelay” to a higher value (such as 60s) to completely prohibit TDR – & gt; modify “tdrlevel” to 0 (not recommended by SP)
How to modify the TDR value in the registry:
(please note that the following operations will modify/create keys. If you don’t know how to edit the registry, it may lead to serious results that you can only reload the system.)
1. Windows + R opens the run window
2. Enter regedit and press enter
3. In the registry on the left, find: Computer/HKEY_ LOCAL_ MACHINE\SYSTEM\CurrentControlSet\Control\GraphicsDrivers
4. Check the key on the right. If there is no tdrdelay, right-click in the space on the right and select new & gt; DWORD (32bit) value
5 double click “tdrdelay” on the right side, change it to a higher value (default 2S), officially recommend 60s, and change its base to decimal
6. Create/Edit “tdrddidelay” value in the same way (default 5S)
(note decimal60 = hexadecimal 3C)
7. Now the TDR value in your registry should be as shown in the figure below
8. Close the registry and restart the computer.
The solution of Maya exporting obj to sp without identifying group information
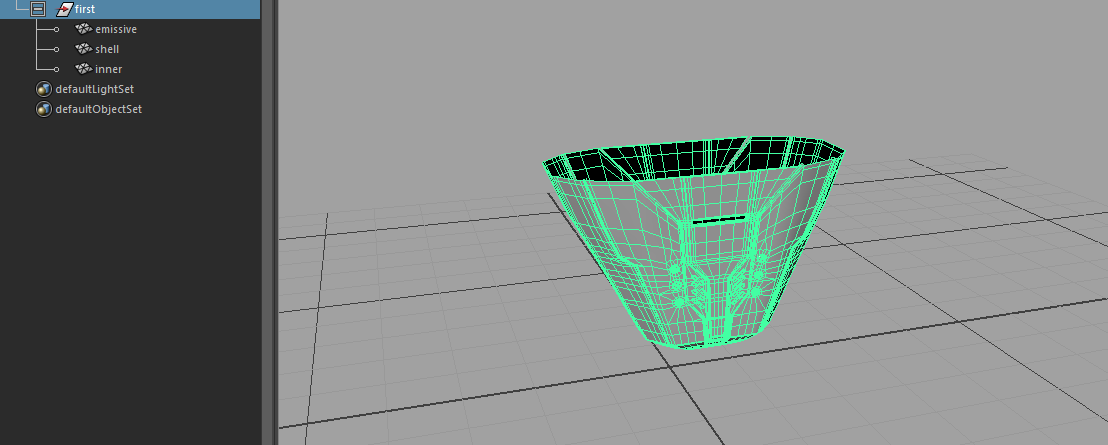
Today, I encountered a very painful problem. After grouping, I exported obj and baked it in sp. in any case, I could not read the mesh ID of the object, as shown in the figure.
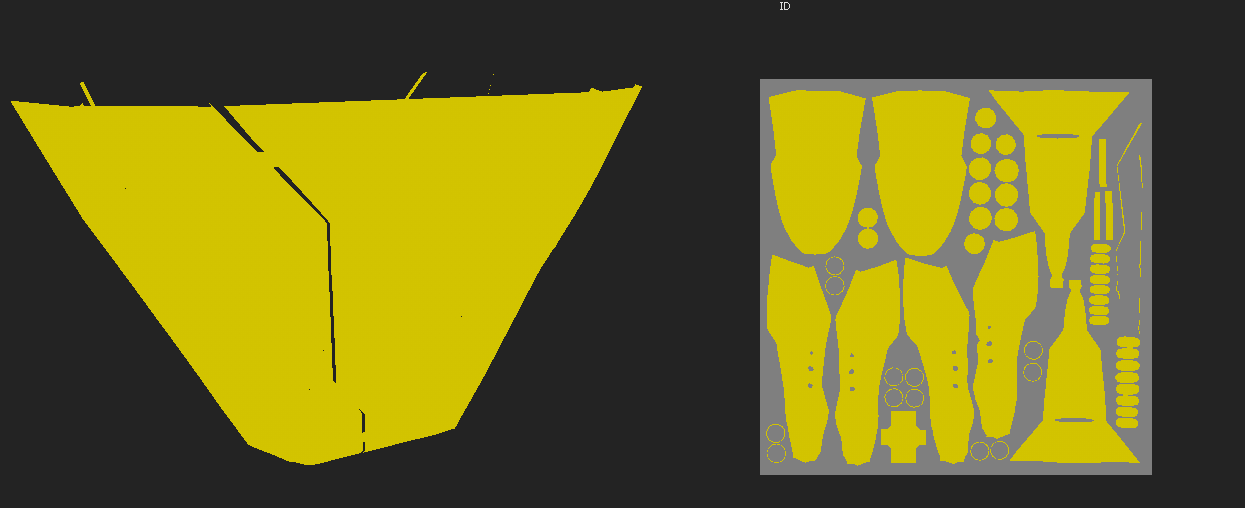

Unable to read the mesh ID. the error baking result is as follows: 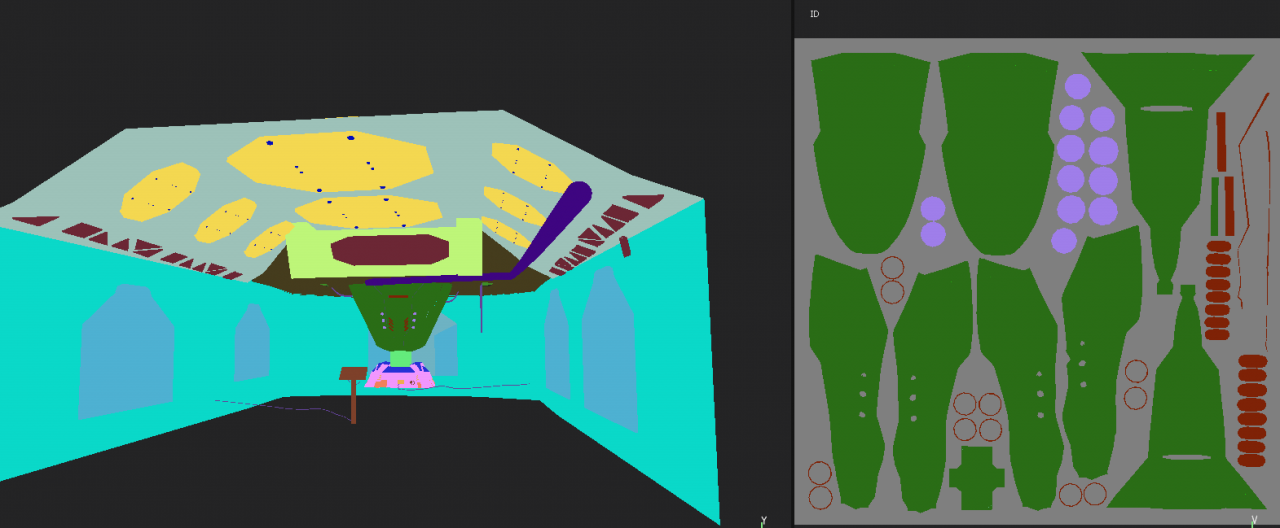 . Although I haven’t figured out the reason now, there is a good solution.
That’s it—————————————
Don’t use obj, just FBX.
[solution] the system is running in low graphics mode
When entering the one out of four interface:
use Ctrl + Alt + (one of F1 ~ F6) to enter the pure command mode, and enter the user name and password
Then enter the following command:
CD/etc/X11
sudo CP xorg.conf.failsafe xorg.conf
sudo reboot
This problem can be solved
[solution] install youcompleteme through VIM plug-in manager VIM plug, including ycmd server shutdown solution
Reference article:
take you step by step to install the most difficult VIM plug-in in history: youcompleteme
VIM plug-in: minimalist VIM plug-in manager
Installation method
- install VIM
sudo apt get install VIM edit vimrc
first add VIM ~ /. Vimrc
at the top:
call plug#begin (‘~ /. VIM/plugged’)
plug ‘valloric/youcompleteme’
call plug#end() to install VIM plug and install youcompleteme through plugged
Input: curl – flo ~ /. VIM/autoload at the terminal/ plug.vim –create-dirs https://raw.githubusercontent.com/junegunn/vim-plug/master/plug.vim Open VIM
Enter “: source ~ /. Vimrc” at the command line
Enter “: pluginstall” at the command line to install youcompleteme, which takes a long time. Please wait patiently for YCM to be compiled and installed_ core
mkdir ~/.ycm_ build
cd ~/.ycm_ build
cmake -G “Unix Makefiles” . ~/.vim/plugged/YouCompleteMe/third_ party/ycmd/cpp
cmake –build . –target ycm_ core –config Release
Supplement: VIM prompts the debugging method of the ycmd server shut down:
Select log through ycmtogglelogs to view errors
For example, the solution of no module named watchdog: PIP3 install watchdog
[opencv + openvino] opencv-vino4.5.1 + opencv contrib installation
Get opencv vino
git clone --branch 4.5.1 https://github.com/opencv/opencv_ contrib.git git clone --branch 4.5.1-openvino https://github.com/opencv/opencv.git opencv_ Place contrib in opencv directory
Enter the opencv Directory:
mkdir build & cd buildcmake -D CMAKE_ BUILD_ TYPE=RELEASE -D CMAKE_ INSTALL_ PREFIX=/usr/local -D INSTALL_ PYTHON_ EXAMPLES=ON -D OPENCV_ EXTRA_ MODULES_ PATH=../../opencv_ contrib/modules -D WITH_ INF_ ENGINE=ON -D ENABLE_ CXX11=ON -D PYTHON_ EXECUTABLE=/usr/bin/python ..
Common errors and solutions:
opencv_ contrib/modules/xfeatures2d/src/ boostdesc.cpp:673 :20: fatal error: boostdesc_ BGM. I: no such file or directory
solution:
source code compilation is adopted, so you can view the log file in the build folder CMakeDownloadLog.txt , in the log file CMakeDownloadLog.txt Search for bootdesc in_ BGM. I keyword (not search in the folder),
found that the file download failed. The log file has its download address. You can directly copy the download address to the web page to see the source code of the file. You can directly copy the source code and save the file with the same name and put it in OpenCV_ The path of contrib/modules/xfeatures2d/SRC/ is OK.
Baidu network disk download address: https://pan.baidu.com/s/1BeYF8kqEZLAJYQj-MvxpmA Password: e1wc (thank you for sharing) fatal error: features2d/test/test_ detectors_ regression.impl.hpp : no such file or directory
solution:
copy opencv/modules/features2d and paste it into the build directory to solve the problem. Final error: opencv2/xfeatures2d.hpp: no such file or directory
solution:
Add OpenCV_ The problem of can be solved by copying the contrib/modules/xfeatures 2D/include/opencv2 folder to the /usr/local/include/opencv2/ folder
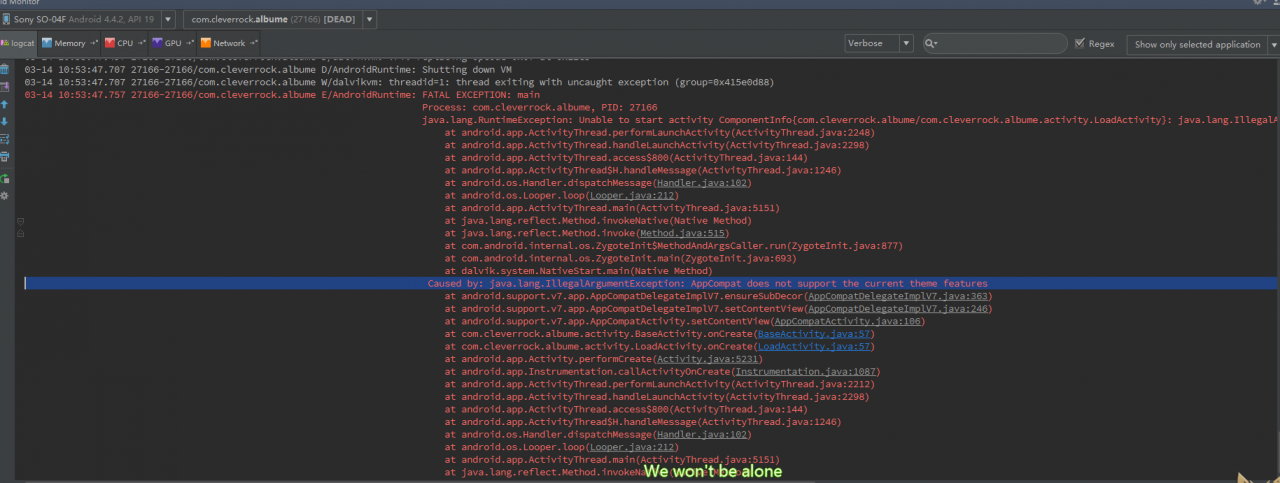
AppCompat does not support the current theme features
Error message
Process: com.cleverrock.albume, PID: 27166
java.lang.RuntimeException: Unable to start activity ComponentInfo{com.cleverrock.albume/com.cleverrock.albume.activity.LoadActivity}: java.lang.IllegalArgumentException: AppCompat does not support the current theme features
   at android.app.ActivityThread.performLaunchActivity(ActivityThread.java:2248)
   at android.app.ActivityThread.handleLaunchActivity(ActivityThread.java:2298)
   at android.app.ActivityThread.access$800(ActivityThread.java:144)
   at android.app.ActivityThread$H.handleMessage(ActivityThread.java:1246)
   at android.os.Handler.dispatchMessage(Handler.java:102)
   at android.os.Looper.loop(Looper.java:212)
   at android.app.ActivityThread.main(ActivityThread.java:5151)
   at java.lang.reflect.Method.invokeNative(Native Method)
   at java.lang.reflect.Method.invoke(Method.java:515)
   at com.android.internal.os.ZygoteInit$MethodAndArgsCaller.run(ZygoteInit.java:877)
   at com.android.internal.os.ZygoteInit.main(ZygoteInit.java:693)
   at dalvik.system.NativeStart.main(Native Method)
Caused by: java.lang.IllegalArgumentException: AppCompat does not support the current theme features
   at android.support.v7.app.AppCompatDelegateImplV7.ensureSubDecor(AppCompatDelegateImplV7.java:363)
   at android.support.v7.app.AppCompatDelegateImplV7.setContentView(AppCompatDelegateImplV7.java:246)
   at android.support.v7.app.AppCompatActivity.setContentView(AppCompatActivity.java:106)
   at com.cleverrock.albume.activity.BaseActivity.onCreate(BaseActivity.java:57)
   at com.cleverrock.albume.activity.LoadActivity.onCreate(LoadActivity.java:57)
   at android.app.Activity.performCreate(Activity.java:5231)
   at android.app.Instrumentation.callActivityOnCreate(Instrumentation.java:1087)
   at android.app.ActivityThread.performLaunchActivity(ActivityThread.java:2212)
   at android.app.ActivityThread.handleLaunchActivity(ActivityThread.java:2298)
   at android.app.ActivityThread.access$800(ActivityThread.java:144)
   at android.app.ActivityThread$H.handleMessage(ActivityThread.java:1246)
   at android.os.Handler.dispatchMessage(Handler.java:102)
   at android.os.Looper.loop(Looper.java:212)
   at android.app.ActivityThread.main(ActivityThread.java:5151)
   at java.lang.reflect.Method.invokeNative(Native Method)
   at java.lang.reflect.Method.invoke(Method.java:515)
   at com.android.internal.os.ZygoteInit$MethodAndArgsCaller.run(ZygoteInit.java:877)
   at com.android.internal.os.ZygoteInit.main(ZygoteInit.java:693)
   at dalvik.system.NativeStart.main(Native Method)
25130;`22270
1.2.2.2.2.2.2.2.2.
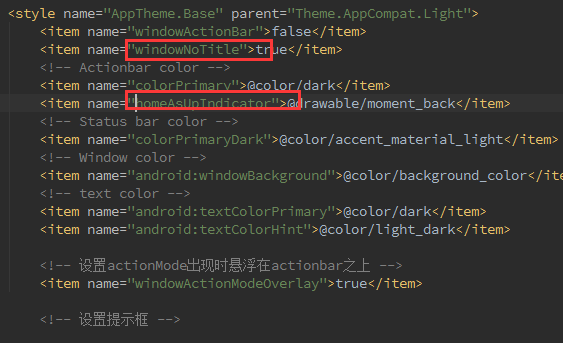
values style.xml 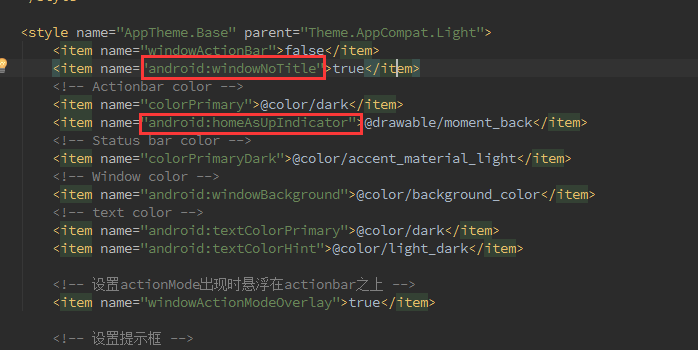
21435;”25481an android:
To:
Solution: pairing Bluetooth devices with win10 and Linux dual systems
preface
My computer is equipped with windows (win10) and Linux (Ubuntu 18.04) dual systems. I usually use Logitech’s wireless keyboard, but I find that every time I switch the system, although I have paired before, I can’t connect successfully. You must delete the paired device and re link it every time. Occasionally there will be device delete unsuccessful, very angry. So I want to connect (pair) two systems with one Bluetooth device once and for all.
Device deletion failed
Solution: (reprint, delete)
1. Download the repair tool and complete the installation with the default options. To prevent link failure, attach Baidu network disk link
2. Open shell, input btpair – u from the command line, and press enter to execute
3. Wait, and you will find that the paired bluetooth device has been successfully and completely deleted
Solution: (reprint, delete)
Basic steps:
1. First pair Bluetooth mouse under Linux (used to generate configuration file)
2. Switch to pair Bluetooth mouse under windows (used to read pairing information)
3. Modify pairing information under Linux to be consistent with that under windows
Of course, you can also do the opposite. The pairing information under windows is consistent with that under Linux, but it is not recommended.
Reading Bluetooth pairing information in Windows
The Bluetooth pairing information of windows is stored in the registry
HKEY_LOCAL_MACHINE\SYSTEM\CurrentControlSet\Services\BTHPORT\Parameters\Keys\<本机蓝牙 MAC>\<鼠标蓝牙 MAC>
The MAC address does not have a separator, and the system permission is required to access it. I found two ways to read this part of information. (I used the first way)
use psexec.exe Start with system permissions regedit.exe
psexec.exe </ code> can be downloaded from this page to PSTools.zip ), will PSTools.zip In PsExec.exe Or psexec64.exe (here I copy it directly to Windows/system32), and run CMD with administrator privileges (also in Windows/system32), and then Enter the following command to start regedit.exe :
psexec64.exe -si regedit
Then we can view the corresponding key value in the registry editor, and we can also export it: (my length is like this)
Windows Registry Editor Version 5.00

[HKEY_LOCAL_MACHINE\SYSTEM\CurrentControlSet\Services\BTHPORT\Parameters\Keys\58fb842d509f]
"34885dd2457f"=hex:cf,a0,fc,2d,50,b3,f0,4a,93,8b,36,da,81,bb,5b,5e
Modifying Bluetooth pairing information under Linux
The pairing information of Bluetooth devices under Linux is stored in the/var/lib/Bluetooth/& lt; local Bluetooth MAC & gt; directory, such as/var/lib/Bluetooth/60:57: XX: XX: XX: XX. The letters in the MAC address are all uppercase and contain colon separator.
Enter the directory: (of course, it’s more convenient to click directly)
sudo su
cd /var/lib/bluetooth/60:57:XX:XX:XX:XX
You can see the paired bluetooth devices in the system:
root@nanpuyue-pc:/var/lib/bluetooth/60:57:XX:XX:XX:XX# ls -l
All 24
drwx------ 2 root root  4096 3月  13 19:48 4C:57:XX:XX:XX:XX
drwx------ 2 root root 12288 3月  13 22:38 cache
drwxr-xr-x 2 root root  4096 3月  13 21:52 EB:50:XX:XX:XX:XX
-rw------- 1 root root    69 3月   9 13:21 settings
Enter the directory of Bluetooth mouse we want to configure:
cd EB:50:XX:XX:XX:XX
What we need to modify is the info file in this directory. Take mine as an example, the file is as follows (it has been modified here. We only need to change the key into the key in the registry exported under windows. Specifically, delete the comma in win and change the lowercase to uppercase)
[General]
Name=Keyboard K380
Class=0x000540
SupportedTechnologies=BR/EDR;
Trusted=true
Blocked=false
Services=00001000-0000-1000-8000-00805f9b34fb;00001124-0000-1000-8000-00805f9b34fb;00001200-0000-1000-8000-00805f9b34fb;

[LinkKey]
Key=CFA0FC2D50B3F04A938B36DA81BB5B5E
Type=5
PINLength=0

[DeviceID]
Source=2
Vendor=1133
Product=45890
Version=16897
Reset computer
VMware this host does not support 64 bit solutions
environment
VMware version: 14.1.3
operating system: win10 x64
terms of settlement
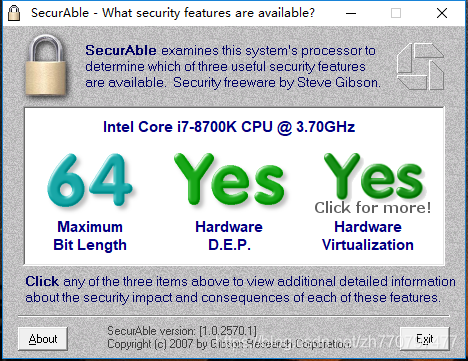
Enter the BIOS to confirm the Intel (R) virtualization technology status. Please set the disabled status to enabled. Remove the Hyper-V status from the control panel (i.e. cancel the check of Hyper-V). If the above steps are all done or not, run the CMD program, execute Bcdedit/set hypervisorlaunchtype off, and restart the computer. (that’s my problem) in addition, you can use the following tools to check whether the computer hardware supports virtualization:
to check whether the computer hardware supports virtualization https://www.grc.com/securable.htm
After startup, it is shown in the following figure:
Modifying SVN user name and password in eclipse
Sometimes in development, some code is submitted by a public computer. Eclipse has no special function to switch SVN accounts. The solution is obtained by consulting the data
1. Check what SVN interface you are using in eclipse
Windows & gt; preference & gt; team & gt; SVN # SVN interface (bottom right)
2. If you are using javahl, Find the following directory and delete the files in the auth directory.
Windows 7
C: (users) \ “your user name” \ \ appdata/roaming/subversion/auth \
XP
C: (documents and settings) \ “your user name” \ \ “application data (hidden folder) \” subversion/auth “
3, Find the following directory and delete the. Keyring file.
[eclipse] “configuration” org.eclipse . core.runtime
Tomcat start error touch under Linux
Touch: unable to touch/usr/local/tomcat6.0/logs/ catalina.out ”: there is no file or directory
Tomcat startup error:
[ root@rhel bin]# ./ startup.sh
Using CATALINA_ BASE: /usr/local/tomcat6.0
Using CATALINA_ HOME: /usr/local/tomcat6.0
Using CATALINA_ TMPDIR: /usr/local/tomcat6.0/temp
Using JRE_ Home:/usr/local/JDK/JRE
touch: cannot touch “/ usr/local/tomcat6.0/logs/ catalina.out ”: no file or directory
/usr/local/Tomcat/bin/ catalina.sh : line 310: /usr/local/tomcat6.0/logs/ catalina.out : without that file or directory
// prompt that/usr/local/tomcat6.0/logs cannot be created/ Catalina.out This is a file because there is no logs directory;
Solution:
just create a logs directory
MKDIR/usr/local/tomcat7.0.19/logs
Solution of Chinese garbled code when using QT
Additional
Execution_character_set(“utf-8”)
Summary resolution