Category Archives: Error

CARLA Report an Error: rpc server [How to Solve]

CARLA reports error rpc server
Trying to do some research on autopilot with carla,When running the example,error:
RuntimeError: trying to create rpc server for traffic manager; but the system failed to create because of bind error.
Possible reasons for this issue: The last time the PythonAPI was run was not properly terminated,causing some resources or ports Occupied.

Solution:
1)Restart carla;
2)If the error is still reported after restarting carla, Then restart the computer.

Introduce wangeditor5 to run an error: You may need an appropriate loader to handle this file type (es6 compatibility issue)

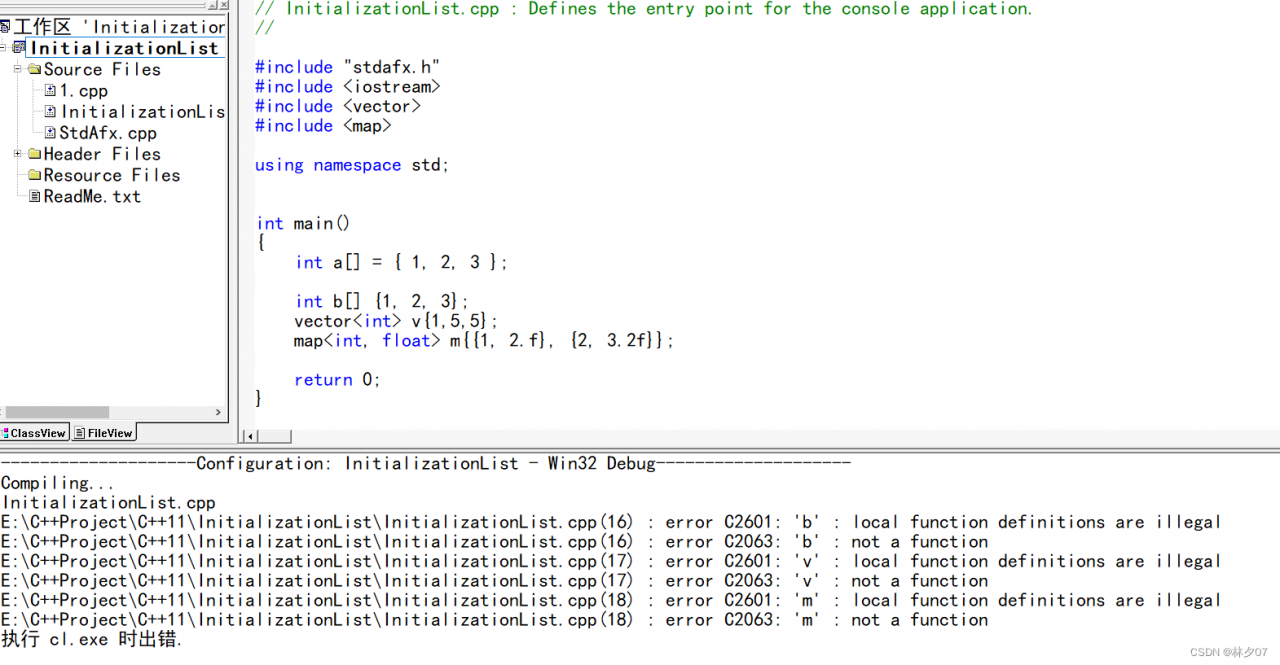
wangeditor5 Import and Run Error: You may need an appropriate loader to handle this file type (es6 compatibility issues)

Recently upgraded the rich text wangeditor used, I upgraded to the latest version of wangeditor5
Introduced wangeditor5 into the vue project, Starting the project has been reporting errors

You may need an appropriate loader to handle this file type 

At first, I tried many methods but failed to solve it, Later I noticed an error reported in the console, Guess it may be related to the writing method of  (…) in es6, So I will make a specific query later I took a look at the issue of compatibility with es6, I learned that webpack can only process a part of ES6 syntax, some more advanced ES6 syntax cannot be processed,Need to do compatibility processing.


Solution

1. Install the babel-polyfill es6-promise package

npm i babel-polyfill es6-promise --save

2. Add the following codes to main.js:

import 'babel-polyfill' //Note: This import should be before import Vue from 'vue'
import Vue from 'vue'
import Es6Promise from 'es6-promise'
Es6Promise.polyfill()

3. Add the following codes to webpack.base.conf.js:

module.exports = {
...
     entry: {
     app: ["babel-polyfill", "./src/main .js"]
     },
     ...
}

Because wangeditor5 is a third-party dependency, in node_modules, and babel-polyfill does not detect es6,  in node_modules, we need to add it manually.

Note:If you do not configure es6 compatibility for third-party dependencies,You can ignore the fourth step,You can run the startup project after the third step directly

4. In the webpack.base.conf.js file, modify the configuration of babel-loader, add a configuration item: resolve(‘node_modules/@wangeditor’ )(It needs to be modified according to the third-party dependencies actually introduced)

{
        test: /\.js$/,
        loader: 'babel-loader' ,
        include: [resolve('src'), resolve( 'test'), resolve('node_modules/@wangeditor' ), resolve('node_modules/webpack-dev-server/client')]
      },

Finally restart the project to be successful!

[Solved] Nacos2.1.1 Startup Error: nacos is starting with standalone

Project Scene:

Developing a microservice project, requires the service registration and configuration center. The development and application of Nacos technology. The native OS is Windows11, Nacos version is 2.1.1 installed on Drive D.


Problem description

Nacos start:

Double-click startup.cmd in the bin directory and it will flash back, that is, the startup failed;

Use the command to start: startup.cmd -m standalone, An error message appears

D:\Program Files (x86)\nacos-server-2.1.1\nacos\bin>startup.cmd -m standalone
"nacos is starting with standalone"
There should be no \nacos-server-2.1.1\nacos"\logs\java_heapdump.hprof -XX:-UseLargePages" at this point.


Solution:

The first solution:  unzip Nacos to a directory does not contain non-English and numbers, Command line started successfully

Second solution: Open startup with editor, Comment out the content shown below:

rem if %MODE% == "cluster" (
rem echo "nacos is starting with cluster"
rem if %EMBEDDED_STORAGE% == "embedded" (
rem set "NACOS_OPTS=-DembeddedStorage=true"
rem )

rem set "NACOS_JVM_OPTS=-server -Xms2g -Xmx2g -Xmn1g -XX:MetaspaceSize=128m -XX:MaxMetaspaceSize=320m -XX:-OmitStackTraceInFastThrow -XX:+HeapDumpOnOutOfMemoryError -XX: HeapDumpPath=%BASE_DIR%\logs\java_heapdump.hprof -XX:-UseLargePages"
rem )

Not sure if this solution will cause other problems, but it starts fine

flask init-db Error: Error: Could not locate a Flask application. Use the ‘flask –app’ option, ‘FLASK_APP’ environment variable, or a ‘wsgi.py’ or ‘app.py’ file in the current directory.

1. Problem description

When flask initializes the database file, execute flask init-db to report Error: Could not locate a Flask application. Use the ‘flask –app’ option, ‘FLASK_APP’ environment variable, or a ‘wsgi.py’ or ‘app.py’ file in the current directory, the specific error screenshot is as follows:


2. Problem solving

This problem is really annoying. I can’t find the corresponding solution on Baidu. The official document about the flask initialization database is also very vague. I wrote an execution command directly, so I don’t understand it very well, so I do it when initializing the database. The operation is:

1. Shut down the previously started server, open a new terminal and execute the following command:

1
2
3
%export FLASK_APP=flaskr
export FLASK_ENV=development
%flask run

 2. Open another terminal and cd to the package directory to execute the flask inti-db command, and the above error is reported. Obviously this is the wrong step.

3. Solutions

After thinking about this problem for a long time, I want to understand where I am wrong. The correct execution steps should be:

1. Execute the following command

1
2
3
%export FLASK_APP=flaskr
export FLASK_ENV=development
%flask init-db

 2. After the execution is successful, a flaskr.sqlite file will be created in the instance folder. The actual result is shown as follows:


./popins2: error while loading shared libraries: libbifrost.so: cannot open shared object file: No such file or directory

001. Question

root@ubuntu01:/home/software/PopIns2/PopIns2# ./ popins2 
. / popins2 : error while loading shared libraries: libbifrost.so: cannot open shared object file: No such file or directory


002, the cause of the problem

Analysis of the reason: ld prompts that the library file cannot be found, and the library file is in the current directory.

The default directories of the linker ld are /lib and /usr/lib. If they are placed in other paths, you need to let ld know where the library files are.


003. Find the file

root@ubuntu01:/home/software/PopIns2/PopIns2# find / -name " libbifrost.so "
 /usr/local/lib/ libbifrost.so
 /home/software/bifrost/build/src/ libbifrost.so 
find: ' / run /user/ 1000 / doc': Permission denied
find: ' /run/user/ 1000 / gvfs': Permission denied
find: ' /run/user/ 127 / doc': Permission denied
find: ' /run/user/ 127 /gvfs': Permission denied


004. Solution

method 1:

Edit the /etc/ld.so.conf file and add the directory where the library file is located in a new line;

Run ldconfig to update the /etc/ld.so.cache file;
method 2:

Create any file with a .conf suffix in the /etc/ld.so.conf.d/ directory, and add the directory where the library file is located in the file;

Run ldconfig to update the /etc/ld.so.cache file;

I think the second method is more convenient, with minimal changes to the original system. Because the content of the /etc/ld.so.conf file is include /etc/ld.so.conf.d/*.conf

root@ubuntu01:/home/software/PopIns2/PopIns2# echo " /home/software/bifrost/build/src/libbifrost.so " > /etc/ld.so.conf.d/bifrost.so 
root@ubuntu01 : / home/software/PopIns2/PopIns2# ldconfig ## Update library files


005. Test

root@ubuntu01:/home/software/PopIns2/PopIns2# ./popins2

db2 purescale Install Error: ERROR: An error occurred while compiling IBM General Parallel File System (GPFS) Portability Layer (GPL) on host “cf1”. Return code “3”.

background

RedHat Linux 6.5

DB2 10.5.10

Install DB2 purescale and check the installation requirements through db2prereqcheck, but an error is reported when executing db2_install installation:

[rootserver_t]# ./db2_install 
DBI1324W  Support of the db2_install command is deprecated.

Default directory for installation of products - /opt/ibm/db2/V10.5

***********************************************************
Install into default directory (/opt/ibm/db2/V10.5) ? [yes/no] 
yes

Specify one of the following keywords to install DB2 products.

  SERVER 
  CONSV 
  EXP 
  CLIENT 
  RTCL 
 
Enter "help" to redisplay product names.

Enter "quit" to exit.

***********************************************************
SERVER
***********************************************************
Do you want to install the DB2 pureScale Feature? [yes/no] 
yes
DB2 installation is being initialized.

 Total number of tasks to be performed: 53 
Total estimated time for all tasks to be performed: 2201 second(s) 

Task #1 start
Description: Checking license agreement acceptance 
Estimated time 1 second(s) 
Task #1 end 

省略部分...

Task #47 start
Description: Installing or updating DB2 SSH Utilities 
Estimated time 5 second(s) 
Task #47 end 

Task #48 start
Description: Compiling GPL 
Estimated time 30 second(s) 
Task #48 end 

A major error occurred while installing "DB2 Server Edition " on this
computer. The installation cannot continue. If the problem persists contact
your technical service representative.

For more information see the DB2 installation log at
"/tmp/db2_install.log.38995".

Solution

Check /tmp/db2_install.log.38995 log according to the prompt

[root@cf1 server_t]# cat /tmp/db2_install.log.38995
...

ERROR: An error occurred while compiling IBM General Parallel File System
(GPFS) Portability Layer (GPL) on host "cf1". Return code "3". GPL compilation
log file location  "/tmp/compileGPL.log.000". The GPFS file system cannot be
mounted properly until the GPL module is successfully compiled on this host. 
For details, see the specified GPL compilation log. After fixing the problems
shown in the log file, re-run the DB2 installer. For information regarding the
GPFS GPL module compile, see DB2 Information Center.

Compiling GPL :.......Failure 
ERROR: A major error occurred while installing "DB2 Server Edition " on this
computer. The installation cannot continue. If the problem persists contact
your technical service representative.

...


Reference: https://www.ibm.com/support/pages/purescale-installation-failed-compiling-ibm-general-parallel-file-system-gpfs-portability-layer-gpl, it should be caused by the kernel version problem.


Check the current system kernel version, the operating system kernel version is 2.6.32-754.35

[root@cf1]# uname -r
2.6.32-754.35.1.el6.x86_64


Check the installed kernel and find that kernel-2.6.32-431.el6.x86_64 is inconsistent with the kernel version of the operating system

[root@cf1]# rpm -qa | grep kerne
abrt-addon-kerneloops-2.0.8-44.el6.centos.x86_64
kernel-headers-2.6.32-754.35.1.el6.x86_64
dracut-kernel-004-411.el6.noarch
kernel-firmware-2.6.32-754.35.1.el6.noarch
kernel-devel-2.6.32-754.35.1.el6.x86_64
kernel-2.6.32-431.el6.x86_64
kernel-2.6.32-754.35.1.el6.x86_64
libreport-plugin-kerneloops-2.0.9-34.el6.centos.x86_64


uninstall kernel-2.6.32-431.el6.x86_64

[root@cf1]# yum remove -y kernel-2.6.32-431.el6.x86_64


Re-execute db2_install to successfully install db2 purescale

[root@cf1]# ./db2_install 
DBI1324W  Support of the db2_install command is deprecated.


Default directory for installation of products - /opt/ibm/db2/V10.5

***********************************************************
Install into default directory (/opt/ibm/db2/V10.5) ? [yes/no] 
yes
 
 
Specify one of the following keywords to install DB2 products.

  SERVER 
  CONSV 
  EXP 
  CLIENT 
  RTCL 
 
Enter "help" to redisplay product names.

Enter "quit" to exit.

***********************************************************
SERVER
***********************************************************
Do you want to install the DB2 pureScale Feature? [yes/no] 
yes
DB2 installation is being initialized.

 Total number of tasks to be performed: 9 
Total estimated time for all tasks to be performed: 150 second(s) 

Task #1 start
Description: Installing or updating DB2 HA scripts for IBM Tivoli System Automation for Multiplatforms (Tivoli SA MP) 
Estimated time 40 second(s) 
Task #1 end 

Task #2 start
Description: Compiling GPL 
Estimated time 30 second(s) 
Task #2 end 

Task #3 start
Description: Executing control tasks 
Estimated time 20 second(s) 
Task #3 end 

Task #4 start
Description: Updating global registry 
Estimated time 20 second(s) 
Task #4 end 

Task #5 start
Description: Updating the db2ls and db2greg link 
Estimated time 1 second(s) 
Task #5 end 

Task #6 start
Description: Setting default global profile registry variables 
Estimated time 1 second(s) 
Task #6 end 

Task #7 start
Description: Initializing instance list 
Estimated time 5 second(s) 
Task #7 end 

Task #8 start
Description: Registering DB2 Update Service 
Estimated time 30 second(s) 
Task #8 end 

Task #9 start
Description: Updating global profile registry 
Estimated time 3 second(s) 
Task #9 end 

The execution completed successfully.

For more information see the DB2 installation log at
"/tmp/db2_install.log.87073".

Refer to the official solution: https://www.ibm.com/support/pages/purescale-installation-failed-compiling-ibm-general-parallel-file-system-gpfs-portability-layer-gpl

How to Solve UE5 Compile Error: Error MSB3073

Error Messages:

Severity Code Description Project File Line Suppression State

ErrorUnhandled exception: Dependency file “F:\unrealengine-release\Engine\Intermediate\Build\Win64\UnrealHeaderTool\Development\Core\Module.Core.14_of_18.cpp.json” version (“1.2”) is not supported version
UE5 F:\unrealengine-release\Engine\Intermediate\ProjectFiles\UnrealBuildTool 1

Severity Code Description Project File Line Suppression State

Error MSB3073 The command “…\Build\BatchFiles\Build.bat UnrealGame Win64 Development -WaitMutex -FromMsBuild” exited with code 6.
UE5 C:\Program Files\Microsoft Visual Studio\2022\Enterprise\MSBuild\Microsoft\VC\v170\Microsoft.MakeFile.Targets 44


Cause:
The problem occurs in the MSVC compiler (14.32.31326:MSVC v143-VS 2022 C++v14.32-17.2)
Visual Studio 2022 17.3.3 latest version, version too high
Locate.
/Engine/Source/Programs/UnrealBuildTool/System/CppDependencyCache.cs#L454
if (!String.Equals(Version, “1.1”) && !String.Equals(Version, “1.0”))
{
thrownew BuildException($”Dependency file “{InputFile.Location}” version (“{Version} “) is not supported version”);
}

Solution:
Use the following version of MSVC compiler and recompile it.
14.29.30133: MSVC v142 – VS 2019 C++ v14.29-16.11
14.30.30705: MSVC v143 – VS 2022 C++ v14.30-17.0
14.31.31103: MSVC v143 – VS 2022 C++ v14.31-17.1


[vite] Internal server error:options.devServer.transformWidthEsBuild is not a function…

[vite] Internal server error:options.devServer. transformWidthEsBuild is not a function…

Vite2.x upgrade Vite3.x error reported this message

Solution:

In addition to upgrading Vite itself, it is best to upgrade all plugins involved in Vite in package.json devDependencies development dependencies, such as @vitejs/plugin-vue, @vitejs/plugin-legacy, etc.

If not yet solved, try to upgrade the plugins corresponding to Vite involving eslint and so on.

[Solved] Rstudio Error: Error in `vec_as_location()`: `…` must be empty.

In the process of running the dplyr package installation, you may be prompted with this error, and you can install it again


Error in `vec_as_location()`:
! `...` must be empty.
x Problematic argument:
* call = call
Run `rlang::last_error()` to see where the error occurred.

Solutions

install.packages("dplyr")

[Solved] ERROR: Could not open requirements file: [Errno 2] No such file or directory : ‘requirments.txt‘

After checking the relevant information, I found out that this is actually a path setting problem. It is that your text actually exists, but the path you set is not correct causing the system to not find the requriements.txt file.

So, you just need to change your path setting to the path of the parent file you want to query.

I use the cmd system command cd to enter the specified file and then pip install -r requirments.txt method.

Example.

If requirements.txt is under the PythonProject file, then use

Cd C:\Users\xizhou\Desktop\PythonProject # Enter superior files first

pip install -r requirements.txt # Install pip again

The file can then be found.

[Solved] Error: error C2601: ‘b‘ : local function definitions are illegal error C2063: ‘b‘ : not a function

Scene:

In general, this problem may be that a "}" is missing
There is also a small probability that your C++standard library is C++98 or earlier, which does not support non built-in initialization list writing.


the Situation of Missing ‘}’

We can see that if our test1 method is short of one}, all subsequent functions will report errors. We need to check it carefully

Solution
Check for yourself that the first line of code near the line number that reports the error is missing a }.

C++ standard does not support
When your C++ standard is C++98, the initialization list of C++98 does not support the initialization list methods of non-built-in types. This can be seen in the following code

#include <iostream>
#include <vector>
#include <map>
using namespace std;

int main()
{
	int a[] = { 1, 2, 3 };

	int b[] {1, 2, 3};
	vector<int> v{1,5,5};
	map<int, float> m{{1, 2.f}, {2, 3.2f}};

	return 0;
}

编译结果:

Solution:
Then in this case your non-built-in type variables will have to be initialized using other methods

start-all.sh Execute error: Stopping journal nodes [slave2 slave1 master]…

Stopping journal nodes [slave2 slave1 master]
ERROR: Attempting to operate on hdfs journalnode as root
ERROR: but there is no HDFS_JOURNALNODE_USER defined. Aborting operation.
Stopping ZK Failover Controllers on NN hosts [master slave1 slave2]
ERROR: Attempting to operate on hdfs zkfc as root
ERROR: but there is no HDFS_ZKFC_USER defined. Aborting operation.


Error Cause:
Trying to operate on hdfs namenode as root user, but HDFS _ NAMENODE _ user is not defined. Abort the operation.

Solution:
In the environment variables in add.
1. into the environment variables
vi ~/.bash_profile
2. Add the following codes:

#hadoop
export HDFS_NAMENODE_USER=root
export HDFS_DATANODE_USER=root
export HDFS_JOURNALNODE_USER=root
export HDFS_SECONDARYNAMENODE_USER=root
export YARN_RESOURCEMANAGER_USER=root
export YARN_NODEMANAGER_USER=root
export HDFS_ZKFC_USER=root

Enabling environment variables
source ~/.bash_profile
​​​​​