Author Archives: Robins

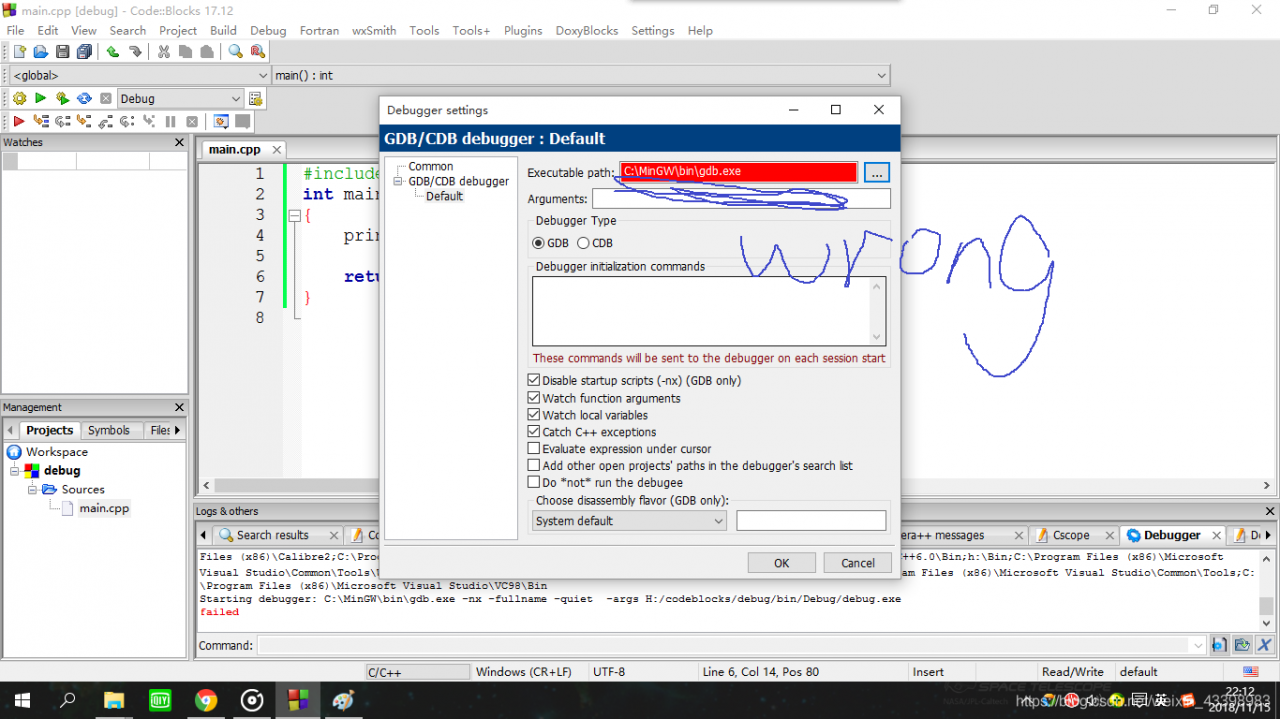
Code blocks debugger debugger setup problem

Code Blocks debug problem
ERROR
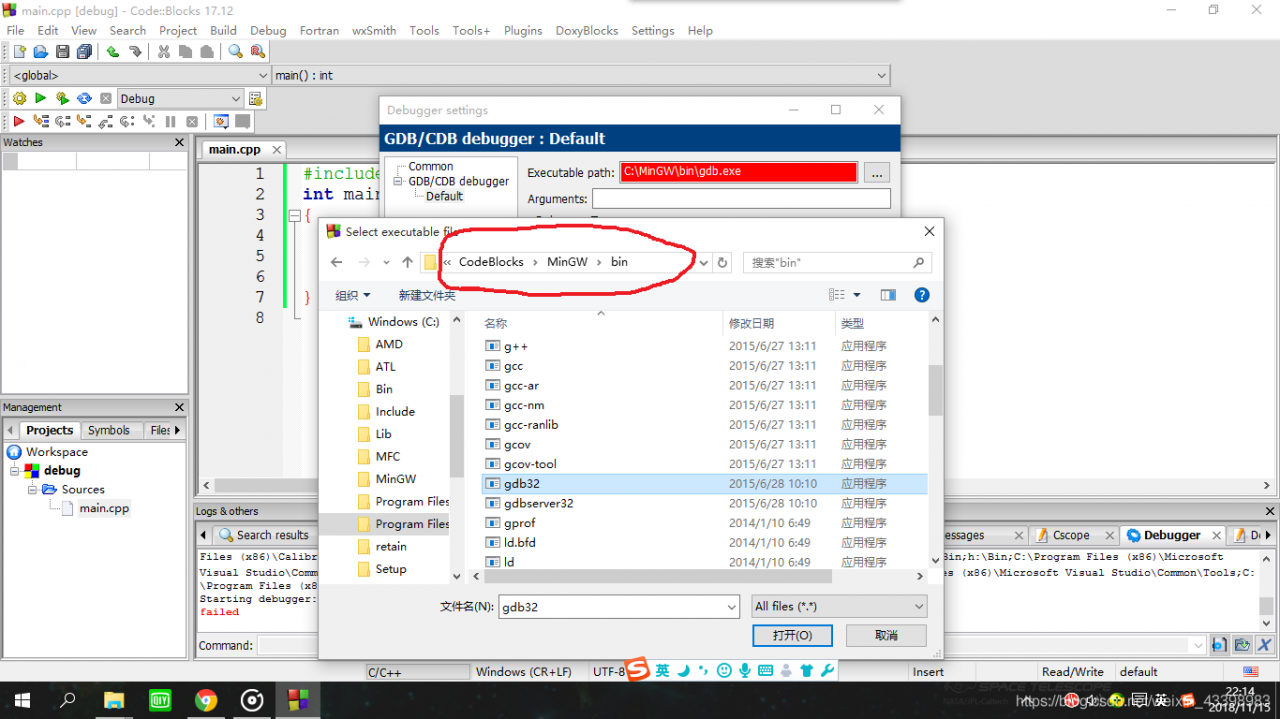
ERROR when debugging: You need to specify a debugger program in the debuggers’ Settings.
(For MinGW compilers, it’s ‘GDB. Exe’ (without the quotes))
(For MSVC compilers, It’s ‘CDB. Exe’ (without the quotes)
indicates that the debugger is not set properly
Below is the error path


go to the directory where you installed code blocks — code blocks \MinGW\bin to see if there is a gdb32. Exe if you have a direct path change, you can download this file from MinGW’s official website, or contact me to send this file to you at [email protected]
to fix the problem!

Solution to x service error when installing NVIDIA graphics driver under Ubuntu

Solutions to “You Appear to be running an X Server “:

During the installation process appeared the question, I’m just saw tutorial (http://wenku.baidu.com/link?Url = w – jxqF6FpNQ_FV – _r_kK7T9TZbo7VNxmtkTTf1iHH4m9kERbpyOdyZZi8tWPL_zxpKAGNbEEgIc0hy0nMuH9V – razBlXnLZEDUyDgqK47qm) also mentioned that, I didn’t solve according to his method, and then search abroad a great spirit of the solution:

Hit CTRL+ALT+F1 and login using your credentials. Kill your current X server session by typingsudo service lightdm stop or sudo stop lightdm Enter runlevel 3 by Typing sudo init 3 and install your *. The run file. You took a be required to reboot the when the installation finishes. If not, sudo service start lightdm or sudo start lightdm to start your X server again.

First go to NVIDIA official website to download the driver file (.run format)
1. Press CTRL+ALT+F1 to enter the command line
2. Sudo Service LightDM Stop or SUdo stop lightDM
3. The sudo init 3
4. Install the driver: # : sudo./ Nvidia-Linux-x86_64-177.67-pkG2.run // Execute the NVIDIA driver under the current directory
5. Follow the instructions to reboot. Sudo Reboot

MacOS uninstall clean pychar

Recently updated 2018.3-Pycharm was reported as an exception when I was writing the code, so I plan to reduce the version. Looking for no relevant uninstall document on the Internet, I will simply share my uninstall process. If there is any error, please correct it in the comments section.
1. Open visit, find PyCharm application, and right-click it and move it to the wastepaper basket;
2. Clear the cache, parameters and log-related configuration files (note: PyCharm2018.3 is the name of my file)

      a、cd ~/Library/Preferences/           

            rm -rf PyCharm2018.3/         

      b、cd ~/Library/Logs

           rm -rf PyCharm2018.3/

      c、cd ~/Library/Application\ Support/

           rm -rf PyCharm2018.3/

      d、cd ~/Library/Caches/

           rm -rf PyCharm2018.3/

The above two steps completely uninstall clean, the following on their own to find the low version of installation can.
 

How to: Install Hyperterminal On Windows 7

U
nfortunately, Hyperterminal is not included with Windows 7 but you can still control your serial devices with alternate methods. There are several alternatives to this which i am going to discuss in this guide. By the end, you will know how to set one up and which one to use. Why is it not included with Windows 7 is a question for Microsoft and they have the answer HERE

Alternative #1 PuTTy
PuTTy is an awesome FREE and opensource emulator that has been around for 16 years. You can download PuTTy from http://www.chiark.greenend.org.uk/~sgtatham/putty/download.html
How to use putty as Hyperterminal
You will need to have a COM port on your machine whether laptop or desktop in order to connect your console cable first. If you do not have one, then USB port is basically available on almost all computers so you would need a DB9 to USB Converter – Assuming you now have the converter/port, you will connect one end to your device and the other end to DB9 which goes into USB port on your computer, or if you have a com port, then connect directly.
You now need to have the com port number, which you can get from Device Manager -> Ports (COM & LPT)
Once you have it, you will then start to Configure PuTTy with your Console Settings
Open PuTTy and click Serial from the left pane which is the last option. This is where you will conf. your terminal settings: eg for a Cisco router, this will look like this:

Now click the Session button in left pane, the first option and select Open.
.
This will get you connected to your device and you will be using PuTTy as your Hyperterminal

Installing Hypterterminal on Windows 7
Now, if you still do not want to use PuTTy and have Hypterterminal back, then here’s what you will need to do.
In order to do this, you will need to have access to a Windows XP computer from where you can copy the three files we need:

C:\Program Files\Windows NT\hypertrm.exe
C:\WINDOWS\system32\hypertrm.dll
C:\WINDOWS\Help\hypertrm.chm

Once you have the above files copied then create the folders on your Windows 7 as follows and copy the three files into them.

For a 32-bit Windows 7 create a folder
C:\Program Files\HyperTerminal
For a 64-bit Windows 7 create a folder
C:\Program Files (x86)\HyperTerminal

Now from the folders, you can create a shortcut for hypertrm.exe and run it to get HyperTerminal back OR if you wish to get HyperTerminal on Start Menu, then put the hypertrm.exe file in C:\ProgramData\Microsoft\Windows\Start Menu\Programs

Error analysis of swap file “*. SWP” already exists! When editing files with VIM

When editing a file with VIM, exit the terminal in time out, or close the terminal directly without quitting, resulting in an abnormal exit scenario. The following error will be reported when editing again:
E325: ATTENTION
Found a swap file by the name “.test.txt. SWP “
owned by: root dated: Thu Jun 27 14:38:06 2019
file name: ~root/test.txt
modified: YES
user name: root host name: VMcentos
process ID: 20994
While opening file “test.txt”
dated: Thu Jun 27 13:42:52 2019
(1) Another program may be editing the same file. If this is the case,
be careful not to end up with two different instances of the same
file when making changes. Quit,
(2) An edit session for this file comedown.
If this is the case,
to recover (see “:help recovery”).
If you did this already, delete the swap file “.test.txp “
to avoid this message.
Swap file “.test.txt.swp” already exists!
[O]pen Read-Only, (E)dit anyway, (R)ecover, (D)elete it, (Q)uit, (A)bort:
Use LL-A command to check, there is indeed a hidden file, originally when editing the file, the system will copy a temporary file. Test.txt.swap, also will edit this file, the temporary file will be written to the official file when executing: W, the temporary file will be deleted when executing: Q.
Solutions:
Delete the file.test.txt.swap, rm.test.txt.swap

Anaconda returns Python 3.7 to Python 3.6

Windows10 system installs tensorflow-gpu (CUDA Toolkit, CUDNN) under anaconda
A recent download of TensorFlow provided the following: Could not find a version that front-end the requirements tensorflow

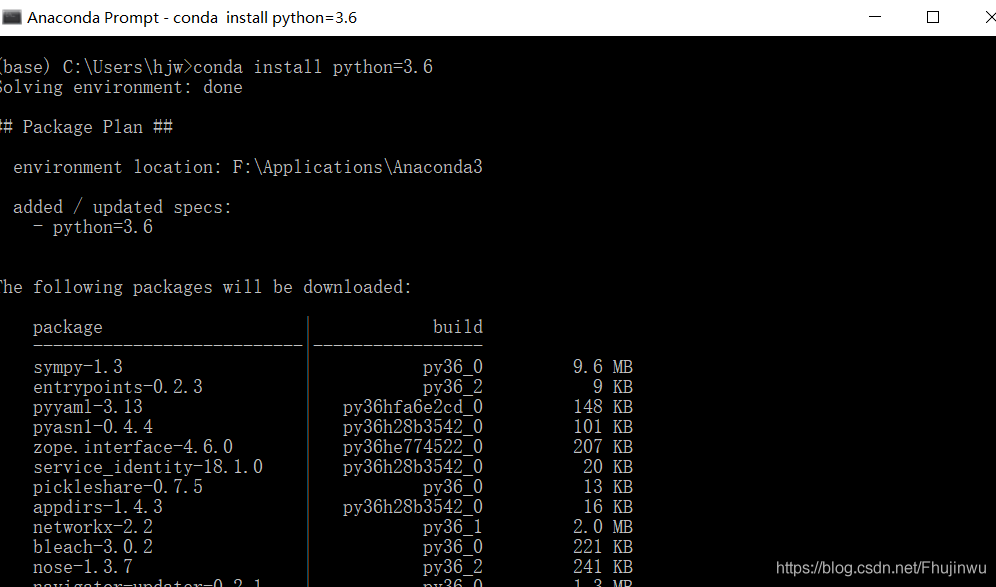
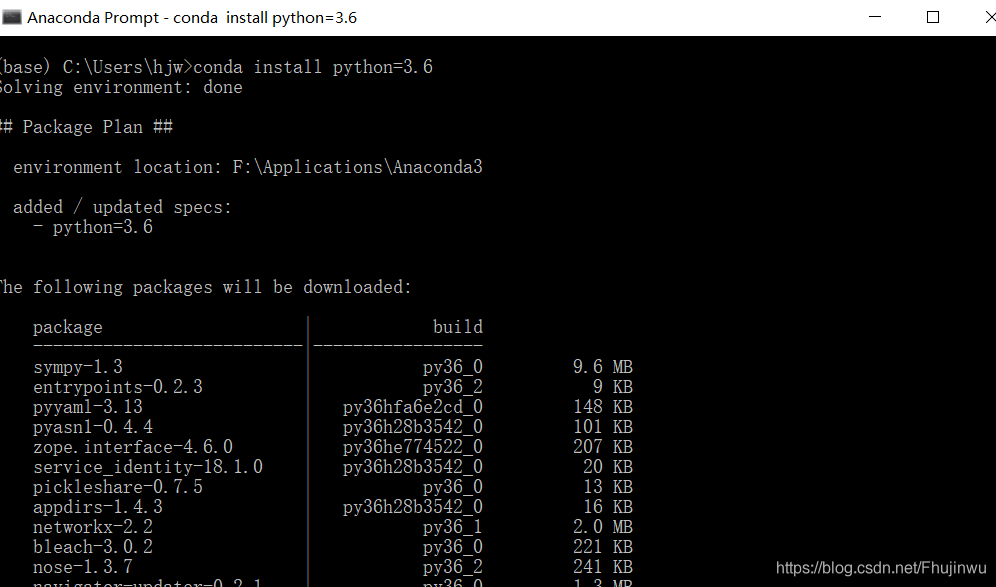
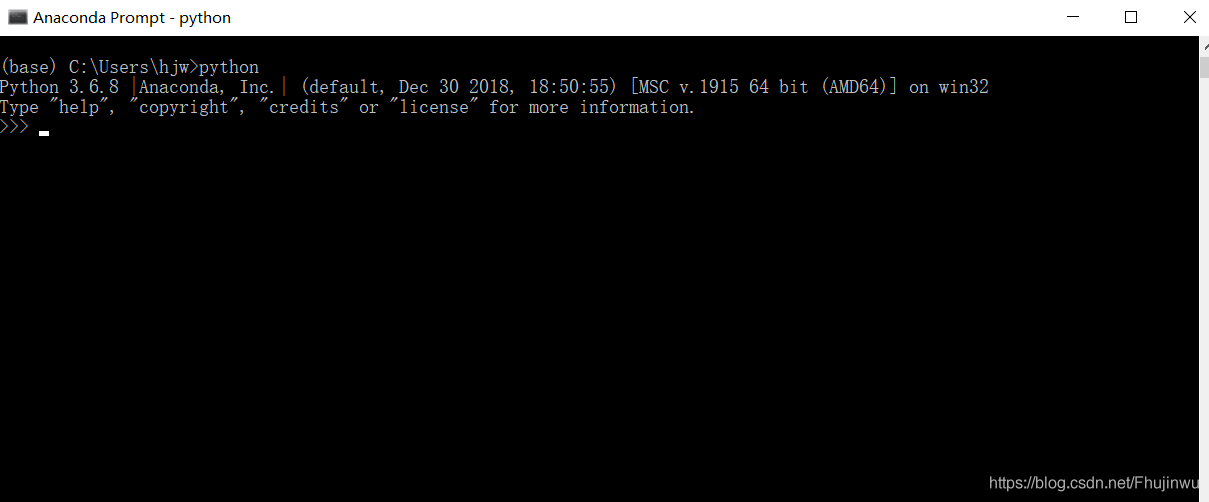
After a bit of research, it turned out that Python 3.7 was not supported by TensorFlow in 2019, so I was forced to revert back to 3.6, which was a simple step. You open the Anaconda Prompt, type Conda Install Python =3.6, wait for a prompt (y/n), type y, wait for a few minutes, and the prompt done will indicate that Python 3.7 has fallen back to Python 3.6.


— — — — — — — — — — — — — — — — — — — — — — — — — — — — — — — — — — — — — — — — — — — — — — — — — — — — — — — — — — — — — — — — — — — — — — line — — — — — — — — — — — — — — — — — — — — — — — — — — — — — — — — — — — — — — — — — — — — — — — — — — — — — — — — — — — — — — — — — — — — — — — — — — — — — — — — — — — — — — — — —
August 15, 2020
Some netizens left comments or chatted with me that this method was not successful. Through communication, I learned that many people actually did not use domestic mirror images. So we need to add domestic images first.
Conda source changes:

conda config --add channels https://mirrors.tuna.tsinghua.edu.cn/anaconda/pkgs/free/

conda config --set show_channel_urls yes

The PIP source:
Add parameters after PIP -i https://pypi.tuna.tsinghua.edu.cn/simple
example: PIP install -i https://pypi.tuna.tsinghua.edu.cn/simple pandas
In fact, many laptops have Gpus (I was cheated by someone before that the LAPTOP GPU does not support tensorFlow-GPU, ha ha ha), you can check my new blog to see if your computer supports GPU, and then install the GPU version, because the acceleration of the GPU version of TensorFlow is very obvious. Windows10 system installs tensorflow-gpu (CUDA Toolkit, CUDNN) under anaconda
-- -- -- -- -- -- -- -- -- -- -- -- -- -- -- -- -- -- -- -- -- -- -- -- -- -- -- -- -- -- -- -- -- -- -- -- -- -- -- -- -- -- -- -- -- -- -- -- -- -- -- -- -- -- -- -- -- -- -- -- -- -- -- -- -- -- -- -- -- -- line -- -- -- -- -- -- -- -- -- -- -- -- -- -- -- -- -- -- -- -- -- -- -- -- -- -- -- -- -- -- -- -- -- -- -- -- -- -- -- -- -- -- -- -- -- -- -- -- -- -- -- -- -- -- -- -- -- -- -- -- -- -- -- -- -- -- -- -- -- -- -- -- -- -- -- -- -- -- -- -- -- -- -- -- -- -- -- -- --
 

Installing Theano :Windows Installation Instructions

 Theano
 
Windows Installation Instructions
Warning
If you want to install the bleeding-edge or development version of Theano from GitHub, please make sure you are reading the latest version of this page.
Requirements
Note
We only support the installation of the requirements through conda.

Python == 2.7* or ( >= 3.4 and < 3.6 )
The conda distribution is highly recommended. Python 2.4 was supported up to and including the release 0.6. Python 2.6 was supported up to and including the release 0.8.2. Python 3.3 was supported up to and including release 0.9.
NumPy >= 1.9.1 <= 1.12
Earlier versions could work, but we don’t test it.
SciPy >= 0.14 < 0.17.1
Only currently required for sparse matrix and special functions support, but highly recommended. SciPy >=0.8 could work, but earlier versions have known bugs with sparse matrices.
BLAS installation (with Level 3 functionality)
Recommended: MKL, which is free through Conda with mkl-service package. Alternatively, we suggest to install OpenBLAS, with the development headers (-dev-devel, depending on your Linux distribution).

Optional requirements

GCC compiler with g++ (version >= 4.2.*), and Python development files
Highly recommended.  Theano can fall back on a NumPy-based Python execution model, but a C compiler allows for vastly faster execution.
nose >= 1.3.0
Recommended, to run Theano’s test-suite.
Sphinx >= 0.5.1, pygments
For building the documentation.  LaTeX and dvipng are also necessary for math to show up as images.
pydot-ng
To handle large picture for gif/images.
NVIDIA CUDA drivers and SDK
Highly recommended Required for GPU code generation/execution on NVIDIA gpus. See instruction below.
libgpuarray
Required for GPU/CPU code generation on CUDA and OpenCL devices (see: GpuArray Backend).
pycuda and skcuda
Required for some extra operations on the GPU like fft and solvers. We use them to wrap cufft and cusolver. Quick install pip install pycuda scikit-cuda. For cuda 8, the dev version of skcuda (will be released as 0.5.2) is needed for cusolver: pip install pycuda; pip install git+https://github.com/lebedov/scikit-cuda.git#egg=scikit-cuda.
warp-ctc
Required for Theano CTC implementation. It is faster then using an equivalent graph of Theano ops.

Requirements installation through Conda (recommended)
Install Miniconda
Follow this link to install Miniconda.
Note
If you want fast compiled code (recommended), make sure you have g++ installed.
Install requirements and optional packages

conda install numpy scipy mkl-service libpython <m2w64-toolchain> <nose> <sphinx> <pydot-ng> <git>

Note
Arguments between <…> are optional. m2w64-toolchain package provides a fully-compatible version of GCC and is then highly recommended. git package installs git source control through conda, which is required for the development versions of Theano and libgpuarray
Package parameterized is also optional but may be required for unit testing. It is available via pip.

pip install parameterized

Install and configure the GPU drivers (recommended)
Warning
OpenCL support is still minimal for now.
Install CUDA drivers
Follow this link to install the CUDA driver and the CUDA Toolkit.
You must reboot the computer after the driver installation.
Installation
Stable Installation
With conda
If you use conda, you can directly install both theano and pygpu. Libgpuarray will be automatically installed as a dependency of pygpu.

conda install theano pygpu

Warning
Latest conda packages for theano (>= 0.9) and pygpu (>= 0.6*) currently don’t support Python 3.4 branch.
With pip
If you use pip, you have to install Theano and libgpuarray separately.
theano
Install the latest stable version of Theano with:

<sudo> pip install <--user> Theano[test, doc]

Any argument between <…> is optional. Use sudo for a root installation. Use user for a user installation without admin rights. It will install Theano in your local site-packages. [test] will install the requirements for testing. [doc] will install the requirements in order to generate the documentation.
If you encountered any trouble, head to the Troubleshooting page.
The latest stable version of Theano is 0.9.0 (tagged with rel-0.9.0).
libgpuarray
For the stable version of Theano you need a specific version of libgpuarray, that has been tagged v0.6.9. Download it with:

git clone https://github.com/Theano/libgpuarray.git
cd libgpuarray
git checkout tags/v0.6.5 -b v0.6.9

and then follow the Step-by-step instructions.
Bleeding-Edge Installation (recommended)
Install the latest, bleeding-edge, development version of Theano with:

<sudo> pip install <--user> <--no-deps> git+https://github.com/Theano/Theano.git#egg=Theano

Any argument between <…> is optional. Use sudo for a root installation. Use user for a user installation without admin rights. It will install Theano in your local site-packages. Use no-deps when you don’t want the dependencies of Theano to be installed through pip. This is important when they have already been installed as system packages.
If you encountered any trouble, head to the Troubleshooting page.
libgpuarray
Install the latest, development version of libgpuarray following the Step-by-step instructions.
Note
Currently, you need libgpuarray version 0.7.1 that is not in conda default channel. But you can install it with our own channel mila-udem (that support only Python 2.7 and 3.5):

conda install -c mila-udem pygpu

Developer Installation
Install the developer version of Theano with:

git clone git://github.com/Theano/Theano.git
cd Theano
<sudo> pip install <--user> <--no-deps> -e .

Any argument between <…> is optional. Use sudo for a root installation. Use user for a user installation without admin rights. It will install Theano in your local site-packages. Use no-deps when you don’t want the dependencies of Theano to be installed through pip. This is important when they have already been installed as system packages. -e makes your installation editable, i.e., it links it to your source directory.
If you encountered any trouble, head to the Troubleshooting page.
libgpuarray
See instructions for bleeding-edge installation about libgpuarray.
Instructions for other Python distributions (not recommended)
If you plan to use Theano with other Python distributions, these are generic guidelines to get a working environment:

Look for the mandatory requirements in the package manager’s repositories of your distribution. Many distributions come with pip package manager which use PyPI repository. The required modules are Python (of course), NumPy, SciPy and a BLAS implementation (MKL or OpenBLAS). Use the versions recommended at the top of this documentation. If the package manager provide a GCC compiler with the recommended version (see at top), install it. If not, you could use the build TDM GCC which is provided for both 32- and 64-bit platforms. A few caveats to watch for during installation:

    Install to a directory without spaces (we have placed it in C:\SciSoft\TDM-GCC-64)If you don’t want to clutter your system PATH un-check add to path option. Enable OpenMP support by checking the option openmp support option.

Install CUDA with the same instructions as above. Install the latest, development version of libgpuarray following the Step-by-step instructions.
Using onnx to deploy models in mmdetection

Install ONNX
Making: https://github.com/onnx/onnx

conda install -c conda-forge protobuf numpy
sudo apt-get install protobuf-compiler libprotoc-dev
pip install onnx
pip install pytest==2.8 nbval

I started with PIP Install Pytest NBval and reported the following error,

Then I pass the prompt nbVAL 0.9.6 requires Pytest> =2.8, but you’ll have pytest 0.0.0 which is incompatible. I made a version of PyTest and retyped the command to install it successfully.
Then I input Pytest to verify whether the installation is successful. The prompt says that I did not install it. According to the following prompt, I input the following command and then input Pytest.

sudo apt install python-logilab-common

For example, If I go into a project folder and type PyTest, the output looks like the following to indicate that the installation is successful.

Java class file operation and exception

The File class operates on files and directories
CreateNewFile create file
Mkdir mkdirs create file
Exists to determine whether a file or folder exists
Length gets the file length
LastModified Time
GetName gets the name of the file or folder
GetPath relative path
Absolute path of getAbsoultPath

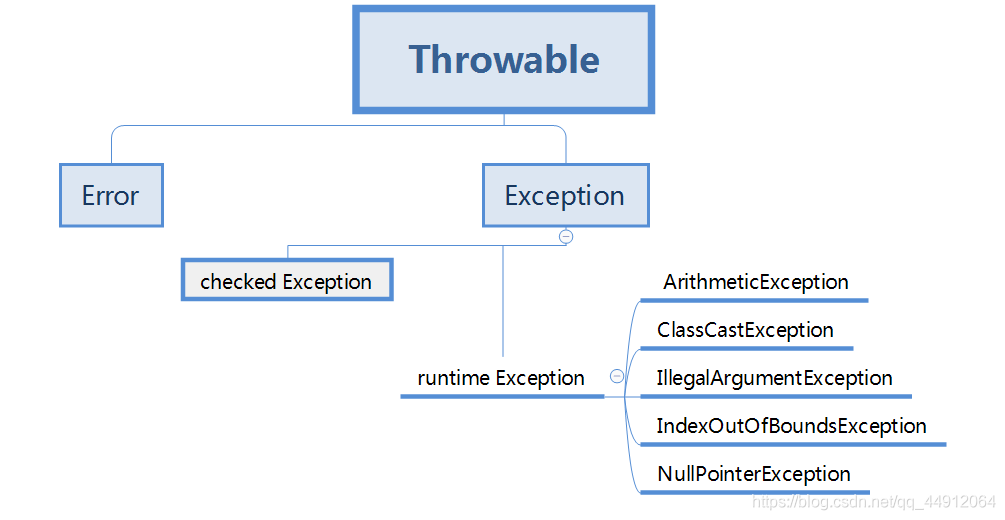
Runtime Exception
ArithmeticmeticException
Abnormal ArrayIndexOutOfBoundsException array index of crossing the line
NullPointerException NullPointerException
Type cast exception ClassCastException
Illegal parameter exception IllegalArgumentException
Index overbounds Exception IndexOfBoundsException
Checked Exceptions are non-runtime exceptions
I/O exception IOException

@Value gets the configuration file value and returns null

The @value gets the configuration file Value returns NULL
In custom parameters parser implementation HandlerMethodArgumentResolver subclasses, access to @ the Value label Value is null.
Example:

@Configuration
public class ArgumentResolverConfig extends WebMvcConfigurerAdapter {


    @Override
    public void addArgumentResolvers(List<HandlerMethodArgumentResolver> argumentResolvers) 
    {
        argumentResolvers.add(new UserArgumentResolver());
    }

}

Direct new UserArgumentResolver(), not managed by the Spring container, so use @value to get an invalid Value in the UserArgumentResolver
Revised:

@Configuration
public class ArgumentResolverConfig extends WebMvcConfigurerAdapter {

    @Bean
    public UserArgumentResolver getUserArgumentResolver(){
        return new UserArgumentResolver();
    }

    @Override
    public void addArgumentResolvers(List<HandlerMethodArgumentResolver> argumentResolvers) {
        argumentResolvers.add(getUserArgumentResolver());
    }
}

The @bean annotation is given to the Spring container-managed Bean, at which point @Value gets the configuration file Value.

tf.one_ How to use hot ()

Tensorflow study notes
tf.one_hot
This paper only serves as a personal learning record, please refer to tensorFlow Chinese official website TF Chinese official website
Call format
tf.one_hot(indices, depth, on_value=None, off_value=None, axis=None, dtype=None, name=None)
Parameters that
Indices: Tensors of an index.
· depth: a scalar quantity defined in one_hot dimension
· on_value: a set of indices[j] = I (default: 1)
· off_value: a set of indices[j]! = I (default: 0)
· axis: axis to be filled (default: -1, a new innermost axis)
· dtype: the data type of the output tensor.
· name: the name of the operation (optional).
The output
A one_hot tensor
A possible mistake

    TypeError
    whether on_value or off_value does not match dtype. TypeError
    whether on_value and off_value do not match each other

prompt

    indices location value is on_value, while the other location is off_value. The on_value and OFF_value data types must match. If dType has a value, they must take the same value as the type displayed by DTYPE.
    if on_value has no value, the default value is 1, and the output is dtype.
    if off_value has no value, the default value is 0, and the output is dtype.
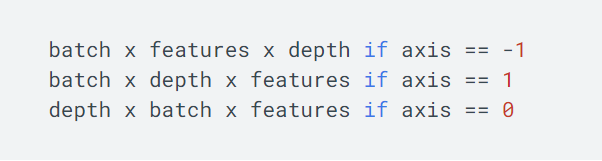
    if the indices have N dimensions, the output is N+1. If the indices are scalars, the output is a vector with a length of depth. If the indices are tensor with features, the output will be:
    . If the indices are indices with batch size [batch, features], the output will be:
    . If the indices are RaggedTensor, the axis must be positive and form an axis which is hard to form. The output is equivalent to the output of one_hot applied with a value of an irregular shape, and a new irregular shape is generated from the result.
    if dtype has no value, it will try to assume that the data type is on_value or off_value if one or both pass. If on_value, off_value, dtype have no value, dtpye will default to be tf.float32.
    ** note: if output of non-numeric types (such as tf.string, tf.bool, etc), on_value, off_value all need to have a value.

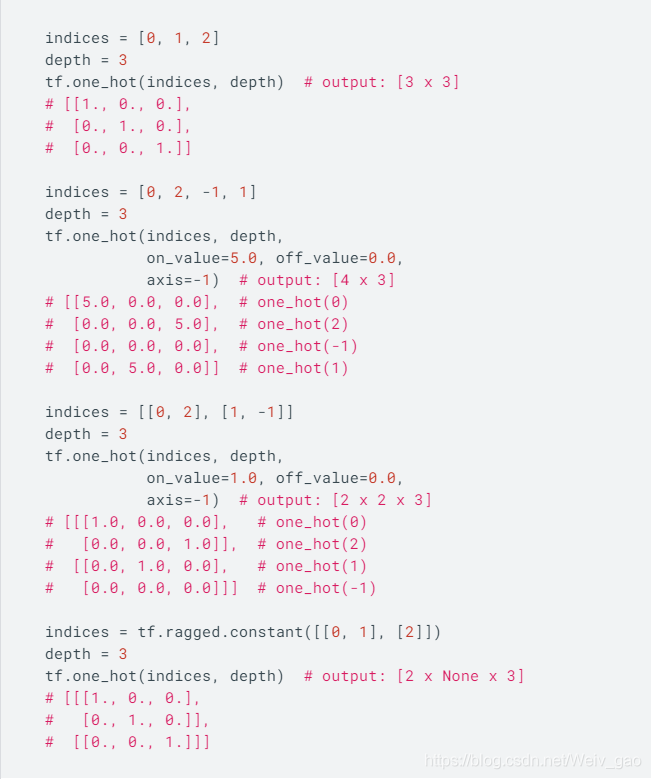
example