Author Archives: Robins

E: Unable to fetch some archives, maybe run apt-get update or try with –fix-missing?

Install software error
apt-get install python-minimal

E: Unable to fetch some archives, maybe run apt-get update or try with --fix-missing?

Reason:  the Error message indicates that the package failed to download to a database in the source.

Solution:
apt-get update
or
apt-get clean
apt-get update

problem resolution
1. source itself
According to the prompt, we should first update the source with apt-get. If this error is still reported after apt-get update, it means that there is an error in this source. Try the APt-get update– fix-Missing and still report this error, and change the source decisively
2. Network problems
The gateway mistakenly intercepts the packet or the firewall intentionally blocks it (for example, when the UPDATE contains the source of The Google Chrome browser, the IP will be automatically redirected to 6.6.6.6).
3. Replace source
sudo vim /etc/resolv.conf
Add the nameserver 8.8.8.8
The second:
The content of /etc/apt/ source. list is replaced with
sudo apt-get update

Matlab draw logarithmic coordinates!

In many engineering problems, some characteristics of data can be seen more clearly through logarithmic transformation of data. The curve of data points depicted in logarithmic coordinate system can directly represent logarithmic transformation.
There are two kinds of logarithmic transformation: double logarithmic transformation and single axis logarithmic transformation. Loglog function can be used to achieve the double log coordinate transformation, semilogx and Semilogy functions can be used to achieve the single axis log coordinate transformation.
Loglog (Y) means that the x and Y coordinates are logarithmic coordinates
Semilogx (Y) means that the x axis is a logarithmic coordinate system
Semilogy (…). That means that the Y-axis is a logarithmic coordinate system
So plotyy has two y axes, one on the left and one on the right
Example 1: Create a simple loglog with the square tag.
Solution: Enter a command
X = logspace (1, 2);
loglog(x,exp(x),’-s’)
Grid on % annotated grid
The produced figure is:

Example 2: Create a simple semi-logarithmic graph.
Solve input command:
x=0:.1:10;
semilogy(x,10.^x)
The produced figure is:

example 3: draw function graph, logarithmic graph and semilogarithmic graph of y=x^3.
Solution: Enter in the window:
x=[1:1:100];
Subplot (2,3,1);
plot(x,x.^3);
grid on;
title ‘plot-y=x^3’;
 
Subplot (2, 31);
loglog(x,x.^3);
grid on;
title ‘loglog-logy=3logx’;
 
Subplot (2 filling);
plotyy(x,x.^3,x,x);
grid on;
title ‘plotyy-y=x^3,logy=3logx’;
 
Subplot (2, 4);
semilogx(x,x.^3);
grid on;
title ‘semilogx-y=3logx’;
 
Subplot (2,3,5);
semilogy(x,x.^3);
grid on;
title ‘semilogy-logy=x^3’;
The produced figure is:


CentOS/RHEL 7: How to Reinstall GRUB2 from Rescue Mode (EFI)

CentOS/RHEL 7 now includes GRUB2 which uses a new way of installing to the MBR of your boot device. You may have to reinstall the GRUB2 bootloader if your system is not bootable after a failure. In order to reinstall GRUB2 you have to boot into rescue mode. Follow the steps below to boot into rescue mode and reinstall GRUB2 bootloader.
Booting into rescue mode and reinstalling GRUB2
1. Boot from the RHEL7 installation DVD by altering the boot order in Bios and selecting DVD media as the first booting preference.
Note : Older version of RHEL 7 DVD will not work here. So make sure you have latest version RHEL 7 DVD with you.
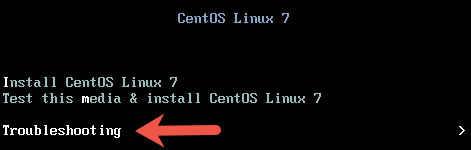
2. At the boot screen, Select the Troubleshooting option at the end of the screen.


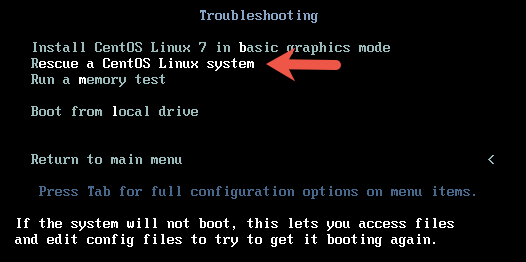
3. At the next screen, select the option Rescue a CentOS Linux system.

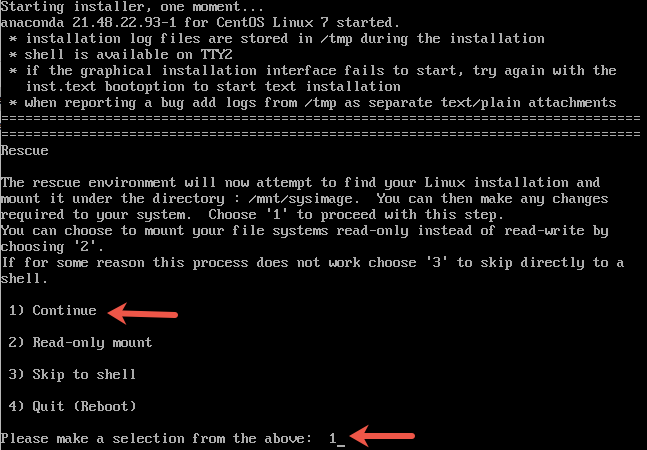
4. On the next screen, press enter to continue. When asked if you would like Rescue to find your installation, choose Continue.

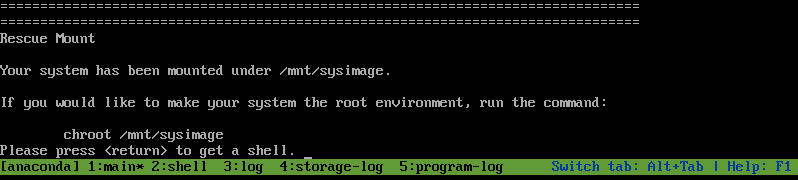
If you run into trouble detecting your install, retry using the Skip option and manually detect and mount your storage. You would get a message shown in the picture below if the rescue mode has detected the correct installation.

5. Next step is to change your root directory to /mnt/sysimage using the chroot command. This makes your system the root environment.

# chroot /mnt/sysimage

6. Use the grub2-install command to re-write the MBR to your boot device. The boot device is usually /dev/sda.

# grub2-install /dev/sda

You should get a successful installation message as shown below.

To reboot the system first exit from the chroot environment and the run reboot command.
Reinstalling grub2 on UEFI-based machines
If you are on an UEFI-based machine, make sure you add the below 2 steps as well before you re-install GRUB2 using “grub2-install” command.
1. If the EFI System Partition has been recreated or damaged, these files can be recovered by reinstalling the grub2-efi, grub2-efi-modules and shim packages.

# yum reinstall grub2-efi grub2-efi-modules  shim

2. If /boot/efi/EFI/redhat/grub. cfg has been removed or damaged, it can be restored with the following command:

# grub2-mkconfig -o /boot/efi/EFI/redhat/grub.cfg

Filed Under: CentOS/RHEL 7, Linux
Some more articles you might also be interested in …

    lvcreate/lvremove Failed with Error “Can’t remove merging snapshot logical volume”CentOS/RHEL : How to configure vsftpd to use ports other than the default ports 20 and 21How to shrink root filesystem on CentOS/RHEL 6How to Move Swap From Disk Partition to LVM Volume in LinuxCentOS/RHEL LVM : Backing Up Volume Group MetadataCentOS/RHEL 7 : How to install and configure ftp server (vsftpd)CentOS/RHEL 7 : systemctl replacements of legacy commands service and chkconfigHow to Enable/Disable CPUs (Limiting CPU count) in CentOS/RHELHow to Create a Custom Log File Rotation by logrotate in LinuxHow to Remove/ Disable Bash shell Command History on Linux

Change API level Android studio

Changing API Level Android Studio
I want to change the minimum SDK version in Android Studio from API 12 to API14. I have tried changing it in the manifest file, ie, I want to change the minimum SDK version in Android Studio from API 12 to API14. I tried to make the change in the manifest file, which is

<uses-sdk
    android:minSdkVersion="14"
    android:targetSdkVersion="18" />

and rebuilding the project, but I still get the Android Studio IDE throwing up some errors. and rebuild projects, but I still get the Android Studio IDE throw out some mistakes. I presume I have to set the min SDK in ‘project properties’ or something similar so the IDE recognizes the change, But I can’t find where this is done in Android Studio. I think I have to set the min SDK in project properties or something similar so that the IDE can recognize changes, but I can’t find anything done in Android Studio.


# 1/f,
Reference: https://stackoom.com/question/1JfkP/ change the Android API level – Studio


# 2 floor
For me what worked was: (right click)project-> android tools-> Clear lint markers. , for me, markers that have worked are :(right click) markers -> The android tools – & gt; Remove lint marks. Although for some reason the Manifest reverted to the old (lower) minimum API level, But after I changed it back to the new (higher) API level there was no red error underline and the project now USES the new minimum API level. although for some reason the list has been restored to the old (lower) minimum API level, But after I changed it back to the new (higher) API level, there was no red error underscore, and the project now USES the new lowest API level.
Edit: Sorry, I see you were using Android Studio, not Eclipse. Edit: Sorry, I see you are using Android Studio, not Eclipse. But I guess there is a similar ‘clear lint markers’ in Studio somewhere , which I think might be able to solve the problem.


The # 3 floor
As well as updating the manifest, update the module’s build.gradle file too (it’s listed in the project pane just below the manifest – if there’s no minSdkVersion key in it, you’re looking at the wrong one, Gradle build. Gradle file for the module (list this file in the project pane at the bottom of the list – if there is no minSdkVersion key in it, then you have entered the wrong key because there are several). A rebuild and things should be fine… rebuild, everything should be fine…


# 4 floor
When you want to update your minSdkVersion in an existent project… when you want to update your minSdkVersion in an existing project…

    Update build. Gradle (Module: app)-make sure is the one under gradle 4 build and it is NOT build. Gradle (Project: yourproject) Update build. Gradle (Module: app) App) - make sure it's the one under Gradle Script, not build. Gradle (Project: yourproject).

An example of build.gradle: build.gradle :

apply plugin: 'com.android.application'

android {
    compileSdkVersion 28
    buildToolsVersion "28.0.2"

    defaultConfig {
        applicationId "com.stackoverflow.answer"
        minSdkVersion 21
        targetSdkVersion 28
        versionCode 1
        versionName "1.0"
    }
    buildTypes {
        release {
            minifyEnabled false
            proguardFiles getDefaultProguardFile('proguard-android.txt'), 'proguard-rules.pro'
    }
}

dependencies {
    androidTestCompile 'junit:junit:4.12'
    compile fileTree(dir: 'libs', include: ['*.jar'])
}
    Sync gradle button (refresh all gradle projects also works) synchronous gradle button (refresh all gradle projects can also work)

For beginners in Android Studio "Sync gradle button" is located in Tools -> Android -> Sync Project with Gradle Files "Rebuild project" Build -> Rebuild Project for beginners in Android Studio, the "sync gradle button" is located in the tool -> Android-> Use Gradle file to synchronize the project "Rebuild Project" build-& gt; Rebuild Project

    Rebuild project Rebuild project

After updating the build.gradle 's minSdkVersion , You have to click on the button to sync gradle file (" sync Project with gradle files"). update build. After gradle minSdkVersion, you must click on the button gradle sync file (' sync Project with cradle files'). That will clear the marker. this will clear the marker.
Updating manifest.xml, for eg deleting any references to SDK levels in the manifest file, is NOT necessary anymore in Android Studio. ; Updating manifest.xml is NOT necessary. For example, remove any references to the SDK level in the manifest file.


The # 5 floor
For android studio users: For android studio users:

    right click the App directory right-click App directory choose the "module setting" option select "module Settings "option change the ADK Platform as what you need0 1 change the ADK Platform 2 3 click Apply click Apply

The gradle will rebuild The project automatically. gradle will automatically rebuild The project.


# 6 building
According to this answer , you just don't include minsdkversion in the manifest.xml, And the build system will use the values from the build.gradle file and put the information into the final apk. according to this answer, you only need to include minsdkversion in the manifest.xml, the build system will use the values in the build.gradle file and put the information into the final apk.
Because the build system needs this information anyway, this makes sense. Because the build system still needs this information, so this makes sense. You should not need to define this values two times. You do not need to define this values twice.
You just have to sync the project after changing the build.gradle file, But Android Studio 0.5.2 display a yellow status bar on top of the build. Gradle editor window to help you you only need to synchronize the project after changing the build. Gradle file, But Android Studio 0.5.2 displays the yellow status bar at the top of the build.gradle editor window to help you
Also note there at least two build. Gradle files: one master and one for the app/module. Also note that there are at least two build. Gradle files: one main file and one file for the application /module. The one to change is in The app/module, it already includes a property minSdkVersion in a newly generated project. to change is in The app/module, It has already included the attribute minSdkVersion in the newly generated project.

Parsing the difference between “R” and “RB” patterns of text files (Python)

Difference between a text file in r and rb mode
what’s the Difference between r and rb in fopen
0. EOL (end-of-line)
The difference is mainly in the treatment of EOL. For different operating systems,
Unix: \nMac: \rWindows: \r\n
For the Python language, the query is performed using the following statement:

>> import os
>> os.linesep
'\r\n'

1. Different operating systems
For Windows systems, having b (rb, wb, r+b) means to open files in binary form. Python on Windows handles text files differently than binary files,
2. Python 2 vs Python 3
For Python 3 environments:
r : Python returns STR rb : binary mode, read() returns 0 bytes1

Installation and unloading of Python module

Using the PIP command
If there are multiple versions of the system, use the corresponding PIP version to remove the corresponding Python version of the module
In python2.7 use pip3 above PIP python3.0
Installation module:
The python3 version USES the pip3 install module name
Such as installing python3 version of pygame

xubin@xubindeMBP:~/Python$ pip3 install pygame
Collecting pygame
  Using cached https://files.pythonhosted.org/packages/b9/89/aca02f8771727c2713c11a39c1cc295e4deb60be322be19ad7460570f978/pygame-1.9.4-cp37-cp37m-macosx_10_11_intel.whl
Installing collected packages: pygame
Successfully installed pygame-1.9.4

Unloading module:
The python3 version USES the pip3 uninstall module name
Such as uninstalling pygame in python3

xubin@xubindeMBP:~/Python$ pip3 uninstall pygame
Uninstalling pygame-1.9.4:
  Would remove:
    /usr/local/include/python3.7m/pygame/_camera.h
    /usr/local/include/python3.7m/pygame/_pygame.h
    /usr/local/include/python3.7m/pygame/_surface.h
    /usr/local/include/python3.7m/pygame/bitmask.h
    /usr/local/include/python3.7m/pygame/camera.h
    /usr/local/include/python3.7m/pygame/fastevents.h
    /usr/local/include/python3.7m/pygame/font.h
    /usr/local/include/python3.7m/pygame/freetype.h
    /usr/local/include/python3.7m/pygame/mask.h
    /usr/local/include/python3.7m/pygame/mixer.h
    /usr/local/include/python3.7m/pygame/pgarrinter.h
    /usr/local/include/python3.7m/pygame/pgbufferproxy.h
    /usr/local/include/python3.7m/pygame/pgcompat.h
    /usr/local/include/python3.7m/pygame/pgopengl.h
    /usr/local/include/python3.7m/pygame/pygame.h
    /usr/local/include/python3.7m/pygame/scrap.h
    /usr/local/include/python3.7m/pygame/surface.h
    /usr/local/lib/python3.7/site-packages/pygame-1.9.4.dist-info/*
    /usr/local/lib/python3.7/site-packages/pygame/*
Proceed (y/n)?y
  Successfully uninstalled pygame-1.9.4


Leetcode solution 189 Rotate Array Java version

189. Rotate Array
Rotate an array of n elements to the right byk steps.
For example, with n = 7 and k = 3, the array[1,2,3,4,5,6,7] is rotated to[5,6,7,1,2,3,4].
Note:
Try to come up as many solutions as you can, there are at least 3 different ways to solve this problem.
[show hint]Hint:
Could you do it in-place with O(1) extra space?
given an array of n lengths, rotate it to the right by k positions.first convert k into the number in [0, n-1]. Flip the entire array, flip the number at the [0, K-1] position, and flip the rest.
note that k is positive

	public void rotate(int[] nums, int k) {
		int len = nums.length;
		// Ensure that k is positive
		k = (len + (k % len)) % len;
		// Flip the entire array.
		rotateCore(nums, 0, len - 1);
		// Flip the array of subscript 0~k-1.
		rotateCore(nums, 0, k - 1);
		// Flip the array of subscript k~len-1.
		rotateCore(nums, k, len - 1);

	}

	/**
	 * @param nums
	 *            Flip the array (the subscript is closed front to back).
	 * @param start
	 * Subscript to the beginning of the flipped array
	 * @param end
	 * End subscript for flipping arrays
	 */
	private void rotateCore(int[] nums, int start, int end) {
		for (int i = start, j = end; i < j; i++, j--) {
			nums[i] = nums[i] ^ nums[j];
			nums[j] = nums[i] ^ nums[j];
			nums[i] = nums[i] ^ nums[j];
		}

	}


R language notes – sample() function

Field studies and sample selection in medical statistics or epidemiology often use one word: random sampling. Random sampling is an important method to ensure the equilibrium among comparison groups. So the first function introduced today is the function sample for sampling:

> x=1:10
> sample(x=x)

 [1]  3  5  9  6 10  7  2  1  8  4

The first line represents assigning the x vector 1 to 10, and the second line represents random sampling of the x vector. The output is the result of each sampling, and it can be seen that the sampling is not put back — at most n times, n is the number of elements in the x vector.

if you want to specify the number of elements extracted from the vector, you need to add a parameter size:

> x=1:1000
> sample(x=x,size=20)

 [1]  66 891 606 924 871 374 879 573 284 305 914 792 398 497 721 897 324 437
[19] 901  33

This is sampled in positive integers from 1 to 1000, where size specifies the number of times the sample is sampled, 20 times, and the result is shown above.
These are not put back into the sample. No put back sampling means that once an element is selected, there will be no more of that element in the population. If the sample is put back, a parameter repalce=T should be added:

> x=1:10
> sample(x=x,size=5,replace=T)

[1] 4 7 2 4 8

“Replace” means to repeat. So you can sample the elements repeatedly, which is what’s called a put back sample. We look at the results above. Element 4 is selected twice in the course of 5 random sampling.


R language code has a feature is “contraption”, maybe my word is not professional, but it means: if we enter the position of the code corresponds to the position of the parameters in a function, we can not write the parameters of the function, such as:

> x=1:10
> sample(x,20,T)

 [1] 1 2 2 1 5 5 5 9 9 5 2 9 8 3 4 8 8 8 1 1

In the above code, we have omitted the parameters x, size and Repalce, but it can still be evaluated and indicates that the x vector is put back to random extraction 20 times. The reason we try to take parameters with us every time we write code is because I think it’s a good habit and it looks clear. In addition, if you are familiar with the location of a function’s arguments, you will get the wrong result if there is no “counterpoint”. And many functions have too many arguments to remember where they are. If the parameters are taken, the operation can be carried out even if the positions do not correspond:

> x=1:10
> sample(size=20,replace=T,x=x)

 [1]  4  9  2  6  4  5  4  7 10  5  2  2  3  4  2  4  6  8  7  8

This advantage is obvious, not only clear, but also has no counterpart. And we can also see that if you put it back, the size is infinite, and if you don’t put it back, the size depends on the size of the population.

for the roll of dice, the roll of a coin (this is probably a necessary introduction to sampling), is a put back sampling.
It should be explained here that for the SAMPLE function, the parameter x can be either a numerical value or a character. In fact, the parameter x represents any vector:

> a=c("A","B")
> sample(x=a,size=10,replace=T)

 [1] "B" "A" "A" "A" "B" "A" "A" "B" "A" "A"

The code above can be interpreted as the number of flips of A coin, in which heads (A) and tails (B) occur 10 times.

above mentioned sampling process, each element is drawn with equal probability, called random sampling.
Sometimes our probability of extracting elements may not be equal (for example, common binomial distribution probability problems). In this case, we need to add a parameter prob, which is the abbreviation of “probability”. If a doctor performs an operation on a patient with an 80% chance of success, how many times can he operate on 20 patients today?The code is as follows:

> x=c("S","F")
> sample(x,size=20,replace=T,prob=c(0.8,0.2))

 [1] "F" "S" "S" "S" "S" "S" "S" "S" "S" "S" "S" "S" "F" "S" "S" "F" "S" "S"
[19] "F" "S"

Where “S” stands for success and “F” for failure.

> x=c(1,3,5,7)
> sample(x,size=20,replace=T,prob=c(0.1,0.2,0.3,0.9))

 [1] 3 5 7 3 7 3 7 5 3 7 7 7 1 5 7 5 7 7 3 7

These codes tell us that each element can be given a probability, and each probability is independent, that is, in the parameter PROb, the probability of all elements does not necessarily add up to 1, it only represents the probability of an element being extracted.

for the sample function, the parameter x can be any object in R (such as the sample character above). Another of the same functions is sample.int, short for “intger” or “integer.” Its argument n must be a positive integer:

> x=-10.5:7.5
> sample(x=x,size=3);sample.int(n=x,size=3)

[1] -5.5 -7.5  0.5
Error in sample.int(x, size = 3) : invalid first argument

The first line of code generates an arithmetic sequence of -10.5 to 7.5. The first line of output is the result of SAMPLE. The second line is the result of sample.int with an error: “First argument invalid” because it is not a positive integer. The rest of the usage is the same as sample.

pick from http://www.wtoutiao.com/p/186VWin.html

UDID and UUID in IOS development

Today, I suddenly want to talk to you about UDID and UUID. Although we usually ignore these two things, it is often difficult to distinguish them. Let’s talk about it today.
【 UDID 】
UDID’s full name is Unique Device Identifier: Device Unique Identifier. As you can see from the name, UDID is device specific and device specific, kind of like a MAC address. In my last blog, iOS App Release Process Details, I mentioned real machine debugging and the need to add UDID to the Provisoning Profile authorization file, which is to add a unique device identifier to identify a device.
UDID is a 40-bit hexadecimal sequence, and we can use iTunes and Xcode to get this value.
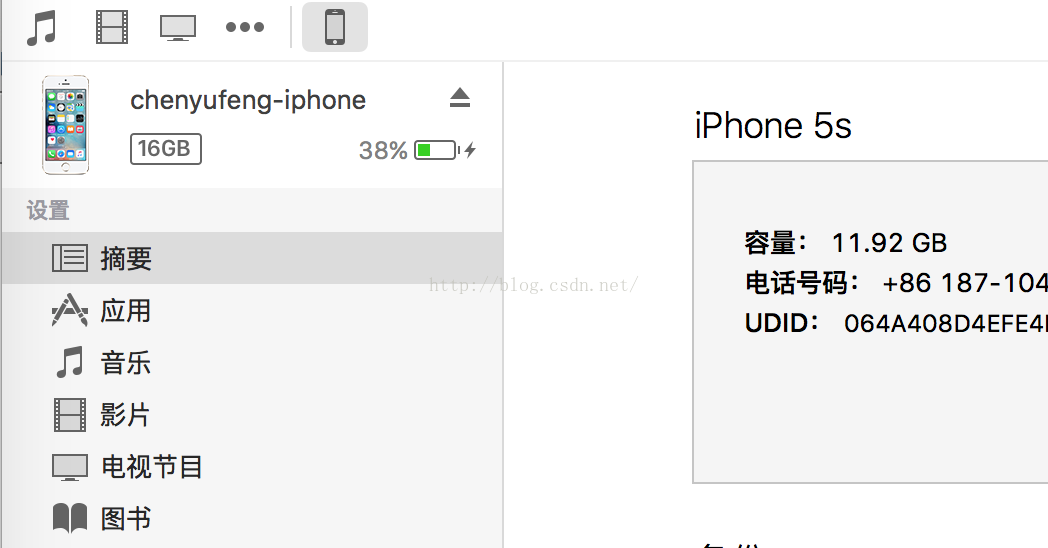
(1) iTunes acquisition of UDID:
Connect our phones to our computers and turn on iTunes.
.
By default, this location shows the serial number. Just click the location of the serial number to switch to UDID.

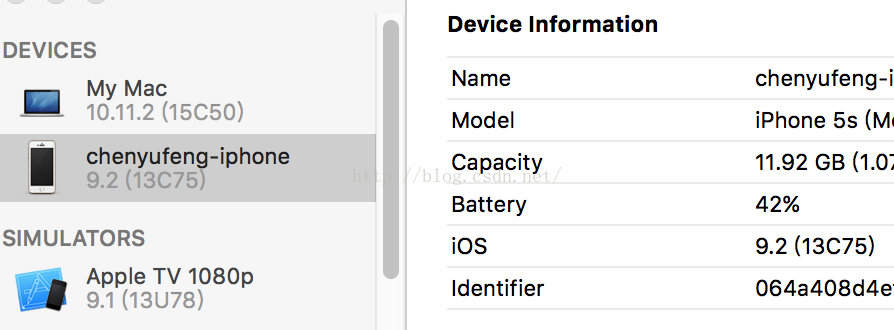
(2) Xcode gets UDID:
Connect your phone to your computer, open Xcode, and select Window–> Devices, all the Devices you are currently connected to are displayed, among which the Identifier displayed is the UDID of the device:
.

But what if we want to use UDID in our code?Unfortunately, since iOS5, apple has banned accessing UDID through code. Previously, you could drive past a device using the method [[UIDevice cuurrent] uniqueIdenfier], which is now impossible. As to why access to UDID is prohibited, I will mention below. In the current SDK, Apple provides a parameter identifierForVendor that replaces the original UDID function. The code is as follows:

NSUUID *uuid = [UIDevice currentDevice].identifierForVendor;
NSLog(@"uuid 1 = %@",uuid.UUIDString);

The string UUIDString that you print out here is not a real UDID, but rather a substitute that looks a little bit like it. As I mentioned above, UDID is only related to iOS devices, while the identifierForVendor is an application related to both the device and the device. An application A is installed on the device to generate an identifierForVendor (for example: 1234). An application installed on li Si’s device will generate another identifierForVendor (e.g. 5678). The B application was installed on zhang SAN’s device, and a new identifierForVendor (e.g. 9999) was installed on Li Si’s device. The B application was also installed on Li Si’s device. However, no matter how many times an application A is installed or uninstalled, the resulting identifier is 1234. So, we know that the identifierForVendor is an identifier generated by an application plus A device binding, equivalent to: Z(identifierForVendor) = X(an application) + Y(A device). Of course, the difference from a real UDID is obvious: App developers have no way to distinguish between a particular device, but can only identify an application on a particular device.

【 UUID 】
Universally Unique Identifier is a Universally Unique Identifier. Is a 32-bit hexadecimal sequence, connected by little horizontal lines: 8-4-4-12. UUID is unique in a given space and time. For example, in the current second, the uUids generated all over the world are different; Of course, the UUID generated by the same device is also different. In an earlier blog post, iOS Project Dev Practice: Getting current UUids, I used what now seems like a silly way to get current UUids. As some readers have reflected, the easiest way to get uUids is as follows:

    for (int i = 0; i < 10; i++)
    {
        NSString *uuid = [NSUUID UUID].UUIDString;
        NSLog(@"uuid 2 = %@",uuid);
    }

By running the program, it can be found that the value printed is different each time after 10 cycles, but no matter how many cycles there are, the value will never be the same. So in a way, the UUID doesn’t have anything to do with your device.

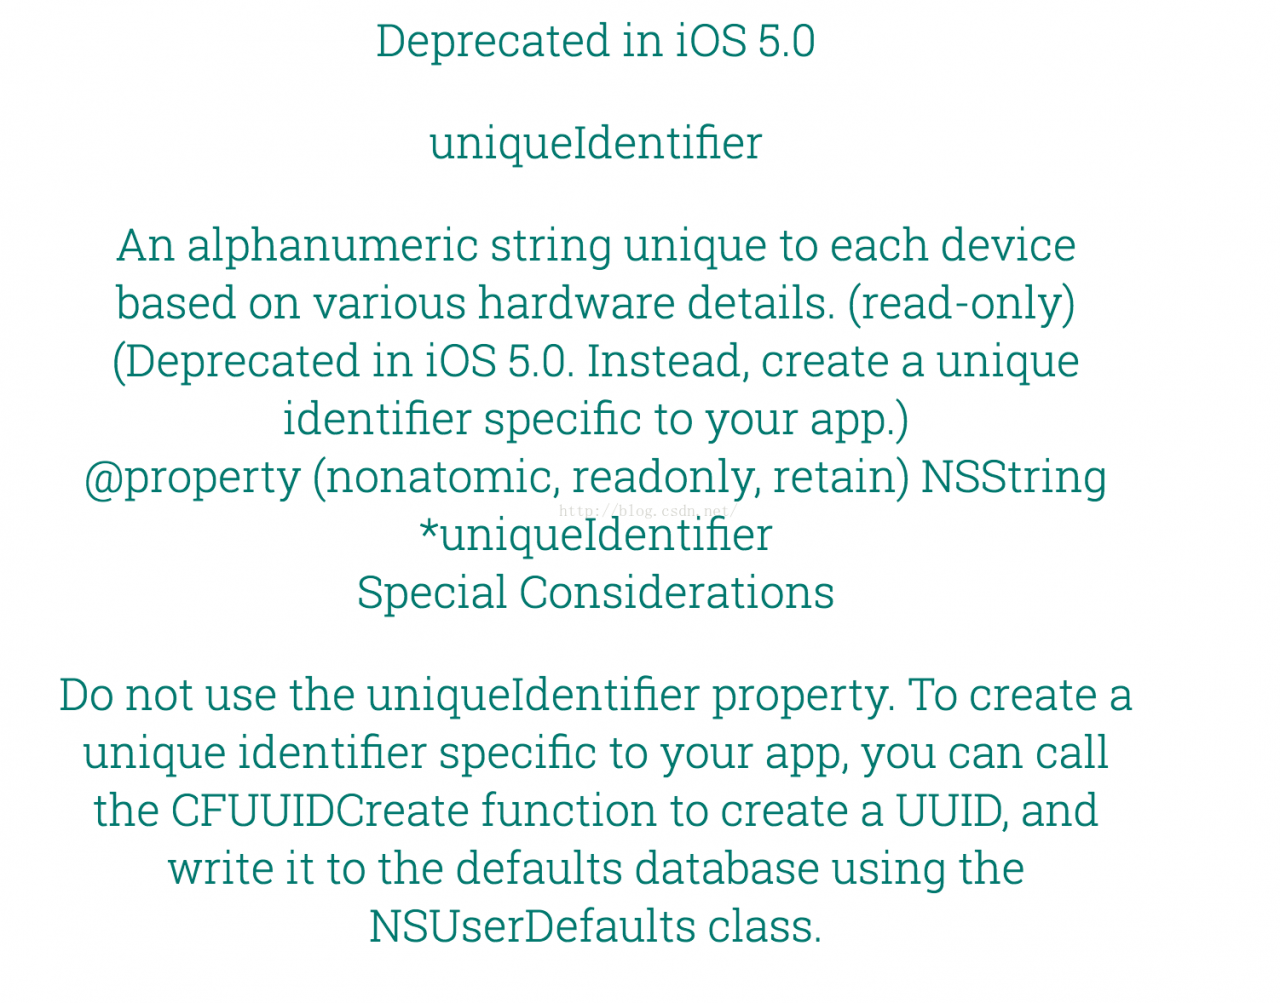
Apple has long said that if third-party app developers continue to share or use UDID on the iPhone, Mac or AppleWatch, their apps will be banned from the shelves. Why would Apple ban it from apps?That’s because of privacy issues. For example, I have developed 5 apps, and many users have downloaded these 5 apps and used them. If I can easily get the UDID of these users, I can actually piece together a lot of information about them. Due to the privacy nature of UDID itself, it was previously used for third-party statistics and other purposes. Now, of course, there are people who use MAC addresses to identify devices, because the MAC address uniquely identifies a device and doesn’t change, and I don’t know how Apple will do that in the future. Here’s Apple’s statement on disabling UDID:
.

JAVE: LeetCode(189) Rotate Array

Q:
Rotate Array Total Accepted: 19161 Total Submissions: 108570 My Submissions Question Solution
Rotate an array of n elements to the right by k steps.

For example, with n = 7 and k = 3, the array [1,2,3,4,5,6,7] is rotated to [5,6,7,1,2,3,4].

Here is the code:

/*
Runtime Error Message:	Line 5: java.lang.ArrayIndexOutOfBoundsException: 1
Last executed input:	[-1], 2 
Note: k might be larger num.length - 1.
225 ms
*/
public class Solution {
    void reverse(int[] nums, int start, int end) {
        while(start < end) {
            int temp = nums[start];
            nums[start] = nums[end];
            nums[end] = temp;
            ++start;
            --end;
        }
    }
    public void rotate(int[] nums, int k) {
        k = k % nums.length;
        reverse(nums, 0, nums.length - 1 );
        reverse(nums, 0, k - 1 );
        reverse(nums, k, nums.length - 1 );
    }
}


Ubuntu 16.04 install Chinese input method


http://www.programering.com/a/MTOyMDMwATc.html

Ubuntu 16.04 Chinese input method to install Input method on Ubuntu are mainly small input platform (support Pinyin/two pen/five pen), Fcitx, Ibus, Scim etc.. Where Scim and Ibus are input method framework.

In Chinese Ubuntu system comes with Chinese input method, through the Ctrl+ Space English input method switch. Here we mainly said Ubuntu English system, Chinese input method to install.

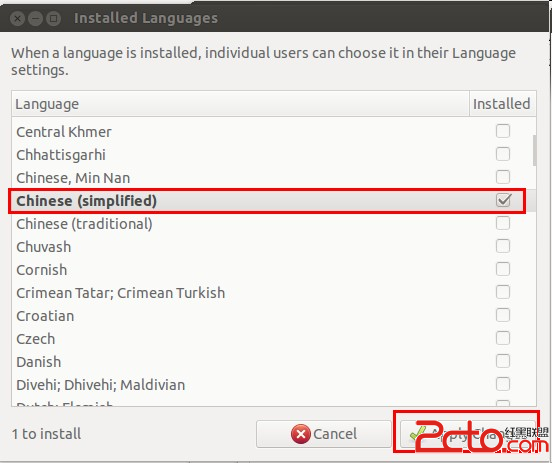
The first step to install the input method, is installing a language pack. We choose the System Settings–> Language Support–> Install/Remove Languages, the following window will popup: www.2cto.com

After inputting password, the system will install simplified Chinese language pack.

The second step, install the IBus framework, input the following commands in a terminal:
sudo apt-get install ibus ibus-clutter ibus-gtk ibus-gtk3 ibus-qt4 Start the IBus framework, in terminal input:

im-switch -s ibus

After you install the IBus framework after the write off system, guaranteed that the changes take effect immediately.

The third step: install the Pinyin engine

There are several common choices:

IBus Pinyin: sudo apt-get install ibus-pinyin

IBUS five pen: sudo apt-get install ibus-table-wubi

Google Pinyin input method: sudo apt-get install ibus-googlepinyin

Sun Pinyin input method: sudo apt-get install ibus-sunpinyin

The fourth step: setting the IBus framework www.2cto.com

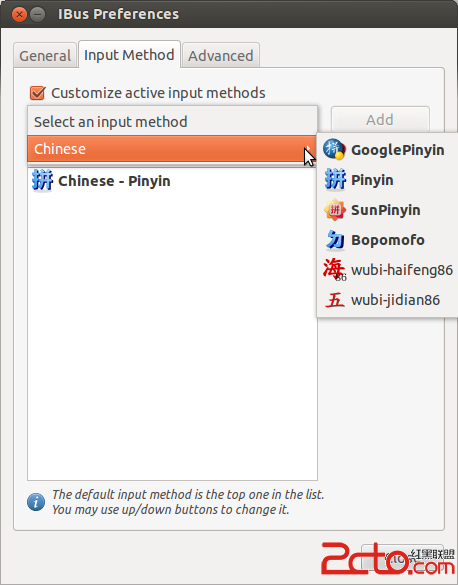
ibus-setup

At this point, IBus Preference is set to be opened. We are in the Input Method tab, select the input method you like, and configure shortcuts can be like. As shown below:

The fifth step: normally, the IBus icon (a small keyboard) will appear in the top right corner of the taskbar. Sometimes this icon will disappear, you can use the following command, retrieve the disappearance of the IBus Icon:

ibus-daemon -drx

The sixth step: Click the Keyboard icon, choose  configure current input method,
                           Click the add(+) icon, choose the Chinese input method
The seventh step: configure the shortcut key
                                system sitting-> Test Entry 
Then you can set the shortcut key of input method exchange.