Tag Archives: The iOS development

UIStackView before iOS 9.0

A friend encountered a problem today " uistackview before IOS 9.0 "

This is because uistackview cannot be used under IOS 9. The solution is stack flow

Check inProject Targets-> Deployment info -> Deployment Target.If it’s not 9.0 change it to 9.0. 

You need to change the deployment target of your application’s target to iOS 9. Otherwise the app supports down to whatever OS that your deployment target is set to. 

Not solved?? Check out for other reason??? Check this:

If your Deployment target is already set to 9.0 and you still get this error then try then check your project File inspector-> Project Document -> Project Format and check if its Xcode-6.3-compatible or not.If its not then set it to Xcode-6.3-compatible.

The other reason is may be you accidentally add UIStackView and thats why you encounter the problem. UIStackView supports 9.0 and later and your deployment target doesn’t allow that. So just check if you accidentally add UIStackView and if you added and you don’t want it than just remove it.

2. To use uistackview under IOS, someone has mined this method.

Why can I use uistackview under IOS 9 through fdstackview

Xcode 12 compiles and reports errors on simulator

In the new version of Xcode12.0, using the old computer to compile the project will find that the previously compiled project will report an error on the emulator,
This is because Apple is about to release a new Mac using ARM instruction set. When using the new Mac, you will need to use instruction set like x86_64, but you can execute code using the same instruction set as the iPhone. So in the new version of Xcode 12, the default support for emulator instruction set is dropped, only the Build Setting is required –>; User-Defined–> The VALID_ARCHS manually add the instruction set for the simulator.

UDID and UUID in IOS development

Today, I suddenly want to talk to you about UDID and UUID. Although we usually ignore these two things, it is often difficult to distinguish them. Let’s talk about it today.
【 UDID 】
UDID’s full name is Unique Device Identifier: Device Unique Identifier. As you can see from the name, UDID is device specific and device specific, kind of like a MAC address. In my last blog, iOS App Release Process Details, I mentioned real machine debugging and the need to add UDID to the Provisoning Profile authorization file, which is to add a unique device identifier to identify a device.
UDID is a 40-bit hexadecimal sequence, and we can use iTunes and Xcode to get this value.
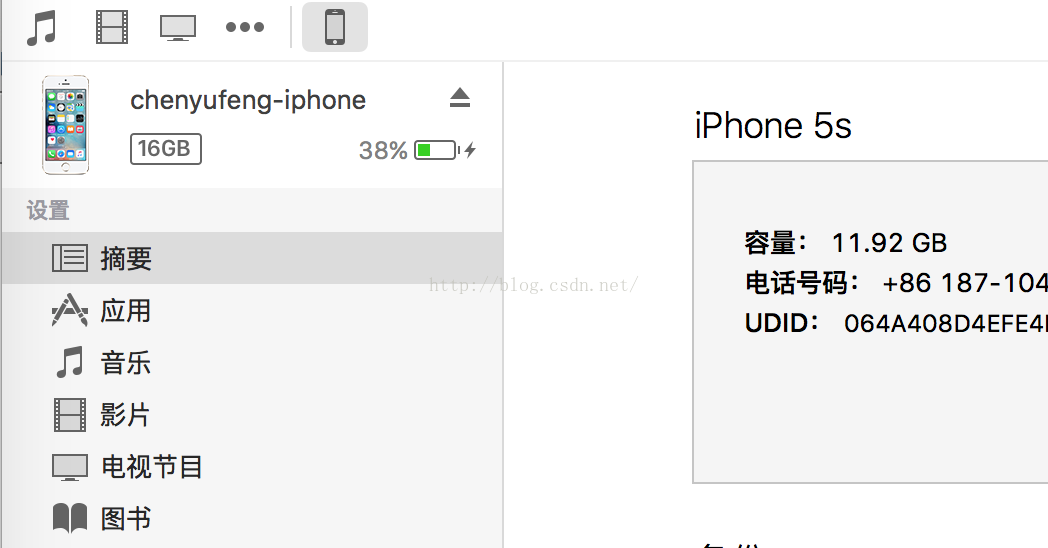
(1) iTunes acquisition of UDID:
Connect our phones to our computers and turn on iTunes.
.
By default, this location shows the serial number. Just click the location of the serial number to switch to UDID.

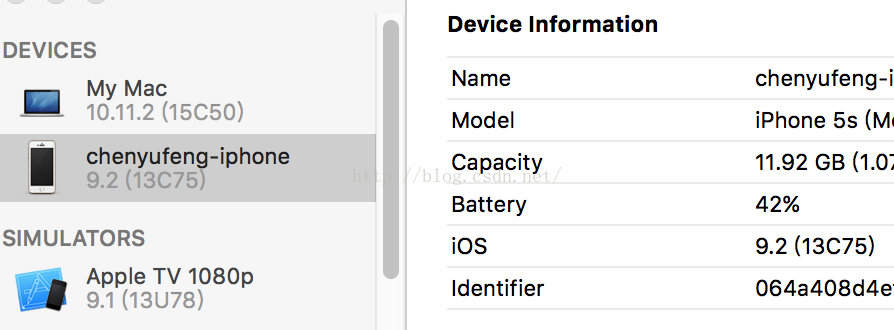
(2) Xcode gets UDID:
Connect your phone to your computer, open Xcode, and select Window–> Devices, all the Devices you are currently connected to are displayed, among which the Identifier displayed is the UDID of the device:
.

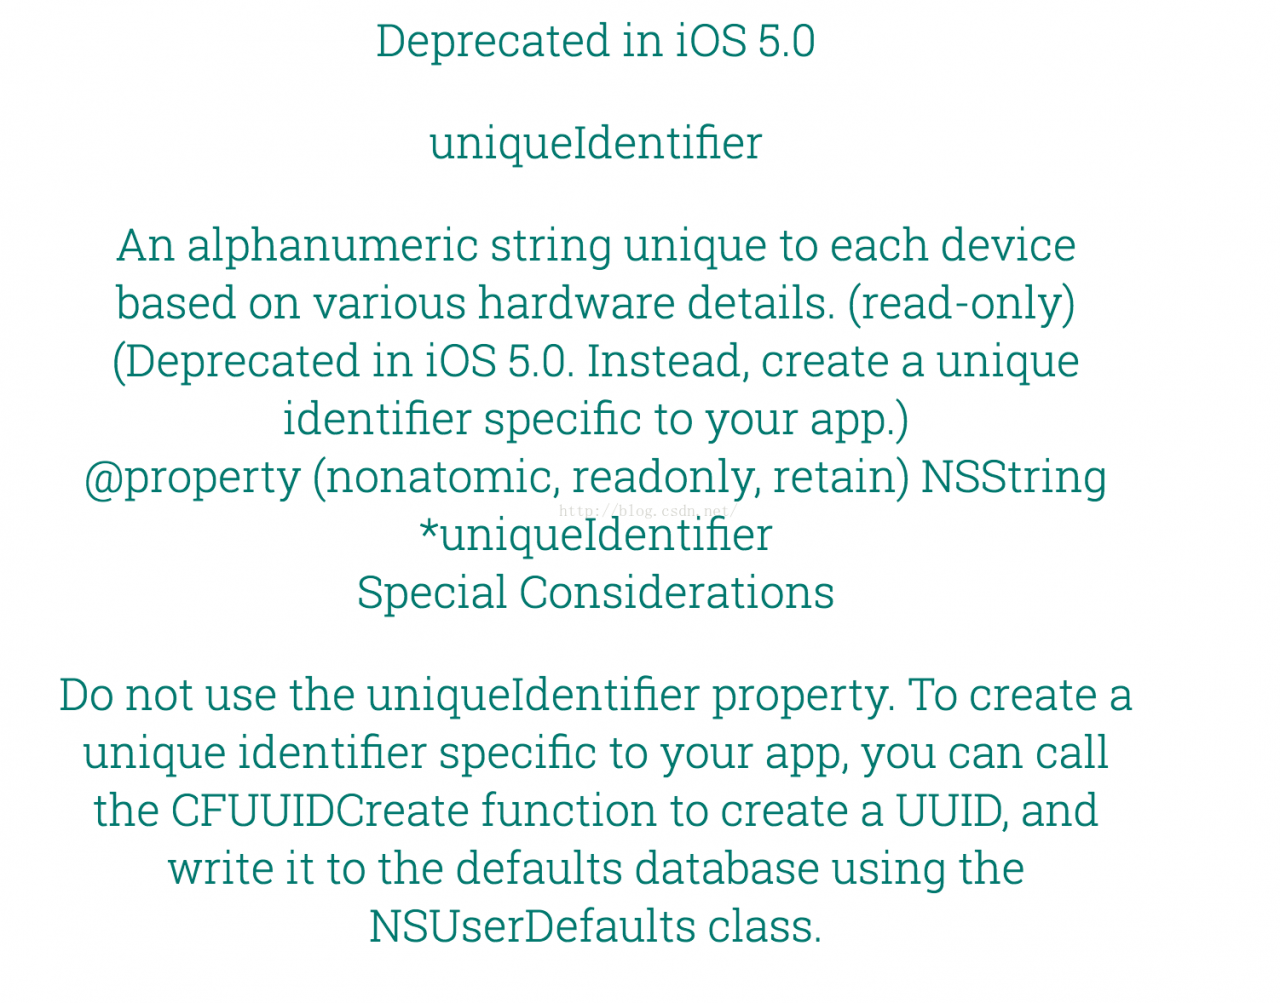
But what if we want to use UDID in our code?Unfortunately, since iOS5, apple has banned accessing UDID through code. Previously, you could drive past a device using the method [[UIDevice cuurrent] uniqueIdenfier], which is now impossible. As to why access to UDID is prohibited, I will mention below. In the current SDK, Apple provides a parameter identifierForVendor that replaces the original UDID function. The code is as follows:

NSUUID *uuid = [UIDevice currentDevice].identifierForVendor;
NSLog(@"uuid 1 = %@",uuid.UUIDString);

The string UUIDString that you print out here is not a real UDID, but rather a substitute that looks a little bit like it. As I mentioned above, UDID is only related to iOS devices, while the identifierForVendor is an application related to both the device and the device. An application A is installed on the device to generate an identifierForVendor (for example: 1234). An application installed on li Si’s device will generate another identifierForVendor (e.g. 5678). The B application was installed on zhang SAN’s device, and a new identifierForVendor (e.g. 9999) was installed on Li Si’s device. The B application was also installed on Li Si’s device. However, no matter how many times an application A is installed or uninstalled, the resulting identifier is 1234. So, we know that the identifierForVendor is an identifier generated by an application plus A device binding, equivalent to: Z(identifierForVendor) = X(an application) + Y(A device). Of course, the difference from a real UDID is obvious: App developers have no way to distinguish between a particular device, but can only identify an application on a particular device.

【 UUID 】
Universally Unique Identifier is a Universally Unique Identifier. Is a 32-bit hexadecimal sequence, connected by little horizontal lines: 8-4-4-12. UUID is unique in a given space and time. For example, in the current second, the uUids generated all over the world are different; Of course, the UUID generated by the same device is also different. In an earlier blog post, iOS Project Dev Practice: Getting current UUids, I used what now seems like a silly way to get current UUids. As some readers have reflected, the easiest way to get uUids is as follows:

    for (int i = 0; i < 10; i++)
    {
        NSString *uuid = [NSUUID UUID].UUIDString;
        NSLog(@"uuid 2 = %@",uuid);
    }

By running the program, it can be found that the value printed is different each time after 10 cycles, but no matter how many cycles there are, the value will never be the same. So in a way, the UUID doesn’t have anything to do with your device.

Apple has long said that if third-party app developers continue to share or use UDID on the iPhone, Mac or AppleWatch, their apps will be banned from the shelves. Why would Apple ban it from apps?That’s because of privacy issues. For example, I have developed 5 apps, and many users have downloaded these 5 apps and used them. If I can easily get the UDID of these users, I can actually piece together a lot of information about them. Due to the privacy nature of UDID itself, it was previously used for third-party statistics and other purposes. Now, of course, there are people who use MAC addresses to identify devices, because the MAC address uniquely identifies a device and doesn’t change, and I don’t know how Apple will do that in the future. Here’s Apple’s statement on disabling UDID:
.

In IOS development, there is an error: Apple mach-o linker error

Small make up in a small demo letter about ring, ring of import letter SDK (EaseMobSDK), the connection of the error, as shown in the figure below:

solution is in general, the following figure, respectively, in the absence of label arrow to add compiler needs. M files and the necessary framework:

and the small make up the problem here is not more than compile files and framework problem, the solution is,

in the third arrow to add: -obJC, and then you just recompile.

Xcode – pbxcp Error Repair – no such file or directory

Xcode-pbxcp error fixes -No such file or directory, which is almost a common compilation error in Xcode. The reason is usually caused by an error when adding or deleting art resources. It’s a small problem, but it comes up quite frequently.

Solutions (try one after the other, and there is always one that will solve the problem) :
Methods 1. Xcode, then from the finder and into the ~/Library/Developer/Xcode/DerivedData delete all the content inside, and then restart Xcode give it a try

Method 2. The above operations can also be performed directly in The Xcode organizer, switch to projects in the organizer, and then delete derivedData
Delete the PrefixHeader values from the Target Settings and try restarting Xcode
Finally, restore the setting of the Prefix Header

Method 3:
It’s still in Xcode
Project – the targets – buildphases,
Then delete the red error resource file from copy Bundleresources

Abaddressbooksave about the failure of saving to address book

First of all, the premise is that you add the address book statement without any errors.
And then there is
// Add the newly created contact to the address book
ABAddressBookAddRecord (addressBook, person, NULL);
The next step is to save the address book in order to better learn how to deal with the Error that will not cause crashes and prompts. It is recommended that you create an Error object to see the Error prompts given by the system

CFErrorRef error = NULL;
If (ABAddressBookSave (addressBook, & amp; error))
{
UIAlertView * Alert = [[UIAlertView Alloc] initWithTitle:@” prompt “Message :@” has successfully imported contacts into address book” delegate: Self cancelButtonTitle:@” confirm “otherButtonTitles:nil];
[alert show];
        
}
The else
{
NSLog (@ “% @”, the error).
UIAlertView * Alert = [[UIAlertView Alloc] initWithTitle: @@” prompt “message:@” import failed” delegate:self cancelButtonTitle:@” confirm “otherButtonTitles:nil];
[alert show];
}

The error is “error Domain=ABAddressBookErrorDomain Code=1 “The operation couldn’t be completed. (ABAddressBookErrorDomain error 1.)”

This error basically means that the operation is not complete, which does nothing to me, but at least it tells us one thing, that there is nothing wrong with the code we write. If there’s nothing wrong with the code, why did it fail to save the contact to the address book?The only answer seems to be that the system won’t allow you to access the address book
Solution: First in the phone’s privacy Settings, address book privacy to see if the permissions are turned on.
It then gives a code to request application access to the address book before importing.

if (ABAddressBookGetAuthorizationStatus() == kABAuthorizationStatusNotDetermined) {
ABAddressBookRequestAccessWithCompletion (addressBook, ^ (bool granted, CFErrorRef error) {
The first time, a prompt will pop up telling the user whether to allow the application to access the address book
});
}
Else if (ABAddressBookGetAuthorizationStatus () = = kABAuthorizationStatusAuthorized) {
Description accessible
        
}
The else {
The user may have turned off access to the communication.
}

Well, the problem with the address book not being able to hold data has finally been solved.

How to delete Microsoft AutoUpdate from Mac

how to remove Microsoft AutoUpdate from Mac

how to remove Microsoft AutoUpdate from Mac

want to remove Microsoft AutoUpdate from Mac?Maybe you uninstalled Microsoft Office or some other Microsoft application from the Mac, so you no longer need Microsoft applications to automatically update themselves. In any case, you can remove the Microsoft AutoUpdate application from the Mac OS.

if Microsoft AutoUpdate is currently running, you need to exit the application first. You can also force an exit from the Microsoft AutoUpdate application from the activity monitor if desired.

From the MacOS Finder, pull down the “Go” menu and select “Go To Folder” (or press Command + Shift + G) and enter the following path:
/Library/Application Support/Microsoft/

find the folder named “MAU” or “MAU2.0”, then open that directory
find and drag “Microsoft autoupdate.app” to the wastepaper basket

After closing the MAU folder and continuing to use Mac as usual
to delete Microsoft AutoUpdate, Microsoft AutoUpdate will no longer run or automatically run on the Mac to update the software.

if you still want to own and use on the Mac Microsoft applications, deleting Microsoft AutoUpdate application may result in some unexpected consequences, in addition to get outdated software from Microsoft, so if you are a heavy Microsoft software users, it is best not to delete it, Microsoft Office, Word, Outlook, PowerPoint, Excel, Edge or any other things.

* if you want to leave other items in deleted messages for the time being, you can also specifically delete the file from deleted messages.

if you know of any other ways to manage, tame, or remove Microsoft AutoUpdate applications on a Mac, please share them in the comments below!