
torch& torchvision23545; 24212; 29256;
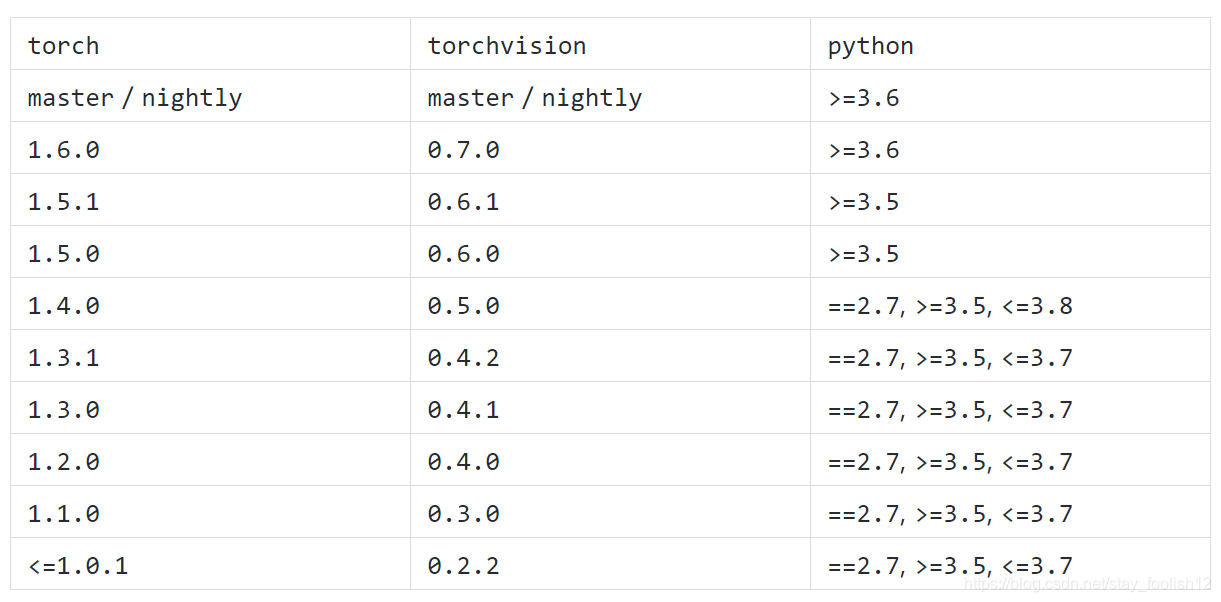
torch& torchvision23545; 24212; 29256;
Amend the following documents
sudo vi /etc/resolv.conf
Then write to the following file:
nameserver 8.8.8.8
nameserver 8.8.4.4
Problem Description:
Call imbalanced today_ An error is reported when the module is enabled:
importerror: cannot import name ‘delayed’ from ‘sklearn. Utils. Fixes’
Cause analysis:
Sklearn library, not updated in time. As a result, the sklearn.utils.fixes.py file does not have a delayed module.
Solution:
Update the sklearn library with the following command
conda update scikit-learn
Today, I encountered a bug. I added a menu to the toolbar, but there is no response when I click it. In other words, this button cannot be clicked.
Menu file menu_ toolbar_ announcement_ comment:
<?xml version="1.0" encoding="utf-8"?>
<menu xmlns:android="http://schemas.android.com/apk/res/android"
    xmlns:app="http://schemas.android.com/apk/res-auto">

    <item
        android:id="@+id/menu_comment"
        android:title="@string/comment"
        android:visible="true"
        app:actionLayout="@layout/menu_provider_number_subscript"
        app:showAsAction="always" />

</menu>
code:
mToolbar.setOnMenuItemClickListener(new Toolbar.OnMenuItemClickListener() {
            @Override
            public boolean onMenuItemClick(MenuItem item) {
                switch (item.getItemId()) {
                    case R.id.menu_comment:
                        //enable comment
                        showComment();
                        break;
                }
                return true;
            }
        });

 @Override
    public boolean onCreateOptionsMenu(Menu menu) {
        getMenuInflater().inflate(R.menu.menu_toolbar_announcement_comment, menu);
        return true;
    }
The setonmenuitemclicklistener method in the code doesn’t work.
I think the reason may be that I use custom layout in menu
app: actionlayout = @ layout/menu_ provider_ number_ subscript"
At this time, you need to write the click event of the menu in oncreateoptionsmenu
The details are as follows:
@Override
    public boolean onCreateOptionsMenu(Menu menu) {
        getMenuInflater().inflate(R.menu.menu_toolbar_announcement_comment, menu);
        MenuItem item = menu.findItem(R.id.menu_comment);
        item.getActionView().setOnClickListener(new View.OnClickListener() {
            @Override
            public void onClick(View v) {
                //enable comment
                showComment();
            }
        });
        return true;
}Error when running python3 command:python: error while loading shared libraries: libpython3.6m.so.1.0: cannot open shared object file:no such file or directory。
Just copy this file to /usr/lib64
cp /python3 installation directory/lib/libpython3.6m.so.1.0 /usr/lib64/ $("#gridTable").jqGrid('setGridParam', {
postData: { queryJson: queryJson }, page: 1
}).setGridParam({datatype:"json"}).trigger('reloadGrid');const a = async (x) => {};
const b = async (x, y) => {};
const c = async (x, y, z) => {};
async function all () {
const [resultA, resultB, resultC] = await Promise.all([
a(x),
b(x, y),
c(x, y, z)
]);
}
Finding problems
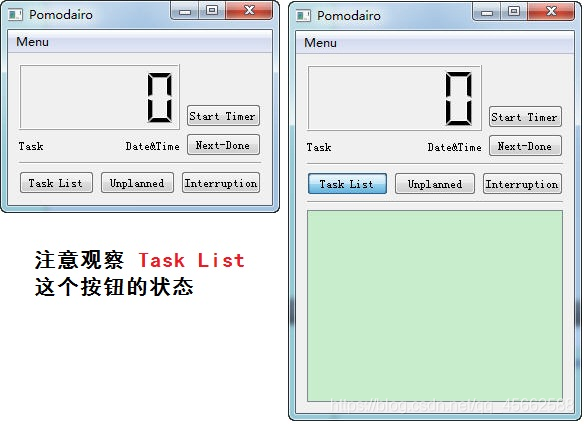
I want to make a tomato clock software and learn QT by the way. But when I did it, I found that toggled could not trigger setvisible (). After comparing the source code of C + + GUI QT4 programming, I found that it was a detail problem about QPushButton, which was not clear.
The effect you want to complete is as follows:
Solution
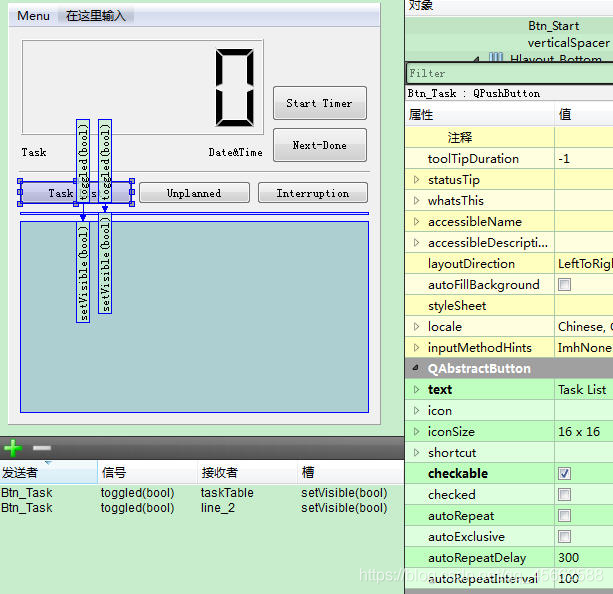
QPushButton must be checkable and must be selected when designing with designer.
The specific operation is as follows:
Problem exploration
By default, checkable is not selected, and button is the trigger button by default. When you press it, it will pop up immediately
After checkable is selected, the button becomes a toggle button, which can have two states: Press/pop. This is why the state of the task list button is different in the two images
————————————————
Link to the original text: https://blog.csdn.net/humanking7/article/details/44095283
At the command prompt
Microsoft Windows 10 operating system has a built-in command line tool as certificate service, namely “certutil”. The command line provides a switch “hashfile”, so a hash string can be generated. Here, you can use the specified algorithm, such as MD5:
certutil -hashfile < file> & lt; algorithm>
 certutil -hashfile myfile.zip MD5

Generating MD5 file checksums in command prompt of windows
Using PowerShell
There is also a command in PowerShell
this is the most effective and simple method, because it does not include any type of coding. If you use PowerShell 4.0, there are cmdlets on the command line. This cmdlet is also known as “get filehash.”. Thanks to this command line, you can easily generate a hash file:
Get-FileHash -Path < file> - algorithm < name>
 Get-FileHash -Path myfile.zip -algorithm MD5
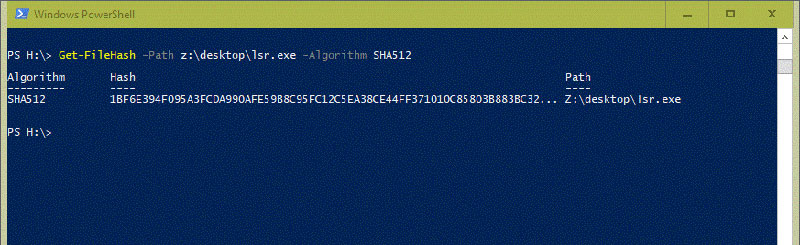
Using get filehash in PowerShell
Motion problems usually occur in a moment, and may not exist in the next second. So how to position this kind of problem?First of all, we should be able to collect the relevant system information at the moment of the problem.
atop
For a problem, we can find the direction of the problem from a macro point of view. We can install an atop and configure it to record the system information in 1s granularity. In this way, when jitter occurs, we can trace back the system monitoring information. From a macro point of view, we can see which module may have problems, such as IO, MEM or network.
yum -y install atop
After the installation, configure the sampling frequency to 1 second
cat /etc/sysconfig/atop
LOGOPTS=""
LOGINTERVAL=1
LOGGENERATIONS=28
LOGPATH=/var/log/atop
Start atop service:
service atop start
After running, atop will record the system monitoring information to the/var/log/atop directory. When jitter occurs, it will trace back through the log file saved in it
atop -r atop_20210715
perf
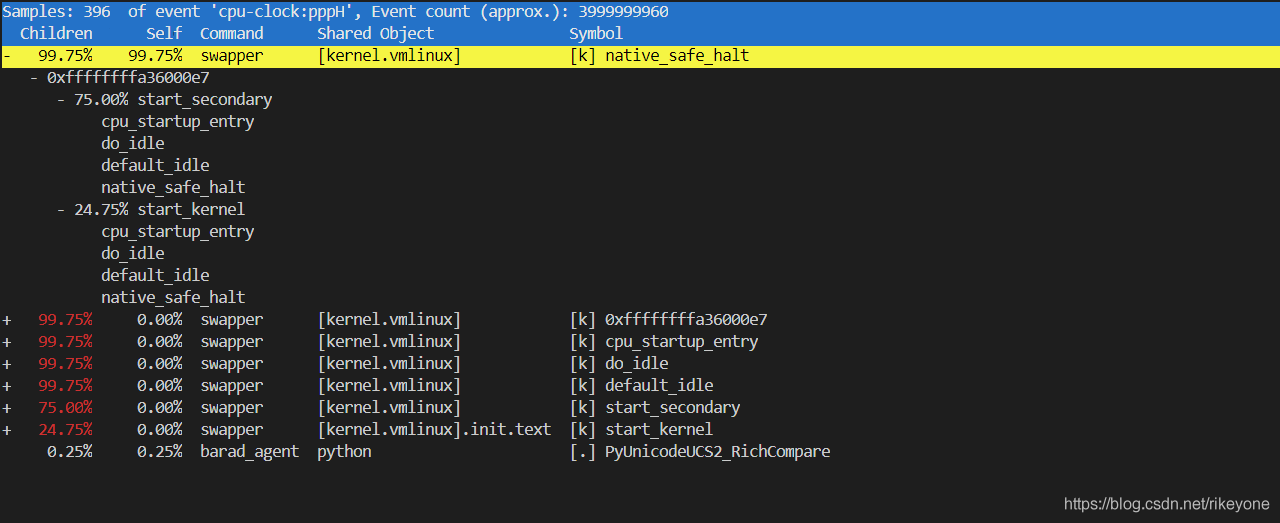
If you view atop, you can see the resource information of the system. You can know the direction of possible problems through these information. However, atop alone may not be enough to accurately locate the problem. Therefore, perf needs to capture more trace information. For perf, directly grasping hot spots may have a great impact on the performance of the system. Here we need to consider a lightweight sampling method. We can pass in – F to specify the sampling frequency to collect perf hotspots.
perf record -g -a -F 99
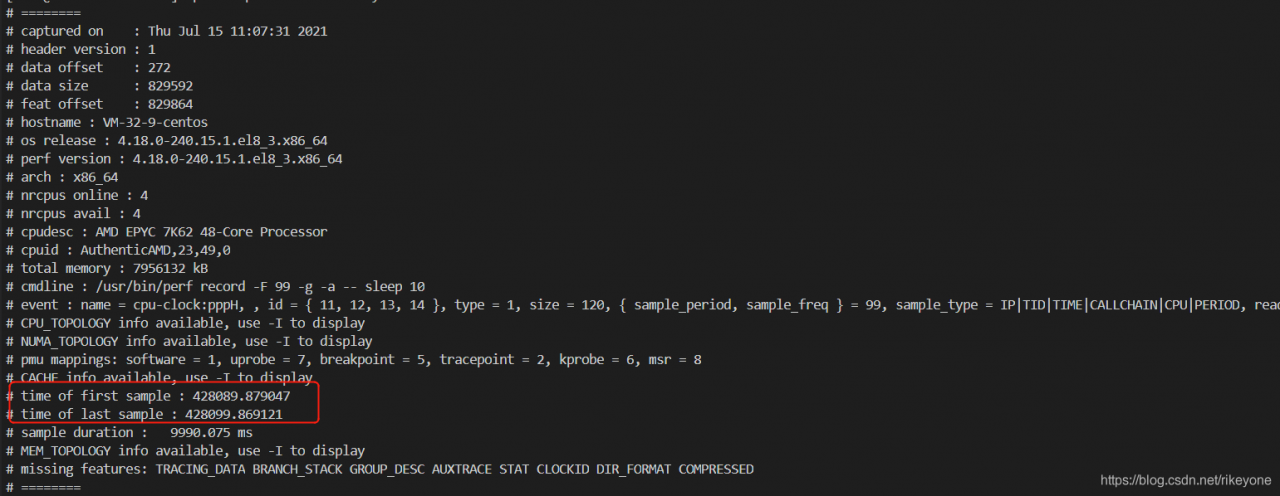
99 sampling points will be collected every second, and the impact on the system can be controlled, so you can try to capture information for a long time to ensure that data can be viewed in case of failure. There is also a problem here. If the data collected by perf is for a period of time, then the instantaneous jitter will be counted in a long time range, which may not reflect the problem point. Another function of perf needs to be used here, that is – time view by time range:
perf report --header-only
perf report --time  start,end
The first command can view the start time and end time of the current data captured by perf. Then, the time when the fault occurs can be calculated according to this, and the second command can intercept one of the segments for report analysis
For example, if you want to view the hot spot information captured by perf in the first 1s:
perf report --time 428090,428091
new_lrs[:5] = lr_warm
[12] TypeError: can only assign an iterable
explain:
In Python, using list [0:3] =’xxx ‘will not cause an error, so that the elements with subscripts of 0, 1, 2 are assigned to’ xxx ‘; This is because the string itself is a character array in Python, which can be iterated.
In list [0:2] = 1, an error will be generated: typeerror: can only assign an Iterable
This is because integer 1, which has no iteration ability, is a value. If the goal is not achieved, write list [0:2] = (1,)
The right side of this assignment must be an iteratable type, not an integer, but [int] is OK
lr =[0.0001,0.00012,0.00013]
new_lrs = [0.001, 0.0009,0.0008,0.0007,0.0006]
new_lrs[:3] = lr
new_lrs
Out[5]: [0.0001, 0.00012, 0.00013, 0.0007, 0.0006]
It is encountered in the process of adding learning rate to warmup. The complete code is as follows
import torch
import math
from torch.optim.lr_scheduler import _LRScheduler
from utils.utils import read_cfg

cfg = read_cfg(cfg_file="/yangjiang/CDCN-Face-Anti-Spoofing.pytorch/config/CDCNpp_adam_lr1e-3.yaml")

class CosineAnnealingLR_with_Restart(_LRScheduler):
    """Set the learning rate of each parameter group using a cosine annealing
    schedule, where :math:`\eta_{max}` is set to the initial lr and
    :math:`T_{cur}` is the number of epochs since the last restart in SGDR:

    .. math::

        \eta_t = \eta_{min} + \frac{1}{2}(\eta_{max} - \eta_{min})(1 +
        \cos(\frac{T_{cur}}{T_{max}}\pi))

    When last_epoch=-1, sets initial lr as lr.

    It has been proposed in
    `SGDR: Stochastic Gradient Descent with Warm Restarts`_. The original pytorch
    implementation only implements the cosine annealing part of SGDR,
    I added my own implementation of the restarts part.

    Args:
        optimizer (Optimizer): Wrapped optimizer.
        T_max (int): Maximum number of iterations.
        T_mult (float): Increase T_max by a factor of T_mult
        eta_min (float): Minimum learning rate. Default: 0.
        last_epoch (int): The index of last epoch. Default: -1.
        model (pytorch model): The model to save.
        out_dir (str): Directory to save snapshots
        take_snapshot (bool): Whether to save snapshots at every restart

    .. _SGDR\: Stochastic Gradient Descent with Warm Restarts:
        https://arxiv.org/abs/1608.03983
    """

    def __init__(self, optimizer, T_max, T_mult, model, out_dir, take_snapshot, eta_min=0, last_epoch=-1):
        self.T_max = T_max
        self.T_mult = T_mult
        self.Te = self.T_max
        self.eta_min = eta_min
        self.current_epoch = last_epoch

        self.model = model
        self.out_dir = out_dir
        self.take_snapshot = take_snapshot

        self.lr_history = []

        super(CosineAnnealingLR_with_Restart, self).__init__(optimizer, last_epoch)

    def get_lr(self):
        if self.current_epoch < 5:
            warm_factor = (cfg['train']['lr']/cfg['train']['warmup_start_lr']) ** (1/cfg['train']['warmup_epochs'])
            lr = cfg['train']['warmup_start_lr'] * warm_factor ** self.current_epoch
            new_lrs = [lr]
        else:
            new_lrs = [self.eta_min + (base_lr - self.eta_min) *
                   (1 + math.cos(math.pi * self.current_epoch/self.Te))/2
                   for base_lr in self.base_lrs]

        #new_lrs[:5] = lr_warm
        #self.lr_history.append(new_lrs)
        #print('new_lrs', new_lrs,len(new_lrs))
        return new_lrs

    def step(self, epoch=None):
        if epoch is None:
            epoch = self.last_epoch + 1
        self.last_epoch = epoch
        self.current_epoch += 1

        for param_group, lr in zip(self.optimizer.param_groups, self.get_lr()):
            param_group['lr'] = lr

        ## restart
        if self.current_epoch == self.Te:
            print("restart at epoch {:03d}".format(self.last_epoch + 1))

            if self.take_snapshot:
                torch.save({
                    'epoch': self.T_max,
                    'state_dict': self.model.state_dict()
                }, self.out_dir + "Weight/" + 'snapshot_e_{:03d}.pth.tar'.format(self.T_max))

            ## reset epochs since the last reset
            self.current_epoch = 0

            ## reset the next goal
            self.Te = int(self.Te * self.T_mult)
            self.T_max = self.T_max + self.Te
JSON conflict, solution:
<dependency>
			<groupId>org.springframework.boot</groupId>
			<artifactId>spring-boot-starter-test</artifactId>
			<scope>test</scope>
			<exclusions>
				<exclusion>
					<groupId>com.vaadin.external.google</groupId>
					<artifactId>android-json</artifactId>
				</exclusion>
			</exclusions>
	</dependency>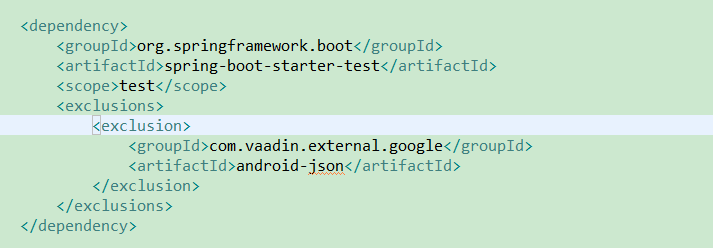
.21442;-32771;65306;
https://cloud.tencent.com/developer/ask/106622
https://github.com/qcloudsms/qcloudsms_java/wiki/maven%E8%A7%A3%E5%86%B3org.json%E5%86%B2%E7%AA%81%E7%A4%BA%E4%BE%8B
W
W