error as follows:
Reading package lists... Done
Building dependency tree
Reading state information... Done
E: Unable to locate package python3.6
E: Couldn't find any package by glob 'python3.6'
E: Couldn't find any package by regex 'python3.6'
The ppa used by
is the old version:
sudo add-apt-repository ppa:jonathonf/python-3.6
needs to update ppa:
sudo add-apt-repository ppa:deadsnakes/ppa
and then system update:
sudo apt-get update
Finally, python3.6
is installedsudo apt-get install python3.6
Wireless network solution of deepin Linux network card driver (manual) installation
thoroughly solve the deepin Linux wireless network problem, manually install their own network card driver:
1. Enter the terminal, type LSPCI and look at my wireless card. Mine is RTL8723BE.
then use another computer to the Internet, to https://github.com/lwfinger/rtlwifi_new, the above with Realtek almost a full range of Linux drivers.
2. Click the Clone or Download button on the right and select Download ZIP.
3. Copy the downloaded ZIP file back to the dead computer on the wireless network, right-click, select unzip to the current folder. A folder called RTLwifi_new-master appears under the current folder.
4. Enter the rTLWifi_new-master folder, press the right mouse button, select open in the terminal, and enter the terminal command line mode in this directory.
5. Type the following command:
make
sudo make install
sudo modprobe rtl8723be
6. Restart and the wireless network is finally back.
must first determine the computer’s network card, find the corresponding driver on the network download to the computer (think of their own way). Put the driver file into the corresponding folder directory of the system disk, after unzipping, enter the folder, right-click and select “open in the terminal”. After entering the terminal, type the command in step 5 and it will complete automatically. After the operation, restart the computer, you can see the computer has a wireless chart, the next operation, complete by yourself…
add:
Linux to view network card driver and version information :
to view network card manufacturers and signals
1. View basic information: lspci
2. View details: lspci-vvv # 3 lowercase v
3. View network card information: lspci | grep Ethernet
view network card driver
view network card driver information: lspci-vvv # find the network card device details, including the network card driver
NPM modify download dependency (modify global download and cache path)
method and command
first make sure that node.js is installed successfully
open CMD
input command:
1. Modify cache path
npm config set cache "D:\url\npm-cache"
2. Modify global download:
npm config set prefix "D:\url\npm_global"
so you can put the installation of things in the corresponding disk character, save C disk space!
the corresponding position will appear two folders:

may no NPM – cache this folder at the beginning, but after installing things will appear, such as installation of vue scaffolding, etc.
Error in comparing the size function of STL with negative number
#include<stdio.h>
#include<math.h>
#include<vector>
#include<queue>
using namespace std;
vector<int>v;
queue<int>q;
int main()
{
	v.push_back(1);
	q.push(1);
	int x=0;
	int y=v.size()-2;
	int z=q.size()-2;
	printf("%d %d\n",x,y);
	printf("%d %d\n",x<(v.size()-2),x<y);

	printf("\n%d %d\n",x,z);
	printf("%d %d\n",x<(q.size()-2),x<z);
    return 0;
}
program run results are as follows:
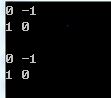
it is obvious there is a problem, the reason is that the size function the result is unsigned number, into negative becomes a big number. The solution is to store the results in a variable, so that won’t happen.
[c++] unsigned type and negative comparison
Eclipse automatic prompt setting method and optimization
Eclipse prompts to set
automatically
we open the Eclipse configuration autoprompt and click the window-preferences interface
first configure the automatic prompt for the Java file
click on Java – Editor – Content Assist and change Auto activation triggers for Java to
.abcdefghijklmnopqrstuvwxyzABCDEFGHIJKLMNOPQRSTUVWXYZ
good click Apply to
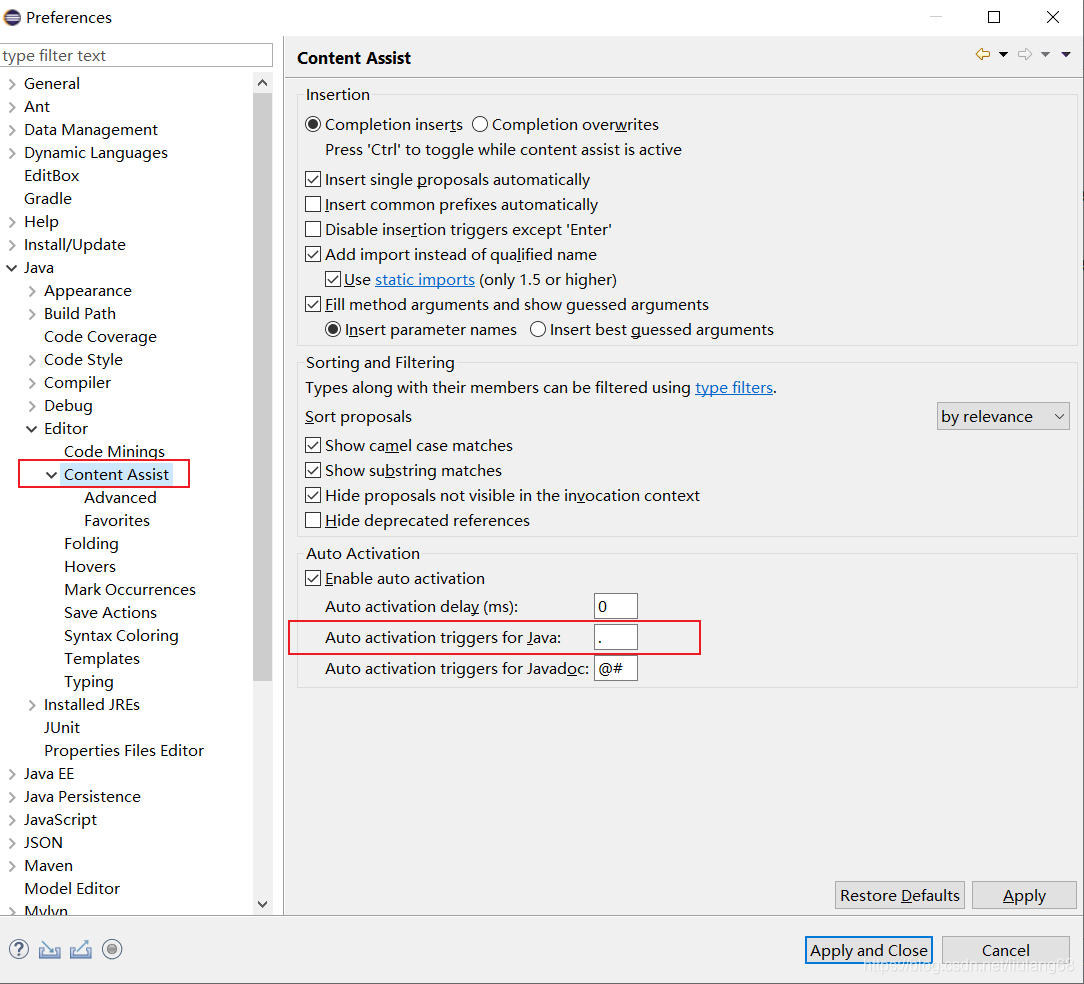
Refer to the article: https://blog.csdn.net/qq_36949176/article/details/86522183
Python 3 install pyqt5
Python3.8
version: Python3.8
PyQt5 5.15.1
Anaconda has been installed
finds the article by following the steps:
pip3 install Sip
pip3 install PyQt5
pip install PyQt5-tools -i http://pypi.douban.com/simple –trusted-host=pypi.douban.com
adds pyqt5-tools to the global environment variable (Path). Mine is:
C:\Users**\AppData\Local\Programs\Python\ python38-32 \Lib\site-packages\pyqt5_tools
test code
import sys
from PyQt5 import QtWidgets
app = QtWidgets.QApplication(sys.argv)
widget = QtWidgets.QWidget()
widget.resize(360, 360)
widget.setWindowTitle("hello, pyqt5")
widget.show()
sys.exit(app.exec())
:
: this application failed to start because no Qt platform plugincould be initialized may fix thisproblem
reinstalled PyQt5 also not
qt_qqpa_platform_plugin_path
C:\Users**\AppData\Local\Programs\Python\ python38-32 \Lib\site-packages\PyQt5\Qt\plugins
and then restart the computer, to take effect, appear successful problem solving

reference articles:
https://www.cnblogs.com/yclizq/p/11192128.html
https://blog.csdn.net/zjm12343/article/details/79707275?utm_medium=distribute.pc_relevant.none-task-blog-BlogCommendFromMachineLearnPai2-3.channel_param& depth_1-utm_source=distribute.pc_relevant.none-task-blog-BlogCommendFromMachineLearnPai2-3.channel_param
Centos7 quick installation of docker and configuration of image acceleration
follow the official documentation step by step
https://docs.docker.com/engine/install/centos/
1: uninstall the old version
sudo yum remove docker \
                  docker-client \
                  docker-client-latest \
                  docker-common \
                  docker-latest \
                  docker-latest-logrotate \
                  docker-logrotate \
                  docker-engine
2: download docker dependent packages and configure docker warehouse address
 sudo yum install -y yum-utils
 sudo yum-config-manager \
    --add-repo \
    https://download.docker.com/linux/centos/docker-ce.repo
3: install docker’s engine, operate docker’s client, and its container
sudo yum install docker-ce docker-ce-cli containerd.io
after the execution of the installation is complete
start docker command:
sudo systemctl start dockerset docker startup:
sudo systemctl enable docker
view docker version:
docker -v
view docker image:
sudo docker images
configure image acceleration: configure ali cloud
1: create directory
sudo mkdir -p /etc/docker
2: configure the mirror accelerator address
sudo tee /etc/docker/daemon.json <<-'EOF'
{
  "registry-mirrors": ["https://17o3zxc0.mirror.aliyuncs.com"]
}
EOF
3: restart docker background thread
sudo systemctl daemon-reload4: restart docker service
sudo systemctl restart docker
Exception in thread “main“ java.lang.ClassCastException: com.sun.proxy.$Proxy8 cannot be cast to XXX
:
note that the following two errors may be caused by not properly configuring the values of proxy-target-class:
error 1 : No qualifying bean of type ‘com. PJH. Service. Imp. ServiceImp’ available
error : The Exception in the thread “main” Java. Lang. ClassCastException: com. Sun. Proxy. $Proxy8 always be cast to XXX — — — — — — — dynamic proxy (proxy – target – the meaning of the class attribute)
this means roughly : no type is’ com. PJH. Service. Imp. ServiceImp “qualified bean available proxy: this is caused by not configuring proxy-target-class I use this code for:
H2> why?
proxy-target-class has two values: true/false
determines whether a proxy is created based on the interface or based on the class .
if the proxy-target-class attribute value is set to true, then the class-based proxy will come into play (in which case the cglib library is required). If the proxy-target-class attribute value is set to false or this property is omitted, the standard JDK interface-based proxy will come into effect.
statement : serviceImp is to implement the service interface is the parent of the
serviceImp bean1 = (serviceImp) classPathXmlApplicationContext. GetBean (serviceImp. Class);
and serviceImp is a class, not an interface
, but I did not configure proxy-target-class attribute when I was woven in, the default is proxy-target-class=false, this is based on the interface proxy, so the error is
, which is the content of the error : No type is’ com. PJH. Service. Imp. ServiceImp “qualified bean available <aop:config>
<aop:pointcut id="txPointcut" expression="execution(* com.pjh.service.Imp.serviceImp.*(..))"/>
<aop:advisor advice-ref="txAdvice" pointcut-ref="txPointcut"/>
</aop:config>
solution
when I change the value of the code’s proxy-target-class to true, I will not report an error, that is, I will change the class-based proxy
<aop:config proxy-target-class="true">
      <aop:pointcut id="txPointcut" expression="execution(* com.pjh.service.Imp.serviceImp.*(..))"/>
      <aop:advisor advice-ref="txAdvice" pointcut-ref="txPointcut"/>
  </aop:config>
To change the passed parameters to interface, there is no need to add proxy-target-class, because the default is false, which is based on the interface proxy
declaration : serivce is the parent class of serviceImp is an interface
service bean1 =(service) classPathXmlApplicationContext.getBean(service.class);
above is the error encountered today and its solution, if there is help, please pay attention to thumb up, this is the greatest support for bloggers, I will often update my study notes and problems encountered

NoClassDefFoundError: org/apache/flink/metrics/MetricGroup
. So we have this problem :
Exception in thread “main” java.lang.NoClassDefFoundError: Org/apache/flink/metrics/MetricGroup
the at org. Apache. The flink. Streaming. API. Environment. StreamExecutionEnvironment. AddSource StreamExecutionEnvironment. Java: (1614)
the at Org. Apache. Flink, streaming API. Environment. StreamExecutionEnvironment. FromCollection (StreamExecutionEnvironment. Java: 975)
the at Org. Apache. Flink, streaming API. Environment. StreamExecutionEnvironment. FromCollection (StreamExecutionEnvironment. Java: 945)
at the Map. The main (Map) Java: 22)
under Caused by: java.lang.ClassNotFoundException: Org. Apache. Flink. Metrics. MetricGroup
the at java.net.URLClassLoader.findClass (URLClassLoader. Java: 381)
the at Java lang. This. The loadClass (424). This Java:
the at Sun. Misc. The Launcher $AppClassLoader. LoadClass (335). The Launcher Java:
the at Java lang. This. LoadClass (357). This Java:
… 4 more
obviously the first thing to do is go to $FLINK_HOME and type in
grep -r MetricGroup
returns
flink – dist_2. 11-1.12 – the SNAPSHOT. Jar
Flink-dist
is really no way, stuck for a long time, the last way is as follows :
import flink-dist-***.jar
directly in Project Structure under $FLINK_HOME/lib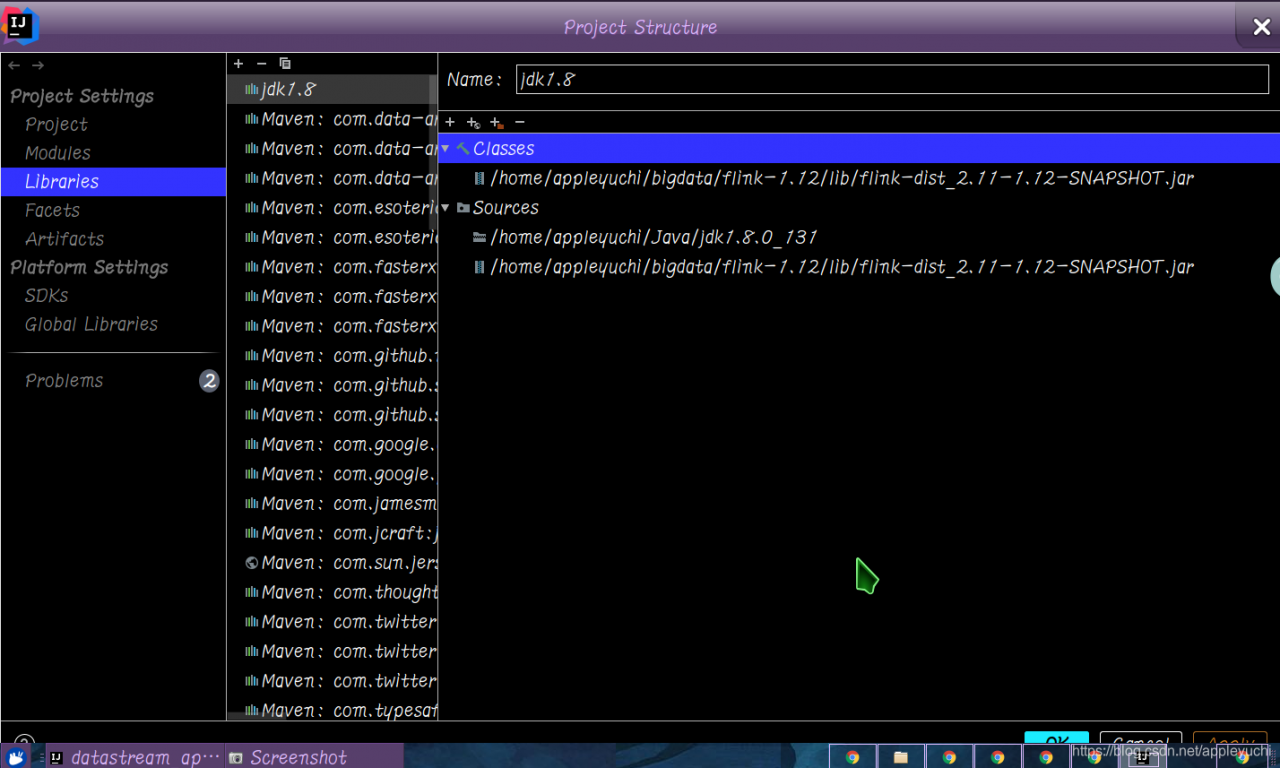
then run the code again, problem solved.
Pytorch — nn.Sequential () module
In short, nn.Sequential() packs a series of operations into , which could include Conv2d(), ReLU(), Maxpool2d(), etc., which could be packaged to be invoked at any point, but would be a black box, which would be invoked at forward().
extract part of the AlexNet code to understand sequential:
class AlexNet(nn.Module):
    def __init__(self, num_classes=1000, init_weights=False):
        super(AlexNet, self).__init__()

        self.features = nn.Sequential(
            nn.Conv2d(3, 48, kernel_size=11, stride=4, padding=2),
            nn.ReLU(inplace=True),
            nn.MaxPool2d(kernel_size=3, stride=2),
            nn.Conv2d(48, 128, kernel_size=5, padding=2),
            nn.ReLU(inplace=True),
            nn.MaxPool2d(kernel_size=3, stride=2),
            nn.Conv2d(128, 192, kernel_size=3, padding=1),
            nn.ReLU(inplace=True),
            nn.Conv2d(192, 192, kernel_size=3, padding=1),
            nn.ReLU(inplace=True),
            nn.Conv2d(192, 128, kernel_size=3, padding=1),
            nn.ReLU(inplace=True),
            nn.MaxPool2d(kernel_size=3, stride=2),
        )
        ......

    def forward(self, x):
        x = self.features(x)
        ......
        return x
init__, self. Features = nn.Sequential(…)
in forward() just use self.features(x) to
The difference between hive and relational database
Hive versus relational databases
hive is so similar to relational databases that there is always an illusion in hive learning that hive is a database, not a database. Hive is the client side of Hadoop, with HDFS at the bottom, and the execution engine is MapReduce, which is executed on Hadoop and, in other words, a layer of Hadoop’s client package.
1. Data update
- hive read more write less
- mysql usually needs to modify
frequently
2. Data delay
- mysql usually executes in seconds
- hive for a longer time:
- hive query, there is no index, need to scan the whole table, so the delay is high
- mapreduce when the hive is executed, there will be a shuffle, shuffle to drop the disk, the delay is high
3. Data size
- hive data scale is large
- hive is stored in HDFS and built on clusters. You can add machine vertical expansion
- mysql has storage bottlenecks
Mysql store on disk
Springboot + mybatis plus transaction management
business
transactions are mainly used to process data with large operation volume and high complexity. For example, in the personnel management system, you delete a person, you need to delete the basic information of the person, also want to delete the information related to the person, such as mailbox, article and so on, so that these database operation statements constitute a transaction!
open transaction, in Springboot start class, or a @ the Configuration class with @ EnableTransactionManagement open transactions. Because this is database related, I added
to the mybatis plus configuration class
/**
 * mybatisplus配置类
 */
//扫描mapper文件夹
@MapperScan("com.sec.mapper")
@EnableTransactionManagement//事务
@Configuration//配置类
public class MybatisPlusConf {


    //配置乐观锁插件
    @Bean
    public OptimisticLockerInterceptor optimisticLockerInterceptor() {
        return new OptimisticLockerInterceptor();
    }

    //配置分页插件
    @Bean
    public PaginationInterceptor paginationInterceptor() {
        PaginationInterceptor paginationInterceptor = new PaginationInterceptor();
        paginationInterceptor.setOverflow(false);
        return paginationInterceptor;
    }
}
Then simply add @transactional to the method that needs to use the transaction and start the transaction, just as simple as
notice that
Transactional by default rollback is RuntimeException which means that the database does not roll back if an exception is thrown that is not RuntimeException. Fortunately, however, under the springframework, all exceptions are rewritten by the org.springframework as RuntimeException, so you don't need to worry too much about
and if the exception is caught and handled manually by the programmer, the exception will not be rolled back
@Transactional
	public void buy() throws Exception {
        try{
        1. 扣钱
        } catch (Exception e) {
        	catch了自己处理,也就是异常被自己吞了,外层并不知道,此时也不会回滚
        }
        3. 扣库存
    }
when we need to use a try catch to catch an exception in the service layer class of transaction control, the transaction control is invalidated, because the exception of this class is not thrown, it is not the trigger transaction management mechanism. How to use the try catch to catch exceptions, and let the abnormal after spring roll back, here will use the TransactionAspectSupport. CurrentTransactionStatus (). The setRollbackOnly ();
//假设这是一个service类的片段

try{
    //出现异常
} catch (Exception e) {
            e.printStackTrace();
           //设置手动回滚
            TransactionAspectSupport.currentTransactionStatus()
                    .setRollbackOnly();
        }
//此时return语句能够执行
return  xxx;