Specific treatment methods are as follows:
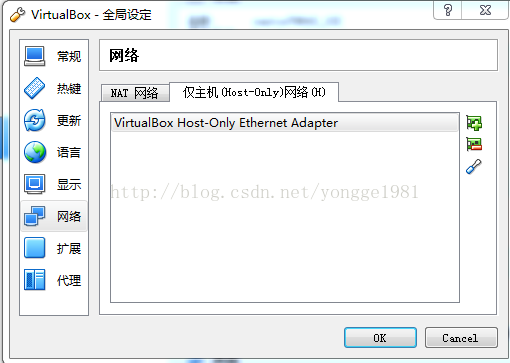
1. Start VirtualBox and select “Administration” –>; “Global Settings”, in the pop-up window, select “Network”, and then in the right window, select the “Host-only Network” TAB, as shown below;

If you don’t have a VirtualBox Host-only Ethernet Adapter, you can add it by clicking “+” on the right.
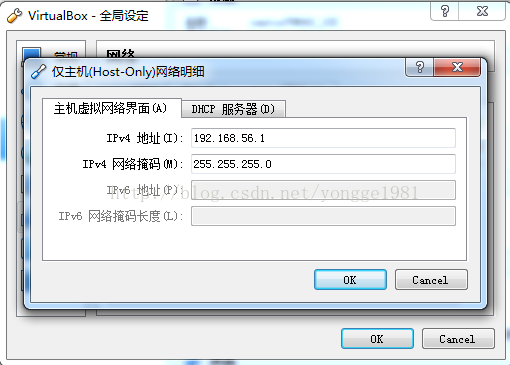
Then double-click the VirtualBox Host-Only Ethernet Adapter and the following image will pop up:

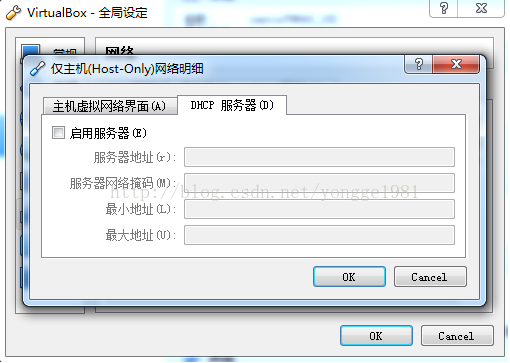
Select “DHCP Server” and uncheck the “Enable Server” status.

2. Start the virtual machine
Enp0s3 and enp0s8 represent two network cards: Enp0s3 and enp0s8 represent two network cards:
[hadoop@xhp1s2 ~]$ ifconfig
enp0s3: flags=4163< UP,BROADCAST,RUNNING,MULTICAST> MTU 1500
inet6 fe80::a00:27ff:fe4c:2f5b prefixlen 64 scopeid 0x20< link>
ether 08:00:27:4c:2f:5b TXQueuelen 1000 (Ethernet)
Packets 28 bytes 3361 (3.2 Kib)
R>rors 0 dropped 0 overruns 0 frame 0
Tx Pack>58 Bytes 6795 (6.6kib)
errors 0 dropped 0 overruns 0 carrier 0 Collision-losing 0
br> <>bb3 enp0s8: flags=4163< UP,BROADCAST,RUNNING,MULTICAST> MTU 1500
inet6 Fe80 :: A00:27ff: Fe46: D7F8 Prefixlen 64 scopeid 0x20< link>
ether 08:00:27:46: D7: F8 TXQueuelen 1000 (Ethernet)
Packets 24 bytes 6616 (6.4Kib)
R>rors 0 dropped 0 overruns 0 frame 0
Tx Pack>81 9555 bytes (9.3 KiB)
the TX errors 0 dropped overruns carrier collisions 0 0 0 0
In the directory CD /etc/sysconfig/network-scripts, you will see the presence of IFCFG-ENP0S3 file, copy a copy and change the name to IFCFG-ENP0S8, then edit IFCFG-ENP0S8, the final file contents are as follows:
TYPE=Ethernet
HWADDR= 08:00:27.46 :d7:f8 This indicates that the virtual network card address)
BOOTPROTO = static (here to change into the static)
DEFROUTE = yes
PEERDNS = yes
PEERROUTES = yes
IPV4_FAILURE_FATAL = no
IPV6INIT = yes
IPV6_AUTOCONF = yes
IPV6_DEFROUTE = yes
IPV6_PEERDNS = yes
IPV6_PEERROUTES = yes
IPV6_FAILURE_FATAL = no
NAME = enp0s8
UUID = 3 d54f693 – c56 bbef – 4-8984 – e0495a7c21s2 (this unlike enp0s3 coding)
DEVICE = enp0s8
ONBOOT = yes
IPADDR = 192.168.56.103
NETMASK = 255.255.255.0
GATEWAY = 192.168.56.1
Once this is done, start Service Network Restart and everything is OK.
Read More:
- A solution to the default invalid host only mode of CentOS virtual machine in VirtualBox
- IP address cannot be viewed through ifconfig in virtual machine
- Modify the VDI path of VirtualBox on MacOSX, and transfer the virtual machine
- VirtualBox reports an error supr3hardenedwinrespawn what 5 when opening the virtual machine
- The solution to the problem that the virtual machine and the host SSH can’t connect on vmvare
- Error ns when starting VirtualBox virtual machine after upgrading kernel_ ERROR_ FAILURE
- VirtualBox failed to start, prompt failed to open a session for the virtual machine windoze 7
- VirtualBox failed to start virtual machine – ntcreatefile (\ device \ \ vboxdrvsstub)
- Solution to redis error in CentOS of idea connected virtual machine
- Solve the problem that the virtual machine can’t be opened? Tips on VMware Workstation cannot connect to the virtual machine
- The solution of centos7 in VMware virtual machine unable to access after installing nginx
- Problem solving: this application cannot run under a virtual machine arcmapr, but you are not using a virtual machine
- [Solved] Centos7 Wget Error: nown. wget: unable to resolve host address ‘mirrors.aliyun.com’
- Several ways to check the IP address of raspberry pie
- VirtualBox problem solving set -[drm:vmw_host_log [vmwgfx]] *ERROR* Failed to send host log message
- System and host port mapping under virtualbox
- Hadoop download and install cloudera virtual machine (VM)
- Sata3.0 host controller IP
- (Virtual machine monitor failed and Virtual ethernet failed)
- Install Xen virtual machine using virt-manager