Tag Archives: solution

Python uses CX_ Oracle batch insert error report ora-01036 error solution

Recently, in the process of using Python to write data import program, CX is used_ When the Oracle database was imported into Oracle database, there was an error of “ora-01036: illegal variable name/number”. After querying the data and trying, the problem was solved.

The Error statement is:

sql = ‘insert into \”mytable_ a\” values(%s,%s,%s)’

cursor.executemany (sql, data)

As a result, the error “ora-01036: illegal variable name/number” appears.

resolvent:

Change the place holder of parameter transfer to “: 1,: 2,: 3”,

The modified statement is as follows:

sql = ‘insert into \”mytable_ a\” values(:1, :2, :3)’

cursor.executemany (sql, data)

Execute again and solve the problem.

The solution to frequently pop up “cannot find a valid baseurl for repo” error prompt box in CentOS 6.7

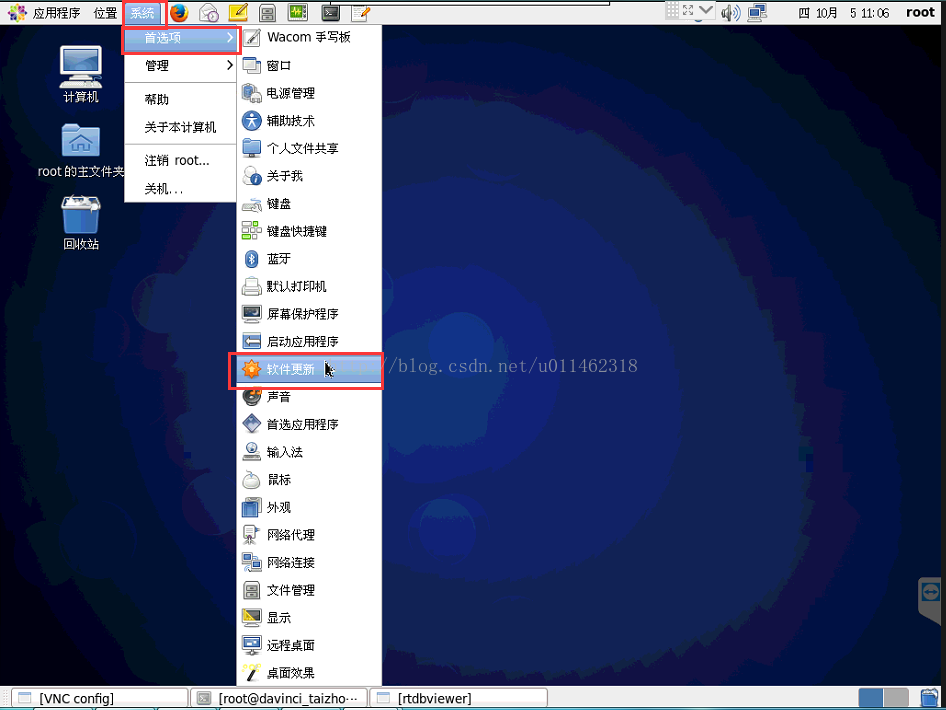
The situation is: CentOS 6.7 server cannot connect to the external network normally, and can only be used in the internal network. The “cannot find a valid baseurl for repo” error box pops up frequently. Here’s a screenshot:

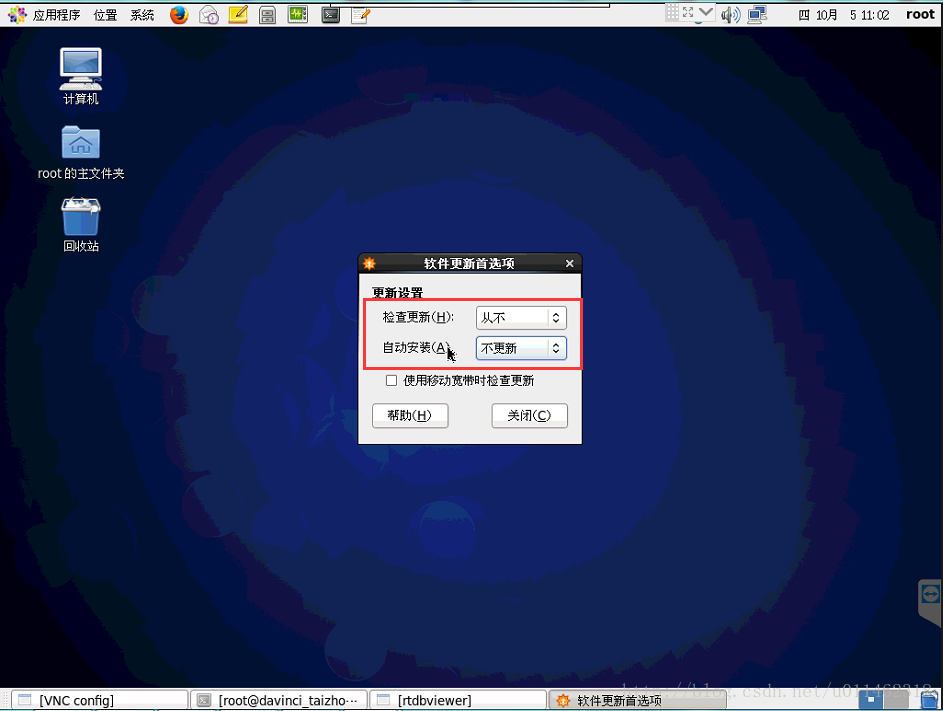
As the system is running normally, it does not need to be updated. Therefore, by adjusting the system settings and setting the system to “never check for updates” and “never update”, this error box will not appear in the system. As shown in the figure below:

Oracle quick replacement undo table space method

Undo table space is not enough. There are two ways to deal with it

1. Expand the table space size;

2. Create a new undo table space and delete the original one.

1、 Preliminary operation

Confirm undo table space name

select name from v$tablespace; 

Check the occupancy of undo table space and the storage location of data files;

select file_ name,bytes/1024/1024 from dba_ data_ files where tablespace_ name like ‘UNDOTBS1’; 

2、 Expand undo table space

alter   database  UNDOTBS1 datafile   ‘/opt/oracle/oradata/inms/undotbs02.dbf’   resize   4000M; 

3、 Create a new undo table space and delete the original one

1. Create a new undo table space and set the automatic extension parameters;

create undo tablespace undotbs2 datafile ‘/oradata/oradata/ddptest/UNDOTBS1.dbf’ size    2 1000m reuse autoextend on next 800m maxsize unlimited; 

2. Change the SPFILE configuration file dynamically;

alter system set undo_ tablespace=undotbs2 scope=both; 

3. Delete the original undo table space;

drop tablespace undotbs1 including contents; 

4. Confirm whether the deletion is successful;

select name from v$tablespace; 

5. Determine $Oracle_ HOME/dbs/ spfileoinms.ora Whether the content has changed:

$more spfileoinms.ora  

*.undo_ management=’AUTO’

*.undo_ retention=10800

*.undo_ tablespace=’UNDOTBS2′ 

If there is no change, execute the following statement:

SQL> create pfile from spfile; 

File created. 

6. Delete the data file of the original undo table space, and the file name is the result of the step.  

#rm $ORACLE_ BASE/oradata/$ORACLE_ SID/undotbs01.dbf

4、 Conclusion

According to the actual situation, expanding undo table space can only support for a period of time. After running for a period of time, the undo table space data file will eventually reach the upper limit. Therefore, the second scheme is adopted. You can use the script to replace the undotbs1 and undotbs2 table spaces alternately, which can quickly solve the problem.

(1) Script 1: replace the undotbs2 table space with undotbs1

create undo tablespace undotbs1 datafile ‘/u01/oracle/oradata/orcl/UNDOTBS1.dbf’ size 512m reuse autoextend on next 512m maxsize unlimited;


alter system set undo_ tablespace=undotbs1 scope=both;


drop tablespace undotbs2 including contents;


rm ‘/u01/oracle/oradata/orcl/UNDOTBS2.dbf’

(2) Script 2: replace the undotbs1 table space with undotbs2

create undo tablespace undotbs2 datafile ‘/u01/oracle/oradata/orcl/UNDOTBS2.dbf’ size 512m reuse autoextend on next 512m maxsize unlimited;


alter system set undo_ tablespace=undotbs2 scope=both;


drop tablespace undotbs1 including contents;


rm ‘/u01/oracle/oradata/orcl/UNDOTBS1.dbf’


Oracle data file space release

When the data of Oracle database takes up a large space, and the data stored in it does not take up such a large space, the reason may be that the user has deleted some data, but the size of the data file will not automatically shrink. At this time, if you want to reduce the size of the data file, you can use the following methods.

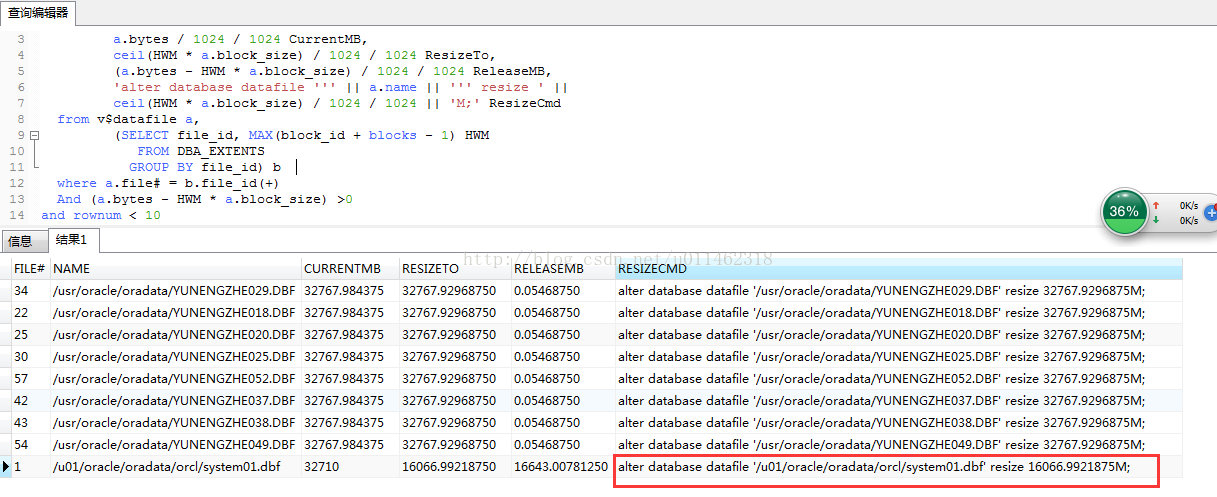
1、 Use the following statement to query data files that can free up space:

select a.file#,

a.name,

a.bytes/1024/1024 CurrentMB,

ceil(HWM * a.block_ size)/1024/1024 ResizeTo,

(a.bytes – HWM * a.block_ size)/1024/1024 ReleaseMB,

‘alter database datafile ”’ || a.name || ”’ resize ‘ ||

ceil(HWM * a.block_ size)/1024/1024 || ‘M;’ ResizeCmd

from v$datafile a,

(SELECT file_ id, MAX(block_ id + blocks – 1) HWM

FROM DBA_ EXTENTS

GROUP BY file_ id) b

where a.file# = b.file_ id(+)

And (a.bytes – HWM * a.block_ size) >0

and rownum < 10

View the data file that belongs to the system table space, and reset it.

2、 Find out the data file that needs to be reset, and execute the reset statement

An error is reported because the reset data file size needs to be set to an integer.

Adjust the size of resize to 16GB, 16384mb;

3、 View free disk space

The size of the system file is reduced to 16GB, the remaining space of the root disk is greatly increased to 19.6gb, and the utilization rate is reduced to 78%.

A solution to the problem that the number of nodes does not increase and the name of nodes is unstable after adding nodes dynamically in Hadoop cluster

Problem phenomenon

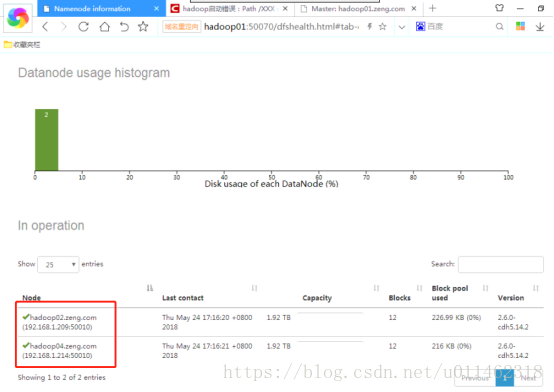
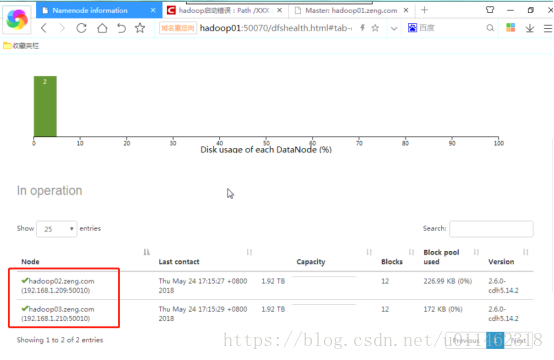
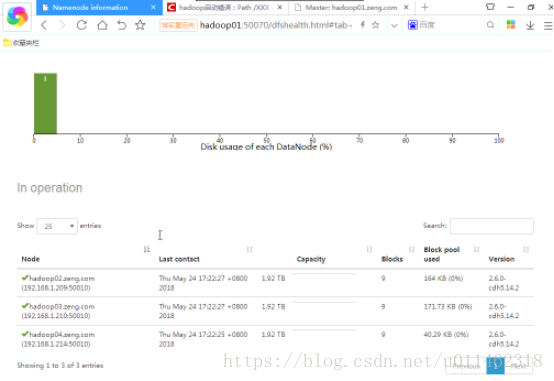
At present, there are three Hadoop clusters with 01, 02 and 03 nodes, among which 01 is the master node and 02 and 03 are the slave nodes. After dynamically adding 04 slave nodes, the number of nodes displayed in Hadoop web interface does not increase. Further observation shows that the contents of slave nodes in the node list are sometimes 02 and 04 nodes, and sometimes 02 and 03 nodes, which is very strange.


Analyze the reasons

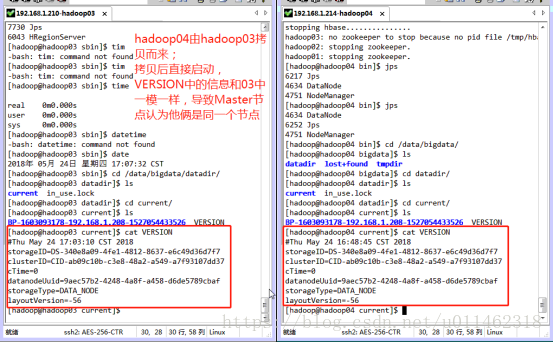
Find the current/version file in the dataDir directory, and the datanodeuuid values in the 03 and 04 servers are exactly the same. It can be inferred that the master node treats 03 and 04 as the same server. The reason is that the 03 server has been started before, and the datanodeuuid has been recorded in the generated version. When the virtual machine is cloned, all the information is the same as the 03 server.


Solution

Considering that if it is not a clone but a direct installation, the dataDir and TMPDIR directories of the 04 server are blank, so stop the datanode and nodemanager services of the 04 server, delete all the files in the dataDir and TMPDIR directories, restart the datanode and nodemanager services, and observe again that the contents of the Hadoop cluster display three datanodes 02, 03 and 04, which are similar to the The expectation is consistent and the problem is solved.

matters needing attention

When adding new nodes by copying or cloning virtual machines, the following operations need to be done:

1. Modify the host name and IP address, restart the new node, and copy the/etc/hosts file to other nodes in the cluster (if using the local DNS server, this step can be omitted, just add the modified node to the domain name resolution record in the DNS server);

2. The new node needs to re run SSH keygen – t RSA to generate the public key and add it to authorized_ And copy it to other nodes in the cluster.

reference material:

1. Hadoop datanode starts normally, but there is no node in live nodes

https://blog.csdn.net/wk51920/article/details/51729460

2. Hadoop 2.7 dynamically adds and deletes nodes
in this paper

https://blog.csdn.net/Mark_ LQ/article/details/53393081

Method of canceling anydesk startup under Windows

Anydesk, a remote connection tool, is not used frequently after installation. It starts automatically every time it is turned on. It takes up resources. Hanging it in the windows tray is very eye-catching.

The solution is as follows:

In the start folder of the start menu, find anydesk, right-click and select Delete.

complete

Linux learning experience sharing

1. What’s the use of learning Linux?

Learning Linux well will let you break the limitation of windows, come and go freely in the open source world, there are a lot of free software for you to use, especially the students of computer department,.
If you only use Linux as the only tool to make a living, you can choose the direction mainly in the operation and maintenance, system level software development and other fields. Linux occupies the vast majority of the server market, such as the Internet industry, front-end web development, back-end web servers, databases, storage devices are basically running on Linux, so you have to fight with Linux to do software development Although I think Linux brings you a different world view. There is no good or bad technology, the key is to see how you understand it.

2. I think there are many English words in Linux. Is it difficult to learn them?

Many people may think that there are many English words and documents in Linux. Is it difficult for us to learn them, but these commands are just abbreviations of English words, such as LS – list, CD – change directory, PWD – print working directory, CP – copy, MV – move, RM – remove these commands are abbreviations of English words, as long as you understand the meaning (understand), this shoe command will be very simple.
Therefore, don’t be afraid of English. English, as the most widely circulated language in the world, always has its value. It is also necessary to study and further study. Why not learn English together while learning Linux?If you have such an idea, then I’m sure you can learn Linux well.

3. I want to learn Linux, but I’m too busy with my work. I can learn less every day, and then Bala

Linux is a skill that makes a lot of things. In fact, it doesn’t require you to spend a lot of time learning it, but requires you to keep on and accumulate it. So, for office workers, it is the key to be good at using fragmented time. As long as you take out half an hour every day and persist in learning for a year, there will be a breakthrough!
Finally, there is the saying: “if you want to learn, nothing is an excuse. If you don’t want to learn, everything is an excuse.”

4. Some people say that “learning Linux is going in laughing and coming out crying”. Is that right?

Those who say that everything (skills) is easy to get started and difficult to learn later are all excuses for not learning well. Linux is just a basic computer skill. It has no requirements for learners’ background, knowledge structure and age. As long as they make unremitting progress, there is nothing they can’t learn. Of course, in learning there will always be bottlenecks, this time we need to self-regulation, adhere to. There are a lot of things to remember in learning Linux. If you are too lazy to recite, study and understand the command options of Linux, you will find it difficult to learn. Or that sentence, down-to-earth, there will always be harvest.

5. My qualifications are average and I don’t have any foundation. Generally, I have to study Linux in non working hours. How long can I pass RHCE?

It varies from person to person how long they have passed the certification. According to past experience, most people spend 1 or 2 hours a day studying hard for 2 to 4 months, so they should be able to pass the RHCE. I personally don’t agree with the method of storming RHCE half a month, because the certificate is secondary to learning Linux, and the main thing is to improve my working ability. Certification like this can be used as a phased goal for you to learn Linux, but it is not the main purpose of your study.

6. I want to teach myself Linux. What’s a good textbook to recommend.
When it comes to teaching materials, there are quite a lot of Linux teaching materials on the market. If you really want to recommend them, you can recommend many books. Next, I mainly recommend a book that I think is more suitable for beginners: This is how to learn Linux written by Liu Trent.
This book was started in 2015, and is still in the process of being written. It is a relatively new book. Compared with the Linux books on the market a few years ago, it is more suitable for the current environment, so as to improve the efficiency Redhat7 is a teaching system. Compared with other books, you can learn a lot of useful things. For a classmate with zero basis in Linux, the knowledge of this book is certainly enough, and what you have learned can be used in work It’s OK in the RHCE exam. The main points and difficulties of Linux system management are all covered in it. It’s easy to learn in order, and you don’t have to worry about the fracture of the knowledge layer.

7. I want to learn Linux, but I have no patience. How can I persist?

I don’t think this is a case. Many beginners will ask this question. In fact, what I want to say is that patience should be cultivated slowly. One of the most important things in learning Linux is interest. Generally speaking, people who want to learn Linux are interested in Linux or have what they want. In addition, a good learning environment and a good example will naturally lead to patience If you keep learning, you will be in touch with Linux every day. You can turn books whenever you have time. Therefore, interest is the best teacher. Although this sentence is vulgar, it’s quite right.

8. I want to learn Linux. Can I completely study by myself without taking any training courses?

You can download a free copy of “this is how to learn Linux” http://www.linuxprobe.com/book Take a look at it by self-study, but I don’t recommend not to apply for classes at all. In fact, Linux is a simple thing: you will use it after you learn it. For example, when you take exams and use them in your work, you will be short of learning by yourself at the beginning, which will directly affect your study time and greatly increase the cost of study. Therefore, when you first get started, you still need a Linux teacher to guide you to get started;
when you get started, you need a Linux teacher to help you get started Secondly, in fact, there are certain rules in learning Linux. We can call it the knowledge architecture of Linux. If you just look at the content in the textbook without the teacher’s summary and explanation, it’s easy to forget after learning. If you follow the teacher to learn Linux at the beginning, you can establish the correct knowledge architecture of Linux. On the contrary, if you don’t set up a good structure at the beginning, even if you teach yourself to the intermediate level, you may find it difficult to learn in the face of some unfamiliar problems, and your interest in learning will weaken, leading to giving up in the end. In addition, if it’s class learning, you can find like-minded partners to study together in a class, which is also a kind of promotion for your own learning.

Generally speaking, they can learn by themselves, but they are difficult and easy to take detours. Knowledge on the Internet is scattered, and there are mistakes and loopholes. If there is a teacher’s advice, on the one hand, it can help you to summarize in time, on the other hand, it can also play a role in urging you to learn.
[neo4j] error report when visiting neo4j in spring boot project

Spring boot project uses spring-data-neo4j to connect with neo4j. It can start and access the database normally when running locally all the time. If you write dockerfile well and run on the server with docker compose, you will report an error, such as:

Caused by: java.lang.NullPointerException: null
    at org.neo4j.ogm.MetaData.entityType(MetaData.java:280) 

The reasons are as follows:
https://github.com/spring-projects/spring-boot/issues/6709

stay pom.xml To solve the problem, add dependency to

 <!--Not adding this package to run in docker will report an error-->
 <!--https://github.com/spring-guides/gs-accessing-data-neo4j/issues/19-->
        <dependency>
            <groupId>io.github.lukehutch</groupId>
            <artifactId>fast-classpath-scanner</artifactId>
            <version>3.1.13</version>
        </dependency>

Several properties of Android listview

First is the stackFromBottom property, after this property your finished list will be displayed at the bottom of your list, with the values true and false

android:stackFromBottom="true"             

The second is the transciptMode property, you need to track or view information in real time with a ListView or other control that displays a large number of Items, and you want the newest items to be automatically scrolled to the visible range. The control transcriptMode property can be set to automatically scroll to the bottom of the Android platform control (which supports ScrollBar) by setting
 android:transcriptMode="alwaysScroll"    

The third cacheColorHint property is that many people want to change the background to match the overall UI design, it's easy to change the background by preparing an image and specifying the property android:background="@drawable/bg", but don't be too happy, after you do that, you will find that the background is but when you drag or click on the blank position of the list, you will find that the ListItem becomes black, which ruins the overall effect.

If you just change the color of the background, you can directly specify android:cacheColorHint as the color you want, if you are using pictures as the background, then also just specify android:cacheColorHint as transparent (#00000000) on it!

The fourth divider attribute, the role of this attribute is to set a picture as a spacer between each item, or to remove the divider line between the items

 android:divider="@drawable/list_driver" where @drawable/list_driver is an image resource, if you don't want to show the divider, just set it to android:divider="@drawable/@null" and you're done.

The fifth fadingEdge property, with black shadows on the top and bottom edges

android:fadingEdge="none" set to no shadow~

 The fifth scrollbars property, which hides the scrollbars of the listView, is

android:scrollbars="none" and setVerticalScrollBarEnabled(true); the effect is the same, hidden when inactive and hidden when active

The sixth fadeScrollbars property, android:fadeScrollbars="true", can be set to true when configuring the ListView layout to achieve automatic hiding and displaying of scrollbars.

The precision of decimal calculation with double and float in Java is not accurate

The precision of decimal calculation with double and float in Java is not accurate

In most cases, using double and float to calculate the result is accurate, but in some systems with high accuracy requirements or known decimal calculation results will not be accurate, this problem is very serious.

《Effective Java “refers to a principle, that is, float and double can only be used for scientific calculation or engineering calculation, but we should use them in commercial calculation java.math.BigDecimal By using the BigDecimal class, we can solve the above problems. The designer of Java provides a very useful class BigDecimal for programmers, which can improve the problem that the float and double classes can’t calculate accurately I’m sorry.

The example code is as follows:

package ex;

import java.math.*;

public class BigDecimalDemo {
    public static void main(String[] args){
        System.out.println(ArithUtil.add(0.01, 0.05));
        System.out.println(ArithUtil.sub(1.0, 0.42));
        System.out.println(ArithUtil.mul(4.015, 100));
        System.out.println(ArithUtil.div(123.3, 100));
    }
}

class ArithUtil{
    private static final int DEF_DIV_SCALE=10;

    private ArithUtil(){}
    //+
    public static double add(double d1,double d2){
        BigDecimal b1=new BigDecimal(Double.toString(d1));
        BigDecimal b2=new BigDecimal(Double.toString(d2));
        return b1.add(b2).doubleValue();

    }
    //-
    public static double sub(double d1,double d2){
        BigDecimal b1=new BigDecimal(Double.toString(d1));
        BigDecimal b2=new BigDecimal(Double.toString(d2));
        return b1.subtract(b2).doubleValue();

    }
    //*
    public static double mul(double d1,double d2){
        BigDecimal b1=new BigDecimal(Double.toString(d1));
        BigDecimal b2=new BigDecimal(Double.toString(d2));
        return b1.multiply(b2).doubleValue();

    }
    // /
    public static double div(double d1,double d2){

        return div(d1,d2,DEF_DIV_SCALE);

    }

    public static double div(double d1,double d2,int scale){
        if(scale<0){
            throw new IllegalArgumentException("The scale must be a positive integer or zero");
        }
        BigDecimal b1=new BigDecimal(Double.toString(d1));
        BigDecimal b2=new BigDecimal(Double.toString(d2));
        return b1.divide(b2,scale,BigDecimal.ROUND_HALF_UP).doubleValue();

    }

}

Now let’s analyze in detail why floating-point operations cause precision loss?

1. Binary representation of decimals

 First we need to clarify the following two issues.

     (1) How to convert decimal integers to binary numbers

           The algorithm is simple. As an example, 11 is expressed as a binary number.

                     11/2=5 remainder 1

                       5/2=2 remainder 1

                       2/2=1 remainder 0

                       1/2=0 remainder 1

                          End of 0 11 is represented in binary as (from bottom to top):1011

          In other words, will the algorithm for converting all integers into binary numbers go on indefinitely? Absolutely not, integers can always be represented exactly in binary, but not decimals.

      (2) How decimal decimals are converted into binary numbers

           The algorithm is to multiply by 2 until there are no more decimals. As an example, 0.9 is expressed as a binary number

                     0.9*2=1.8 Take the integer part 1

                     0.8(fractional part of 1.8)*2=1.6 Take the integer part 1

                     0.6*2=1.2 Take the integer part 1

                     0.2*2=0.4 Take the integer part 0

                     0.4*2=0.8 Take integer part 0

                     0.8*2=1.6 Take integer part 1

                     0.6*2=1.2 Take integer part 0

                              .........      0.9 Binary representation (from top to bottom): 1100100100100 ......

           Note: The above calculation process is circular, which means that *2 can never eliminate the fractional part, so that the algorithm will go on indefinitely. Obviously, the binary representation of decimals is sometimes impossible to be exact. The reason is simple: can 1/3 be represented accurately in the decimal system? This explains the loss of precision in floating-point subtraction, where "subtraction is incomplete". 

.
2. Storage of float type in memory

It is well known that Java's float type takes up 4 bytes in memory. float's 32 binary bits are structured as follows


float memory storage structure

             4bytes 31 30 29 ----23 22 ----0         

                        Indicates real sign bit Exponential sign bit Exponential bit Valid number of bits

        Where the sign bit 1 means positive and 0 means negative. The valid bits are 24 bits, one of which is the real sign bit.

         The steps to convert a float type to memory storage format are

        (1) First convert the absolute value of this real number into binary format, noting that the binary methods for the integer and decimal parts of the real number have been discussed above. 
     (2) Shift the decimal point of this binary format real number left or right by n bits until the decimal point moves to the right of the first significant digit. 
     (3) Count out twenty-three digits from the first digit to the right of the decimal point into the 22nd to the 0th digit. 
     (4) If the real number is positive, put a "0" in the 31st place, otherwise put a "1". 
     (5) If n is shifted to the left, the exponent is positive and "1" is placed in the 30th place. If n is shifted to the right or n=0, then "0" is placed in the 30th position. 
     (6) If n is obtained by left shift, n is converted to binary by subtracting 1 and adding "0" to the left to make up the seven bits and put it into the 29th to 23rd place. If n is shifted to the right or n=0, then n is converted to binary and "0" is added to the left to make up the seven bits, and then each bit is inverted and placed in bits 29 to 23.

          Example: Memory storage format of 11.9

       (1) The memory storage format of 11.9 is approximately "1011. 11100110011001100110011001100..." after converting 11.9 to binary. .".

       (2) Shift the decimal point three places left to the right of the first significant digit: "1. 011 11100110011001100110". Ensure that the number of significant digits is 24, with the extra intercept on the right (where the error is created ).

       (3) This already has twenty-four valid digits, remove the leftmost "1" to get "011 11100110011001100110" with 23 bits. (4) Since 11.9 is a valid number, it is a valid number.

       (4) Since 11.9 is a positive number, put "0" in the 31st real sign bit.

       (5) Since we are shifting the decimal point to the left, we put "1" in the 30th exponent sign position.

       (6) Since we are shifting the decimal point 3 places to the left, we subtract 1 from 3 to get 2, convert it to binary, and add 7 bits to get 0000010, and put it in the 29th to 23rd place.

           The final representation of 11.9 is: 0 1 0000010 011 11100110011001100110

           Another example: the memory storage format of 0.2356
      (1) After converting 0.2356 to binary, it is approximately 0.00111100010100000100100000. 
      (2) Move the decimal point three places to the right to get 1.11100010100000100100000. 
      (3) Count out twenty-three valid digits from the right of the decimal point, i.e. 1110001010100000100100000.
into the 22nd to the 0th digit. 
      (4) Since 0.2356 is positive, put a "0" in the 31st place. 
      (5) Since we have shifted the decimal point to the right, we put a "0" in the 30th place. 
      (6) Because the decimal point is shifted to the right by 3 bits, so the 3 is converted to binary, and the "0" is added to the left to make up the full seven
(6) Because the decimal point is shifted to the right by 3 bits, the 3 is converted to binary, and the "0" is added to the left to make up the seven bits to get 0000011. 


           The final value of 0.2356 is: 0 0 1111100 11100010100000100100000

          Steps to convert a memory-stored float binary format to decimal. 
     (1) Write out the binary number from the 22nd to the 0th digit, and add a "1" to the leftmost digit to get twenty-four valid digits. Put the decimal point to the right of the leftmost "1". 
     (2) Take out the value n from the 29th to the 23rd digit, and invert the n digit when the 30th digit is "0". When the 30th digit is "1", increment n by 1. 
     (3) Shift the decimal point left by n (when the 30th digit is "0") or right by n (when the 30th digit is "1") to obtain a real number in binary. 
     (4) Convert this binary real number to decimal and add a plus or minus sign depending on whether the 31st bit is a "0" or a "1". 

3. Subtraction of floating point

The process of adding and subtracting floating point is more complex than the process of fixed point. The process of completing a floating point addition or subtraction operation is roughly divided into four steps.

(1) Checking of the 0 operand.
        If one of the two floating-point numbers to be added or subtracted is 0, the result of the operation is known without the need to perform some sequential operations. 

(2) Comparing the magnitude of the ordinal (exponent bits) and completing the pair order.
    To add or subtract two floating-point numbers, we must first see whether the exponent bits of the two numbers are the same, i.e., whether the decimal point positions are aligned. If the two numbers have the same exponent, it means the decimal points are aligned, and the addition and subtraction of the last number can be performed. On the contrary, if the two numbers have different ordinates, it means that the decimal points are not aligned, so we must make the ordinates of the two numbers the same, and this process is called pairing.

    How to pair order (assuming two floating point numbers with exponent bits Ex and Ey ).
    By shifting the mantissa to change Ex or Ey so that they are equal. Since floating point numbers are mostly speciated, shifting the trailing left number will cause the loss of the highest significant bit, resulting in a large error; while shifting the trailing right number will cause the loss of the lowest significant bit, but the error caused is smaller, therefore, the pairwise order operation requires that the trailing right number be shifted, and after the trailing right number is shifted, the order code is increased accordingly, while its value remains unchanged. Obviously, if one of the increased ordinals is equal to the other, the increased ordinal must be a small one. Therefore, in the order pairing, always make the small order to the large order, that is, the end of the small order shift to the right (equivalent to the decimal point left shift), each right shift one, its order code plus 1, until the two numbers of the order code equal, the number of right shift is equal to the order difference △ E. 

(3) The mantissa (valid digits) is added or subtracted.

(4) The result is normalized and rounded.

Android realizes the fade in and fade out of animation effect

View fade animation effect

  /**
     * View fade animation effect
     */
    public  void setHideAnimation( View view, int duration)
    {
        if (null == view || duration < 0)
        {
            return;
        }

        if (null != mHideAnimation)
        {
            mHideAnimation.cancel();
        }
        // Listening for the end of animation operations
        mHideAnimation = new AlphaAnimation(1.0f, 0.0f);
        mHideAnimation.setDuration(duration);
        mHideAnimation.setFillAfter(true);
        view.startAnimation(mHideAnimation);
    }

View fade animation effect

/**
     * View fade animation effect
     */
    public  void setShowAnimation( View view, int duration)
    {
        if (null == view || duration < 0)
        {
            return;
        }
        if (null != mShowAnimation)
        {
            mShowAnimation.cancel();
        }
        mShowAnimation = new AlphaAnimation(0.0f, 1.0f);
        mShowAnimation.setDuration(duration);
        mShowAnimation.setFillAfter(true);
        view.startAnimation(mShowAnimation);
    }

It is best to monitor the beginning and end of the animation. For showview, call showView.setVisibility ( View.VISIBLE )Set to visible before calling showView.animate ()
for hideview, call hideView.animate (), and finally invoked in the onAnimationEnd event. hideView.setVisibility ( View.GONE ); set to invisible

Monitor processing: View fade animation effect

 /**
     * View fade animation effect
     */
    public  void setHideAnimation( final View view, int duration)
    {
        if (null == view || duration < 0)
        {
            return;
        }

        if (null != mHideAnimation)
        {
            mHideAnimation.cancel();
        }
        // Listening for the end of animation operations
        mHideAnimation = new AlphaAnimation(1.0f, 0.0f);
        mHideAnimation.setDuration(duration);
        mHideAnimation.setFillAfter(true);
        mHideAnimation.setAnimationListener(new AnimationListener()
        {

            @Override
            public void onAnimationStart(Animation arg0)
            {

            }

            @Override
            public void onAnimationRepeat(Animation arg0)
            {

            }

            @Override
            public void onAnimationEnd(Animation arg0)
            {
                view.setVisibility(View.GONE);
            }
        });
        view.startAnimation(mHideAnimation);
    }

Monitor processing: View fade animation effect

 /**
     * View fade animation effect
     */
    public  void setShowAnimation( final View view, int duration)
    {
        if (null == view || duration < 0)
        {
            return;
        }
        if (null != mShowAnimation)
        {
            mShowAnimation.cancel();
        }
        mShowAnimation = new AlphaAnimation(0.0f, 1.0f);
        mShowAnimation.setDuration(duration);
        mShowAnimation.setFillAfter(true);
        mShowAnimation.setAnimationListener(new AnimationListener()
        {

            @Override
            public void onAnimationStart(Animation arg0)
            {
                view.setVisibility(View.VISIBLE);
            }

            @Override
            public void onAnimationRepeat(Animation arg0)
            {

            }

            @Override
            public void onAnimationEnd(Animation arg0)
            {

            }
        });
        view.startAnimation(mShowAnimation);
    }

Note: I found that after setting the view control fade, and gone (completely invisible), after these two properties. When you click the position of the control, the click event of the view will still start. However, when view gone is set separately, if you click view, there will be no response. It’s hard for me to understand. Just in the project, the click of this view needs to be processed, so when I set gone to view, I will set clickable to false again.