ubuntu/Linux
sudo apt install libopenmpi-dev
pip3 install -i https://pypi.tuna.tsinghua.edu.cn/simple/ mpi4py
mac
brew install mpich
pip install -i https://pypi.tuna.tsinghua.edu.cn/simple/ mpi4py
ubuntu/Linux
sudo apt install libopenmpi-dev
pip3 install -i https://pypi.tuna.tsinghua.edu.cn/simple/ mpi4py
mac
brew install mpich
pip install -i https://pypi.tuna.tsinghua.edu.cn/simple/ mpi4py
Datetime: date time module, which provides multiple methods to operate date and time
Strftime: format date and time
Get today’s date, yesterday’s date, formatted date
>>> import datetime
>>> today=datetime.date.today()
>>> print today
2018-01-17
>>> formatted_today=today.strftime('%y%m%d')
>>> print formatted_today
180117
>>> yesterday=int(formatted_today)-1
>>> print yesterday
180116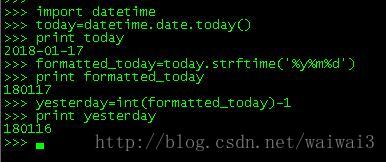
The above content was written on January 17, 2018. Now some problems are found on March 1. When it crosses months, the above code will appear.
yesterday=int(formatted_today)-1After executing this line of code, the day before March 1 becomes March 0
How to change it?
yesterday = (datetime.date.today() + datetime.timedelta(days=-1)).strftime('%Y%m%d')Get today’s date first
Then use the timedetla object of datetime, which represents the difference between the two times, datetime.timedelta (days = – 1) means the time of the day before. The day before March 1 is February 28.
Finally, we use strftime to transform the time format
Base64 coding is a kind of coding method of “guard against gentleman but not villain”. It is widely used in MIME Protocol. As the transmission code of e-mail, the generated code is reversible. The last two bits may have “=”, and the generated codes are all ASCII characters.
Advantages: fast speed, ASCII characters, incomprehensible to the naked eye
disadvantages: the encoding is relatively long, very easy to crack, only suitable for the occasion of encrypting non key information
Base64 encoding and decoding in Python
& gt; & gt; & gt; import Base64
& gt; & gt; s =’I am a string ‘
& gt; & gt; a = Base64. B64encode (s)
& gt; & gt; & gt; Print a
ztlkx9fwt / u0rg = =
& gt; & gt; & gt; print Base64. B64decode (a)
I am a string
I’ve been looking online for a long time. Either the data frame is transformed into array or the array is transformed into data frame. So here’s a summary. The python generation of mutual transformation is as follows:
Transform dataframe into array
and
df=df.valuesTransform array into dataframe
import pandas as pd

df = pd.DataFrame(df)
That’s OK!
Httprunner output assure Report
1. Install allure
Mac:
brew install allure Windows: https://repo.maven.apache.org/maven2/io/qameta/allure/allure-commandline/2.12.0/
After downloading, unzip, enter the bin directory, and use the allure.bat That is, the directory can be configured to an environment variable
2. Install assure pytest
pip install allure-pytest 3. Execute httprunner command
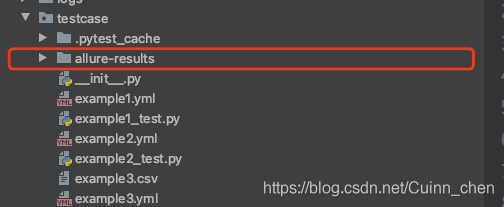
hrun --alluredir allure-results --clean-alluredir testcasesname After execution, you can see that there is an assure results folder
implement
allure generate Folder for generating alure reports 
Windows can use the allure.bat generate …
Or start the static service of the report directly:
allure serve Folder for generating alure reports Generate reports.
*
*
First install the memory_profiler and psutil (psutil is mainly used to improve the performance of memory_profile, recommended) (you can use PIP directly)
PIP install memory_profiler
p install psutil
Mprof run test. Py generates a
results. Dat file, such as “mprofile_20160716170529. Dat”, which records the memory along with the change of time
mprof plot
using the commands in the form of pictures showing
the original:
https://blog.csdn.net/baidu_33122327/article/details/79195176
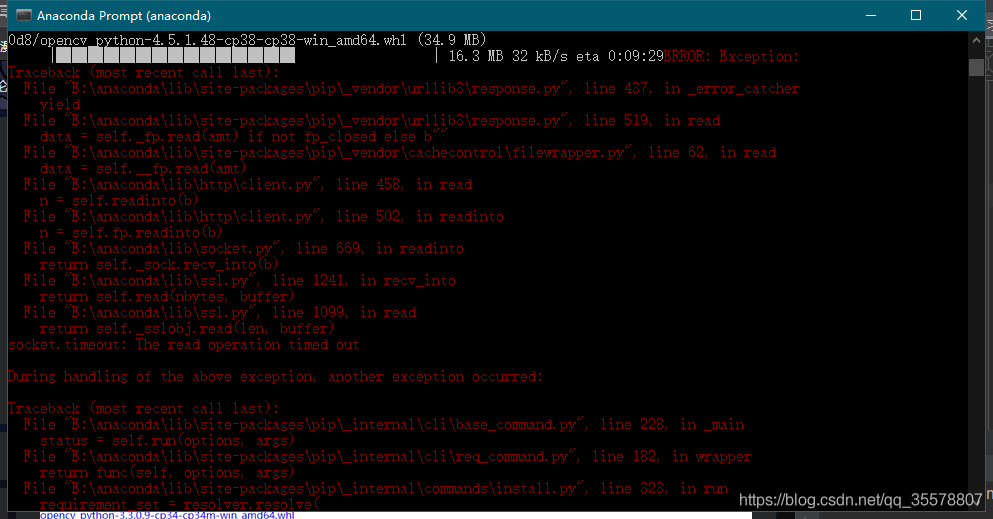
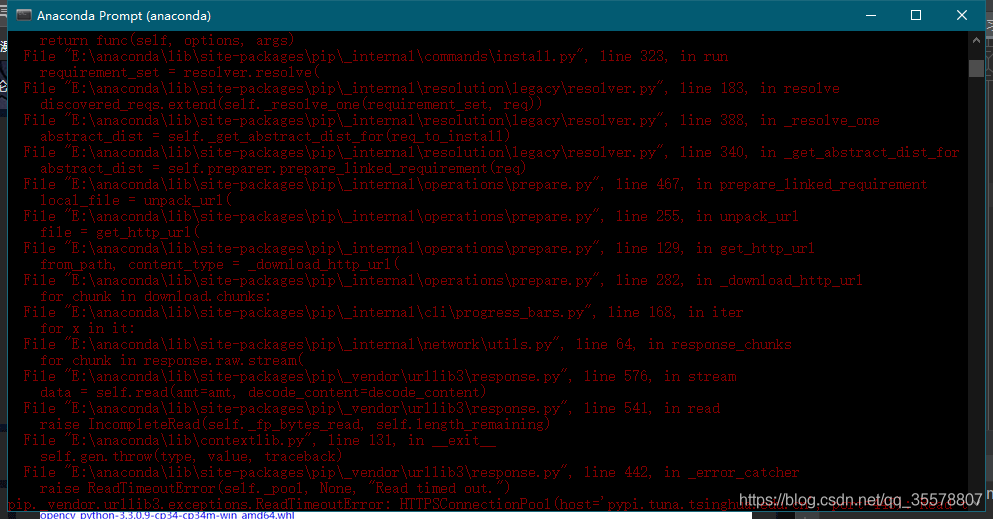
Error message: PIP _vendor. Urllib3. Exceptions. ReadTimeoutError:
HTTPSConnectionPool (host = “pypi.tuna.tsinghua.edu.cn”, the port = 443) : Read timed out.
directly in the console input PIP install opencv – python error as shown in figure:
May be because I accidentally canceled the cause behind all installation not
behind direct route directly to tsinghua source download and then switch to the installation was successful
 tsinghua source: https://pypi.tuna.tsinghua.edu.cn/simple/opencv-python/
small pit: switch plate command is “E:”, rather than the CD disc cutting
reference: https://blog.csdn.net/qq_43766304/article/details/104862174
New structures, the database, the application after connecting up, with the following process:
120528 10:07:32 [ERROR]/usr/local/mysql/bin/mysqld: Can ‘t open file:./ag4_1/raa4_1 FRM’ (24) errno:
I didn’t look at the error code carefully at first! Thought the file was corrupted, reimport! Throw the above error again!
Use the perl error tool to see specific errors!
Linux:/usr/local/mysql/bin #./perror 24
OS error code 24: Too many open files
beyond the maximum number of open file limit! The maximum number of open files on the system is 65535. It cannot be exceeded! The maximum number of open files in the database must be out of limit!
Show variables like ‘open_files_limit’; show variables like ‘open_files_limit’;
>
Reproduced in: https://blog.51cto.com/imysqldba/883374
python manage.py migrate‘can’t open file ‘manage.py’: [Errno 2] No such file or directory’ can’t open file ‘manage.py’: [Errno 2] No such file or directory ‘can’t open file ‘manage.py’: [Errno 2] No such file or directory’
Django-admin.py: django-admin.py: django-admin.py: django-admin.py: django-admin.py: django-admin.py: django-admin.py: django-admin.py: django-admin.py: django-admin.py: django-admin.py: django-admin.py: django-admin.py: django-admin.py: django-admin.py: django-admin.py:
django-admin.py startproject student_project .4, then report the above described error, the reason: in fact, the path is wrong, did not set the soft connection. F:\python_stu\student_project\stu_env\Lib\site-packages\ Django \bin. Django-admin.py: F:\python_stu\student_project\stu_env\Lib\site-packages\ Django \bin.
python F:\python_stu\student_project\stu_env\Lib\site-packages\django\bin\django-admin.py startproject student_projectThe above content is only for your reference, thank you!
Python deep learning often uses package summaries
Update history
2021/2/28
1.pytorch
Website: https://pytorch.org/
Current installed version: 1.7.1
pip install torch===1.7.1+cu110 torchvision===0.8.2+cu110 torchaudio===0.7.2 -f https://download.pytorch.org/whl/torch_stable.html
2. scikit-learn(sklearn)
pip install scikit-learn
Current version: 0.24.1
3.pandas
pip install pandas
Current version: 1.2.2
Installing Pandas will install Numpy
4.numpy
pip install numpy
Current version: 1.20.1
Previous installers of PyTorch did not use the latest Numpy. 1.16.6 does.
But now the latest version does.
5.matplotlib
pip install matplotlib
Current version: 3.3.4
6 tensorflow 1.15
pip install tensorflow==1.15 -i http://pypi.douban.com/simple/
Less use of
1.networkx
NetworkX is a Python package for building and manipulating complex graph structures and providing algorithms for analyzing graphs.
pip install networkx
Current version: 2.5
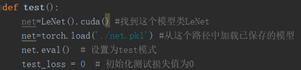
AttributeError: Can’t get attribute ‘LeNet’ on <module ‘main’ from
introduce
Magic is a python module to identify the file type
the original project address: https://github.com/ahupp/python-magic
the project integration the Windows needed libraries, directly use this one instead:
https://github.com/julian-r/python-magic
The installation
pip install python-magic-bin
Simple to use
Method 1
>>> import magic
>>> magic.from_file("testdata/test.pdf")
'PDF document, version 1.2'
>>> magic.from_buffer(open("testdata/test.pdf").read(1024))
'PDF document, version 1.2'
>>> magic.from_file("testdata/test.pdf", mime=True)
'application/pdf'
Method 2
>>> f = magic.Magic(uncompress=True)
>>> f.from_file('testdata/test.gz')
'ASCII text (gzip compressed data, was "test", last modified: Sat Jun 28 21:32:52 2008, from Unix)'
A small example of solving a real problem
This example combines the use of Zipfile and Magic
# coding:utf8

import os
from zipfile import ZipFile
import magic

m = magic.Magic()

dir_name = '/home/some_zip/'
for root, dir, files in os.walk(dir_name):
    zipnames = files
    break

for a_zip_name in zipnames:
    print '#' * 80
    print a_zip_name
    with ZipFile(dir_name + a_zip_name) as azip:
        filenames = azip.namelist()
        for i in [10, 20, 30]:
            with azip.open(filenames[i], pwd='zippassword') as afile:
                print m.from_buffer(afile.read())